Abstract
Here's a project that involves a different kind of sandbox than the ones you usually think of. This one has a moving wall inside, acting like a piston, to compress the sand. You can make layers using two different colors of sand, and then see what happens when you compress the layers with the piston. If you're handy with woodworking tools, this is a good project to give you a feel for the effects of geological forces that deform the Earth's crust.Summary
Andrew Olson, Ph.D., Science Buddies
Sources
This project is based on:
- ISFD. (n.d.). Sandbox Compression Experiments. Indiana School for the Deaf.
/-/https/www.sciencebuddies.org/cdn/Files/3055/3/Geo_img055.jpg)
Objective
The goal of this project is to investigate how layers of sand deform under lateral compression.
Introduction
If you've studied Earth science in school, you know that the surface of the Earth (the crust) is made up of many separate plates (Figure 1). These plates ride on top of the deeper, molten layer of the Earth, the mantle. You also learned that the plates are not stationary, but are slowly moving. What happens to the Earth's crust when tectonic plates collide?
One result of the tremendous forces generated by movement of tectonic plates is the folding of the Earth's crust. For a quick demonstration, grasp a sheet of paper lengthwise with one hand at each end of the paper. Slowly push your hands together. The paper buckles, with the center either rising upward or extending downward as you bring the ends of the paper toward each other. Due to the tremendous pressures that can be created by plate movement, this kind of folding can occur with layers of rock.
Geologists have names to describe the different types of folds. When the layers have just a slight bend, it's called a monocline. When the center of the fold rises up like an arch, the fold is called an anticline. When the center of the fold falls down in a trough, the fold is called a syncline. When the compression forces are very great, you can sometimes see multiple anticlines and synclines following one after the other. There are also more complex folds called recumbent folds ("recumbent" means "lying down"). As you might imagine, these are folds that have been "knocked over" by additional shearing forces. A reference in the Bibliography has example diagrams to illustrate each of the folding patterns described above (Pidwirny, 2007).
It's a little hard to generate enough force to bend rocks with an apparatus that you can easily build in your garage, so for this project you'll be investigating layers made with different colors of sand instead of rock. For your experimental apparatus, you'll build a sandbox with a moveable piston to compress the sand (see Figure 2 in the Experimental Procedure).
To do the experiment, you first carefully load up the box with layers of sand, alternating two different colors to make the layers readily visible. Then you use the piston to apply a compressive force to the layers of sand. Transparent windows in the sides of the box allow you to see the resulting layering patterns after the compressive force has been applied. You can take successive pictures, or record with a video camera, to see how the patterns develop over time as the force is applied.
The surface tension of water causes the grains of sand to stick to one another, so you could investigate the effect of changing the wetness of the sand used. Or, you could investigate the effects of changing the grain size of the sand used. Or, while you're doing the experiment, your own observations may lead to another avenue of exploration. Press on and find out!
/-/https/www.sciencebuddies.org/cdn/Files/3052/5/Geo_img031.gif)
Figure 1. Map of major tectonic plates of the earth. (Tilling, date unknown).
Terms and Concepts
To do this project, you should do research that enables you to understand the following terms and concepts:
- Structure of sand
- Compression
- Plate tectonics
- Crustal folding
- Monocline
- Syncline
- Anticline
- Recumbent fold
Questions
- Will folding patterns be affected by the grain size of the sand used?
- Will folding patterns be affected by the wetness of the sand used?
Bibliography
- For background on the processes of folding and faulting, see:
- Pidwirny, M., 2007. Crustal Deformation Processes: Folding and Faulting, PhysicalGeography.net. Retrieved June 21, 2007.
- For information on plate tectonics, see:
- WGBH, 1998. A Science Odyssey: You Try It: Plate Tectonics, WGBH, Boston, and PBSOnline. Retrieved June 21, 2007.
- Kious, W.J. and R.I. Tilling, 1996. This Dynamic Earth: The Story of Plate Tectonics, U.S. Geological Survey. Retrieved June 21, 2007.
- USGS, 2003. Plate Tectonics and Sea-Floor Spreading, Cascades Volcano Observatory, U.S. Geological Survey. Retrieved June 21, 2007.
- Here's some good background information on the structure of sand:
Armstrong, W.P., . Sand Grains: Chips Off the Old Rock, Wayne's Word, An Online Textbook of Natural History. Retrieved June, 21 2007. - If you want to make your own colored sand, here is a way to do it with food coloring. (You'll need to dry out the sand afterwards, so plan ahead to allow extra time to complete your project.):
About.com, date unknown. How To Color Sand, About.com. Retrieved June 21, 2007. - To cut the Plexiglass plastic for the side window(s), you can score the material and then snap it off. Here's how to do it:
DIY.com, 2007. Plexiglass Cutting, DoItYourself.com Community Forum. Retrieved June 21, 2007.
Materials and Equipment
To do this experiment you will need the following materials and equipment:
-
Tools:
- Table saw, circular saw, or hand saw for cutting plywood
- Router, sabre saw, or coping saw to make cut-out(s) in sides for viewing
- Power drill and drill bits (including pilot bit for wood screws)
- Plexiglass/acrylic scoring tool
- Straightedge
- Half sheet (4' x 4') of 3/4" plywood
- 1/4" or 3/16" thick transparent Plexiglass/Lexan/acrylic material for sides
- Length of 1/2" threaded rod for applying lateral pressure
- Mounting hardware for threaded rod
- Strip of sheet metal (for "scraper" at bottom of piston)
- Box of #10 wood screws (for assembling sand box)
- Camera and/or video camera
- Tripod
-
Sand
- You'll need some colored sand to make visible layers. You can find this at art/hobby stores or online. One online source is Blick Art Materials.
- You can experiment with dry sand vs. wet sand.
Experimental Procedure
-
Use the photograph below as a guide for building the sandbox. The exact dimensions are not critical.
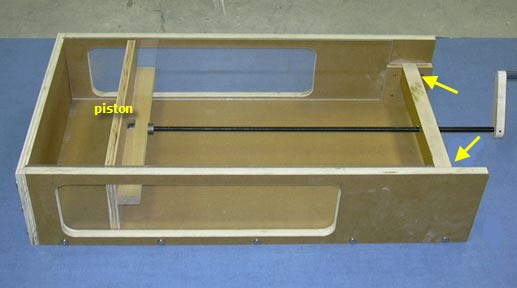
A shallow box is built with 3 walls and no cover. The two longest walls have windows installed across their length. The fourth side wall is replaced with a wooden board attached to a long screw that allows the fourth wall to move across the inside of the box. This box will be filled with sand and the screw turned to have the fourth wall compress the sand in the box.
Experimental apparatus for compressing layers of sand. (Indiana School for the Deaf, date unknown)
-
Here are some tips for the construction:
- The brace at the right side of the box (yellow arrows) needs to be sturdily mounted.
- Naturally, it will be important to make sure that all of the corners are nice and square.
- The piston needs to fit snugly against the plastic sides.
-
Attach a flat strip of sheet metal at the bottom of the front face of the piston. It should be flush with the bottom of the piston. The sheet metal will act as a "scraper" to keep sand from slipping underneath the piston. The photograph below shows how much sand was left behind before the sheet metal strip was installed.
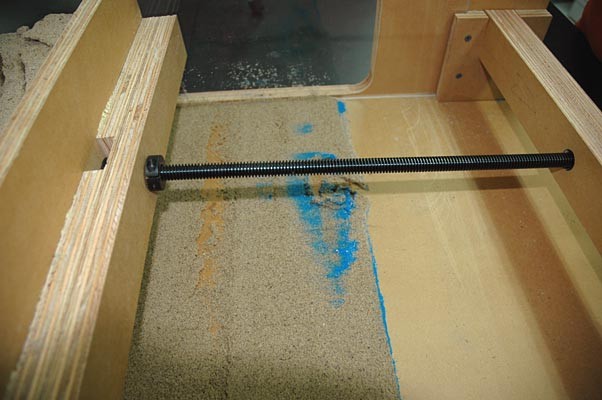
Before a sheet metal "scraper" was installed at the bottom surface of the piston a lot of sand could "leak" under the piston as it moved. (Indiana School for the Deaf, date unknown)
- In the design shown, there is a nut mounted inside the brace at the right hand side. The crank is turned, which rotates the threaded rod, and advances it through the nut. The threaded rod pushes the piston to compress the sand. At the piston end, the threaded rod is mounted in a metal bushing, which holds the rod in place but allows it to turn.
-
For each experiment, you'll need to carefully load the box with sand, alternating layers of different colors. Here are some ideas for you to try (remember to change only one variable at a time):
- Vary the wetness of the sand.
- Vary the coarseness of the sand.
- Advance the piston by turning the threaded rod.
-
Use a video camera to record the results, or take still photographs at regular intervals.
- For photographs, you will probably get better results if you turn the camera's flash off. This will avoid glaring reflections from the Plexiglass windows. If you are shooting indoors, you will probably need a tripod (or other sturdy support for the camera) so that the shot is not blurry.
-
You may want to take separate photographs showing both side views and top views of the sand:
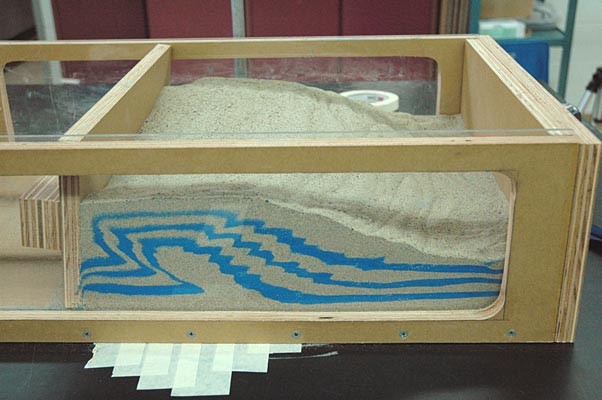
Side view of sand compression apparatus in action (Indiana School for the Deaf, date unknown).
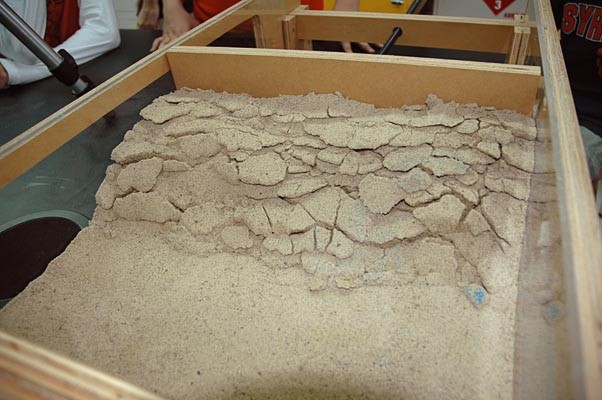
Top view of sand compression apparatus in action (Indiana School for the Deaf, date unknown).
- As with any scientific experiment, you should run repeated trials with the same conditions to verify that your results are consistent.
-
What layering patterns do you see? For example, do you see any examples of:
- monoclines?
- synclines?
- anticlines?
- recumbent folds?
- What similarities persist across the various experimental conditions you tried?
- What differences did you notice?
- Advanced. Can you explain how the force of the piston is transmitted through the sand to create the folding patterns in the layers?
/-/https/www.sciencebuddies.org/cdn/Files/3053/3/Geo_img053.jpg)
/-/https/www.sciencebuddies.org/cdn/Files/3054/3/Geo_img054.jpg)
/-/https/www.sciencebuddies.org/cdn/Files/3055/3/Geo_img055.jpg)
/-/https/www.sciencebuddies.org/cdn/Files/1061/10/Geo_img056.jpg)
Ask an Expert
Global Goals
The United Nations Sustainable Development Goals (UNSDGs) are a blueprint to achieve a better and more sustainable future for all.
/-/https/www.sciencebuddies.org/cdn/Files/19752/5/E-WEB-Goal-09.png)
Variations
- Try using sands with various grades of coarseness. You should be able to find different grades at your local hardware or building supply store.
- What happens if the pressure is applied back-and-forth instead of steadily advancing?
- If you want to get really fancy, you may even want to consider modifying the apparatus to use a hydraulic drive for the piston. You should be able to better control of the speed of the motion, and you may have the ability to increase the speed of the motion this way. What effect do the dynamics of the motion have on the layers of sand?
- Note: the following idea has not been tested, so it may or may not work. You might try using layers of more solid materials to see if faulting would occur and what patterns would result. You might try thin layers of plaster, or cement without sand in it. For these harder materials, you would probably need to use two threaded rods to apply sufficient pressure to the piston. A potential drawback of this project idea is that the materials you are testing may prove to be more durable than your box, in which case it will be the box that breaks instead of the test material. You will definitely want to wear safety glasses, in case any bits of material go flying.
Careers
If you like this project, you might enjoy exploring these related careers:
/-/https/careerdiscovery.sciencebuddies.org/cdn/Files/1783/17/nrcseprd423668.jpg)
/-/https/careerdiscovery.sciencebuddies.org/cdn/Files/1359/18/VNIIOarctic.jpg)
/-/https/careerdiscovery.sciencebuddies.org/cdn/Files/1450/21/iStock-1227179796.jpg)

/-/https/img.youtube.com/vi/8ptiSuskdtU/0.jpg)
/-/https/img.youtube.com/vi/pFSAMkEDBQA/0.jpg)
/-/https/img.youtube.com/vi/Xxm_beTs2LU/0.jpg)