Abstract
While looking at a package of dry yeast it is hard to believe that the package has organisms in it that are alive. But add the right ingredients and presto, the mixture becomes a bubbly, oozing, mess of life! What are the right ingredients? What does that yeast need to become active? Do this science project and figure it out for yourself!Summary
Sara Agee, Ph.D., and Teisha Rowland, Ph.D., Science Buddies
/-/https/www.sciencebuddies.org/cdn/Files/5699/8/bakers_yeast_cerevisiae_under_DIC_microscopy_img.jpg)
Objective
Measure how active yeast is in different conditions
Introduction
Yeasts are tiny, microscopic organisms — or microorganisms — that are a type of fungus. This means that they are more closely related to a mushroom than to plants, animals, and bacteria (which are also microorganisms). You can see a picture of some yeasts in Figure 1, below. These little critters might sound strange and different, but people have actually been using them for thousands of years to make bread "rise." How does this work? It has to do with the metabolism of the yeasts, or, in other words, what they eat and what they turn that food into.
/-/https/www.sciencebuddies.org/cdn/Files/5699/8/bakers_yeast_cerevisiae_under_DIC_microscopy_img.jpg)
Yeasts must get their food from their surrounding environment to grow and reproduce, or make more yeast. What do they eat? Yeasts feed on sugars and starches, which are in bread dough. They turn their food into energy and release carbon dioxide (CO2) gas as a result. This process is known as fermentation. The CO2 gas made during fermentation is what makes a slice of bread so soft and spongy. The pockets of gas are produced by yeasts when the dough is allowed to rise before baking. Fermentation is also used to make beer, wine, and champagne.
In this microbiology science project, you will grow yeasts in different conditions to see which cause the yeasts to be most active during fermentation. Some of the conditions you will test will change the pH of the environment that the yeasts will be grown in. pH is a scale that measures how acidic or how basic something is. A base has a pH that is above 7, such as baking soda or bleach, and an acid has a pH that is less than 7, such as lemon juice or battery acid. A neutral substance has a pH of 7, such as drinking water. For more on this topic, see the Science Buddies page on Acids, Bases, & the pH Scale. These are the five different conditions you will investigate in this science project:
- Water only: This condition will be your negative control because it will not have the food (i.e., sugar) that yeasts need to eat and grow. The yeasts should remain inactive.
- Sugar: This condition will be your positive control because it will have the sugar that yeasts need to eat and carry out fermentation.
- Sugar and salt: The salt in this condition will increase the salinity (or amount of salt) that is in the yeasts' environment.
- Sugar and baking soda: The baking soda in this condition will increase the environment's pH, making it more basic.
- Sugar and vinegar: The vinegar in this condition will decrease the environment's pH, making it more acidic.
How do you think increasing the salinity will affect the ability of yeasts to carry out fermentation? What about making the environment more basic or more acidic? To measure how well the yeasts carry out fermentation, you will use balloons to trap the CO2 gas released by the yeasts during fermentation. To measure how much CO2 is in each balloon you will then submerge each under water and use water displacement to measure how much space each balloon takes up. Which condition(s) will cause the formation of the most CO2 gas and the most active fermentation?
Terms and Concepts
- Yeasts
- Microorganisms
- Fungus
- Carbon dioxide (CO2)
- Fermentation
- pH
- Bases
- Acids
- Neutral substances
- Water displacement
Questions
- What do yeasts eat?
- What do yeasts turn their food into?
- How can the activity of yeast be measured?
- What do you think will be the best conditions for yeast to ferment?
Bibliography
You can find out more about yeast and fermentation through these resources:
- R. Fogel. (November 13, 2006). Fun Facts About Fungi. Utah State University. Retrieved July 14, 2021.
- Wikipedia contributors. (February 22, 2014). Yeast. Wikipedia, The Free Encyclopedia. Retrieved February 27, 2014.
This science project is based on a classic science demonstration, nicely described by the Exploratorium, a hands-on science museum in San Francisco:
- Exploratorium Staff. (n.d.). The Science of Bread: Yeast-Air Balloons Activity. The Exploratorium. Retrieved February 27, 2014.
For help creating graphs, try this website:
- National Center for Education Statistics, (n.d.). Create a Graph. Retrieved June 25, 2020.
Materials and Equipment
- Plastic 2 L bottles (5). If you do not want to clean out and reuse the same bottles after each trial, you will need 10 additional bottles.
- Permanent marker
- Measuring spoons
- White table sugar
- Salt
- Baking soda
- Vinegar
- Graduated, metric beaker, at least 100 mL in size. This may be purchased through a scientific supply company or online suppliers such as Amazon.com Alternatively, a clear liquid measuring cup may be used.
- Warm tap water
- A large pot or bowl, at least 5 qt. in size
- Optional: Thermometer for measuring the water temperature. A suitable thermometer may be purchased locally or through online suppliers such as Amazon.com
- Dry yeast (at least 30 packets or an equivalent amount from a jar). Tip: Buying a whole jar is probably more economical than individual packets.
- Latex balloons, around 9 to 12 inches inflated size (5). These may be found at discount and/or party-supply stores, or through online suppliers such as Amazon.com.
- Clock or timer
- String or clips for tying off balloons
- A large pan or bowl that the large pot or bowl can sit inside of
- Optional: Adult helper
- Lab notebook
Disclaimer: Science Buddies participates in affiliate programs with Home Science Tools®, Amazon.com, Carolina Biological, and Jameco Electronics. Proceeds from the affiliate programs help support Science Buddies, a 501(c)(3) public charity, and keep our resources free for everyone. Our top priority is student learning. If you have any comments (positive or negative) related to purchases you've made for science projects from recommendations on our site, please let us know. Write to us at [email protected].
Experimental Procedure
- Make a data table like Table 1, in your lab notebook for you to record your results in.
| Water Displaced (mL) | |||||
|---|---|---|---|---|---|
| Bottle | Condition | Trial 1 | Trial 2 | Trial 3 | Average |
| #1 | Water only | ||||
| #2 | Sugar | ||||
| #3 | Sugar and salt | ||||
| #4 | Sugar and baking soda | ||||
| #5 | Sugar and vinegar | ||||
- Prepare and label the water bottles for your experiment. Rinse each bottle thoroughly with water and remove any labels. Number each bottle 1–5 with the permanent marker.
-
Add 2 tablespoons (tbsp.) of sugar to bottles 2-5.
- Do not add sugar to bottle #1 because it is the negative control.
- Bottle #2 will only have sugar and will be a positive control.
- Add 2 tbsp. of salt to bottle #3. How do you think increasing the environment's salinity will affect yeast fermentation?
- Add 2 tbsp. of baking soda to bottle #4. How do you think being in a basic environment will affect yeast fermentation?
- Add 2 tbsp. of vinegar to bottle #5. How do you think being in an acidic environment will affect yeast fermentation?
-
Fill a large pot with at least 4 liters (L) (or 17 cups [C]) of very warm tap water.
- Adjust the temperature of the hot water coming from the tap until it is almost too hot to hold your hands under. Use this temperature water to fill the pot.
- If you have a thermometer, you can measure the temperature of the water and confirm that it matches the recommended temperature on the yeasts' packaging. If you do this, record this temperature in your lab notebook.
-
Using the water from the pot, to each bottle add 600 milliliters (mL) (about 2.5 C, or 1/3 full) of warm water, replace the lid, and shake thoroughly to dissolve all of the ingredients.
- Using the water from the pot will help you make sure that the water in each bottle is the same temperature.
- To each bottle add two packets of dry yeast (or an equivalent amount from a jar), replace the bottle's lid, and shake gently to mix in the yeast.
- Remove each lid and stretch a balloon completely over the opening of the bottle, as shown in Figure 2.
/-/https/www.sciencebuddies.org/cdn/Files/5697/8/yeast_fermentation_balloon_img.jpg)
Figure 2. Stretch the balloon completely over the bottle's opening, going over all of the bottle's ridges, as shown here.
-
Leave the bottles to rest in a warm location for 1 hour.
- Note: Be sure the balloons stay out of direct sunlight as this can cause the balloons to deflate.
- After 1 hour, look at the balloons. Which ones have become inflated? How big are they compared to each other? Write your observations in your lab notebook.
- Using a permanent marker, number each balloon so it matches its bottle.
- Carefully tie a length of string tightly around the base of each balloon to seal the balloon so that any gas inside cannot escape. When the balloon is tightly sealed, remove it from the bottle top, being very careful not to loosen the string or allow any air to escape from the balloon.
- After removing each balloon from its bottle, carefully tie a knot at the bottom of each balloon (where the string is) so that you can be sure no air will escape the balloons while you collect your data.
-
Now you are ready to measure the amount of CO2 gas inside each balloon with a water displacement test. To do this, do the following:
- Fill the large pot or bowl completely full with water, to the very top of the pot.
-
Carefully place the pot in the pan or bowl that it can fit inside of, as shown in Figure 3. You may need an adult helper to help you move the pot. If you spill any water while doing this, clean up the spill and add water back to the large pot so it is completely full again.
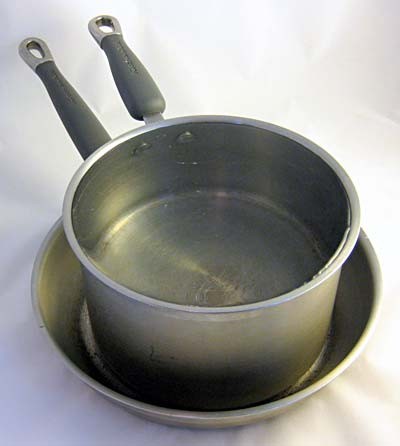
Figure 3. Fill the large pot completely full of water and place it inside of the pan, as shown here.
-
Take one of the balloons and slowly dunk it into the large pot of water. Water should spill out and go into the pan that the large pot is sitting in. Dunk the balloon until it is completely submerged.
- Make sure not to dunk your hand in.
- If the pan becomes full of water before the balloon is completely submerged, go on to step 16.d. and then repeat steps 16.b. to 16.d. until you can completely submerge the balloon.
- Once you have submerged the balloon, carefully lift the pot off of the pan. Pour the water from the pan into the graduated, metric beaker.
- In the data table in your lab notebook, record how much water was displaced (how much water is in the beaker) by the balloon, in milliliters. This should be recorded in the column for Trial 1. Then empty the measuring cup.
- Repeat steps 16.a. to 16.e. until you have done the water displacement test for each of the five balloons.
- If you only have 5 bottles, rinse them out thoroughly so you can reuse them in the next trial. If you have 15 bottles, repeat step 2 with 5 unused ones so they are ready to use.
- Repeat steps 3–17 two more times so that you have done a total of three trials. Each time be sure to record your results in your data table for the correct trial number.
-
Calculate the average water displaced for each condition over the three trials. Record the results in your data table.
- For example, if the balloon for bottle #2 displaced 950 mL in trial 1, 800 mL in trial 2, and 1200 mL in trial 3, then the average water displaced for #2 would be 983 mL (since 950 mL + 800 mL + 1200 mL = 2950 mL, and 2950 mL ÷ 3 = 983 mL).
-
Make a bar graph of the average water displaced for each environmental condition. You can make your graph by hand or use a program like
Create a Graph to make a graph on a computer and print it out.
- On the x-axis (horizontal axis), put the name of the condition tested, such as "Water only," "Sugar and baking soda," etc. Make a bar for each condition tested.
- On the y-axis (vertical axis), put the amount of water that was displaced (in mL).
-
Analyze your results and try to make some conclusions.
- In what environment(s) did the yeast produce the most CO2 gas? What does this say about the ideal conditions needed for yeast fermentation to take place?
- In what environment(s) did the yeast produce the least CO2? What does this tell you about the conditions that yeast do not prefer for carrying out fermentation?
- Overall, how do you think the different environments affect how well the yeast can produce CO2 during fermentation?
- Does the data in your graph agree with observations you made during the trials?
- Why do you think you got the results that you did?
/-/https/www.sciencebuddies.org/cdn/Files/5698/9/yeast_fermentation_pots_img.jpg)
Ask an Expert
Variations
- Another environmental condition that can affect the activity of yeast and the process of fermentation is temperature. Prepare several bottles using the same conditions. Now place each bottle in a different place with a different temperature. After one hour, measure the amount of gas produced and compare.
- In this experiment, you added the same amount of sugar to each bottle because it is what the yeast uses to make CO2 gas during fermentation. If you add more sugar, will you always get more CO2 gas? How much more sugar can you add? Is there a limit?
- You could try this science project again but instead of comparing salt, baking soda, and vinegar, you could try comparing different types of sugars or sugars from different sources, such as from various juices.
- More advanced students may want to try these Science Buddies projects using yeast:
Careers
If you like this project, you might enjoy exploring these related careers:
/-/https/careerdiscovery.sciencebuddies.org/cdn/Files/1486/17/pexels-photo-4033018.jpg)
/-/https/careerdiscovery.sciencebuddies.org/cdn/Files/940/18/pexels-photo-1267347.jpg)
/-/https/careerdiscovery.sciencebuddies.org/cdn/Files/1316/17/unsplash-ePJQise0OkQ.jpg)
/-/https/careerdiscovery.sciencebuddies.org/cdn/Files/962/18/pexels-photo-4299436.jpg)

/-/https/img.youtube.com/vi/qUo6hXSV1b8/0.jpg)
/-/https/img.youtube.com/vi/AUguvwpnJ5M/0.jpg)
/-/https/img.youtube.com/vi/SLiibpsV5AQ/0.jpg)