Abstract
What do you do if you take a photo and it turns out too dark or too bright? You can use your computer to fix it for you.Summary
Sara Agee, Ph.D., Science Buddies
/-/https/www.sciencebuddies.org/cdn/Files/2464/3/Photo_img020.jpg)
Objective
In this experiment you will investigate how changing the contrast of a digital photo will change the colors and quality of the printed image.
Introduction
One of the most common photo edits is to change the brightness or the contrast of a photo. Brightness refers to how much light is in your picture. Contrast is the difference between points of color, called pixels, that are next to each other. The more different the two adjacent pixel colors are, the higher the contrast is. The two highest contrasting colors are black and white.
How can contrast help you make your photo better? Sometimes we take our pictures where there is not enough light. If the picture is too dim you can lighten it by increasing the brightness. The problem will be that as you increase the brightness of the photo, it will start to look washed out. Changing the contrast can correct for this by amplifying the differences in color between pixels in the photo.
Enhancing a photo by changing the brightness and contrast is tricky. You need to strike a careful balance between the two. If you over do the contrast, your picture will look very exaggerated. In this experiment you can investigate the limits of changing the contrast of an image. How low or high can you go before the image quality is compromised? Can you identify the window of opportunity?
Terms and Concepts
To do this type of experiment you should know what the following terms mean. Have an adult help you search the internet, or take you to your local library to find out more!
- Digital image
- Pixel
- Contrast
- Brightness
Questions
- How can changing the contrast and brightness settings enhance a digital photo?
- How does changing the contrast change the quality of an image?
- How does changing the contrast change the colors of an image?
Bibliography
- Adobe. (n.d.). Adobe Photoshop Tutorials. Adobe Systems, Inc. Retrieved July 1, 2001.
- Wilson, Tracy V., Nice, K., and Gurevich, G. (2005). How Digital Cameras Work. HowStuffWorks, Inc. Retrieved July 1, 2001.
Materials and Equipment
- Computer
- Adobe Photoshop or another image editing program that allows you to adjust image contrast. GIMP is a popular free image editing program.
- Your favorite photo
- Color printer
- Photo quality printing paper
Experimental Procedure
Note: the directions are for Adobe Photoshop. If you are using different image editing software, you may need to read the help files or do a web search to find out how to adjust a photo's contrast.
- On your desktop, create a new folder called "My Photo Experiment" and place a copy of your favorite photo in the folder (like puppy.jpg).
- Open the photo in Adobe Photoshop.
- Click "Image" then "Adjustments" and then "Brightness/Contrast" from the file menu.
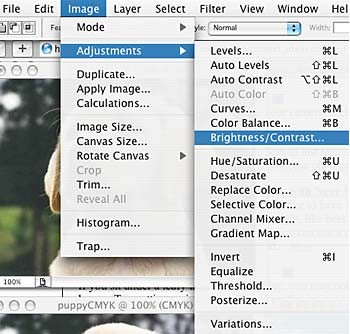
A cropped screenshot from Adobe Photoshop showing image adjustment options. Image adjustments can be accessed by selecting Image and Adjustments from the main menu. Brightness/contrast is selected in the Adustments drop-down menu
- You will see a dialog box that has two slider controls, one for brightness and one for contrast. Click and move one of the sliders, what happens to the image?
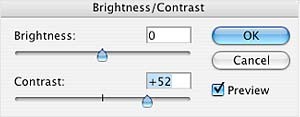
A cropped screenshot from Adobe Photoshop shows the Brightness / Contrast settings window with 2 sliders. The top slider will adjust the brightness of an image and the bottom slider will adjust the contrast of an image. The OK button to the right of the sliders will save the changes made.
- Next you will make a series of different images with different contrast levels. Set the brightness level to zero for each image. The contrast levels will be set at the following values: -100, -50, 0, +50, and +100. If you want to collect more data, add more settings in between these values.
- After changing your first setting, click "OK" to apply the settings and close the dialog box.
- Click on "File" and "Save As" to save this picture as a new file in the folder on your desktop named "My Photo Experiment", naming each new file with a different name to keep track of your experiments (like puppy1, puppy2, puppy3, etc.). Keep all of the settings and file extensions the same. You can use a data table to help you keep track of your contrast settings and file names:
Swipe left to see moreFile Name Contrast Setting Description of result: puppy.jpg original file puppy1.jpg -100 puppy2.jpg -50 etc.
- Print the picture on photo quality paper and label the image by writing the contrast setting on the corner of the image.
- Close this image and re-open the original image from the desktop folder (puppy.jpg).
- Repeat steps 3-9 changing the contrast setting each time, until you have one picture for each setting you wish to test.
- Arrange your photos in a row and compare the images. How does contrast change the colors in the photo? Does it change the quality of the photo? When might adjusting this setting be useful?
/-/https/www.sciencebuddies.org/cdn/Files/2463/3/Photo_img019.jpg)
/-/https/www.sciencebuddies.org/cdn/Files/2464/3/Photo_img020.jpg)
Ask an Expert
Variations
- In this project, you changed the contrast levels. You can also try changing the brightness levels. Do you get similar or different results?
- To kick this project up a notch, you can quantify the data by counting the number of unique colors in each image. Photoshop can not calculate the unique colors used in an image, so you will need to use another program like PaintShop Pro, which is a shareware program available for a free download. Open each of your files with PaintShop Pro and choose Colors/CountColorsUsed. After a while PaintShop Pro will show a dialog box that tells you the number of unique colors in the image, (like 16,777,216). When you increase or decrease the contrast, what happens to the total number of colors?
- Another interesting component of a digital image is the saturation and contrast of the image. To investigate these topics see the Science Buddies project ideas Color Saturation and Color Profiles for more ideas.
Careers
If you like this project, you might enjoy exploring these related careers:
/-/https/careerdiscovery.sciencebuddies.org/cdn/Files/1907/18/pexels-photo-3153207.jpg)
/-/https/careerdiscovery.sciencebuddies.org/cdn/Files/18382/4/film-editor.jpg)

/-/https/img.youtube.com/vi/q9X-ez31oiY/0.jpg)
/-/https/img.youtube.com/vi/41RzGwZINOk/0.jpg)
/-/https/img.youtube.com/vi/M0eTiAE3gI0/0.jpg)