Using a Laser Pointer to Measure the Data Track Spacing on CDs and DVDs
Abstract
You've probably noticed the colorful patterns "reflecting" from the shiny surface of a CD disk. What you are seeing is actually diffraction of white light, and the rainbows of color are diffraction patterns. In this project you'll learn about how diffraction patterns are generated, and you'll find out how you can use a laser pointer and a protractor to measure the microscopic spacing of data tracks on a CD.Summary
Andrew Olson, Ph.D., Science Buddies and
David Aziz, Ph.D.
/-/https/www.sciencebuddies.org/cdn/Files/2186/3/Phys_img008.jpg)
Objective
The objective of this project is to learn how to use a diffraction pattern to measure the pitch (spacing) of the data tracks on CDs and DVDs.
Introduction
CDs and DVDs are becoming less common, as they get replaced by mp3 files, Blu-Ray discs and streaming music/video. However, they used to be the primary way to store audio and video data like songs and movies. CDs and DVDs store huge amounts of binary data (patterns of 0's and 1's) which your player can "read" with a laser, lenses, light detector, and some sophisticated electronics.
CDs and DVDs are both multi-layered disks, made mostly of plastic. The layer that contains the data (DVDs can have more than one data layer) consists of a series of tiny pits, arranged in a spiral, tracking from the center of the disk to the edge. The data layer is coated with a thin layer of aluminum or silver, making it highly reflective.
How small are the pits? Well, their diameter is 500 nanometers (nm). How small is that? A millimeter (mm), which you can see with your unaided eye, is one-thousandth of a meter. Imagine how much you have to shrink a meter to get down to the size of a millimeter. Now imagine shrinking a millimeter by the same amount. That takes you down to a micrometer (µm), or one-thousandth of a millimeter. You have to shrink a micrometer one thousand times more to get down to the size of a nanometer. A typical human hair is about 100 µm wide. The pits on a CD are 0.5 µm wide. So you could fit 200 pits across the width of a typical human hair! The diameter of the pits is also similar to the wavelengths of visible light (400 to 700 nm).
On the CD, the pits have some blank space ("land") on either side of them. This means that the adjacent data tracks of the spiral are regularly spaced (something like 3 times the pit diameter). This regular spacing of the spiral tracks, slightly larger than the wavelengths of visible light, produces the shimmering colors you see when you tilt a CD back and forth under a light. The colors result from diffraction of the white light source by the CD.
What is diffraction? That is a bit harder to describe, so we'll start with a related concept that is easier to understand: interference. Interference is what happens when waves collide with each other. If the peak of the first wave meets the peak of the second wave, the peaks add together to form a higher peak. If the trough of the first wave meets the trough of the second wave, the troughs add together to form a lower trough. If the peak of the first wave meets the trough of the second wave, the peak is made smaller. And if the peak of the first wave is the same size as the trough of the second wave, they can actually cancel each other out, adding to zero at the point of interference. You can see a demonstration of interference with the Ripple Tank Applet link in the Bibliography.
The first screen shot shows the results of a single wave source (choose "Setup: Single Source" from the first drop-down list and "Color Scheme 2" from the fourth drop-down list). To avoid the complications of ripples reflected from the walls of the tank, click on the "Clear Walls" button (simulates an infinitely large tank, so reflections are eliminated):
/-/https/www.sciencebuddies.org/cdn/Files/2183/3/Phys_img005.gif)
A cropped screenshot of the applet Ripple Tank shows circular waves being produced from a single point near the top of the page. Each circular wave is uniform and spaced evenly apart, and waves fade in color as they move further from the source point. On the right of the applet there are drop-down menus and buttons which allow settings in the wave simulator to be changed. Single source is selected from the first drop-down menu, color scheme 2 is selected from the 4th drop-down menu and the clear walls button is pressed for this simulation.
The second screen shot shows the results of two wave sources (choose "Setup: Two Sources" from the first drop-down list):
/-/https/www.sciencebuddies.org/cdn/Files/2184/3/Phys_img006.gif)
A cropped screenshot of the applet Ripple Tank shows circular waves produced from two vertically stacked point sources near the center of the page interfering with each other. Each circular wave produced is uniform and spaced evenly apart, and waves fade in color as they move further from the source point. There are eight bands of black where no waves are shown, they are evenly spaced and appear from the center of the page towards the edges. On the right of the applet, there are drop-down menus and buttons which allow settings in the wave simulator to be changed. Two sources is selected from the first drop-down menu.
The diagonal black lines are regions of destructive interference (where peaks of one wave met troughs of the other). If you run the applet yourself, you'll see that, though the waves keep moving, these regions are a steady feature. This is a simple example of patterns that can form when waves interfere in well-defined ways.
There are many more simulations you can try with the Ripple Tank Applet to give you a better understanding of interference and diffraction. Take some time to explore with it.
When there are a large number of wave sources, or an array of obstacles that a wave interacts with, the result is usually described as "diffraction" rather than "interference", but it is basically the same fundamental process at work.
So, how can you use diffraction to measure the data track spacing on a CD or DVD? The diffraction pattern from a bright, monochromatic source (e.g., a laser pointer) interacting with a regular structure can be described by a fairly simple equation:
d(sin θm - sin θi ) = mλ (Equation 1)
- In this equation, d is the spacing of the structure (in this case, the data tracks).
- θm is the angle of the mth diffracted ray, and θi is the angle of the incident (incoming) light. Both angles (θm and θi) are measured from the normal, a line perpendicular to the diffracting surface at the point of incidence (where the light strikes the CD).
- m is the order of the diffracted ray. The reflected ray (when θm = θi) has order 0 (zero). Rays farther from the normal than the reflected beam have order 1, +2, +3, etc. Rays closer to the normal have order −1, −2, −3, etc. In certain cases, for example very small d, some or all of the negative m orders may actually be diffracted through such a large angle that they are on the same side of the normal as the incident light. When the diffracted beam is on the same side of the normal as the incident light, the angle for the diffracted beam is negative.
- λ is the wavelength of the light.
The Experimental Procedure section will show you how to produce and measure a diffraction pattern with a CD and laser pointer. You will also use the equation above to calculate d, the data track spacing on the CD or DVD. Do you think the value you calculate will match the standard data track spacing for a CD or DVD (which you can look up online)?
Terms and Concepts
To do this project, you should do research that enables you to understand the following terms and concepts:- CD, CD-ROM
- DVD
- interference
- diffraction
- DVDs can hold from 7 to 25 times the amount of data on a CD, depending on the DVD format. Do you think the DVD data track spacing will be greater, lesser, or the same as the CD data track spacing? If greater or lesser, how much?
Bibliography
- The Ripple Tank Applet is one of a set of educational math and physics Java applets by Paul Falstad:
http://www.falstad.com/ripple/index.html - This applet by Sergey Kiselev and Tanya Yanovsky-Kiselev illustrates the simplest case of diffraction, light passing through a single slit:
http://www.physics.uoguelph.ca/applets/Intro_physics/kisalev/java/slitdiffr/ - Another slit-diffraction applet from the Molecular Expressions website:
http://www.microscopy.fsu.edu/primer/java/diffraction/diffractionorders/index.html - Nave, R. (n.d.). Diffraction Grating. HyperPhysics. Retrieved April 14, 2014, from http:g//hyperphysics.phy-astr.gsu.edu/hbase/phyopt/grating.html
Materials and Equipment
- laser pointer (with known wavelength)
- CD
- DVD
- protractor
- index card
- several pieces of thin cardboard (cereal box, or similar)
- sturdy box, preferably wooden
- stack of books
- black marker
- calculator with trigonometry functions (sin, cos, tan)
- digital camera and tripod (optional)
Experimental Procedure
Laser Pointer Safety
Adult supervision recommended. Even low-power lasers can cause permanent eye damage. Please carefully review and follow the Laser Safety Guide.
/-/https/www.sciencebuddies.org/cdn/Files/2185/3/Phys_img007.jpg)
- The image above shows the experimental setup. It's a good idea to work near the edge of a table, with good lighting. Here are the important features of the setup, in order of construction:
- Place the CD, label-side down, near the center of the workspace.
- Put a piece of cardboard to the right of the CD, and another piece of cardboard behind the CD. Both pieces should be about the same thickness as the CD. You will be placing the box on top of all this. The cardboard prevents the box from wobbling.
- If you want, put a piece of paper or tissue over the back half of the CD, to prevent scratching.
- For measuring the angles, you will attach the protractor to the index card, flush at the bottom. Use a stack of two cardboard spacers at the points indicated, so that the laser pointer can shine down between the index card and the protractor.
- Tape the index card to the side of the box (we used a wooden box for holding magazines). The index card and protractor should be flush with the bottom of the box.
- Carefully place the box over the CD and cardboard pieces. You want the index card lined up along the diameter of the CD, parallel to the front of the table. The center of the protractor should be lined up midway between the center and the rim of the CD.
- A stack of books makes a convenient elbow rest for the person holding the laser pointer. Rest your fingers against the box as shown to help hold the laser pointer steady.
- Before you turn on the laser pointer, make sure that no one is in the path of the diffracted beams (the plane of the index card, extended out on both sides and above).
- Direct the laser pointer beam down the face of the index card, and align the beam with the center of the protractor. You may have to fiddle slightly before you see a diffraction pattern like the one in the photo. Make your adjustments carefully, keeping the beam as close to parallel with the card as possible.
- Making measurements
- When the incident and diffracted beams are clearly visible, mark their locations with the marker, or take a digital photo for later analysis. If you are using a marker, start with a fresh index card for each measurement. If you are using a digital camera, make sure that the camera is aligned parallel to the index card, with the frame horizontally centered on the protractor. As a test, it's a good idea to take a picture of an index card marked with three lines at known angles. Measure the angles with your favorite photo editing program to confirm that your camera is aligned properly.
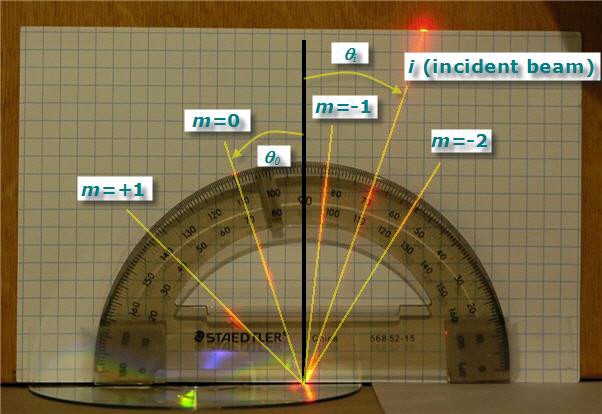
- The image above shows how to mark and measure the angles. If you are using a marker, mark the beam locations with dots, and label them. If you are using digital photos, use a photo editing program to draw lines over the beams, starting from the center of the protractor. Remember that angles are measured from the normal (black line in the illustration). For example, θi, the angle of the incident beam, is 20° degrees in the image above. You measure from the normal (90° on the protractor) to the incident beam (70° on the protractor). The angle for the diffracted beam of order m=1 is about +48 degrees. You measure from the normal (90° on the protractor) to the diffracted beam (about 138° on the protractor). This angle is positive because the diffracted beam is on the opposite side of the normal from the incident beam. The angle for the diffracted beam of order m=−1 is about −7 degrees. This angle is negative because the diffracted beam is on the same side of the normal as the incident beam. What is the angle for diffracted beam of order m=−2? Is it positive or negative?
[Note: Did you notice the small problem with this setup? Examine the protractor closely, and you will see that the positions for 0 and 180 degrees are not flush with the CD. Because of this, the angles measured with this setup will be slightly underestimated. If you do the calculations with the angles given above, you'll see that the calculated values for data track spacing are reasonable nevertheless. However, a protractor that has 0 and 180 degrees flush with its edge is a better choice.]
- Repeat the procedure at least five times. If you are using a marker, remember to start with a fresh index card for each measurement. Make sure to keep the incident beam angle the same for each trial (as a variation to the project, you can try varying the incident beam angle — but keep it constant for now).
- Do five trials with a DVD for comparison.
- When the incident and diffracted beams are clearly visible, mark their locations with the marker, or take a digital photo for later analysis. If you are using a marker, start with a fresh index card for each measurement. If you are using a digital camera, make sure that the camera is aligned parallel to the index card, with the frame horizontally centered on the protractor. As a test, it's a good idea to take a picture of an index card marked with three lines at known angles. Measure the angles with your favorite photo editing program to confirm that your camera is aligned properly.
- Calculating d, the data track spacing.
- Make separate tables for your CD and DVD data, similar to the one below. Use the first five columns to record your angle measurements. Remember that the incident angle is always positive, diffracted beams on the opposite side of the normal from the incident beam are positive angles, and diffracted beams on the same side of the normal as the incident beam are negative. For some angles of the laser pointer, you may not see all of the diffraction orders. In that case, just leave the column corresponding to the missing order blank.
Swipe left to see moreTrial θi θ-2 θ-1 θ+1 θ+2 d, m=-2
(nm)d, m=-1
(nm)d, m=+1
(nm)d, m=+2
(nm)1 2 3 etc. Average
- Now, using the following formula to calculate d, for each of the non-zero order diffracted rays (m = -2, -1, +1, +2):
d = m × λ / (sin θm − sin θi ) (Equation 2)For each trial, enter the result for d in the appropriate column of the data table. - For example, for m = −1, and a laser pointer with a wavelength of 655 nm, the formula would be:
d = (−1) × 655 / (sin θ−1 − sin θi )Since we entered the wavelength in units of nm, our answer is also in nm. (To convert to µm, multiply your answer by 1 µm/1000 nm.) - Note: check whether the calculator or spreadsheet program you are using to do calculations (like Microsoft Excel®) expects angle values to be entered in degrees or radians. Many scientific and graphing calculators can toggle back and forth between degree mode and radian mode. Excel requires angles to be entered in radians. To convert degrees to radians, multiply the angle in degrees by π and then divide by 180. For example, 45° is 45×3.14/180 = 0.785 radians.
- If your laser pointer specifies its wavelength as a range of numbers, use the center of the range as the value for λ. Inexpensive red laser pointers are generally in the 635–670 nm range. Green laser pointers are 532 nm.
- For each column (m = -2, -1, +1, +2), calculate an average value of d and enter it in the last row of your data table.
- Remember from the introduction that d is the data track spacing on a CD or DVD. Ask yourself some questions to see if your results make sense. Do you expect the data track spacing on a CD or DVD to change, or be constant? Should all the values for d you calculated be the same, or would you expect them to be different, based on which angles you used in the equation for d? Can you use the internet to look up the expected data track spacing on a CD or DVD? How does the value you looked up compare to the value of d that you calculated?
- Make separate tables for your CD and DVD data, similar to the one below. Use the first five columns to record your angle measurements. Remember that the incident angle is always positive, diffracted beams on the opposite side of the normal from the incident beam are positive angles, and diffracted beams on the same side of the normal as the incident beam are negative. For some angles of the laser pointer, you may not see all of the diffraction orders. In that case, just leave the column corresponding to the missing order blank.
/-/https/www.sciencebuddies.org/cdn/Files/2186/3/Phys_img008.jpg)
Ask an Expert
Variations
- If you measure d for 3 different CDs or DVDs, how do the values compare?
- How sensitive is the value to the placement of the index card relative to the disk? In other words, if your measurement is not along a diameter of the disk, but instead is along a chord, do you get a different value for the track spacing?
- If you have a green laser pointer available, do you get the same value for d? (Remember to change λ when you calculate d!)
- When you calculate the d, for your data table, you are performing the same operations over and over. This is a good chance to add some computer science to your project. Here are two possible ways to go:
- Learn how to use JavaScript to create your own data-track spacing calculator using Equation 2, above. See the following Science Buddies project for information on writing a JavaScript calculator:
Write Your Own Calculator Program - Learn how to use a spreadsheet program (e.g., Microsoft's Excel or WordPerfect's QuattroPro). A spreadsheet is basically a huge, blank data table that you can fill in any way you like. You can even program it to do the calculations for you, automatically. Note: if you program the spreadsheet to do the calculations, check the documentation for the spreadsheet's "sin()" function. It may be expecting angles specified in radians, so you may need to convert your angles from degrees to radians.
- Learn how to use JavaScript to create your own data-track spacing calculator using Equation 2, above. See the following Science Buddies project for information on writing a JavaScript calculator:
Careers
If you like this project, you might enjoy exploring these related careers:
/-/https/careerdiscovery.sciencebuddies.org/cdn/Files/1640/26/Fyysikot_tyossaan.jpg)
/-/https/careerdiscovery.sciencebuddies.org/cdn/Files/1616/17/iStock-1128670108.jpg)
/-/https/careerdiscovery.sciencebuddies.org/cdn/Files/1442/17/unsplash-TXxiFuQLBKQ.jpg)

/-/https/img.youtube.com/vi/WI0pGk0MMhg/0.jpg)
/-/https/img.youtube.com/vi/l_kIbu1kOwo/0.jpg)
/-/https/img.youtube.com/vi/zTTuB_afFyQ/0.jpg)