Abstract
Did you know that you can figure out how much sugar is in a liquid without ever tasting it? In this science fair project, you will learn how to measure the concentration of sugar dissolved in a liquid by using a laser pointer, a hollow prism, and some physics. You will discover how refraction, or the bending of light, is the key to measuring the sugar content of a liquid with a laser pointer.Summary
Andrew Olson, Ph.D, Science Buddies.
Edited by Rose Leopold and Terik Daly, Science Buddies.
Information on making the hollow prism for this project came from:
- Edmiston, M.D., 2001. "A Liquid Prism for Refractive Index Studies," Journal of Chemical Education 78(11):1479-1480.
Recommended Project Supplies
Objective
Determine the sugar concentration of a liquid you can see through, like water or fruit juice, by measuring the solution's index of refraction.
Introduction
You may have seen an odd "bending" effect when you put a straw (or pencil) in a glass of water: the straw appears to bend at the boundary between the air and the water. Compare the two images in Figure 1 and see if you notice anything different between them.
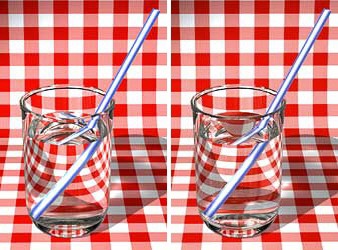 Image Credit: Robin Wood / Copyrighted
Figure 1. These two images illustrate refraction by liquids. One glass contains plain water, and the other contains sugar-water. Which glass has which liquid? (Wood, 2003) (Images © Robin Wood, 2003, used with permission.)
The straws in Figure 1, above, seem to bend because of a phenomenon called refraction, the bending of a wave as it passes from one material into another. Waves travel at different speeds through different mediums (such as air and water), and this speed difference makes the wave refract when it passes from one material into another. As light waves travel from the water into the air, the wave refracts, which makes the straws in Figure 1, above, look bent or broken.
Can you see the refraction is different in the two parts of Figure 1, above? This is because one glass is filled with a denser solution than the other. The denser the medium, the slower the wave travels through the medium. The speed at which a light wave travels through a medium is quantified in the index of refraction, n, of that medium. It represents the ratio between the speed of light in a vacuum and the speed of light in the medium of interest. For example, the index of refraction of air is 1.00028, so light travels 1.00028 times faster in vacuum than it does in air.
The amount of refraction, or how much a light wave bends when it travels from one medium to another, is related to the indices of refraction by a mathematical formula called Snell's Law. We will use Figure 2, to understand Snell's Law. Figure 2 shows a ray of light (the red line in Figure 2) passing from air (white) to water (blue). Snell's Law uses the angle of a light ray entering a material, called the angle of incidence, θ1, and the indices of refraction of the two materials (air and water, in this case) to calculate how much the light ray will refract as it passes from one material into the other. "How much the light refracts" is expressed mathematically as an angle called the angle of refraction, θ2. Note that both the angle of incidence and the angle of refraction are measured from a line perpendicular to the surface the light interacts with. This line is called the surface normal, or simply, the normal (dashed gray line in Figure 2).
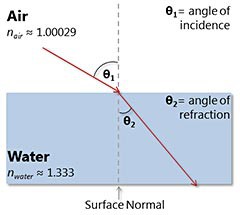 Image Credit: Image created by Terik Daly for Science Buddies / Science Buddies
Figure 2. Illustration of Snell's Law. Snell's Law has four variables: the index of refraction of material 1, n1 (air, in this example), the index of refraction of material 2, n2 (water, in this example), the angle of incidence, θ1, and the angle of refraction, θ2. If you know three of the four variables, you can use Snell's Law to calculate the unknown variable.
In equation form, Snell's Law looks like this:
Equation 1:
=
Index of refraction of material 2 × sin(angle of refraction)
n1 sin θ1= n2 sin θ2
- n1 = index of refraction of material 1 (no units, since it is a ratio)
- θ1 = angle of incidence (degrees or radians)
- n2 = index of refraction of material 2 (no units, since it is a ratio)
- θ2 = angle of refraction (degrees or radians)
Snell's Law tells us that the greater the difference between the indices of refraction of two materials, the more the light bends. If dissolving sugar in water creates a solution with a higher density than water alone, can you tell which glass in Figure 1, above, contains plain water and which one has sugar water?
If a light wave would travel through a prism filled with water, can you draw how the wave would be refracted?
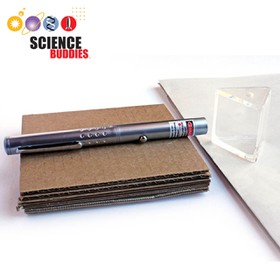
In this science project, you will use the physics of refraction to measure the sugar content of a clear liquid solution (e.g. apple juice or a clear soda drink) using a laser pointer and a hollow prism. Figure 3, shows a picture of the basic setup of the experiment.
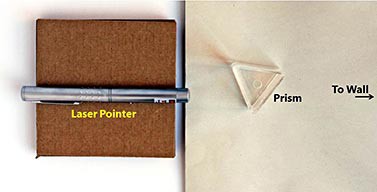 Image Credit: Image created by Terik Daly for Science Buddies / Science Buddies
Figure 3. A birds-eye view of the setup for measuring the index of refraction of a liquid using a laser pointer and a hollow triangular prism.
When there is no liquid in the prism, the laser will seem to shine straight through to a wall. See Figure 4. Refraction does happen as the laser beam crosses the prism walls, but the prism walls are so thin that we cannot see the refraction.
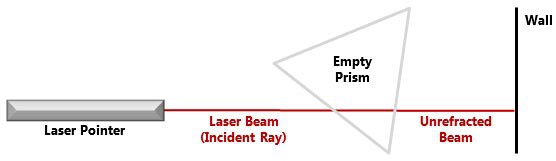 Image Credit: Image created by Terik Daly for Science Buddies / Science Buddies
Figure 4. When the prism is empty, the laser beam (red line) travels straight through the prism to the wall. (Not to scale.)
But, when the prism is filled with liquid, the laser is refracted twice, as shown in Figure 5.
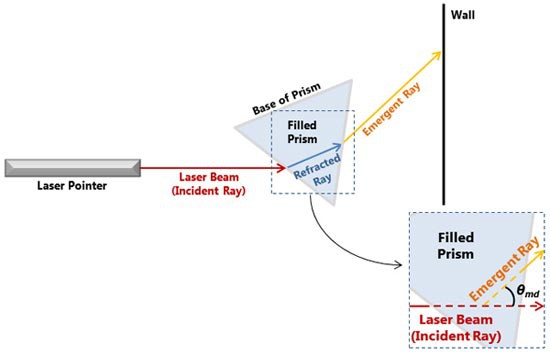 Image Credit: Image created by Terik Daly for Science Buddies / Science Buddies
The diagram shows a top-down view of a laser from a laser pointer shining into a triangular prism filled with a clear liquid. When the laser beam enters the prism it is refracted and turns upward. The laser beam turns upward again when it exits the prism and the emergent ray hits a wall above the original starting point of the laser.
Figure 5. When the prism is filled with liquid, the laser beam entering the prism (red line) refracts, forming the refracted ray (blue line). The laser beam refracts a second time as it exits the prism as the emergent ray (orange line). As shown in the inset, the angle of minimum deviation, θmd is the angle between the incident laser beam and the emergent ray exiting the prism. (Not to scale).
Using the setup shown in Figures 3, 4, and 5, you will make measurements that allow you to calculate the angle of minimum deviation, θmd. The angle of minimum deviation is the smallest possible angle between the incident ray (red line) and emergent ray (orange line), and it occurs when the light passing through the prism (solid blue line) is parallel to the base of the prism, as shown in Figure 5, above.
From θmd, you can calculate the index of refraction using Equation 2, the index of refraction equation. You can derive Equation 2 by applying Snell's Law twice (once for each time the light wave changes mediums), and then using algebra, trigonometric identities, and the fact that the prism is equilateral.
Equation 2:
- n = index of refraction of solution (no units, since it is a ratio)
- nair = index of refraction of air (no units, since it is a ratio)
- θmd = angle of minimum deviation (degrees or radians)
- θp = apex angle of prism (degrees or radians)
Equation 2, above, looks complicated at first, but it is actually not so bad. θmd is the angle of minimum deviation, which you will measure (we will show you how in the Experimental Procedure). θp is the apex angle of the prism, or the angle between the sides of the prism. Since the prism is an equilateral triangle, the apex angle is 60°. In Equation 3, we have substituted 60° for θp.
Equation 3:
In Equation 4, we have added the numerical value of the index of refraction of air (nair = 1.00028). The sine of 30° is 0.5, and that is added in Equation 4.
Equation 4:
Finally, we simplify the numerical terms to produce Equation 5, which is the one you will use.
Equation 5:
- n = index of refraction of solution (unitless, since it is a ratio)
- θmd = angle of minimum deviation (degrees)
To use equation 5, above, plug in your measured value for θmd, add 60°, and multiply the result by 0.5. Then take the sine of the result, and multiply by 2.00056, and you will have the desired index of refraction.
Terms and Concepts
To do this project, you should do research that enables you to understand the following terms and concepts:
- Refraction
- Index of refraction
- Snell's Law
- Angle of incidence
- Angle of refraction
- Density
- Prism
- Angle of minimum deviation
Questions
- Do different wavelengths of light refract the same amount?
- Why would you use a laser in this science project, instead of another source of light? Remember that a laser has exactly one wavelength of light.
Bibliography
A simple summary of Snell's Law (the "plug in the numbers and calculate" version required for this project):
- Kaiser, P. (2005). Snell's Law, The Joy of Visual Perception. Retrieved July 13, 2012.
A fairly comprehensive tutorial that builds an intuitive understanding of Snell's Law using high school-level math:
- Henderson, T. (2004). The Mathematics of Refraction, Snell's Law, The Physics Classroom. Retrieved July 13, 2012.
This reference discusses prisms and the angle of minimum deviation:
- Nave, R. 2010. Prisms, Hyperphysics. Retrieved August 29, 2012.
Materials and Equipment 
Recommended Project Supplies
These specialty items can be purchased from our partner Home Science Tools:
- Sugar Measurement Laser Kit (1). Includes
- Hollow acrylic prism with stopper
- Small funnel
- Laser pointer
- Graduated cylinder, 100 mL
- Stir rod, plastic, 12 inches
You will also need to gather these items:
- Cardboard (a few small pieces; the flaps from a cardboard box work well)
- Masking tape
- Tape measure
- Paper, 8.5 inches by 11 inches
- Pencil
- Piece of string (~ 4 feet)
- Sugar
- Water
- Gram scale, such as the Fast Weigh MS-500-BLK Digital Pocket Scale, 500 by 0.1 G, available from Amazon.com
- Calculator with trigonometric functions (sine, arctangent)
Disclaimer: Science Buddies participates in affiliate programs with Home Science Tools, Amazon.com, Carolina Biological, and Jameco Electronics. Proceeds from the affiliate programs help support Science Buddies, a 501(c)(3) public charity, and keep our resources free for everyone. Our top priority is student learning. If you have any comments (positive or negative) related to purchases you've made for science projects from recommendations on our site, please let us know. Write to us at scibuddy@sciencebuddies.org.
Experimental Procedure
Laser Pointer Safety
Measuring the Index of Refraction of a Liquid
Note: Do this project in an area where you can put a table close to a flat wall or window, and where taping paper to the wall or window is allowed.
- Figure 6, is a diagram of the setup you will use for measuring the index of refraction of a liquid. This is what the setup would look like if you were looking down on it from above. (Note that the diagram is not to scale.)
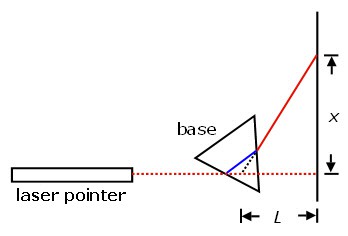
Figure 6. Diagram of setup for measuring the index of refraction of a liquid using a laser pointer and a hollow triangular prism (not to scale; based on the diagram in Nierer, 2002).
- Lay the laser pointer on a table. The laser pointer should be set up so its beam (dotted red line in Figure 6) is perpendicular to a nearby wall.
- Lay a piece of paper in front of the laser pointer. Tape it securely to the table. The paper will be used to mark where the laser beam enters and exits the prism.
- Place the prism on top of the paper, a few centimeters in front of the laser pointer. One of the prism's triangular faces should be resting on the paper, as shown in Figure 7. Using a pencil, trace around the prism's base. If you move the prism, always return it to this location before rotating it, if needed, as explained in step 12.
- Adjust the height of the laser pointer with pieces of cardboard until the laser's beam hits about halfway up the side of the prism. See Figures 7 and 8.
Image Credit: Image created by Terik Daly for Science Buddies / Science Buddies
Figure 7. Photograph showing experimental setup for measuring the index of refraction of a liquid. The prism is a few centimeters in front of the laser pointer. The laser pointer is pointing perpendicular to a nearby wall.
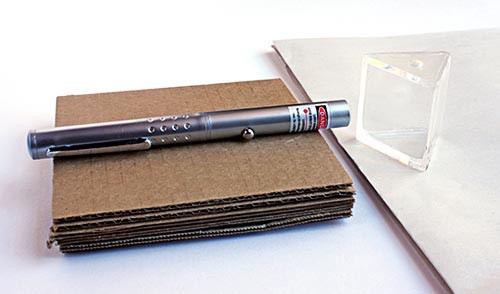 Image Credit: Image created by Terik Daly for Science Buddies / Science Buddies
Figure 8. Adjust the height of the laser pointer with pieces of cardboard. The beam of the laser should hit the prism about halfway up the prism's side.
-
Tape the cardboard to the table, and then tape the laser pointer to the cardboard. Make sure that neither the cardboard nor the laser pointer can move. If the laser pointer's position changes, your measurements will not be accurate.
- Troubleshooting Tip: If you have two or more sheets of cardboard stacked together, you may need to tape the pieces of cardboard together so that they do not slip.
- Tape a big piece of paper to the wall in front of the laser pointer. You will use this paper to mark where the laser beam hits the wall.
- To measure the angle of minimum deviation, θmd, which you will use to calculate the index of refraction of the liquids that you test, you need to mark several points and measure the distances between some of these points. Figure 9, is a more detailed view of the prism and wall. It shows all the points you need to mark in order to measure the angle of minimum deviation, θmd. The procedure below explains how to mark these points and determine the angle of minimum deviation, θmd.
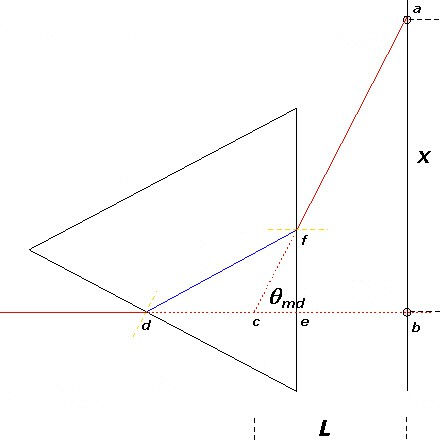
Diagram of a laser beam shining through a triangle. Two paths for the laser beam are shown if the laser is or is not refracted. If a laser is not refracted it travels straight through the triangle and hits the wall behind in a straight line. If the laser is refracted it travels through the triangle and is angled upward where it hits the wall at a higher point. The minimum deviation is the angle between the two spots on the wall that the laser hits.
Figure 9. Detail diagram showing how to measure the angle of minimum deviation (not to scale; based on the diagram in Nierer, 2002).
-
When the prism is empty (filled only with air), placing it in the laser's path should not divert the
beam. Turn the laser on, and mark the spot where the beam hits the paper taped to the wall. Mark this as
point b (point b in Figure 9).
- Troubleshooting Tip: Before testing a new solution, turn on the laser and shine it through an empty prism to make sure that the laser beam still hits point b. If the laser beam no longer hits point b, your measurements will not be accurate. Adjust the laser's position, if necessary, until the undiverted beam hits point b.
- With the prism empty, mark where the beam enters the prism on the paper the prism is sitting on (point d in Figure 9). Label it point d.
- With the prism still empty, mark where the laser beam exits the prism on the paper the prism is sitting (point e in Figure 9). Label it point e.
- Turn off the laser. Fill the prism with plain water. If you moved the prism to fill it with water, return it to the outline you made on the piece of paper. Turn the laser back on.
-
Rotate the prism so that the path of the refracted beam within the prism (solid blue line
from d to f in Figure 9) is parallel with the base of the prism, the side of the prism that has no
laser beam hitting it.
- Troubleshooting Tip: A pinch of non-dairy creamer in the liquid can help you see the beam within the prism, and should not have a significant effect on the index of refraction of the liquid. Or, if you do not have non-dairy creamer, take a straight edge and line it up with the laser beam's entrance and exit points (as seen when looking at the prism from a top view). Rotate the prism until the straightedge connecting those two points is parallel to the side of the prism that the laser beam does not hit.
- When the prism is rotated correctly (as described in step 13), mark the position where the emerging beam hits the paper taped to the wall (point a in Figure 9). Label it point a.
- On the paper on the table, mark the point where the beam emerges from the prism (point f in Figure 9). Label it point f.
- Now you can move the prism aside. Leave the papers taped in place.
- Use a ruler to draw a line from point d to point e. This marks the path of the undiverted beam.
- Next, extend a line from point a (on the wall) through point f (on the table). To do this, stretch a string from point a so that it passes over point f. Mark the point where the string crosses the line between d and e. This is point c.
- Measure the distance between points a and b, and record it in your lab notebook. This is distance x (see Figure 9).
- Measure the distance between points b and c, and record it in your lab notebook. This is distance L (see Figure 9).
- The distances you have measured define the angle of minimum deviation, θmd. The ratio x/L is the tangent of the angle of minimum deviation, θmd. To calculate the angle, use your calculator to find the arctangent of x/L. (The arctangent of x/L means "the angle whose tangent is equal to x/L.") Record the angle and its units (radians or degrees) in your lab notebook.
-
Now that you have the angle of minimum deviation, you can use Equation 5, to
calculate the index of refraction, n, of the liquid in the prism.
Equation 5:
n = 2.00056 × sin[0.5(θmd + 60°)]- n = index of refraction of solution (unitless, since it is a ratio)
- θmd = angle of minimum deviation (degrees)
- Check that your setup is working correctly by measuring the index of refraction of plain water using steps 9 through 22 of this procedure. You should get an index of refraction of about 1.334.
Standard Sugar Solutions for Comparison
-
You will make three sugar water solutions, using the amounts of sugar and water shown in Table 1. Use the gram scale to weigh out the appropriate amount of sugar.
- Troubleshooting Tip: Using warm water will help the sugar dissolve more quickly.
|
Desired concentration (% mass/volume) |
Amount Sugar (g) | Amount Water (mL) |
|---|---|---|
| 10 | 10 | 90 |
| 20 | 20 | 80 |
| 30 | 30 | 70 |
- Mix each of the solutions in Table 1 in a graduated cylinder or liquid measuring cup with metric units, using a stirring rod to dissolve the sugar. Once the solutions are made and the sugar is completely dissolved, set aside the 20% and 30% solution and fill the prism with as much of the 10% sugar solution as possible.
- Measure the index of refraction of the 10% sugar solution (following the steps in the "Measuring the Index of Refraction of a Liquid" section of the procedure, above). Repeat your measurements 4 more times for the 10% sugar solution, for a total of 5 replicates Start with a new piece of paper to mark the points in Figure 9 for each measurement. Average your results.
- Empty the prism and rinse it with plain water. Then repeat step 3 using 20% and then 30% sugar solutions.
- Now measure the index of refraction of a solution with unknown sugar concentration (e.g., a clear soft drink or fruit juice). If you measure a carbonated beverage, make sure that there are no bubbles in the path of the laser (gently dislodge them from the side of the glass, if necessary).
- With the index of refraction of the unknown solution, combined with the data you have from your known sugar solutions, you should be able to estimate the sugar concentration of the unknown solution.
Troubleshooting
For troubleshooting tips, please read our FAQ: Measuring Sugar Content of a Liquid with a Laser Pointer.
Ask an Expert
Variations
- Compare the index of refraction of regular and diet soda. Is there a difference?
- Can you use index of refraction to measure the concentration of salt dissolved in water? Make salt solutions with different known concentrations and find out. If you live near a body of salt water, can you use this method to estimate the salt concentration of salt water samples from different locations? This would be especially interesting to measure where fresh and salt water meet, e.g., in a tidal estuary where a river or stream meets a bay or the ocean.
- Advanced. Slowly pour water containing a pinch of non-dairy creamer over a layer of sugar crystals in the bottom of an aquarium, trying not to allow too much turbulence to develop in the water. Wait for an hour or two to allow a concentration gradient to form as the sugar crystals dissolve. Predict what will happen when a beam of light shines through the solution. Shine a laser pointer through the solution. Can you account for the path that the beam follows in the liquid?
Frequently Asked Questions (FAQ)
Your measured index of refraction may be off due to inaccuracies in data collection or problems in your calculations. If you have a value around 1.334, in the 1.32 to 1.34 range, your error is most likely from your measurements, but it is good to double check your calculations.
If your index of refraction is very far from 1.334 you probably have a problem in your calculations. You should redo your calculations (paying attention to order of operations and checking for consistent units). Also check that the experiment is set up correctly and that you are measuring the correct distances.
Ask an Expert
Careers
If you like this project, you might enjoy exploring these related careers:


Contact Us
If you have purchased a kit for this project from Science Buddies, we are pleased to answer any question not addressed by the FAQ above.In your email, please follow these instructions:
- What is your Science Buddies kit order number?
- Please describe how you need help as thoroughly as possible:
Examples
Good Question I'm trying to do Experimental Procedure step #5, "Scrape the insulation from the wire. . ." How do I know when I've scraped enough?
Good Question I'm at Experimental Procedure step #7, "Move the magnet back and forth . . ." and the LED is not lighting up.
Bad Question I don't understand the instructions. Help!
Good Question I am purchasing my materials. Can I substitute a 1N34 diode for the 1N25 diode called for in the material list?
Bad Question Can I use a different part?
Contact Us