Abstract
When a ship rocks back and forth, it can make people seasick. Even worse, it can make it dangerous for jets to land on aircraft carriers. For these reasons and many others, it's important for engineers to design bilge keels (or fins) to keep boats from rolling back and forth. Become an engineer for a day and discover the best way to keep from rocking the boat in this engineering science fair project!Summary
Justin Spahn, Intern, Science Buddies
Patrick Ryan, Shipbuilding Engineer, Northrop Grumman

Objective
In this engineering science fair project, you will develop a fin (bilge keel) design that is best at keeping a boat from rolling back and forth.
Introduction
Ocean waves have a big impact on ships, even very large ships. Waves can travel in any direction, depending on a lot of factors, like the wind direction, tides, and ocean currents. Ships, on the other hand, need to travel in straight lines to get where they are going quickly. Depending on the direction of the waves and the direction the ship is traveling in, the ship can really start to rock and roll! When a ship rocks from front to back or back to front, it is called pitch, and when a ship rocks from side to side, it is called roll.
Even though rolling is a perfectly natural occurrence, it can be pretty tough on people who live and work on ships. Some people get very seasick due to rolling, and some equipment can be affected or even stop working due to roll. Roll also makes simple tasks, like eating, rather difficult, and it can make hard chores, like landing a helicopter on a ship, almost impossible.
Engineers have developed many ways to reduce how much a ship rolls. One of the simplest and most ingenious ways is a feature called a bilge keel, shown in Figure 1.
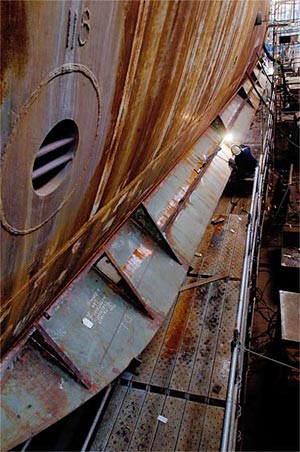 Image Credit: John Whalen, Northrop Grumman Shipbuilding / Permission granted through email
Figure 1. Shown here is a bilge keel on the Nimitz Class aircraft carrier, USS George Bush, CVN 77. (John Whalen, Northrop Grumman Shipbuilding.)
A bilge keel is usually a simple piece of steel on the bottom of a ship that is aligned with the direction that the water passes over the hull (see Figure 2, below, for a diagram of bilge keels and other types of keels). By aligning it this way, the bilge keel doesn't slow the ship down very much when it is traveling straight ahead. But when the ship begins to roll due to wind and waves, the bilge keels act like a plow through the water. The plowing action of the bilge keels generates a force that acts in a direction opposite to the rolling motion, and this force slows down the roll. The bilge keel only works when the ship is rolling and doesn't hurt the straight-ahead speed very much. Since it is just a simple piece of steel and doesn't have any moving parts, it is fairly inexpensive to build, too. Combine those benefits and you have an efficient way to design a better ship!
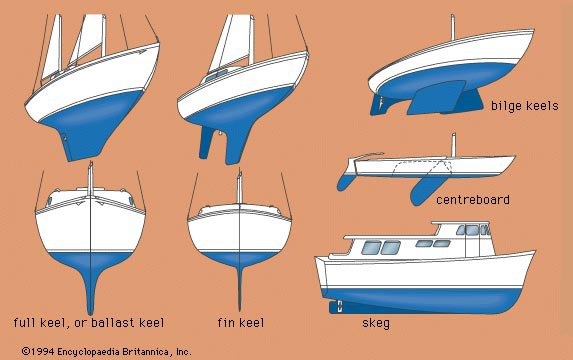 Image Credit: Encyclopedia Britannica / Permission granted by terms of use contingent on nonprofit, educational use.
Diagram shows 5 different keel and hull designs for boats. A full or ballast keel is a large plate that runs across the length of a ship at the center of the hull. A fin keel is a large plate similar to a full keel but is more narrow and doesn't run across the full length of the hull. Bilge keels are plates that run across both sides of the hull. A centreboard is similar to a fin keel except it can be retracted back into the hull. Finally, a skeg is a small keel that is located towards the back of the boat.
Figure 2. This diagram compares bilge keel design with other hull designs. (www.original.britannica.com., 1994.)
In this science fair project, you will learn how different sizes of bilge keels work and how effective they are at reducing the rolling motion of a ship. Try skinny or fat, long or short, straight, curved, or serrated bilge keels, and see what works best. Think about construction and other reasons why bilge keels are a certain size, and investigate what other things ship designers or naval architects need to think about when designing a good bilge keel.
Terms and Concepts
- Roll
- Bilge keel
- Force
- Hydrostatics
- Center of mass
- Oscillation
Questions
- How does a bilge keel stop a boat from rolling?
- How are bilge keels similar to the wings of an airplane? How are they different?
- What would you expect a boat with bilge keels to do when rolled? Think about this in terms of the number and length of rolling oscillations.
Bibliography
This website demonstrates roll. Although it uses a picture of an airplane, the movement is the same for a boat—imagine it rocking back and forth like the plane.
- National Air and Space Museum. (1996, September 18). Roll. Retrieved July 16, 2008.
You might need an adult's help to understand some of the information in the following books.
This book offers a scientific explanation of rolling motion and how bilge keels stop ships from rocking, on pages 269-270.
- Gillmer, Thomas C. and Bruce Johnson. Introduction to Naval Architecture. Annapolis, MD: Naval Institute Press, 1982.
This is a children's scientific dictionary, which defines many of the terms listed in the Introduction:
- Kleinedler, Steven. The American Heritage Children's Science Dictionary. Boston: Houghton Mifflin Company, 2003.
A good explanation of what a bilge keel is and how it works can be found in this book, on pages 116-117.
- Tupper, Eric. Introduction to Naval Architecture. Jersey City, NJ: The Society of Naval Architects and Marine Engineers, 2000.
Another good explanation of bilge keels and rolling motion can be found in this book, on pages 245-255.
- Watson, D.G.M. Practical Ship Design. New York: Elsevier, 1998.
Materials and Equipment
- 2-L soda bottles (2)
- Razor blade or knife
- Ruler (preferably one that measures in metric)
- Rubber cement
- Marbles (50-60)
- Wooden dowel, about 1 foot long
- Permanent marker
- Bathtub or pool
- Helper
- Stopwatch
- Lab notebook
- Foam-padded double-sided adhesive tape
- Scissors
- Graph paper
Experimental Procedure
Building the Bottle Boat and Performing the Initial Test
-
Clean out the 2-L bottles. Cut a rectangular hole in one of the bottles, with the longest edges running from the neck to the base—this will be the top of the boat. This is difficult because the plastic is thick in certain places. Have an adult carefully use a razor blade or a knife to help you with this tricky step. The hole should be about 19 cm x 6 cm, as in Figure 3 below. Use your metric ruler to measure.
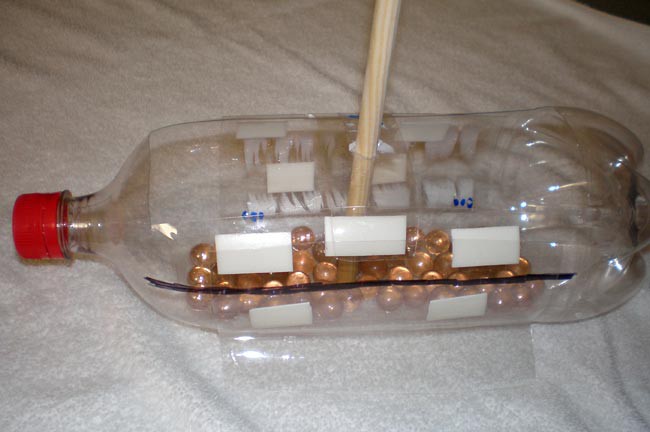 Image Credit: Justin Spahn, Science Buddies / Science Buddies
Figure 3. This is the full boat assembly. Note the rectangular hole at the top of the boat. This is what you need to cut out in step 1.
- Paint the inside of the bottom of the boat with a thick layer of rubber cement and set about 50-60 marbles in it. The marbles clearly define which part of the boat is the bottom. They also lower the boat's center of mass, allowing it to oscillate. Make sure to keep them centered along the bottom of the boat—don't put more marbles on one side of the bottom than the other. Also, leave a small empty space in the center for your wooden dowel to go in. Let the rubber cement dry for about 15-20 minutes, and don't be tempted to touch the bottle to check it—it could dislodge the marbles and cause you to have to cement them down again.
- Cement the wooden dowel vertically into your empty patch so that it sticks straight up out of the rectangular hole. You might want to cement some marbles around it to hold it in place and keep it straight up. Remember to give the rubber cement some time to dry. The dowel will make it easier to see the boat rock back and forth, and it will also give you a handle with which to rock the boat.
- Using a permanent marker, draw a line near the top of the bottle, from the front of the boat to the back, on either the right or left side. See Figure 3, above. This line will help you figure out how much you need to roll the boat—it will represent where you want the water line to be when you tilt it before letting it oscillate.
-
Find a bathtub or a pool in which to test your boat. If you use a pool, make sure that there is an adult to supervise you in case of accidents. The first test should be done without any bilge keels. Set the boat in the water and make sure it floats properly. Use the dowel as a handle and tilt the boat until the water line is at the line you drew with your permanent marker. Let go of the dowel and record the number of oscillations it makes in a data table, like the one below, in your lab notebook.
- An oscillation is when the dowel rocks back and forth; for instance, if you tilted the boat to the right and released it, the boat would roll and the dowel would tilt to the left and then back to the right, completing one full oscillation.
- The oscillations will get smaller and smaller, until the boat finally stops, so make sure you count all of them. You should also record the total time, using the stopwatch. Start the stopwatch when you let go of the boat, and stop it when it is no longer oscillating. You might want to have a helper assist you with the stopwatch since you will be tilting the boat. Record your information in your data table.
Bilge Keel Length (cm) Number of Oscillations Total Time (sec) Trial 1: Trial 1: Trial 2: Trial 2: Trial 3: Trial 3: Average: Average:
Note: If you are using a bathtub, you will cause ripples when you release the boat. The ripples will bounce off the tub walls and go back to the boat, so make sure you don't count when those ripples rock the boat some more! You only want to count the oscillations that are getting smaller. When they start to get bigger again, that's when you should stop the stopwatch and stop counting. Make sure you place the boat in the tub so that the front and back are perpendicular to the longer walls; that way the ripples have farther to travel before hitting the walls and bouncing back, so have less chance of interfering with the oscillations. Why do you think you should ignore the ripple-oscillations? - Repeat step 5 two more times, for a total of three trials. This is done so that you can calculate averages for graphing. Finding the average of multiple trials is more accurate than using only one trial, because what if you made a mistake in that one trial?
Making and Attaching the Bilge Keels
-
Cut the other 2-L bottle completely in half, lengthwise (from the neck to the bottom), using the razor blade or knife. Again, have an adult assist you with this step so you don't hurt yourself. You might have difficulty with the neck and the bottom, so go ahead and cut those off first, as you won't need those parts. You should end up with two half cylinders, or curved rectangles. See Figure 4, below.
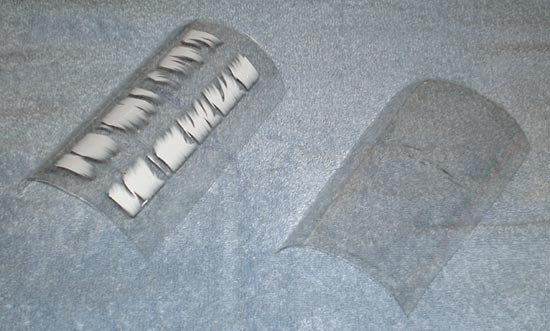 Image Credit: Justin Spahn, Science Buddies / Science Buddies
Figure 4. These are the bilge keels, which will be attached to the bottle boat.
- Next you'll be bending the two bilge keels you just made. Bilge keels extend straight out from the hull at a 90-degree angle (see Figures 1 and 2 in the Introduction). Put one of the bilge keels up against the side of the boat so that it fits onto the side. If the bilge keel is too big, trim it until it fits well on the boat. Bend part of the bottom of the bilge keel outward, away from the boat. Do the same with the other bilge keel. Make sure that the portions bent away from the boat extend out about 5 cm. Use your ruler to get an exact measurement.
- Now attach each bilge keel to the sides of the boat using a few pieces of the padded double-sided tape. This tape will adhere to the bottle even under water, but not for too long. If you have trouble with the tape sticking, take it off, dry the boat side and the bilge keel, and re-attach the bilge keel using fresh tape.
- Hold the boat at eye-level so that the neck and bottle cap are pointed at you. Check the keels again and bend the bottoms of the keels until they're both pointing away from the boat. See Figure 3, above, for a picture of the full ship assembly, and note the bent bilge keels at the bottom of the boat.
Testing Your Bilge Keels
- Repeat steps 5-6 from the section above, Building the Boat and Performing the Initial Test, so you have a total of three trials with the bilge keels attached, recording all data in your lab notebook. How is this test different from when you tested the boat before it had bilge keels?
- Now, trim 1 cm off the bottom (the part sticking out) of each bilge keel so they each extend 4 cm out from the boat. Repeat steps 5-6 from Building the Boat and Performing the Initial Test again with this new length and record your data in your lab notebook.
- Continue trimming the bilge keels in increments of 1 cm and test each new length three times. Your final test should be when the bilge keels extend only 1 cm out from the boat.
Graphing Your Results
- You should have at least three time values and three oscillation totals for each bilge keel length, including when the boat did not have keels. For each length, calculate the average for both time and number of oscillations. You should now have one oscillation value and one time value for each bilge keel length. Record the averages in your data table.
- Make a bar graph where the x-axis is Bilge Keel Length (including "0" for the trial without bilge keels) and the y-axis is Average Number of Oscillations.
- Make another graph with the same x-axis and define your y-axis as Time in Seconds. If you want to combine the graphs into one, divide each bilge keel's number of oscillations by time, and call that number Oscillations per Second.
- Compare the data in the graphs. Which bilge keel length do you think was best at keeping the boat stable? Which was worst? How does the trial without bilge keels compare to the others?
Ask an Expert
Global Connections
The United Nations Sustainable Development Goals (UNSDGs) are a blueprint to achieve a better and more sustainable future for all.

Variations
-
Not all bilge keels are the same—some are shorter or shaped differently (see Figure 5, below). Try using different shapes of bilge keels, instead of just different lengths. Rather than trimming the bilge keels down, cut a shape or a serration into the keel and test the new design. Make sure to cut both keels into the same shape.
 Image Credit: www.free-images.org.uk / Permission granted by terms of use contingent on nonprofit, educational use.
Figure 5. This is an example of another bilge keel design. (www.free-images.org.uk.)
- Instead of using only one permanent marker line, try using two or three and test each bilge keel design at each line. Graph all of your data. Does it matter how far the boat is tilted? Do the oscillations-per-second ratios differ at all? What does this tell you?
- Try using something else besides marbles in the bottom of the boat, such as pouring plaster of paris in there and letting it settle and dry. Does it matter what weighs the boat down? Also try testing more weight. After you've tested each bilge keel design, put an object in the boat on top of the marbles or plaster and test it again. Did the added weight do anything to the number of oscillations or the total time? Make a separate graph for each bilge keel at each weight. You'll have twice as many graphs as normal.
- Simulate actual ocean conditions by testing the boat in moving water. This can easily be done by placing the boat in a pool where others are swimming some distance away. The waves and ripples caused by the swimmers will give the ship a more realistic environment, and will push the boat around for you so you don't need to tilt it. Take video of the boat in the water for each bilge keel design, and determine which design maintains the greatest stability.
Careers
If you like this project, you might enjoy exploring these related careers:


Related Links
- Science Fair Project Guide
- Other Ideas Like This
- Aerodynamics & Hydrodynamics Project Ideas
- My Favorites