Abstract
Most drones fly with a mix of human input and autonomous control based on feedback from electronic sensors. This allows the drone to fly up and down when the human operator presses a joystick on a controller, but automatically hover at a fixed distance above the ground when the operator lets go of the joystick. In this project, you will explore drone programming with an Arduino. What types of inputs and sensors can you make your drone respond to? What behaviors and responses can you program your drone to perform? Try it and find out!Summary

Objective
Program an Arduino to control the altitude of a simple homemade drone.
Introduction
Unmanned aerial vehicles (UAVs), commonly called drones, are aircraft that fly without a human pilot on board. Some drones are very large—as big as a small airplane. Other drones are much smaller, and are popular as toys, for recreational use, and for aerial photography. Quadcopters, which have four propellers, are a popular type of consumer drone (Figure 1).
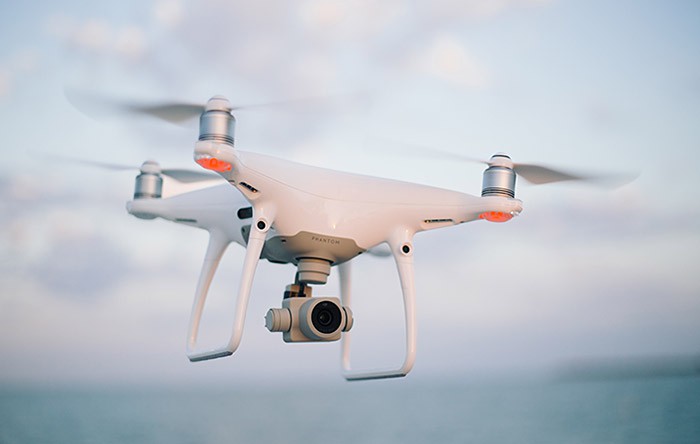 Image Credit: Wikimedia user Josh Sorenson / Public domain
Figure 1. A DJI Phantom, a popular type of consumer drone.
Most drones fly with some level of human control. For example, many consumer drones can be flown with either a controller that has two joysticks, similar to a video game controller (Figure 2), or via an app on a smartphone. The joysticks allow the operator to make the drone fly up and down, side to side, and make it turn.
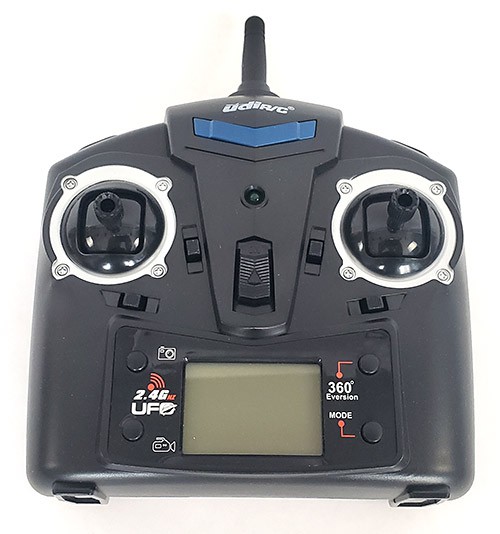 Image Credit: Ben Finio, Science Buddies / Science Buddies
Figure 2. A handheld drone controller.
However, keeping the drone level and preventing it from crashing can be difficult for the human operator. To accomplish this, the drone also has some autonomous control using an on-board computer and electronic sensors. These sensors measure physical information about the drone, like its angle of tilt or distance from the ground. Sometimes these sensors are inside the drone, and sometimes they may be visible on the drone's exterior, like a camera (Figure 3) or downward-facing sensors that measure reflected light or ultrasonic sound in order to measure the distance to the ground.
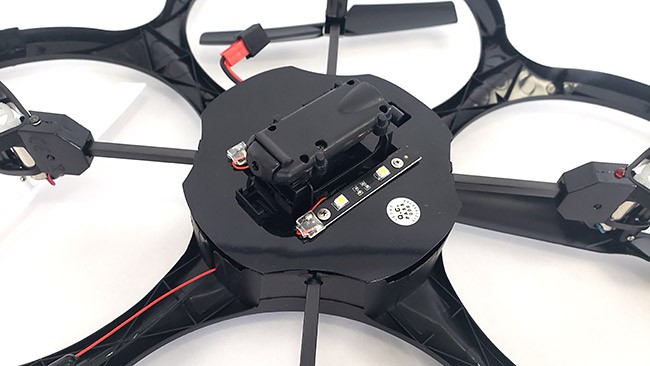 Image Credit: Ben Finio, Science Buddies / Science Buddies
Figure 3. A camera mounted on the bottom of a drone.
In order to keep the drone level or at a fixed distance above the ground, the onboard computer uses feedback control, also called closed-loop control. Feedback control takes measurements from the sensors (the "feedback") and uses it to adjust the speed of the drone's motors. For example, if the drone is too close to the ground, the controller can automatically speed up the motors to make the drone fly upward. If a gust of wind makes the drone tilt to one side, it can speed up the motors on one side of the drone to make it tilt back in the correct direction (Figure 4).
 Image Credit: Ben Finio, Science Buddies / Science Buddies
Figure 4. An example diagram showing how a drone can increase the speed of motors on one side and decrease the speed of motors on the other side in order to tilt in one direction.
There are many other examples of feedback control in your everyday life. The thermostat in a house is a common one. The thermostat contains a temperature sensor that measures the temperature of the air. When the temperature gets too cold in the winter, the thermostat will automatically turn the heat on until the house warms up. It will then turn the heat off until the house gets too cold again, and repeat. This is an example of simple on/off control.
Other types of control, like cruise control in a car, are more complicated. On/off control would not be good in a car; that would be like alternating between slamming on the gas and slamming on the brakes! Instead, the cruise control makes more gentle adjustments, as needed, to maintain the desired speed.
In this project, you can experiment with programming your drone to respond to different human inputs and electronic sensors. To simplify construction and programming of the drone, the drone will be constrained to move vertically on two guide poles. This way, you can focus on just controlling the drone's altitude, without worrying about tilt or side-to-side motion. Can you design an intuitive handheld controller for your drone? What about making the drone automatically respond to disturbances or follow a pre-programmed path? The sky is the limit!
Terms and Concepts
- Unmanned aerial vehicles (UAVs)
- Drone
- Quadcopter
- Sensor
- Feedback control
- Closed-loop control
Questions
- What is a drone?
- What are some uses for drones?
- How do drones fly and steer? How are they controlled?
- What types of electronic sensors could be useful for controlling a drone?
Bibliography
- Chandler, N. (n.d.). How Drones Work. HowStuffWorks. Retrieved March 4, 2021.
- Closed-loop Systems. (n.d.). Closed-loop Systems. Retrieved March 4, 2021.
- Science Buddies staff. (n.d.). How to Use a Breadboard for Electronics and Circuits. Science Buddies. Retrieved March 4, 2021.
- Science Buddies staff. (n.d.). How to Use an Arduino. Science Buddies. Retrieved March 4, 2021.
Materials and Equipment 
Recommended Project Supplies

- DIY Mini Drone Kit
- Science Buddies Electronics Kit for Arduino
- Windows or Mac computer. Unfortunately, Arduino software does not currently work well with Chromebooks. Your computer will need:
- Access to the Arduino IDE, either installed local version or web-based editor. Watch this video for a comparison of the two options.
- USB port. The Science Buddies kit comes with a USB-A to B cable. The "B" end plugs into the Arduino and the "A" end plugs into your computer. You will need an adapter or different cable if your computer only has USB-C ports. Watch this video to learn about the different types of cables and adapters.
- You will also need to gather these items, not included in the kit:
- Ruler
- Hot glue gun
- Scissors
- Stopwatch
- Helper to use the stopwatch
- Metric tape measure or meterstick
- Kitchen or jewelry scale with 0.1 g resolution
- Piece of paper or cardstock
- Lab notebook
Disclaimer: Science Buddies participates in affiliate programs with Home Science Tools, Amazon.com, Carolina Biological, and Jameco Electronics. Proceeds from the affiliate programs help support Science Buddies, a 501(c)(3) public charity, and keep our resources free for everyone. Our top priority is student learning. If you have any comments (positive or negative) related to purchases you've made for science projects from recommendations on our site, please let us know. Write to us at scibuddy@sciencebuddies.org.
Experimental Procedure
Build Your Drone
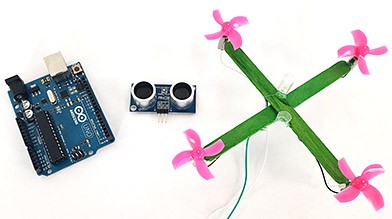
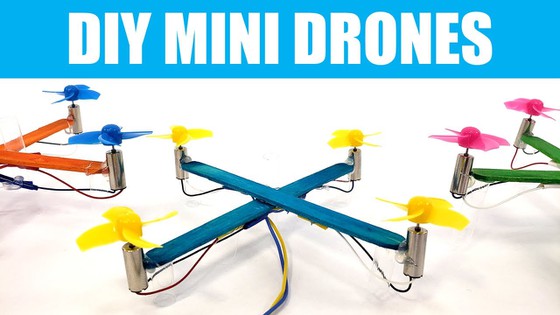
- Watch the following video and read the directions in the Build a Simple Drone and Test How Much It Can Lift project to build your drone. You should use two guide poles for your drone instead of one (as shown in the video). This will prevent the wires from getting twisted around the pole.
Connect the Arduino
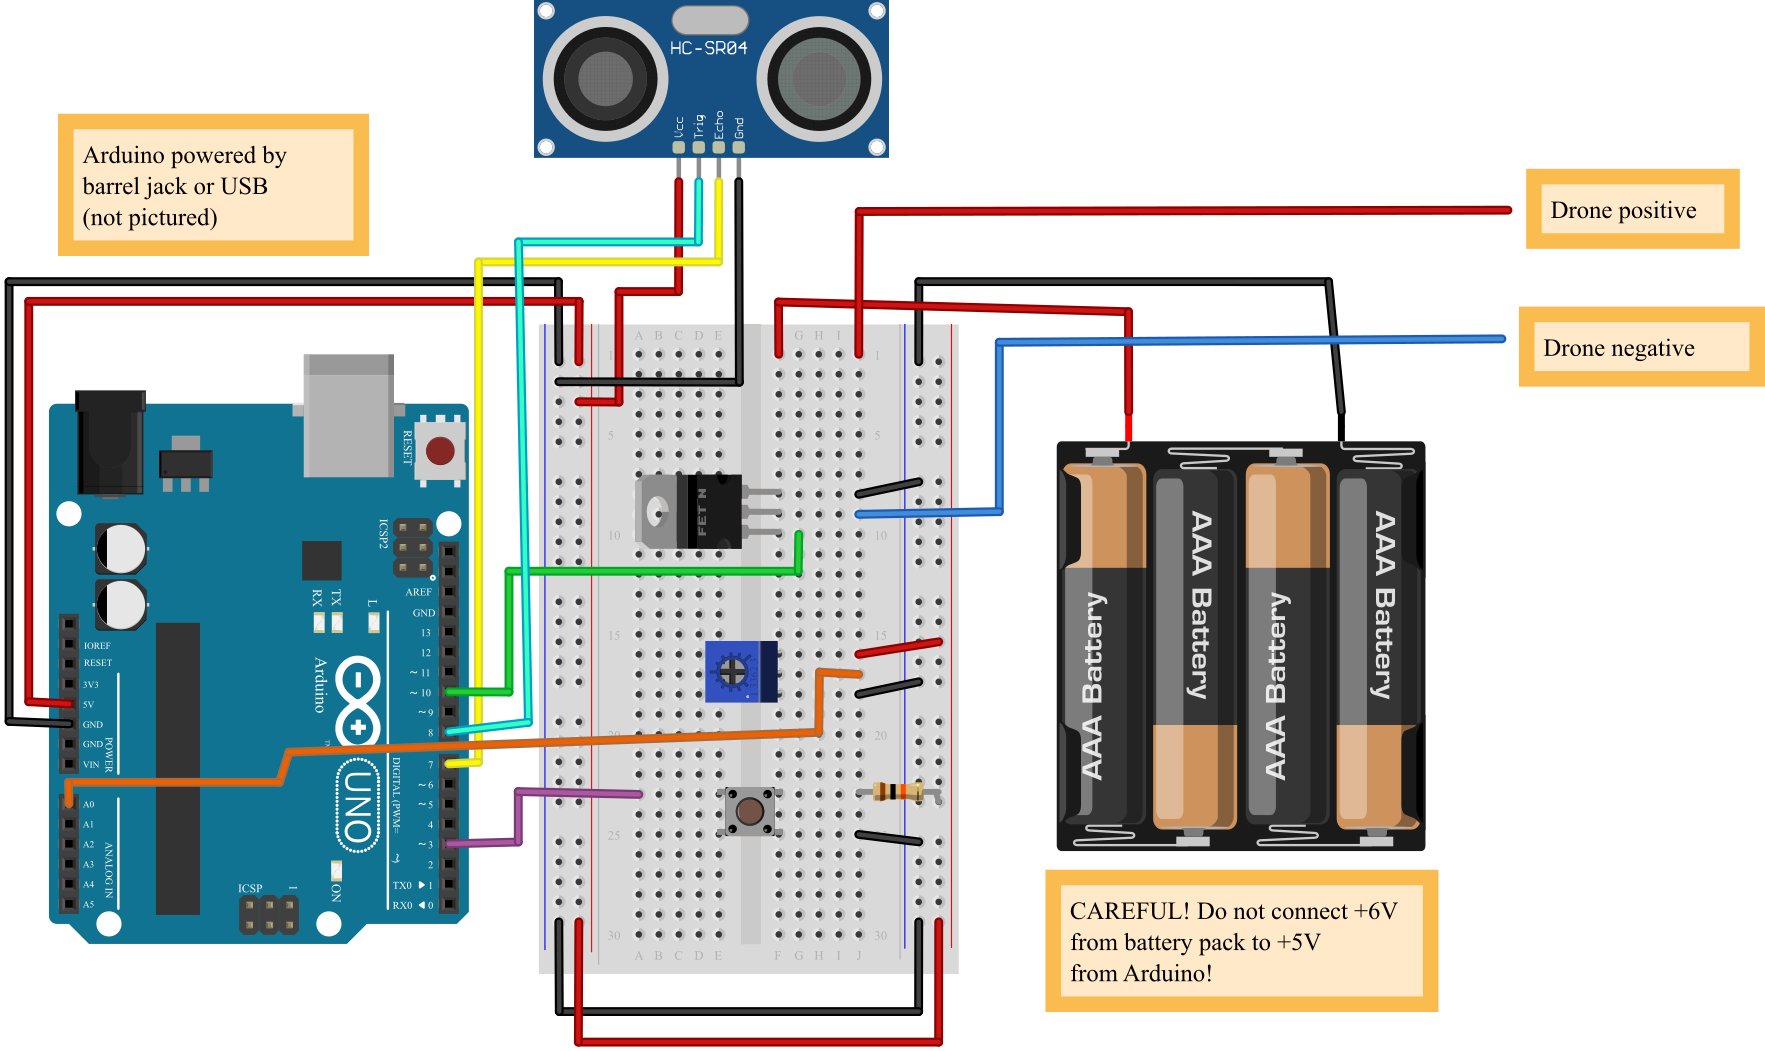
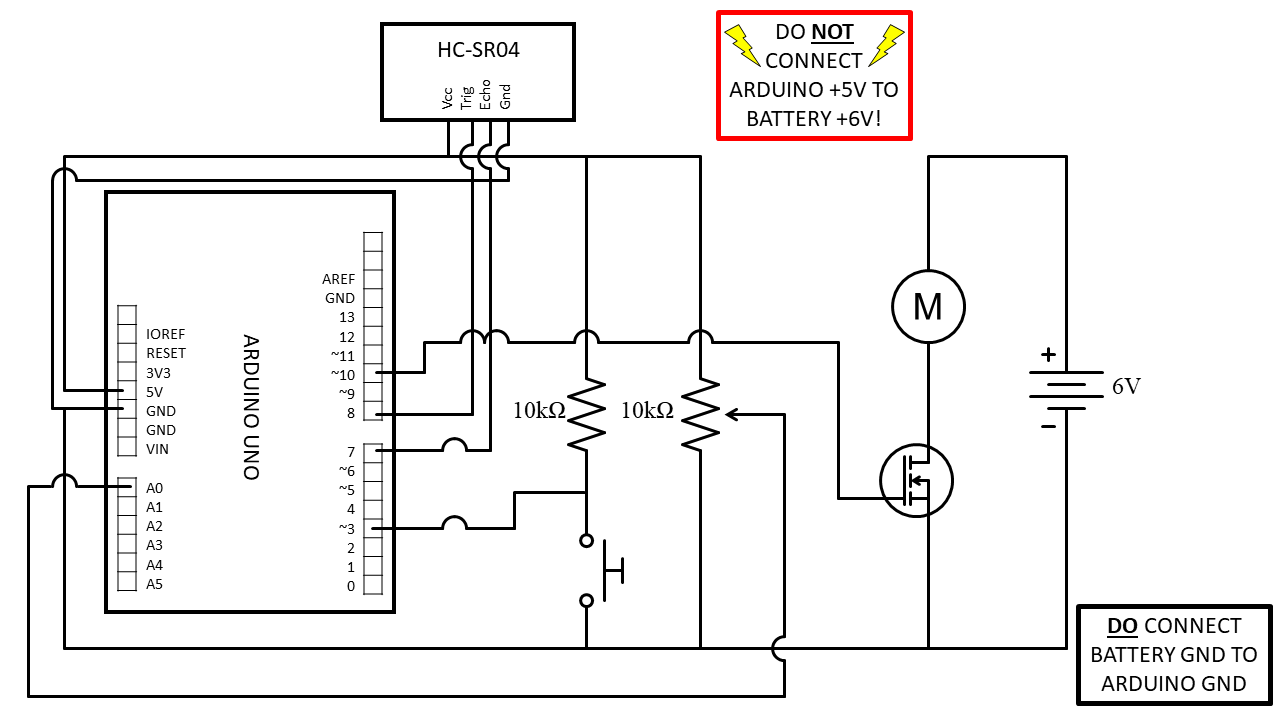
- Orient the breadboard so it is facing you with the writing upright. Then connect all of the following, as shown in Figure 5
(click for a
bigger version of the diagram).
If you know how to read a
circuit schematic,
you can use that instead (Figure 6).
- Arduino 5V pin to breadboard positive bus.
- Arduino GND pin to breadboard ground bus.
- Breadboard left positive bus to breadboard right positive bus.
- Breadboard left ground bus to breadboard right ground bus.
- Ultrasonic sensor GND pin to breadboard ground bus (use male-female jumper wires to connect to the sensor pins).
- Ultrasonic sensor 5V pin to breadboard positive bus.
- Ultrasonic sensor Echo pin to Arduino digital pin 7.
- Ultrasonic sensor Trig pin to Arduino digital pin 8.
- MOSFET in holes F8, F9, and F10, with the large metal tab facing to the left.
- Hole J8 to ground bus.
- Hole G10 to Arduino digital pin 10.
- Potentiometer in holes F16, F17, F18.
- Hole J16 to positive bus.
- Hole J17 to Arduino analog input A0.
- Hole J18 to ground bus.
- Push button straddling the middle gap of the breadboard, with pins in holes E23, E25, F23, and F25.
- Hole A23 to Arduino digital pin 3.
- 10 kΩ resistor from hole J23 to positive bus.
- Hole J25 to ground bus.
- Drone positive wire to J1. The drone's wires are too flexible to push into the breadboard on their own. Twist or crimp them to a short piece of jumper wire to make the connection.
- Drone negative wire to J9.
- 4xAA battery pack negative (black) wire to ground bus.
- 4xAA battery pack positive (red) wire to F1. Important: Do not connect the battery pack's positive wire to the breadboard's positive bus! This will create a short circuit between the Arduino's 5 V power and the battery pack's 6 V power.
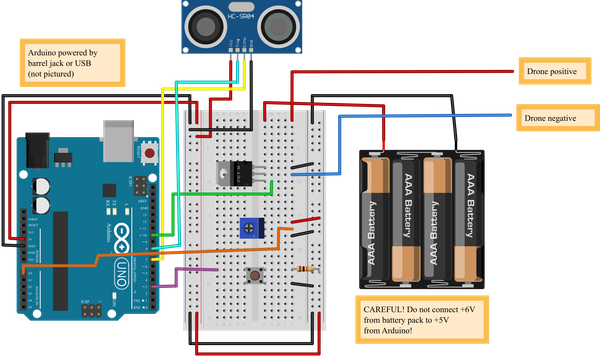 Image Credit: Ben Finio, Science Buddies / Science Buddies
Figure 5. Breadboard diagram for Arduino drone control circuit.
 Image Credit: Ben Finio, Science Buddies / Science Buddies
Figure 6. Circuit schematic for Arduino drone control circuit. -
Upload the code to your Arduino.
- Download drone_altitude_control_code.ino to your computer.
- Temporarily disconnect one of the drone's wires from the breadboard. This will prevent the drone from accidentally taking off when you power up your Arduino (this can happen depending on the last program that ran on the Arduino).
- Connect the Arduino to your computer with the USB cable.
- Open drone_altitude_control_code.ino in the Arduino IDE.
- Press the "Upload" button to send the code to your Arduino.
- Test your drone.
- Make sure the drone is threaded onto the guide poles.
- Place the ultrasonic sensor directly under the drone, facing up (Figure 7).
- Re-connect the drone's wire to the breadboard.
- Press the push button once to make the drone lift off.
- Adjust the potentiometer to change the drone's height.
- Gently tap the drone up or down with your finger or a pencil (watch out for the propellers!). What happens?
- Press the push button again to make the drone land. You can re-press the button to make it lift off again.
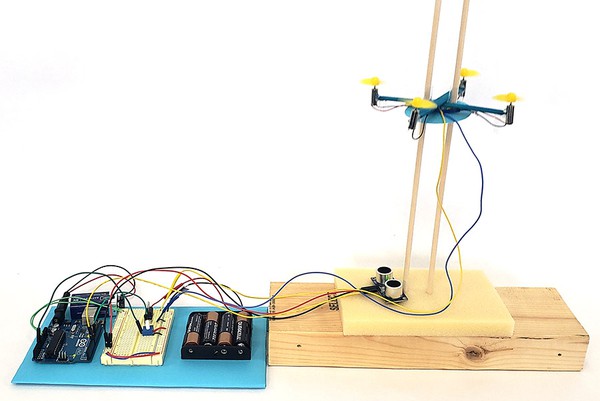 Image Credit: Ben Finio, Science Buddies / Science Buddies
Figure 7. Experimental setup, with the drone on guide poles and ultrasonic sensor placed under the drone facing upward.
Using Your Drone for a Science or Engineering Project
To use your drone for a science or engineering fair project, it is not sufficient to simply present what you have built so far based on the Science Buddies instructions and example code. You will need to conduct your own experiment (for a science project) or design/program something new (for an engineering project). Before you begin either type of project, you should carefully read through the comments in the example code and make sure you understand how it works. Here are a few suggestions for a project:
- How does the drone respond to disturbances of different amounts? For example, try holding the drone at fixed distances from the target height (1 cm, 2 cm, 3 cm...) and then releasing it.
- The example code uses a proportional controller. It increases (or decreases) the motor speed by an amount proportional to the difference between the target height and actual height. What happens if you change the code to use basic on/off control instead (i.e. either turning the motors on full speed or turning them completely off, nothing in between)? How does the drone's behavior compare to the proportional controller?
- What is the effect of changing the gain (the variable K in the code) of the proportional controller?
- Can you program a proportional-integral-derivative (PID) controller instead of a basic proportional controller?
- Can you program the drone to follow a pre-programmed path? For example, continuously flying up and down in an oscillating (sinusoidal) pattern? What about quickly flying to different fixed heights and hovering for a few seconds before moving to the next height? How can you get the drone to closely follow the path with minimal error?
- Can you design and build a handheld controller for your drone? What if you use an analog joystick, just like the type found in video game controllers and many commercial drone controllers, instead of a potentiometer?
In any of the above projects, there are several ways you can collect data about your drone's movement. The easiest way is to copy data from the Arduino serial monitor into a spreadsheet program so you can graph the data*. This will allow you to plot the drone's position vs. time as you change variables or use different control methods. However, you can also film your drone and analyze its motion using a program like Tracker. You could even compare the two different methods and turn that into a project of its own!
* Copying data from the Arduino serial monitor can be a bit tricky due to an apparent bug. If you press CTRL+A then CTRL+C to select and copy all the data in the serial monitor window, it does not work. Instead, when you are done collecting data, unplug the USB cable to disconnect the Arduino from the computer and stop printing to the serial monitor. Then, select all of the data in the serial monitor except for the first line. Do this by clicking at the beginning of the second line, scrolling all the way to the bottom, holding SHIFT, then clicking at the end of the last line. Then press CTRL+C to copy the data, and you can paste it into another program like Notepad or Excel®. You may need to use the Text to Columns feature in Excel, or the equivalent in another spreadsheet program, to get the data into separate columns.
Troubleshooting
For troubleshooting tips, please read our FAQ: How to Control a DIY Mini Drone with an Arduino™.
Ask an Expert
Global Connections
The United Nations Sustainable Development Goals (UNSDGs) are a blueprint to achieve a better and more sustainable future for all.

Variations
- Instead of controlling up-and-down motion of your drone, can you build something that lets you control side-to-side tilt? For example, try mounting the drone on a vertical spring, or threading a dowel through a straw that is glued to the drone's frame horizontally. See this page for a list of other projects you can do with your drone.
Frequently Asked Questions (FAQ)
- Make sure your batteries are firmly inserted into the battery pack and facing the proper direction.
- Make sure the battery pack is on.
- Double-check all of your twisted wire connections. Loose connections can prevent the motors from spinning.
- Make sure that you can easily slide the drone up and down the dowels by hand. If you let go of the drone after lifting it, it should fall back to the bottom. If the drone gets stuck:
- Make sure the wooden dowels are parallel and the spacing between them is even. If the dowels are crooked, this will cause the drone to get stuck.
- Make sure the two straws that act as guide for the drone are parallel and aligned with the dowels. If the straws are crooked, this can cause the drone to get stuck even if the dowels are parallel.
- Make sure that all four propellers are properly mounted and spinning in the right direction. If you turn the drone on and hold your hand under each propeller, you should feel air blowing down on your hand. If you hold your hand over a propeller and you feel air blowing up, then you either a) have the wires for that motor reversed or b) mixed up the clockwise and counter-clockwise propellers. Revisit the procedure to make sure you have all four motors wired correctly with the correct propeller mounted on each motor.
- Do not use excessive amounts of glue or tape when building your drone. If the drone is too heavy, it will not lift off, even if everything else is built correctly.
- Make sure the wires from the battery pack are free and not getting snagged on anything.
- Make sure the motors are all pointed straight up. This will give your drone maximum lift. If the motors are tilted at an angle, the drone will not have as much lift.
- Just like any other battery-operated device, your drone's batteries will wear out eventually. If your drone seems sluggish or is no longer lifting off, replace the batteries.
- Check if the drone has become damaged from repeated use or if your wooden dowels have become misaligned.
Careers
If you like this project, you might enjoy exploring these related careers:


Contact Us
If you have purchased a kit for this project from Science Buddies, we are pleased to answer any question not addressed by the FAQ above.In your email, please follow these instructions:
- What is your Science Buddies kit order number?
- Please describe how you need help as thoroughly as possible:
Examples
Good Question I'm trying to do Experimental Procedure step #5, "Scrape the insulation from the wire. . ." How do I know when I've scraped enough?
Good Question I'm at Experimental Procedure step #7, "Move the magnet back and forth . . ." and the LED is not lighting up.
Bad Question I don't understand the instructions. Help!
Good Question I am purchasing my materials. Can I substitute a 1N34 diode for the 1N25 diode called for in the material list?
Bad Question Can I use a different part?
Contact Us
Related Links
- Science Fair Project Guide
- Other Ideas Like This
- Robotics Project Ideas
- Aerodynamics & Hydrodynamics Project Ideas
- My Favorites


