Abstract
The Wright brothers used kites extensively to test their design ideas in the years leading up to their first successful airplane flight. With this science project, you'll learn about kite aerodynamics, and then come up with your own hypothesis about building or flying a kite. You can test your hypothesis two ways: with an online kite simulation program from NASA, and outdoors with the real thing! A great feature of this science project is that it has many possible variations, so you can decide exactly in which direction you want to take it.Summary
NASA's Glenn Research Center, for the Kite Simulation program.
Objective
The objective of this science project is to determine the effect of changing the bridle point—the point where the kite string, or control line, attaches to the bridle—on the kite's flying height, while keeping the length of the control line constant.
Introduction
Kites aren't just for kids. The Wright brothers used kites to test virtually every idea they had on airplane design before actually flying the test planes, and sometimes they flew their full-size gliders as kites to do additional tests.
Building and flying kites is a great way to start learning about aerodynamics. As you are flying the kite, you can actually feel your kite reacting to the wind through the changes in tension and motion of the string. If you've flown kites before, this science project can bring a scientific foundation to what you already know from experience. Who knows, maybe it will make you a better kite flier!
The science project you'll be doing has many possible variations. You can concentrate on kite design and compare flight performance as a design variable is changed. There are many types of kites to choose from, (for example: diamond, delta wing, and box) each with its own design elements, so you have a lot of choices. You can also choose which flight performance characteristic(s) you want to measure (for example: maximum height, string tension, lift capacity). Another way to go with this science project is to stick with a single kite design and investigate the effects of "trim" adjustments on flight (as in the Experimental Procedure example below). As you do your background research, think about which aspect of building and flying kites interests you most, and think about questions you might like to investigate.
NASA's Glenn Research Center has a great online kite simulation program (see Bibliography), which you can use as a learning tool for this project. It will help you get familiar with the basics of kite aerodynamics. It can also help you focus your ideas as you develop a hypothesis to test (or narrow down your list if you have a lot of ideas). Finally, you can use it to do a first-pass test on your hypothesis before you do your experiment with real kites. Keep in mind that a simulation is an idealized model of the real world. Any computer simulation contains assumptions, whether explicit or implicit, which may or may not be valid for particular conditions. It will be interesting to compare the results of the simulation and your real-life flight tests.
Terms and Concepts
To do kite science project, you should do research that enables you to understand the following terms and concepts:
- The parts of the kite, especially the bridle and bridle point (where the control line attaches to the bridle)
- The four forces on a kite in flight: lift, weight, tension and drag
- How adjustments to the bridle length and bridle point are expected to affect the kite's angle of flight and other flight characteristics
- How to measure the altitude (height) at which your kite is flying
- How to fly a kite safely
For variations of this project, you should be able to explain in your own words how you expect your experimental variable(s) to affect the flight behavior of your kite(s), in terms of the forces on the kite in flight.
Bibliography
- TPT. (2006). Kites by Danielle and Jasmine. DragonflyTV, Twin Cities Public Television. Retrieved January 20, 2023.
- NASA's Glenn Research Center has excellent online aerodynamics resources. Their pages are extensively hyperlinked, so you can follow your own path through the material. A good place to start is the "Guided Tour" page, where you can scroll down to the section on Kites.
NASA Glenn Research Center. (2006, October 5). Guided Tours of the BGA. Retrieved May 12, 2008. - You can go directly to NASA's kite simulator page with this link:
NASA Glenn Research Center. (2005, October 24). Interactive Kite Modeler Version 1.4a. Retrieved May 12, 2008. - This page describes a graphical method for estimating the altitude of your kite:
NASA Glenn Research Center. (2006, March 20). Graphical Maximum Altitude. Retrieved May 12, 2008. - Make sure you follow the safe kite-flying practices described on NASA's kite safety page:
NASA Glenn Research Center. (2006, March 21). Kite Safety. Retrieved May 12, 2008. - There are many sources of information on building and flying kites. The Drachen Foundation is one good online source:
The Drachen Foundation. (2008). Kite Basics. Retrieved January 20, 2023. - Don't miss their excellent page on kite building, including information on knots used in building and flying kites and a wind chart to help estimate wind speed (Beaufort Scale):
The Drachen Foundation. (2008). Kite Building. Retrieved January 20, 2023.
Materials and Equipment
- Kite (1); any design that uses a bridle string with an adjustable bridle point (for example: diamond, box, sled)
- Computer with Internet access (for using NASA's online Kite Simulator program)
- Measuring tape
- Kite string and reel
- Tool to measure angles (for estimating the altitude of your kite; see this
NASA Grapical Maximum Altitude page).
You can make this tool yourself with:- Stiff cardboard (2 pieces), 1 with angle markings and 1 pointer
- A fastener to attach the pointer
- Protractor
- Marker
- String (about 50 ft. long)
- An observer to help you make the altitude measurements
- Lab notebook
- Graph paper
- Safe, open space to fly your kite
- Breezy day
Experimental Procedure
- First, do your background research on kite aerodynamics.
- Select a design and build your kite. Be sure to choose a kite type that uses a bridle string.
- Use the NASA Kite Simulator program, from the Bibliography, to make a model of your kite and "test fly" it. Complete instructions for using the simulator are on the program's webpage. Important: most modern web browsers will not run Java applets (the type of program used to make the NASA Kite Simulator). You may need to search for a third-party app or browser extension to run the program on your computer, such as the CheerpJ Applet Runner for Chrome.
Here are some screenshots of the Kite Simulator program for reference, and an outline of the procedure you will follow to use it.- Use design mode to make a model of your kite (select from Design Mode, Trim Mode, and Fly Mode by pressing the appropriate button in the simulator). Press the Shape button and then select the desired kite type from the drop-down list.
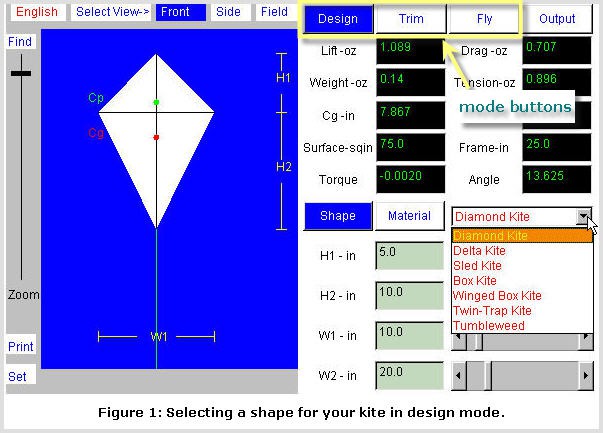
The NASA Kite Simulator program has a large image of a virtual kite on the left side of the screen. The right side of the screen has a panel with 3 tabs that allow all variables of a kite to be changed. The shape of the Kite is selected from a drop-down menu in the design tab on the right of the screen towards the center.
- In design mode, you can also select the type of materials your kite is made of. Press the Material button, and then make your selections from the drop-down lists.
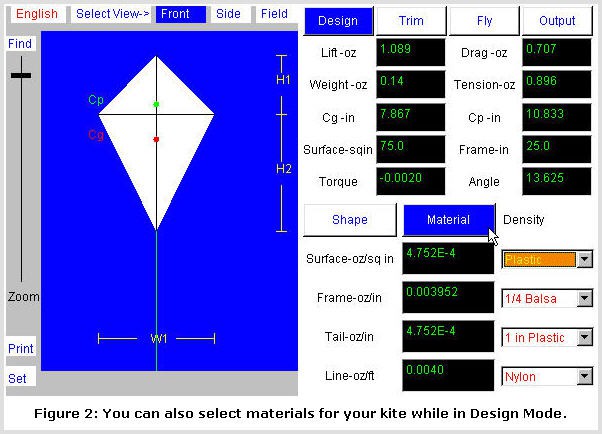
The NASA Kite Simulator program has an option to change the material of different parts of the kite in the material tab under design. Different materials can be chosen for the kite surface, frame, tail and line. These options are found on the bottom right side of the screen.
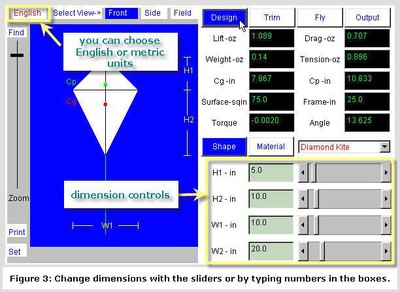
- You can use the dimension controls to change the shape of your kite. To change dimensions, you can type in a number, or use the arrows or sliders to make adjustments. You can choose English or metric units.

The NASA Kite Simulator program has options to change the size of the kite in the shapes tab under design. Sliders can be adjusted to increase or decrease the height of the bottom or top half of the kite. The width of the kite can also be adjusted with sliders. These options are found on the bottom right side of the screen.
- Use trim mode to make adjustments to bridle point. You can use the arrow keys to make adjustments in small steps. B-Bridle: changes the total length of the bridle string. K-Knot: adjusts the bridle point; this is the distance from the tail to the control line knot. T-Tail: is the length of the tail. As you make adjustments, you'll see immediately what effect this has on the angle of the kite.
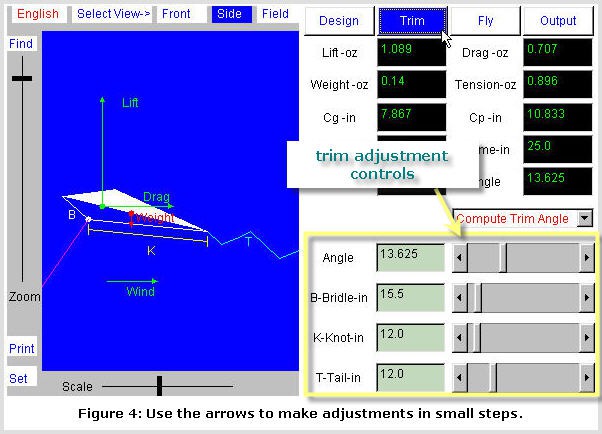
The NASA Kite Simulator program has the ability to simulate a kite in flight in the window on the left side of the program. Under the trim tab adjustments can be made to a kite in flight and have them be reflected in the window. Adjustments are found in the bottom right of program and sliders are used to change the angle, bridle, knot and tail.
- Your trim adjustments may make the kite unstable, but don't worry, it's easy to fix. Make your adjustments in small steps with the arrow keys. If the kite becomes unstable, back off on your adjustments by a step or two. Remember that you can always go back to the starting conditions by pressing the Set button.
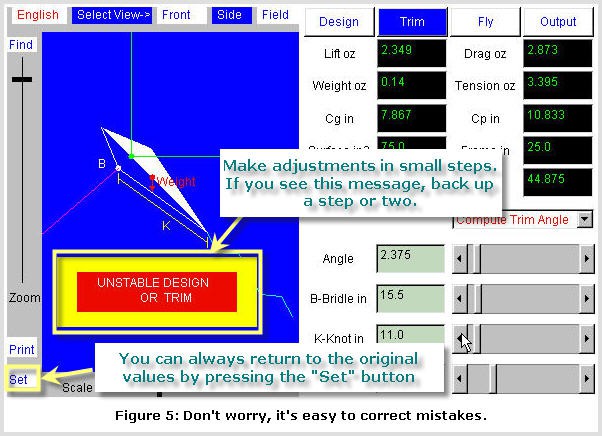
The NASA Kite Simulator program will post an alert over the left window if a simulated kite is unstable. A button labeled "set" at the bottom left of the program can be pressed to reset the kite to original values.
- Switch to fly mode to see how your change to the bridle point (in trim mode) affects the kite's flying height. There are controls at the bottom for entering your flying conditions. To convert wind speed from miles per hour to feet per second, multiply by 1.47 (5280 feet/mile * 1 hour / 3600 seconds). Remember to keep the flight conditions constant throughout your simulation, and throughout your experiment in the field.
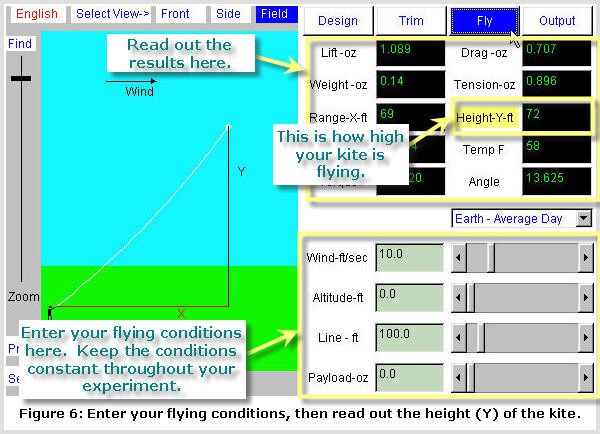
The NASA Kite Simulator program has options to change the variables of a simulated kite in flight under the fly tab. Sliders at the bottom right of the program allow for the wind speed, altitude, line length and payload weight to be changed. Information about a simulated kite in the air are also displayed at the top right of the program.
- Use design mode to make a model of your kite (select from Design Mode, Trim Mode, and Fly Mode by pressing the appropriate button in the simulator). Press the Shape button and then select the desired kite type from the drop-down list.
- Use the results from your simulation experiment to help decide how long to make your bridle string, and where to try placing the bridle point. Then go out and do an actual flight test. It is best to repeat your test two or three times for each condition.
- Here is an example data table (use numbers from your own kite and experiments):
| Trial # | Bridle Length | Bridle Point | Flying Height |
|---|---|---|---|
| 1 | 15.5 | 12.5 | 63 |
| 2 | 15.5 | 12.5 | 62 |
| 3 | 15.5 | 12.5 | 65 |
| 1 | 15.5 | 12.0 | 72 |
| 2 | 15.5 | 12.0 | 70 |
| 3 | 15.5 | 12.0 | 73 |
- This NASA Grapical Maximum Altitude page has a detailed procedure for measuring the flying height of your kite. You can check it out by measuring an object of known height.
Ask an Expert
Global Connections
The United Nations Sustainable Development Goals (UNSDGs) are a blueprint to achieve a better and more sustainable future for all.

Variations
- From your background research, or perhaps from your experience flying kites, you will probably have your own ideas for changing a kite design and predicting what will happen. Once you are familiar with the Kite Simulator program, you will see that it can be a great tool for testing your predictions. If an answer surprises you, go ahead and build the kite and see what happens in the real world.
- Here are some suggestions to get you thinking. We're sure you can come up with many more on your own:
- More surface area more lift, right? But more surface area also means more material, and more material means more weight. Which one wins out? How does it depend on the choice of material?
- Can you devise a diamond kite design with the center of pressure and the center of gravity in the same spot? Is this design more or less stable in flight? Why?
- What is the optimal length for a tail? Does it depend on wind conditions? Why?
Careers
If you like this project, you might enjoy exploring these related careers:


Related Links
- Science Fair Project Guide
- Other Ideas Like This
- Aerodynamics & Hydrodynamics Project Ideas
- My Favorites