Abstract
Alternative energy sources are a big deal these days. One such source is the wind. Find out how a wind turbine can use the power of the wind to generate energy in this science fair engineering project. You'll design various blades to find out which produces the most energy, and put the wind to work for you!
Summary
None
Readily available
Use caution when using the drill. Always wear safety goggles when working with power tools. Adult supervision is recommended.
Kathryn Fosha, Aeronautical/Mechanical Engineer, Northrop Grumman
Elmer's® is a registered trademark of Elmer's Products, Inc.
/-/https/i.ytimg.com/vi/zJyByg2kEnU/maxresdefault.jpg)
Objective
In this engineering science fair project, you will develop and investigate wind turbine rotor designs to evaluate which produces the most energy at a certain wind speed.
Introduction
Nowadays, the need for reliable sources of energy has a lot of people talking about wind power. Wind power is collected using wind turbines—tall pole structures with a machine at the top that looks like a very large fan. Instead of blowing air, however, turbines catch the air. When the wind blows, it makes the blades of the fan, called rotors, spin around, which moves the turbine on the inside and generates electricity. Basically, the wind does work on the turbine when it makes it spin. Work is an application of energy, which makes something move. The energy from the wind's work is taken by the turbine and converted into electricity for use in homes and cities.
What is it about the shape of a rotor on a wind turbine that makes it spin easily in the wind? Is it because of the aerodynamics of the rotor—its shape and curvature? In this science fair project, you will investigate the efficiency of the rotors of a turbine by making a small turbine model and several rotors, varying their shapes and curvatures. You will determine efficiency by measuring energy output using work. The wind turbine model will do work on a small weight by hauling it up from the ground to the top of the turbine. This will represent the energy output of a wind turbine. You will measure the output of each rotor design by how much weight it can haul—the rotor that hauls the most weight is the most efficient design. What are you waiting for? Let's put the wind to work!
Terms and Concepts
You should be familiar with the terms below, as well as the names of the parts of the wind turbine.
- Wind power
- Wind turbine
- Rotor
- Work
- Aerodynamics
- Efficiency
- Energy
- Tower
- Foundation
- Nacelle
Questions
- How does a wind turbine make energy from wind?
- Why does a wind turbine need to have a good aerodynamic design?
- Why is a demonstration of work (hauling a weight) the same thing as generating electricity?
Bibliography
This is a children's science dictionary, which can be used to look up the terms listed in the Introduction:
- Kleinedler, Steven. The American Heritage Children's Science Dictionary. Boston: Houghton Mifflin Company, 2003.
This is a more standard science dictionary, which also can be used to look up the terms listed in the Introduction:
- Kleinedler, Steven, ed. The American Heritage Science Dictionary. 1st ed. Boston: Houghton Mifflin Company, 2005.
This video provides an excellent picture of the aerodynamics of wind turbines, and gives an explanation of wind power:
- Layton, J. (2008). How Wind Power Works. HowStuffWorks, Inc. Retrieved July 30, 2008.
This science fair project is based on the demonstration found on pages 28-29 of this book. How is this science fair project different from the demonstration found in the book?
- Parker, Steve. The Science of Air. Chicago: Heinemann Library, 2005.
Here is a video with a general explanation of what wind turbines are and how they work:
- Alliant Energy. What are turbines? Retrieved June 1, 2026.
Materials and Equipment
- Tall 1-L water bottle
- Short 500-mL water bottle, with its cap
- Scissors
- Marbles (about 50)
- Printer paper (several sheets), cut into 8-cm x 10-cm pieces
- Ruler
- Tape
- Non-bendable straws (about 30-40)
- Permanent marker
- Several large paper clips (about 20)
- String or thread
- Small washers (3), see Figures 5, 6, and 7 in the Procedure tab for examples
- General purpose glue like Elmer's® Glue-All
- Needle-nose pliers
- Small fan, one that you would set on a table is a good size
- Drill with a ¼-inch drill bit
- Lab notebook
Experimental Procedure
Building the Wind Turbine Assembly
- Make sure that both water bottles are dry. Familiarize yourself with the names of each part of the turbine because those terms will be used in this procedure.
- The 1-L water bottle will be the wind turbine's tower and foundation. Cut off the neck of the bottle. Then cut a sort of holder out of the top so that it can hold the smaller water bottle when it is laid horizontally by cutting off two "sides" and leaving two "sides." See Figure 1, below, for an example of how to cut the bottle—leaving two side panels is not the only way to hold the other bottle. Can you come up with another way?
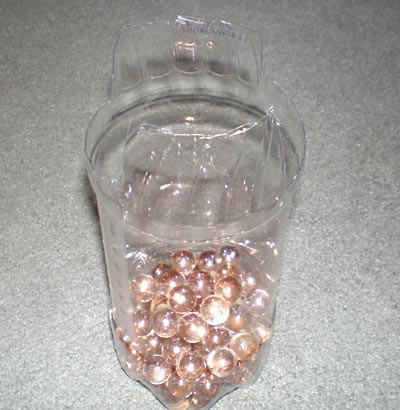
Figure 1. This is the water bottle tower, cut to hold the smaller water bottle, the nacelle, horizontally. The marbles are used as weight to hold the bottle in place. - Now that you've cut the top off of the 1-L bottle, fill it with your marbles. This makes the tower very heavy on the bottom so that the fan doesn't blow it over later when you test the rotors. Also, this way the bottle is both the tower and the foundation because it holds the rest of the turbine up, and it stays firmly on the ground.
- Now for the nacelle, which will be made from the short water bottle. First, set the cap aside. Then you need to drill two holes in this bottle, so have an adult help you. You need one hole in the middle of the cap and one hole in the middle of the bottom, and both need to be big enough so that a straw can fit through them and be able to move around easily. Use a ¼-inch drill bit. Later, you'll be fitting straws through both holes, and they will need to be able to spin easily in the holes.
- After drilling the holes, set the nacelle in the tower—see Figure 2. Note: The cap is off in the picture, but you will need the cap later.
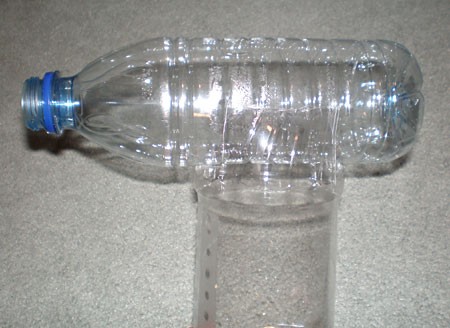
Figure 2. The nacelle is mounted horizontally on the tower.
/-/https/www.sciencebuddies.org/cdn/Files/3565/8/Aero_img072.jpg)
/-/https/www.sciencebuddies.org/cdn/Files/3566/8/Aero_img073.jpg)
Building the Rotor Assembly
In this experiment, you will test different types of rotors on the turbine. You will have two rotors for each design instead of three, like on a real turbine, since the latter is far more difficult to make. You will, of course, want to create some basic designs, such as flat rotors, both rotors curved in the same direction, each rotor curved in opposite directions, etc. Try to come up with some other ideas as well, such as rotors cut into a rounded, serrated, or triangular style. See Figure 3 for examples of different rotors designs.
/-/https/www.sciencebuddies.org/cdn/Files/3567/8/Aero_img074.jpg)
Figure 3. Three different rotor designs.
- Your rotors should all be made from identically sized pieces of paper. This way, you will be able to control the differences between each rotor design and know which differences make the rotor spin the most. A recommended size is 8 cm x 10 cm. For each design, you will need two of those sized pieces of paper. Cut out as many pairs of paper as you have designs to test; for example, if you have eight designs, cut out eight pairs of paper (16 squares total).
- You need to make the rotors look like wings. To make one, gently bend the paper so that you can tape the two 10-cm edges together without creasing the paper. You will have a small wing that looks like a teardrop from the side. Do this for all of your cut pieces of paper, and make sure to organize the rotors in pairs.
- If you have rotor designs that are supposed to be cut (such as the top design in Figure 3), cut them before taping the ends together, then tape them when you have the right shape. If you taped them before you cut them, then you'd be cutting off the taped edges.
- Now you will build the axle, which will be made of straws and will spin when the wind is caught in the rotor wings. You will need a doubly long straw, so you'll put the ends of two straws together. This is done by pinching the end of one of the straws and then pushing the pinched end into an end of the other straw. When you do this, the first straw will open back up inside the second straw and be stuck inside. Make sure that the double-straw is long enough to go all the way through the nacelle, and that it won't easily come apart.
- Measure 10 cm in from each end of the double-straw and make a mark there with your permanent marker. You should only have two marks. These marks show where the rotor wings will go on the double-straw.
- Carefully put a line of glue on one end of the double-straw, between the end and one of the 10-cm marks you made. This glue will keep the rotor wing on the straw. Carefully run this straw end through one of the rotor wings and make sure that it touches the glue. Hold the rotor wing on the straw and let it dry for a few minutes.
- When the first rotor wing is dry, repeat step 5 for the other end of the double-straw. Make sure that the second rotor wing's taped endpoints are facing the same direction as the taped end of the first rotor wing. See Figure 3—even though the rotor wings are folded, they are all still pointing in the same direction.
- Now you will attach another straw to the rotor assembly. This is the straw that is pointing down on all of the rotors in Figure 3, and it will serve as part of the axle, which hauls the weight up when the wind is blowing. This straw is attached using tape and a paper clip.
- Carefully using the needle-nose pliers (with adult help), unbend one of the paper clips and then re-bend it into a "T" shape. See Figure 4, below. Make sure that the bottom of the "T" is thin enough to fit into a straw.
- Now, tape this "T" paper clip to the middle of the double-straw with the rotor wings on it. Make sure that the arms of the "T" are taped to the double-straw, and that the bottom of the "T" points down, in the exact same direction as the taped ends of the rotor wings.
- Now fit a straw onto the bottom of the "T" paper clip and then tape the straw to the double-straw. Make sure that all of the taped parts of this rotor assembly are strong—don't put too much tape, but be sure to use enough that the parts are secure. Your rotor assembly should now look like the ones in Figure 3.

Figure 4. The bottom of the T-shape will be inserted into the double-straw axle, and the top of the T-shape will be taped to the rotor. - Repeat steps 1-8 for each pair of rotors you have. It might seem like a lot of work at first, but it goes smoothly and quickly after you have done it a few times.
- Finally, the rotor assemblies need to be bent for testing. Right now they shouldn't look very different (except for those you have cut into different shapes). To make the rotor function properly, you need to bend the rotor wings in opposite directions. This is done by wrapping one rotor wing clockwise and the other rotor wing counterclockwise around the straw. Be careful here—make sure that you are looking straight down the straw when deciding which way is clockwise or counterclockwise. You have to imagine a clock face on each end of the straw in order to bend the rotor wings in the proper directions. As you wrap each rotor wing around the straw, hold it there for a minute, then release it. It will unfold, but it will be bent into a curve. Be careful when bending! Do not wrap the rotor wings around their straws so hard that you tear them off of their glue!
- Make sure that you have a different design for each rotor assembly—in other words, make sure that no two rotor assemblies are exactly the same. For example, in Figure 3, all three wings are bent in the same way but the designs are different—one has normally sized rotor wings, one has larger rotor wings, and one has cut rotor wings. If you wish to have larger rotor wings, see the Variations section below these instructions.
/-/https/www.sciencebuddies.org/cdn/Files/3568/8/Aero_img075.jpg)
Building the Axle and Completing the Nacelle
In order to demonstrate the efficiency of your rotor designs, the turbine needs an axle, which will spin with the rotor assembly and haul a weight up the tower. You already have half of the axle built—the bottom of the "T" of each rotor assembly. Each assembly will be inserted into the nacelle through the hole in the bottle cap, and will connect to another straw, which is inserted into the nacelle through the hole in the other side.
- To make the other half of the axle, bend the outer loop of the paper clip so that it looks like the paper clip in Figure 5. Make a small cut close to the end of the straw so that you can insert the paper clip—the cut must be a small slit, no larger. Insert the extended end of the paper clip and then tape it to the straw so that it is well-attached and won't move easily. You need to have the extra stability that the slit provides because you will be hanging weights from it, and tape by itself is not strong enough to keep the clip attached to the axle.

Figure 5. The hauling assembly of the wind turbine. - Next, cut a length of string about equal to the height of the tower and tie it to the paper clip using a double knot, as shown in Figure 5. Take the washer and double-knot it to the other end of the string. You've finished the back half of the axle—this will be used in every test, while the rotor assemblies will be changed to test each design.
- You will now connect the axle, which completes building the wind turbine.
- Take the straw to which you just taped the paper clip, and pinch the other end of it, like you did in step 4 of Building the Rotor Assembly. Hold it closed for a minute or so to make it bend this way and not open too quickly.
- Next, insert this end into the hole in the bottom of the small water bottle (nacelle). At the same time, insert the "T" end of one of your rotor assemblies into the bottle cap hole at the front of the nacelle. Now, carefully insert the straw at the bottom of the nacelle into the rotor straw, just like with the straws from step 4 of Building the Rotor Assembly. This step might be tricky because you're trying to connect them inside the nacelle. Keep trying until you get it right. If you need to, take the straw from the bottom of the water bottle out and flatten its end some more to make it fit into the rotor straw.
- Note: You will be disconnecting the rotor assembly and reconnecting with your other rotor assemblies as you test each design, so make sure you know how to connect the two straws inside the nacelle!
- You have now built the entire wind turbine. It should look like the example in Figure 6, below. There are a few things to double-check:
- Make sure that you can easily spin the axle (the two straws connected inside the nacelle). Do this by twirling the rotor gently with your finger. If the axle does not turn well, then you may need to take the straws out and have an adult widen the drilled holes in both ends of the nacelle.
- Also, make sure that the washer hangs from the nacelle and does not rest on the ground. If it does, you can place the entire turbine on top of a book in order to make it taller.
- Make sure that the washer isn't so heavy that it pulls too much on the paper clip, or pulls the axle apart within the nacelle.
/-/https/www.sciencebuddies.org/cdn/Files/3569/8/Aero_img076.jpg)
/-/https/www.sciencebuddies.org/cdn/Files/3570/8/Aero_img077.jpg)
Figure 6. The fully assembled wind turbine model.
Testing the Rotor Designs
- Clear a space on a table or counter. Make sure that there is nothing around that can be blown away by the small fan. Set up the fan so that it is directly facing the wind turbine. Pretend it is the wind, and make sure that the wind blows directly into the rotor. If the turbine is not tall enough, set it on top of a few short books until the fan can blow straight into it.
- When you have the fan and the turbine set up, turn the fan on to its lowest speed. If the rotor assembly begins turning, it works! If not, you might need more wind speed. Try each of the speeds on the fan until you find one that works. If the turbine still does not work, try to reposition the fan to make sure it's blowing directly on the rotor. Also, check all the parts on the turbine—does the axle spin easily in the nacelle? Is the washer too heavy?
- When you've figured out the best speed for the fan and you've got it set at the appropriate height to blow directly into the rotor, write down all the setting details in your lab notebook and use the same settings for each trial.
- Your goal for each test is to determine how much weight each rotor design can haul all the way up the tower. For each design, start out with only one washer. See Figure 7 to see a hauled washer—the string should wrap around the paper clip and bring the washer up to the axle. Next, tie the second washer onto the string and see if the rotor can haul that. If so, tie the third washer, and so on, if you need more washers.
- When your turbine cannot haul any more washers, you should continue your trials with paper clips instead. Take off only the last washer you added (which made it too heavy) and keep the other washers tied to the string. Then, add paper clips, five at a time, to the string, and test again. Keep adding paper clips until the turbine cannot haul any more weight. Record the maximum number of washers and paper clips your turbine can haul.
- Repeat steps 4-5 two more times—make sure you keep adding weight until you max out the turbine! For each rotor design, you will need three trials of the maximum amount to prove that it is really the maximum at the given wind speed. Test this each time by adding more paper clips and making sure that it cannot haul them. When you are convinced that the rotor design has performed the same way for the three maximum-weight tests, record the average maximum weight in your lab notebook.
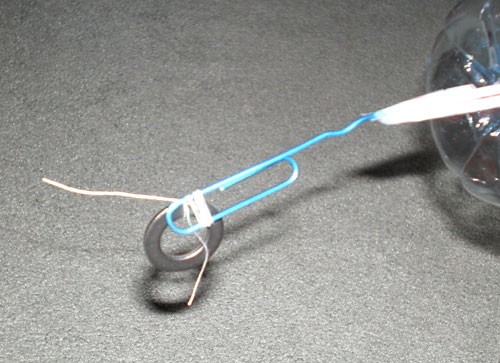
Figure 7. When the rotor spins, it turns the paper clip and winds up the string, which hauls the washer to the top of the tower. - You will now test a new rotor design. Take the rotor assembly out of the nacelle and insert a new one, carefully making sure that you insert the axle-straw into the rotor-straw. Repeat steps 4-6 to find the maximum amount of washers and paper clips this second rotor design can haul, and then test the maximum amount two more times to make sure, finally, calculating the average. Repeat these tests with all of your rotor designs.
- Which design hauled the greatest amount of paper clips and washers? If you have a tie, test each by adding paper clips one at a time instead of five at a time. Which design is the best design for a real wind turbine? Why do you think it is the best?
/-/https/www.sciencebuddies.org/cdn/Files/3571/8/Aero_img078.jpg)
Ask an Expert
Global Goals
The United Nations Sustainable Development Goals (UNSDGs) are a blueprint to achieve a better and more sustainable future for all.
/-/https/www.sciencebuddies.org/cdn/Files/19750/5/E-WEB-Goal-07.png)
Variations
- Try using different sizes of rotor wings in your designs. Instead of 8 cm x 10 cm, try 10 cm x 10 cm, or 12 cm x 8 cm, etc. Get creative! You can make an entire second set of the same designs you used with the 8 x 10 rotor wings, and make the second set exactly the same, but with a larger size. Do you produce the same conclusion with the larger rotor wings? Or is there a new design that hauls the most weight?
- Try making a rotor assembly with three or four rotor wings instead of just two. You can have a small piece of clay at the center to keep them all together. Make sure that the clay is not too heavy, and stick straws into it to make holes for the rotor wing straws and the axle-straw. Then take the straws out and bake the clay (with an adult's help). When the clay is cool and hard, glue the straws into the holes you made before, and then test this new design. Does the turbine haul more weight if it has more than two rotor wings? Does it haul less weight? Why do you think so?
Careers
If you like this project, you might enjoy exploring these related careers:
/-/https/careerdiscovery.sciencebuddies.org/cdn/Files/1888/17/unsplash-IU10leGdwxg.jpg)
/-/https/careerdiscovery.sciencebuddies.org/cdn/Files/1894/17/iStock-870031246.jpg)
/-/https/careerdiscovery.sciencebuddies.org/cdn/Files/1450/21/iStock-1227179796.jpg)
/-/https/careerdiscovery.sciencebuddies.org/cdn/Files/1457/17/pexels-photo-3861938.jpg)

/-/https/img.youtube.com/vi/k8I2YvKS0AM/0.jpg)
/-/https/img.youtube.com/vi/wG3OVpaHGkc/0.jpg)
/-/https/img.youtube.com/vi/RF-aET54CGk/0.jpg)