Abstract
Big, puffy, cotton-like clouds, and the bubbles in a pot of boiling water may not seem like they have much in common, but they do—both are formed by a heat-transfer process called convection. Warmed gases and liquids rise, while cooler ones fall, creating currents and mixing things up. Whether making processed foods in a factory or making plastic or metal parts, knowing how to mix up a big tank of hot and cold liquids or gases quickly is important. Engineers must rely on experimentation to get the best mixing method, as will you when you build a mini mixing tank in this engineering science fair project.Summary
Kristin Strong, Science Buddies
- Popsicle® is a registered trademark of Good Humor-Breyers Ice Cream, which is a subsidiary of Unilever Supply Chain, Inc.

Objective
To determine the mixing method in a rectangular tank that achieves a final temperature the most rapidly.
Introduction
Energy is the ability to cause change or do work. Every living thing in the world has energy, and almost all energy on Earth comes from the Sun. Some forms of energy, like light, come directly from the Sun, while other forms of energy, like the foods we eat, come indirectly from the Sun. Food contains the energy that living things use to power their bodies.
Energy can move around or be transferred from one thing to another as thermal energy. The thermal energy of something is the total energy of all its moving atoms, or particles that make it up. A cup of hot chocolate, for example, has more thermal energy than the same-sized cup of cold chocolate milk. The movement of thermal energy from one place to another is called heat. Heat always moves from a hotter object to a colder one because of the second law of thermodynamics. If, for example, you pour some hot chocolate into a room-temperature cup, and then touch the outside of the cup, you will notice that the cup itself feels warm. There has been a heat transfer from the hot chocolate to the cup.
Heat transfer can occur in three different ways: conduction, convection, or radiation. Which method of heat transfer occurs depends upon the physical state of the matter and which type of heat transfer is most efficient for that state. For example, in solids, heat transfer occurs by conduction, the direct transfer of energy from one particle to another. In liquids and gases, convection—the movement of warmer matter—is often the most efficient way to transfer heat. During convection, warmer liquid or gas rises above cooler liquid or gas, and heat is transferred to the cooler liquid or gas during the movement. As the warmer matter rises, cooler matter rushes in to take its place. This sets up a circulation pattern. You've seen this if you've ever watched a boiling pot of water. The bubbles that rise are the hottest part of the water, and as they come up, the cooler water near the top of the pan falls to the bottom to takes its place. This is because the hotter liquid is less dense than the cooler liquid, so the cooler liquid sinks.
Natural convection is when heat transfer is allowed to occur naturally over time, driven only by temperature differences in a liquid or gas that cause density variations. These variations make warmer parts rise and cooler parts fall, creating currents and circulation. If, for example, you fill a bathtub with cold water, and then add a gallon of hot water on one end of the tub, the temperature of the bath water will be hot where you poured the water in, and cold at the other end of the tub. Over time though, due to natural convection, the temperature of the entire tub of water will even out to the same (warmer) temperature, so that one end of the tub will have the same temperature as the other end, and as the middle.
Forced convection is when a liquid or a gas is mixed by an outside force. When adults make a bath for a child, they often stir the water as the tub is filling up to avoid hot spots. Or, when you heat a cup of soup in a microwave, you often must give the soup a quick stir partway through the warming, so that it doesn't have cold and hot spots when you sit down to eat it. This stirring of the liquid by an outside force, like a hand or a spoon, forces the heat transfer to occur more rapidly than it would if it were allowed to progress naturally.
Can convection be described with math equations? Yes, but convection is a complex process and it is difficult to put those equations on a computer and simulate how the temperature of a liquid or gas will change over time as convection occurs. For instance, if a factory is making hundreds of cookies with a liquid batter in a large tank, it is difficult to predict the best way to mix up that tank so that all the liquid in the tank reaches the same temperature as quickly as possible when a hot or cold ingredient is added. So instead of using computer simulations, engineers must often conduct experiments under different conditions to get empirical data (data obtained by direct observation), so that they can figure out the best way to mix up the tank. That's exactly what you'll do, too, in this engineering science fair project—you'll create a mini tank of your own and see how the temperature of cold water inside the tank changes when hot water is added under different mixing conditions.
Terms and Concepts
- Energy
- Work
- Thermal energy
- Atom
- Heat
- Second law of thermodynamics
- Heat transfer
- Conduction
- Convection
- Radiation
- Physical state
- Matter
- Solid
- Liquid
- Gas
- Circulation
- Density
- Natural convection
- Forced convection
- Simulate
- Predict
- Empirical
- Overshoot
- Viscous
Questions
- From where does most of the energy on Earth ultimately come?
- What method of heat transfer does not use direct contact?
- What is the difference between natural and forced convection?
- How do process engineers often figure out the best way to mix up tanks of liquids or gases?
Bibliography
This source discusses heat transfer:
- Wikipedia Contributors. (2009, January 16). Heat transfer. Wikipedia: The Free Encyclopedia. Retrieved January 16, 2009.
- Machine Design (2015, Oct. 30). What's the Difference Between Conduction, Convection, and Radiation?. Retrieved October 18, 2023.
Materials and Equipment
- Loaf pan, 1.5-quart (qt.)
- Liquid measuring, 1-qt.
- Dry measuring cup, 1-cup
- Popsicle® stick
- Cold tap water
- Boiling water
- Potholder
- Stopwatch
- Kitchen thermometer, available from grocery stores and online suppliers, such as Carolina Biological Supply Company. An instant-read type will work, but a digital thermometer is easier to use.
- Lab notebook
- Helpers (2, in addition to you)
- Graph paper
Disclaimer: Science Buddies participates in affiliate programs with Home Science Tools, Amazon.com, Carolina Biological, and Jameco Electronics. Proceeds from the affiliate programs help support Science Buddies, a 501(c)(3) public charity, and keep our resources free for everyone. Our top priority is student learning. If you have any comments (positive or negative) related to purchases you've made for science projects from recommendations on our site, please let us know. Write to us at scibuddy@sciencebuddies.org.
Experimental Procedure
Note: Before beginning this experiment, decide which of the following duties each person will have.
- One person needs to hold the thermometer and call out temperatures.
- One person needs to move the Popsicle stick.
- One person needs to pour the boiling water, run and read the stopwatch, and write down temperatures. Help from an adult to pour the boiling water is recommended.
Making Your Data Tables
This experiment requires that you rapidly record temperature measurements, so it is helpful if you create your data tables before beginning your experiment. Create three data tables for each of the four mixing methods:
- No mixing (natural convection),
- End-width mixing (forced convection),
- Middle-width mixing (forced convection),
- Middle-length mixing (forced convection).
The first column of each data table should be time in seconds, and the second column of each data table should be temperature in degrees Fahrenheit. Make the start time equal to 0 seconds (sec), the time interval 15 sec, and the end time 120 sec (2 min).
Example Data Table: No mixing method (natural convection)
| Time (sec) | Temperature (°F) |
| 0 | |
| 15 | |
| 30 | |
| 45 | |
| 60 | |
| 75 | |
| 90 | |
| 105 | |
| 120 |
Preparing the Mixing Tank
- Fill the liquid measuring cup with 4 cups of the coldest tap water available.
- Pour the water into the loaf pan.
- Insert the thermometer vertically into the water so that the tip is resting on the bottom of the pan, in the middle of one of the ends (not in a corner).
Testing the Different Methods
-
Have your helpers get into position and make sure they are ready to test:
- One person should be on one end of the loaf pan, holding the thermometer in position and ready to call out temperatures.
- The second person should have a Popsicle stick in hand, ready to mix, if the method calls for it.
- The third person should reset the stopwatch and have a data table, a pen, and a 1-cup liquid measuring cup ready to go.
- Have the first person call out the initial (starting temperature), and have the third person record this temperature in the correct data table.
- Boil 1 cup of tap water in a liquid measuring cup in the microwave.
-
Have the third person bring the measuring cup as close to the loaf pan as possible and carefully and all at once pour the boiling water into the end of the loaf pan opposite the end with the thermometer. The third person should then immediately start the stopwatch, and the second person should do the following immediately (also shown in Figure 1):
- No mixing method: The second person should do nothing.
- End-width mixing method: The second person should insert the Popsicle stick into the water at the end of the loaf pan opposite the thermometer and move it gently, but steadily, back and forth across the width of the loaf pan. The flat edge of the Popsicle stick should be parallel to the length of the loaf pan.
- Middle-width mixing method: The second person should insert the Popsicle stick into the water in the middle of the loaf pan and move it gently, but steadily, back and forth across the width of the loaf pan. The flat edge of the Popsicle stick should be parallel to the length of the loaf pan.
- Middle-length mixing method: The second person should insert the Popsicle stick into the water in the middle of the loaf pan and move it gently, but steadily, back and forth across approximately half the length of the loaf pan. The flat edge of the Popsicle stick should be parallel to the end of the loaf pan.
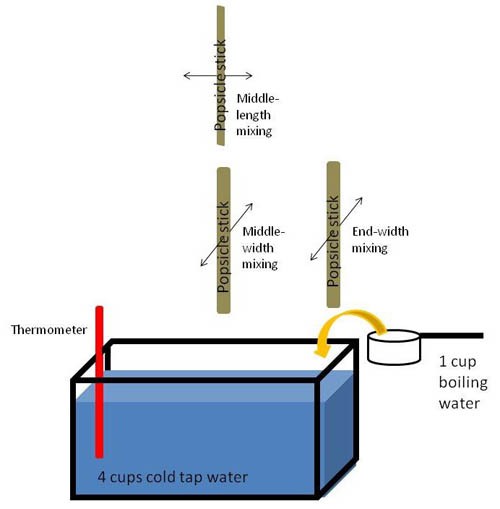 Image Credit: Kristin Strong, Science Buddies / Science Buddies
A thermometer rests at the end of a tank filled with cold water and away from a corner. As 1 cup of boiling water is poured in the opposide end 3 popsicle sticks are used to gently stir the water. One stick is used to mix the water at the end of the tank where the hot water was poured in and only can move across the width of the end of the tank. Another stick can mix the water across the width of the middle of the tank. Both sticks mixing across the width must be held with the flat edge of the stick parallel to the length of the tank. The final stick is held with a flat edge parallel to the end of the tank and can stir water across the length of the tank from the middle to the end where the boiling water was poured.
Figure 1. This drawing shows the setup of the experiment and the three forced convection mixing methods.
- Every 15 seconds, as the second person conducts the mixing task, the third person should say, "Now," and the first person should read the thermometer and call out the current temperature, while the third person records the value. This should continue until 120 seconds have passed.
- Remove the thermometer and dump out the water from the loaf pan.
- Repeat "Preparing the Mixing Tank" and steps 1–6 of this section until all mixing methods have been tested three times each. Record all data in your data tables in your lab notebook.
Analyzing the Data Tables
- Plot the time on the x-axis (in seconds) and the temperature on the y-axis (in °F) for all data tables. Which convection method was the slowest at reaching the final temperature? Which convection method was the fastest? Did all forced convection trials do better than the natural convection trials? Did the natural convection trials overshoot the final temperature? Did any of the forced convection trials display overshoot? Which method would you recommend for mixing your mini tank?
Ask an Expert
Global Connections
The United Nations Sustainable Development Goals (UNSDGs) are a blueprint to achieve a better and more sustainable future for all.

Variations
- Add a food dye, or boiled beet or blueberry juice, to the boiling water before adding it to the loaf pan. Include observations of the dye's behavior to help you explain the temperature changes during the trials.
- Select one forced convection method to investigate. How does the time to reach the final temperature change when different volumes of hot mixing liquid are added to the same volume of cold tank liquid. Plot the time to reach the final temperature on the y-axis and the ratio of the cold to hot water on the x-axis.
- Try this science fair project with one or more viscous liquids, such as tomato soup, rather than water. How does viscosity impact unforced and forced convection?
- Investigate different shapes of mixing tanks.
- Investigate different types of mixing tools, such as propellers.
Careers
If you like this project, you might enjoy exploring these related careers: