Abstract
Do you enjoy going stargazing? In a good location on a clear night, you can see a huge number of stars twinkling in the night's sky. Have you ever wondered how far those stars are from us? Ancient astronomers actually discovered a way figure this out, measuring the distance from Earth to faraway stars. How did they do it without modern technologies? In this astronomy science project you will find out by exploring the link between the distance of an object and perspective (also known as parallax), which can be used to measure how far away distant stars are.Summary

Objective
To discover the relationship between the distance of an object and the viewing perspective, also known as parallax.Introduction
How do astronomers know the distances of planets, stars, and galaxies? They use a visual phenomenon called parallax to measure stellar distances. Parallax is the way an object appears to move, looking like it changed its position, when it is seen from two different locations, or perspectives. To see parallax for yourself, hold out your arm and stick up your thumb. Closing one eye, line up your thumb with an object across the room. Now quickly switch your eyes (while keeping your thumb in the same position) and you will notice that the object you were looking at is no longer lined up with your thumb — the two objects appear to have moved away from each other. (Note that the movement of the objects is only an apparent movement — they look like they moved, but they actually stayed right where they were.) This optical illusion is because of parallax. The difference in distance between your two eyes makes your thumb (a relatively nearby object) line up differently with the object that is across the room (a relatively distant object).
In astronomy, parallax is used along with the Earth's orbit around the sun to measure stellar distances. See Figure 1, below, for an idea of how this works. Basically, when a person looks at the same stars when the Earth is at different places in its orbit around the sun, the closer stars will appear to move position relative to the more distant stars. This apparent movement, or parallax, can be used to figure out distances between Earth and specific, nearby stars.
To measure the distance to a nearby star, astronomers locate two stars beyond the star they are trying to measure. The position of the nearby star is measured in relation to the two distant stars and the position of the Earth is also recorded. In six months when the Earth has orbited to the other side of the sun, the nearby star is measured again in relation to the two distant stars. The difference in the distance between the nearby star and the two distant stars can be used to calculate the distance between Earth and the near star.
Figure 1. When an astronomer looks at these stars from different places in Earth's orbit around the sun (labeled "1" and "2"), the "Near Star" will appear to move position relative to the "Distant Stars" (labeled "A" and "B"). This apparent movement, or parallax, can be used to find out the distance (the line labeled "D") between Earth and the near star. (Diagram adapted from Carroll, 2003.)
In the example you did using your thumb and an object across the room, the star whose distance you are measuring would be represented by your thumb, the two different positions of the Earth would be like your eyes, and the distant stars would be like the object across the room.
In this science project, you will investigate how the distance of a nearby object is related to how far it appears to move when you view it from two perspectives. To set up your two perspectives, you will use two hula hoops placed next to each other. You will use a meterstick to measure the visual shift of a near object (a small table) with respect to a distant object (a tree or tall post).
Terms and Concepts
- Stars
- Galaxy
- Parallax
- Perspectives
- Optical illusions
- Astronomy
- Earth's orbit
Questions
- What is parallax? How can astronomers use it to measure stellar distances?
- How can changing perspective change the apparent position of an object?
- Will objects move more as they become closer or more distant?
Bibliography
Here are some helpful websites on astronomy and parallax:
- Wikipedia Contributors. (2014, July 19). Parallax. Wikipedia, The Free Encyclopedia. Retrieved July 22, 2014.
- National Aeronautics and Space Administration (NASA). (n.d.). Parallax. StarChild. Retrieved July 22, 2014.
- National Aeronautics and Space Administration (NASA). (2014, July 17). NASA Education: For Students. Retrieved July 22, 2014.
For help creating graphs, try this website:
- National Center for Education Statistics, (n.d.). Create a Graph. Retrieved June 25, 2020.
Materials and Equipment
- A wide open space, like your backyard or a park
- Hula hoops (2). Alternatively, you could use two flat rocks or bricks that you can sit on.
- A meterstick. Use one that is clearly marked so that you can read it from a distance.
- Small table or barstool. This will need to be able to be taken outside.
- A thick rubber band
- A large rock. It should be at least the size of a baseball, but not so large that the rubber band cannot fit around it.
- Metric measuring tape
- Lab notebook
Experimental Procedure
- In your lab notebook, make a data table like the one in Table 1, below. You will be writing down your results in this data table.
| Distance to the Near Object (m) | Meterstick Measurement from the Left (cm) | Meterstick Measurement from the Right (cm) | Distance the Distant Object Appeared to Move (cm) |
|---|---|---|---|
| 2 | |||
| 4 | |||
| 6 | |||
| etc. |
- Take your hula hoops (or flat rocks), small table or barstool, rubber band, large rock, and measuring tape outside to a wide open space, like a park or your backyard.
- Find a distant object to use as a visual guide to represent a distant star. The object should be tall and narrow, if possible, to make a clear measurement. Good examples are: trees, light poles, posts, or a parent who is willing to stand up for a while.
- Giving as much distance between you and the distant object as possible, face the object and place the 2 hula hoops on the ground, one on your right and one on your left, so that the hula hoops are nearly touching, as shown in Figure 2, below. The center of each hula hoop will be an observation point.
- If you are using flat rocks or bricks instead of hula hoops, place the rocks so that they are about 1 meter (m) apart (to your left and right as you face the distant object).
 Image Credit: Teisha Rowland, Science Buddies / Science Buddies
Figure 2. While facing the distant object, place the two hula hoops on the ground, so they are almost touching, with one on your right and one on your left.
- Walking from the hula hoops towards the distant object, place the small table or barstool about 2 m from the closer edge of the hula hoops (measuring from the space between the two hula hoops). Use your measuring tape to measure the distance.
- If the distance is not exactly 2 m, change the distance written in the "Distance to the Near Object (m)" column in your data table to be what the actual distance is.
- On top of the table, place the rock. Loop the rubber band around the rock and meterstick to hold the meterstick against the rock so that the meterstick is horizontal (running to your left and right) and its markings are facing you (towards the hula hoops). Center the meterstick along the rubber band. See Figure 3, below, for an idea of how this should look. The table (with the rock, meterstick, and rubber band) will be your near object.
- Your setup with the hula hoops and table should now look similar to the one in Figure 4, below.
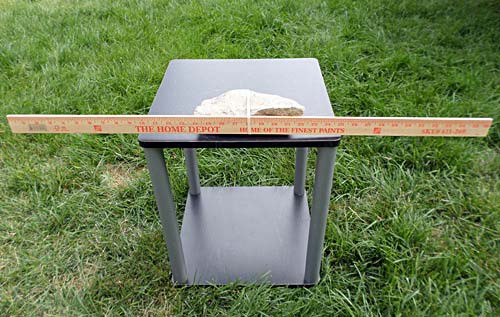 Image Credit: Teisha Rowland, Science Buddies / Science Buddies
Figure 3. Place the rock on the table and rubber band the meterstick to the rock so that the measurement markings are facing you (and the hula hoops).
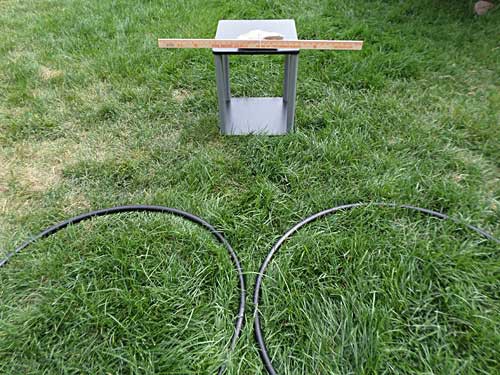 Image Credit: Teisha Rowland, Science Buddies / Science Buddies
Figure 4. Your setup with the table and hula hoops should look similar to this one. (Note that the distant object is not visible in this picture.)
- Make sure that the center of all three parts of your experiment line up well. This means that the spot between your two observation points (the space between the two hula hoops), the middle of the near object (i.e., the rock or rubber band), and the distant object (i.e., the tree's trunk, light pole, or post, etc.) should all roughly line up along an imaginary line, as shown in Figure 5, below.
- If needed, you can shift the table to the left or right to make sure it lines up with the spot between your two observation points and the distant object.
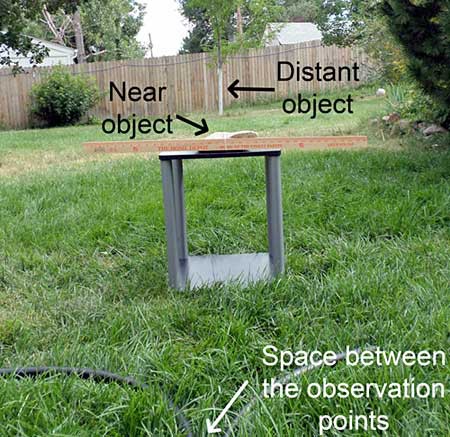 Image Credit: Teisha Rowland, Science Buddies / Science Buddies
Figure 5. Line up the distant object (which is a tree with a white trunk in this picture) with the near object (the rock on the table) and the spot between your two observation points.
- Sit in the center of the left hula hoop (or on the flat rock on the left) and look towards the distant object. Which centimeter number on the meterstick does the distant object appear to line up with? Write this down in your data table in the column labeled "Meterstick Measurement from the Left (cm)."
- Tip: If the distant object lines up with an area that is left of the end of the meterstick, try repeating step 7 to make sure everything is properly lined up.
- If the distant object is still too far to the left, try moving the hula hoops (or flat rocks) closer together and/or moving the table a little closer to the distant object. (If you move the table, be sure to record the new distance in your data table in your lab notebook.)
- Tip: If the distant object lines up with an area that is left of the end of the meterstick, try repeating step 7 to make sure everything is properly lined up.
- Sit in the center of the right hula hoop (or on the flat rock on the right) and look towards the distant object. Which centimeter number on the meterstick does the distant object appear to line up with? Write this down in your data table in the column labeled "Meterstick Measurement from the Right (cm)."
- Tip: If the distant object lines up with an area that is right of the end of the meterstick, try following the tip given in step 8.a. If you change the position of anything, be sure to repeat step 8 to make new measurements.
- Now move the table (with the rock and meterstick still on it) forward another 2 m so that it is 2 m closer to the distant object. Make sure the meterstick markings are still facing the hula hoops. Use your measuring tape to measure the distance between the table and the closer edge of the hula hoops (it should be 4 m).
- If the distance is not exactly 4 m, change the distance written in the "Distance to the Near Object (m)" column in your data table to be what the actual distance is.
- Repeat steps 7-10 several more times, collecting data and writing it in your data table each time. Note that, overall, you will be taking measurements from the hula hoops (which will remain in place) while you continue to move the table closer and closer to the distant object (2 m at a time).
- When you repeat the steps, skip steps 8.a. and 9.a. It is important to keep the hula hoops in the same position after taking your first measurements from them.
- Each time you sit in a hula hoop be sure to sit in the same spot (in the center) as you did before. If you move much to the left or the right of the center it can affect your results.
- Now you can go back inside and analyze your data. First figure out how much the distant object appeared to move along the meterstick when your perspective changed from one hula hoop to the other. Write the distance in the "Distance the Distant Object Appeared to Move (cm)" column of your data table for each row.
- To calculate this, subtract the measurement taken in one hula hoop from the other for each distance to the near object (i.e., for each row).
- Make a line graph of your data. You can make a graph by hand or use a program like
Create a Graph
to make a graph on a computer and print it out.
- On the x-axis (the horizontal axis) of the graph, put the distance to the near object (in m). On the y-axis (the vertical axis), put the distance the distant object appeared to move (in cm).
- Are there any patterns that you see in your data on the graph?
- Is there a relationship between how far the near object is from the observation points and the apparent movement of the distant object (when measured from different perspectives)?
- What do you think this tells you about how astronomers use parallax to measure how far away a relatively nearby star is? Tip: You may want to re-read the Introduction in the Background section to help you answer this question.
Ask an Expert
Variations
- Parallax is similar to the process our brains use when measuring depth perception. Intuitively, you know which objects are near and which objects are far. Try an experiment comparing binocular vision and monocular vision and the effect on depth perception.
- Astronomers use parallax to determine the distances of stellar objects in space. But parallax can also be used to calculate and measure distant objects on the earth. Builders often use parallax to measure the height of buildings or the location of a building site. City planners use parallax to measure city parks and roads. Can you think of an inventive way to use parallax around your city or town?
- Parallax shows us that near stars will move more quickly than distant stars. We can see this if we watch the change in the location of stars in the night sky. If you watch your favorite constellation over several nights, you will notice that the stars move together as a group. Compare the movement of the constellation to nearer objects, like the moon or a planet. Which objects move more quickly? Can you pick out the difference between planets and stars using this method?
- In this experiment you moved the near object (the rock rubber banded to the meterstick) different distances away from the observation points (the hula hoops). Another factor for measuring parallax is the distance between the two observation points. Can you think of a similar experiment to test this variable? (Hint: Try moving the observation points different distances apart instead of moving your near object.) How does the distance between observation points affect parallax?
- For an advanced mathematics challenge, you could try doing a parallax activity that lets you calculate the distance between the observation points and the near object. To get an idea of how to do this, watch this parallax activity video from NASA SciFile's channel.
Careers
If you like this project, you might enjoy exploring these related careers: