Abstract
How do scientists "copy" DNA? They use a process called the Polymerase Chain Reaction, or PCR. The key to making this process work is having a short piece of DNA, called a primer, that will stick to the larger piece of DNA you want to copy, called a template. In this science project, you will test how the number of matches and mismatches in a primer will affect its ability to stick, or anneal, to the DNA template during PCR.Summary
/-/https/www.sciencebuddies.org/cdn/Files/2927/5/BioChem_img052.jpg)
Objective
Test how matches and mismatches affect the ability of primers to stick to the DNA that is copied during PCR.Introduction
All living things come with a set of instructions stored in their DNA, short for deoxyribonucleic acid. Whether you are a human, rat, tomato, or bacteria, each cell will have DNA inside of it. DNA is the blueprint for everything that happens inside the cell of an organism, and each cell has an entire copy of the same set of instructions. The entire set of instructions is called the genome. The information in the DNA is stored in a sequence of nucleotides, which contain four different nucleotide bases (A, T, C, and G). Each base binds with a specific other base to make base pairs. Figure 1 shows an example of a DNA sequence that is 12 base pairs long.
/-/https/www.sciencebuddies.org/cdn/Files/2922/5/BioChem_img017.gif)
Figure 1. This is an example of a DNA sequence that is 12 base pairs long. Notice how each DNA base on the bottom sequence is paired up with a DNA base on the top sequence.
Notice that this piece of DNA has two sequences: one on the top, and one on the bottom. DNA is double stranded, which means that it has two strands. The nucleotide bases are arranged in a particular way to pair with the other strand: A pairs with T and C pairs with G. If a base is paired according to these rules, it is called a match. But if the base is not paired properly, then it is called a mismatch. Matches and mismatches can affect how the two strands of DNA pair together, and sometimes a mismatch can lead to a mutation.
The information stored in the DNA is coded into sets of nucleotide sequences called genes. Each gene has a set of instructions for making a specific protein. The protein has a certain job to do, called a function. Since different cells in your body have different jobs to do, many of the genes will be used to make protein in some cells, but not others. For example, some genes code for proteins specific to your blood cells, like hemoglobin. Other genes code for proteins specific to your pancreas, like insulin. Even though different genes are used in different cells, your cells and organs all work together in a coordinated way so that your body can function properly.
What if there is something wrong with one of your genes? This can cause problems for your body and how it functions. For example, people who have type I diabetes have problems making insulin. To help people with diabetes, scientists figured out a way to make insulin that diabetics can inject into their body. The insulin is made by a bacteria that has the human gene for insulin.
For scientists to study a gene, they need to be able to isolate it. The simplest way to isolate a gene is to clone, or basically insert, the gene into bacteria. But to do this first you need many, many copies of the gene you want to clone. How do you make copies of DNA? Using a powerful technique called polymerase chain reaction, as shown in Figure 2. PCR takes a DNA template (the DNA sequence you want copied) and copies it in four main steps:
- Melt: A high temperature (95° Celsius) will melt (separate) the two strands of the DNA template.
- Anneal: The primer, which is a short DNA sequence, will stick to (anneal to) the DNA template.
- Extend: An enzyme will copy (replicate) the DNA template strand starting with the primer.
- Repeat: The whole process will be repeated over and over, usually about 30 times.
/-/https/www.sciencebuddies.org/cdn/Files/2921/5/BioChem_img016.gif)
An infographic shows a simplified version of the four steps necessary to clone genes. Starting with an extracted segment of a DNA molecule, it is first heated until the two strands that make up the DNA are separated. Then, the strands are cooled and a synthetic DNA strand called a primer is added that attaches to the end of each individual DNA strand. Next, the temperature is slightly raised and the enzyme DNA polymerase is added which build copies of the DNA strands starting at the previously added primer. Finally, the whole process is repeated until the DNA molecule segment has been copied enough times.
Figure 2. PCR is like a copy machine for DNA! (Copyright © The Royal Swedish Academy of Sciences, 2003)
If these first three steps are repeated 30 times, a scientist can make 1 billion copies of a single piece of DNA! That provides the scientist with plenty of DNA material to clone and study. PCR is a very important step in the discovery and manufacturing of genes that become important pharmaceuticals, like the insulin gene.
Notice that if the primer does not stick to the DNA template, then the enzyme will not have a place to start copying the template DNA, so designing a good primer is a very important first step for PCR success. In this biochemistry science project, you will build a model of a primer sticking (annealing) to a DNA template strand using magnets. How important is it for the sequence of the primer to match the template DNA sequence so that the primer is strongly attached to the template DNA? You will make matches (where the magnets will stick to each other) and mismatches (where the magnets will repel each other) to model nucleotide bases in the primer annealing to the DNA template. Will more matches make the primer stick better than a primer with mismatches?
Terms and Concepts
- DNA
- Nucleotides
- Nucleotide bases
- Match
- Mismatch
- Polymerase Chain Reaction (PCR)
- DNA template
- Anneal
- Primer
Questions
- How do scientists make copies of DNA?
- What does a primer do, and how does it anneal?
- How will matches or mismatches affect the ability of the primer to anneal to the DNA of interest?
Bibliography
Do further research by visiting the following websites, which give information about DNA and PCR:
- DNA Interactive. (2003). Manipulation: Techniques: Amplifying. Dolan DNA Learning Center, Cold Spring Harbor Laboratory. Retrieved March 6, 2007.
- Learn. Genetics. Genetic Science Learning Center. (2012). What is DNA? The University of Utah. Retrieved September 18, 2012.
- Rosa, C. et al. (2012). Zooming Into DNA. The Tech Museum of Innovation. Retrieved March 6, 2007.
- Nobelprize.org. (2012, September 18). The PCR Method – A DNA Copying Machine. Retrieved March 6, 2007.
- National Center for Education Statistics. (n.d.). Create a Graph. Retrieved June 2, 2009.
Materials and Equipment
- Small, flat, relatively weak magnets (50)
- Paint pen in a light color, such as yellow, orange, or white
- Clear packaging tape, 2 inches wide
- Metric ruler
- Hole punch
- Paper clip
- Small disposable cup, such as a three ounce paper Dixie cup
- Pennies (at least 60)
- Lab notebook
Experimental Procedure
- Arrange the magnets in a stack to identify the north and south pole ends of each magnet.
- Remember that opposites attract, so your magnets will be arranged in an opposing order: N/S, N/S, N/S, etc.
- Using the paint pen mark the same pole for each magnet. If the magnets you are using already have the poles marked, then you can skip this step:
- To make sure you have the same pole marked on each magnet, mark the top of the magnet on your stack, then remove that magnet. Mark the top of the next magnet. Keep marking and removing magnets until all of them are marked.
- To check that you have done this correctly make sure that when you restack the magnets the marked side of one magnet is attracted to the unmarked side of another magnet. If two marked sides are attracted to each other then the markings are wrong. Like poles should repel one another.
- For the rest of this science project we will refer to the painted side of the magnet as the plus (+) side and the unpainted side as the minus (-) side.
- Next, make a simplified model of a DNA template strand that you will copy using PCR.
- Lay out a strip of clear packaging tape (at least 30 centimeters [cm] long), sticky side up, on a table.
- Place ten magnets along one side of the tape with the painted sides up, spacing the magnets 2 cm apart.
- The sequence for the DNA template strand will be either all plus (+ + + + + + + + + +) OR all minus ( - - - - - - - - - - ) depending upon which side is facing forward. In the example shown in Figure 3, the strand is facing with the plus side (the painted side) towards you.
- Fold the tape over the magnets, creating a long strip of magnets embedded inside the clear tape. Your model DNA template strand should look like Figure 3.
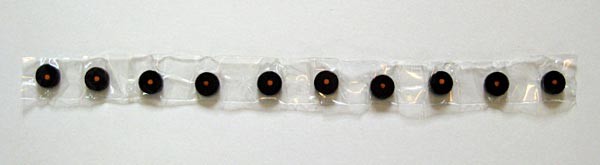
Figure 3. Your model DNA template strand should look like this one, with 10 magnets embedded inside clear tape, all with the same side up. (In this example, the plus sides of the magnets, which are facing up, are painted with an orange dot.)
- Now you are ready to make your model primers, which will be shorter versions of your DNA template model. Each primer will be 5 magnets in length, but the sequence of the primers will be different.
- Place a strip of clear packaging tape (at least 15 cm long), sticky side up, on a table.
- Arrange 5 magnets along one side of the tape, alternating the poles of the magnets in any order you choose. Be sure to space the magnets 2 cm apart as it is important for the positions of the magnets in your primer to be in the same places as the magnets in your DNA template strand.
- Fold the tape over the magnets. Your model primer strand should look like Figure 4.
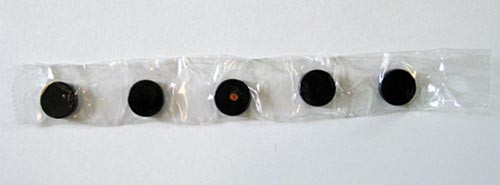
Figure 4. Your model primer strand should look like this one, but the sides facing up may be different.
- Repeat steps 5a-5c until you have made at least seven primers with different sequences.
- The primers should include one positive control (+ + + + +) and one negative control primer(- - - - - ). They can actually be the same primer flipped over!
- You can design the other six primers as any combination of 5 pluses and minuses that you want.
- Tip: You can flip primers over to test them as two different primers. For example, a primer with the sequence - - + - - could be flipped over and used as + + - + +.
- In your lab notebook, create a data table similar to Table 1.
- Write the sequences of the primers in your data table.
- Also write the number of matches and the number of mismatches for each primer sequence in your data table. Hint: When the sides of two magnets that are facing each other are different (such as one is a plus and one is a minus), it will create a match. When the sides of two magnets that are facing each other are the same
(such as both plus or both minus), it will create a mismatch.
Table 1. In your lab notebook, create a data table like this one. The primer sequences given are only examples, so be sure to write the actual primer sequences you test!Primer Name Primer Sequence Number of Matches Number of Mismatches Number of Pennies Trial #1 Trial #2 Trial #3 Average Positive + + + + + 5 0 Primer 1 + + + + - 4 1 Primer 2 + + + - - 3 2 ... ... Negative - - - - - 0 5
- To test the strength of each primer, you need to add weight to the primer while it is sticking (annealing) to the DNA template strand. Then you will increase the weight until the primer falls off. You will do this by attaching a small disposable cup, such as a Dixie cup, to the end of the primer and adding pennies. You will test each primer three times (in three trials total).
- At one end of each primer strand, use the hole punch to punch a hole near the end of the tape strip.
- Unfold a paperclip to make a hook.
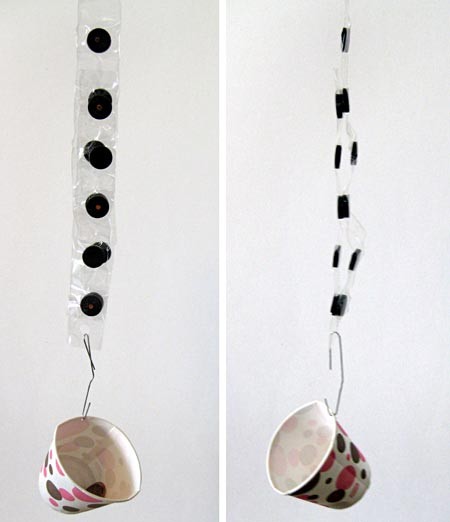
- Slip the paperclip through the hole of one of the primer strands and then through the paper cup, so that the cup will dangle from the end of the primer strand. The primer, with hook attached, should look like Figure 5.
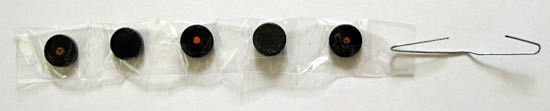
Figure 5. With the paper clip attached to the end of the primer strand, your setup should look similar to this one. - Now stick the primer strand to the DNA template strand.
- If the two strands do not stick together at all, in your data table under "Number of Pennies" write "0" and skip to step 8i.
- Count the number of matches and mismatches between your primer and the DNA strand. Make sure this agrees with the numbers you wrote in your data table.
- Figure 6 shows two examples of primers with mismatches. The one on the left has two mismatches, one at the end and one in the middle. The one on the right has one mismatch, in the middle. See how the magnets repel each other where the mismatches are?
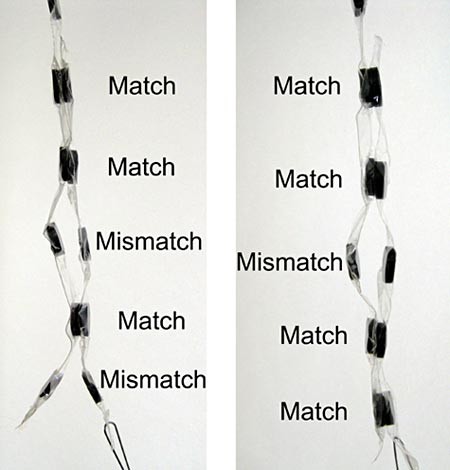
Two strips of magnets are connected with some magnets in the strips repelling against each other. Each strip contains five magnets, in the left image magnets number 3 and 5 repel while magnets 1, 2 and 4 attract. In the right image only magnet 3 repels while magnets 1, 2, 3 and 5 attract.
Figure 6. Here are two examples of primer strands with mismatches. The example on the left has two mismatches (at the end and in the middle) and the example on the right has one mismatch (in the middle).
- Figure 6 shows two examples of primers with mismatches. The one on the left has two mismatches, one at the end and one in the middle. The one on the right has one mismatch, in the middle. See how the magnets repel each other where the mismatches are?
- Hold the DNA template strand by one end so that the end of the primer with the paper cup attached will dangle from the other end.
- Add pennies, one at a time, until the primer strand falls off. While you are adding pennies to the cup, your experiment will look like Figure 7.
Two strips of magnets are connected with some magnets in the strips repelling against each other. Each strip contains five magnets, one strip has a small paper cup attached to its bottom while the other strip is suspended from above. Weight is slowly added to the suspended cup until the magnetic strip it is attached to falls away from the other magnetic strip that is secured from above.
Figure 7. As you test each primer strand, your experiment should look similar to this. (You will hold the DNA template strand from the top, which is not shown here.) - In the data table in your lab notebook, write the number of pennies you added for the primer strand to fall off of the DNA template strand.
- For example, if the primer strand did not fall off of the DNA template strand until you added 50 pennies to the cup, then you would write 50 under the "Number of Pennies" for this primer.
- If it is the first time you are testing a certain primer, write this under "Trial #1."
- Perform steps 8c-8h a total of three times (making three trials) for each primer. In step 8h, write your results under a different trial number each time.
- Repeat steps 8c-8i with a different primer until you have tested all of your primers.
- When you have tested all of your primers three times each, calculate the average number of pennies that was needed for each primer to fall off of the DNA template strand. (Do this by averaging the three trials for each primer.)
- Make a bar graph of your averaged data, placing the number of pennies on the left side (y-axis) and the number of mismatches on the bottom (x-axis) of the graph.
- You can make a graph by hand or use a website like Create a Graph to make a graph on the computer and print it.
- Are your results what you thought they would be? Do you see a correlation between the number of mismatches in the primer strand and the number of pennies needed to make the primer strand fall off of the DNA template strand?
- What do you think this tells you about how real primers anneal to a real DNA template strand, such as how important it is to not have mismatches?
/-/https/www.sciencebuddies.org/cdn/Files/2923/5/BioChem_img048.jpg)
/-/https/www.sciencebuddies.org/cdn/Files/2924/5/BioChem_img049.jpg)
/-/https/www.sciencebuddies.org/cdn/Files/2925/5/BioChem_img050.jpg)
/-/https/www.sciencebuddies.org/cdn/Files/2926/5/BioChem_img051.jpg)
/-/https/www.sciencebuddies.org/cdn/Files/2927/5/BioChem_img052.jpg)
Troubleshooting
For troubleshooting tips, please read our FAQ: A Magnetic Primer Designer.
Ask an Expert
Global Goals
The United Nations Sustainable Development Goals (UNSDGs) are a blueprint to achieve a better and more sustainable future for all.
/-/https/www.sciencebuddies.org/cdn/Files/19746/5/E-WEB-Goal-03.png)
Variations
- How does the strength of the primer change as the length of the primer changes? Try making primers of different lengths, and comparing their annealing strength. Will longer primers anneal more strongly to the DNA of interest?
- How much do magnets vary in their strength? You could try this science project again but instead of testing different primer sequences, you could compare magnets of different strengths. How many more pennies does it take to separate two strands of strong magnets compared to two strands of weak ones? Be sure to keep the sequences you are testing the same so that that is not a factor. Tip: You may need a lot of pennies to test the strong magnets!
- Where does the DNA for PCR come from? You can try the Science Buddies project Do-It-Yourself DNA to make your very own DNA extraction kit. Purify DNA from strawberries and other living materials, like oatmeal, banana, or kiwi. Which foods give you the most DNA?
Frequently Asked Questions (FAQ)
Ask an Expert
Careers
If you like this project, you might enjoy exploring these related careers:
/-/https/careerdiscovery.sciencebuddies.org/cdn/Files/947/17/pexels-photo-3825412.jpg)
/-/https/careerdiscovery.sciencebuddies.org/cdn/Files/962/18/pexels-photo-4299436.jpg)

/-/https/img.youtube.com/vi/zACmjwvbils/0.jpg)
/-/https/img.youtube.com/vi/DV5d31z1xTI/0.jpg)
/-/https/img.youtube.com/vi/mJCtvZskziI/0.jpg)