Abstract
Did you know that even though water is a liquid, it isn't always able to get into little cracks and crevices? So how do clothes go from caked with mud to clean? How can dishes go from greasy to glistening? With a few simple household items, you can find out!Summary

Objective
Measure how soap affects the surface tension of water by putting drops of water on a penny.
Introduction
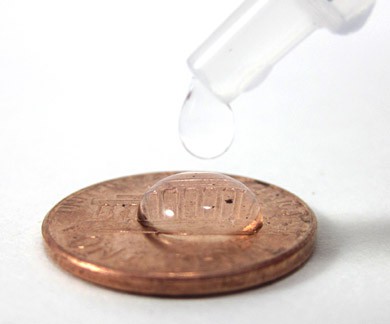
You have probably noticed that water can form tiny droplets or beads on many surfaces. Just think of when it rains and you see tiny droplets of water on the window. Figure 1 shows a tiny droplet of water sitting on a penny.

Figure 1. A tiny droplet of water on a penny.
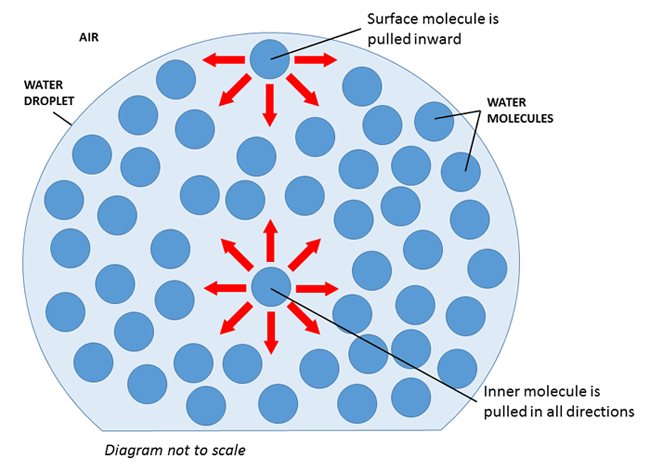
How does the droplet of water stay together? Why doesn't it spread out and flow over the edges of the penny? Water is made up of many tiny molecules. These molecules pull on each other, or exert a force. As shown in Figure 2, a water molecule in the middle of a droplet gets pulled equally in all directions by the neighboring molecules. However, a molecule at the surface of the droplet gets pulled mostly inward by the molecules below it. This means that all the molecules at the surface help "hold together" the droplet of water, and this is called surface tension.
 Image Credit: Ben Finio, Science Buddies / Science Buddies
Figure 2. A diagram showing the forces on water molecules that create surface tension. Note that the diagram is not to scale—there are quintillions of water molecules in a single drop!
Surface tension can be a neat effect to observe, but it can also pose a problem. When you wash things like clothing or dishes, water needs to be able to fit into all the tiny cracks between clothing fibers, or between bits of food encrusted on a plate. This means you need to reduce the surface tension of water. Things that reduce surface tension are called surfactants. In this project, you will put droplets of water on a penny, like in Figure 1. The higher the surface tension of the water, the bigger a droplet you can make before it breaks and flows over the edges of the penny. What do you think will happen when you add soap to the water? Try this project to find out!
Terms and Concepts
- Molecule
- Force
- Surface tension
- Surfactant
- Milliliter (mL)
- Cubic centimeter (cc)
Questions
- What is surface tension?
- How is surface tension created by molecules pulling on each other?
- Do you think soap will increase the surface tension of a water droplet (make the drop bigger) or decrease the surface tension (make the drop smaller)?
Bibliography
- Hipschman, R. (1995a). Sticky Water. Exploratorium. Retrieved June 11, 2015.
- Hipschman, R. (1995b). Soap. Exploratorium. Retrieved June 11, 2015.
For help creating graphs, try this website:
- National Center for Education Statistics, (n.d.). Create a Graph. Retrieved June 25, 2020.
Materials and Equipment
- Tap water
- Dish soap
- Drinking glasses, cups, or small bowls (2)
- Spoon
- 1 cc syringes (2), available from
Amazon.com
- Note: The syringes are sold in packs of 100, but you only need two for the experiment.
- Penny
- Paper towel or dish towel
- Lab notebook
Experimental Procedure
- Create a table in your lab notebook like Table 1, which you will use to record your data.
- Note: You can record the volume of water in either milliliters (mL) or cubic centimeters (cc). One milliliter is equal to one cubic centimeter (1 mL = 1 cc). The examples below will use milliliters.
| Milliliters of Water Until Drop Breaks | ||||
|---|---|---|---|---|
| Type of Water | Trial 1 | Trial 2 | Trial 3 | Average |
| Regular water | ||||
| Soapy water | ||||
- Fill one clean glass, cup, or small bowl with tap water.
- Fill a second clean glass, cup, or small bowl with tap water. Pour in a few drops of dish soap and mix gently with a clean spoon.
- Insert the tip of a syringe into the glass of plain tap water.
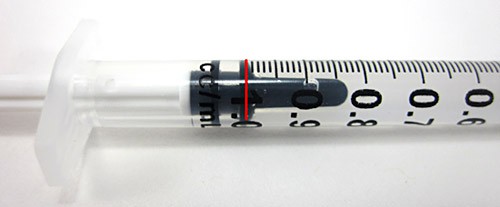
- Pull up on the plunger of the syringe until the water in the syringe reaches the 1.0 mL mark, as shown in Figure 3. If you get too much, just squeeze some back into the glass by pushing down on the plunger and try again.
 Image Credit: Ben Finio, Science Buddies / Science Buddies
Figure 3. A syringe filled to the 1.0 mL mark (highlighted in red) with water.
- Place your penny on a flat, level surface where you can easily clean up a small amount of water, like on a kitchen counter.
- Hold the tip of the syringe over the center of the penny. Slowly press down on the plunger, allowing one drop of water at a time to fall onto the penny.
- Watch the penny very carefully. The drop of water forming on top of the penny will gradually get larger. Stop pushing on the plunger as soon as the drop spills over the edge of the penny, as shown in Figure 4.
 Image Credit: Ben Finio, Science Buddies / Science Buddies
Figure 4. From left to right: a small drop of water starts out on the penny. Eventually it gets big enough to reach the edges of the penny, and finally it spills over the edge.
- Now, look at how much water is left in your syringe. The syringe in Figure 5 has 0.3 mL of water left. Record the value left in your syringe in your lab notebook.
 Image Credit: Ben Finio, Science Buddies / Science Buddies
Figure 5. A syringe with 0.3 mL of water left (highlighted in red).
- Calculate how much water you pushed out of the syringe by subtracting this value from 1.0 mL, and record this value in your data table for "Trial 1." Use Equation 1 to do the calculation:
Equation 1: Amount of water pushed out of syringe = 1.0 mL - amount of water left in syringe
For example, with 0.3 mL left, that means 1.0 mL - 0.3 mL = 0.7 mL were pushed out of the syringe.
- Note: If you completely emptied the syringe and the water droplet did not break apart, then refill the syringe and continue to add water. You will then need to add 1.0 mL to your calculation at the end. For example, if you use one full syringe, then empty the second syringe to 0.9 mL, then you used a total of 1.1 mL of water. Ask an adult for help with these calculations if you need it.
- Completely dry off your penny and the surrounding surface with a towel.
- Repeat steps 4–11 two more times, for your second and third trials with tap water. Remember to fill in your data table each time.
- Using a new syringe, repeat steps 4–11 three times with the soapy water. Remember to completely dry off the penny between each trial, and record all your results in your data table.
- Calculate an average of your three trials for the plain water and soapy water. Do this by adding the values for the three trials and then dividing by 3.
- For example, if your values for the plain tap water were 0.7 mL, 0.9 mL, and 0.95 mL, the average would be (0.7 + 0.9 + 0.95) ÷ 3 = 0.85 mL.
- If you need help calculating an average, ask an adult for help.
- Make a bar graph of your results.
- Put the type of water (plain or soapy) on the x-axis (horizontal line).
- Put the average mL of water when the drop broke on the y-axis (vertical line).
- If you need help making a graph, try the Create a Graph website.
- Based on the size of the droplets, do you think adding soap increased or decreased the surface tension of the water?
Ask an Expert
Variations
- Do you get different results depending on which side of the penny you use (heads or tails)?
- Do your results change if you use an old, dirty penny or a new, shiny penny? If you do not have any shiny new pennies, look up directions online for how you can clean pennies with vinegar.
- Try mixing other things from your kitchen with water. Does dish soap give different results from hand soap or laundry detergent? What about pouring in something like salt or sugar?
- What happens if you try the experiment with different liquids, like milk or juice?
Careers
If you like this project, you might enjoy exploring these related careers:
Related Links
- Science Fair Project Guide
- Other Ideas Like This
- Chemistry Project Ideas
- My Favorites
- Chemistry Safety Guide


