Abstract
Are oranges highest in vitamin C when they are fresh from the tree (or, in a pinch, the grocery shelf)? Does the amount of vitamin C in an orange change over time, after it has been picked? In this science project, you will find answers to these questions by measuring the amount of vitamin C in a solution using an iodine titration method.Summary
Andrew Olson, PhD, Science Buddies Teisha Rowland, PhD, Science Buddies
Sources
This science project is based on:
- University of Canterbury. (n.d.). Determination of Vitamin C Concentration by Titration Outreach, College of Science. Retrieved July 8, 2007.
Recommended Project Supplies
Objective
To determine whether the amount of vitamin C in oranges (or other citrus fruit) decreases after the fruit is picked.
Introduction

In this science project, you will learn an interesting method for determining the amount of vitamin C in a solution. The technique you will be using is called titration.
Titration is used to determine the unknown concentration of a chemical in a solution. In a titration, a carefully measured amount of a second chemical is gradually added to the solution. The added chemical reacts with the original chemical, whose concentration is unknown. The original chemical is called the titrand, and the added chemical whose concentration is known is called the titrant, or titration solution. The titration solution reacts with the titrand, and the progress of this reaction is carefully monitored. When 100% of the original compound has reacted with the added chemical, the titration is complete. Now the concentration of the original chemical can be determined from the amount of titration solution that was added.
So you can better understand how a titration works, let us look at the specific example of determining the concentration of vitamin C. Vitamin C, also known as ascorbic acid, is the titrand in this case (because its concentration is unknown). You start with a measured volume of the titrand. The titrating solution that will added to the titrand is iodine. You will start out by using your iodine solution to titrate a known amount of vitamin C, using a solution prepared from a vitamin C tablet. You will carefully measure the amount of iodine solution needed to titrate the known amount of vitamin C. You will know when the titration is complete because you will add a third chemical—soluble starch—to the solution. The starch acts as an indicator: the starch changes the color of the solution when the iodine/vitamin C reaction is complete. As soon as the solution changes color, you will stop adding iodine solution. Once you have calibrated your iodine solution with a known amount of vitamin C, you can then repeat the procedure to determine how much vitamin C there is in samples of fresh-squeezed orange juice.
The chemical reaction of iodine with vitamin C is called an oxidation-reduction reaction (chemists often use the shorthand 'redox reaction' to refer to this type of reaction). The ascorbic acid is oxidized to dehydroascorbic acid, and the iodine is reduced to iodide ions. Oxidation-reduction reactions always occur in pairs like this. The molecule that loses electrons is oxidized, and the molecule that accepts the electrons is reduced.
In this chemistry science project, you will investigate how different storage times affect the amount of vitamin C in fresh-squeezed orange juice. How do you think the amount of vitamin C will change over time, if it changes at all? Get ready to do some titrations to find out for yourself.
Terms and Concepts
- Titration
- Ascorbic acid
- Iodine
- Indicator
- Oxidation-reduction reaction
Questions
- What happens when iodine is added to a starch solution?
- What happens when iodine is added to a starch solution that also contains vitamin C?
Bibliography
For a good, basic reference on chemistry, see:- Rader, A. (n.d.). Chem4Kids. Andrew Rader Studios. Retrieved July 18, 2007.
- Home Science Tools. (August 20, 2014). Safety Data Sheet: Iodine Potassium Iodide Solution. Home Science Tools. Retrieved November 14, 2017.
- University of Canterbury. (n.d.). Determination of Vitamin C Concentration by Titration. Outreach, College of Science. Retrieved July 18, 2007.
- Ganong, B. (n.d.). Determination of Vitamin C in Orange Juice. Mansfield University. Retrieved July 18, 2007.
- Helmenstine, A.M., 2007. (n.d.). Vitamin C Determination by Iodine Titration. About.com: Chemistry.. Retrieved July 18, 2007.
- Shodor Education Foundation, Inc. (October 6, 2002). Stoichiometry. The University of North Carolina at Chapel Hill. Department of Chemistry. Retrieved July 18, 2007.
- Shodor Education Foundation, Inc. (n.d.). Redox Reactions. The University of North Carolina at Chapel Hill. Department of Chemistry. Retrieved July 18, 2007.
Materials and Equipment 
Recommended Project Supplies
These specialty items can be purchased from the our partner Home Science Tools:
- Orange Juice Titration Kit. Includes:
- Cheesecloth
- Vitamin C tablets, 250 mg each
- Chemical splash goggles
- 2% Lugol's iodine solution (30 mL); also available from Amazon.com
- Consult the iodine Materials Safety Data Sheet for additional safety information.
- Soluble starch (30 g)
- Small funnel. Do not use the funnel for food after using it for chemistry.
- 50 mL graduated cylinder
- 500 mL graduated cylinder
- 50 mL Erlenmeyer flask
- 50 mL buret
- Ring stand
- Buret clamp
- Lab apron
- Eyedropper. A transfer pipette or medicine dropper would work, too.
- Nitrile gloves. Rubber or latex gloves would work, too.
- Measuring spoons. A balance accurate to the 0.1 gram would also work.
- 100 mL beaker
- Glass bottles, amber, 8 oz (2). Iodine is light-sensitive and needs to be stored, once mixed, in an amber glass bottle or in an aluminum foil-covered bottle.
You will also need to gather these items:
- Optional: Newspaper to protect the surface you work on
- Stovetop
- A cooking pot
- Stirrer, such as a cooking spoon, to use with the pot
- Clean glass jar with a lid for storing the starch solution
- Cutting board
- Knife
- Bowl
- Masking tape
- Permanent marker
- Juicing oranges or other citrus fruit (at least 15 fruits of the same type)
- Ideally, you would have access to a citrus tree with ripe fruit.
- The next-best option is to use a big batch of store-bought citrus fruit.
- You will get better juice yield if you use juicing oranges, such as Navel oranges or Valencia oranges, not eating oranges. You may need to do a little research to determine if the oranges are typically used for juicing.
- Juicer for extracting juice from oranges
- Distilled water; available in the bottled water section of most grocery stores
- Lab notebook
Disclaimer: Science Buddies participates in affiliate programs with Home Science Tools, Amazon.com, Carolina Biological, and Jameco Electronics. Proceeds from the affiliate programs help support Science Buddies, a 501(c)(3) public charity, and keep our resources free for everyone. Our top priority is student learning. If you have any comments (positive or negative) related to purchases you've made for science projects from recommendations on our site, please let us know. Write to us at scibuddy@sciencebuddies.org.
Experimental Procedure
Caution: Iodine solution is poisonous. Avoid skin and eye contact. See the Materials Safety Data Sheet for complete information. Wear chemical safety goggles and rubber gloves when handling the concentrated solution. Iodine solution will stain clothing; a lab coat or apron is also recommended. For more information on how to properly use a balance and different titration techniques see Chemistry Lab Techniques.
- Do your background research so that you are knowledgeable about the terms, concepts, and questions, in the in the Background section. For information about doing a titration, visit the Science Buddies webpage Titration Tutorial: Tips & Tricks for Titrating.
- Wear gloves, chemical safety goggles, and a lab coat or apron when using the iodine solutions in this experiment. Also, if you are not working on a surface that can be stained, you should completely cover the surface with newspaper to protect it.
-
Dilute the Lugol's iodine solution 1:10 in distilled water to make your iodine titration solution.
- Carefully pour 30 milliliters (mL) of Lugol's solution into the 500 mL graduated cylinder. This amount should be the entire bottle that comes with the Science Buddies kit.
-
Add enough distilled water to bring the total fluid volume to 300 mL, as shown in Figure 1.
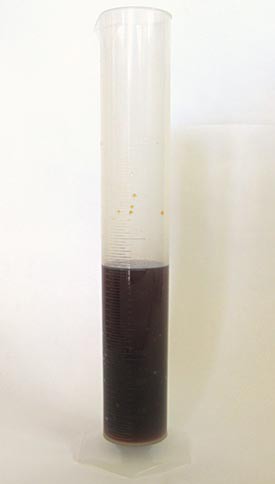 Image Credit: Teisha Rowland, Science Buddies / Science Buddies
Figure 1. After adding the 30 mL of Lugol's iodine solution to the 500 mL graduated cylinder, add enough distilled water to bring the total fluid volume up to 300 mL.
-
Slowly and carefully pour the diluted solution into an amber glass bottle. You should use a funnel to do this.
- Caution: The amber glass bottles that come with the Science Buddies kit hold about 230 mL each. This means you will need to use both bottles to store the 300 mL of solution. Be careful when filling the first bottle so that it does not overflow!
- Label the bottle(s), such as by using a permanent marker and masking tape.
-
You can store the solution in its tightly sealed bottle(s) for now.
- Note: Iodine is light-sensitive. Storing the solution in an amber glass bottle (or an aluminum foil-covered bottle), or in a dark location, will protect it from light.
- Rinse and dry the 500 mL graduated cylinder.
-
Make a starch indicator solution. This can be anywhere from 0.5 to 1.0%. The exact amount of starch is not critical.
- Heat 200 mL of distilled water in a pot on the stove.
- When it is near boiling, for a 0.5% solution, add 1 gram (g) (which is equivalent to 1/4 teaspoon) of soluble starch to the pot.
-
Stir to dissolve the starch, while keeping the water near boiling.
- Because even "soluble" starch is not very soluble, it may take about 15 minutes or more of stirring the starch to dissolve it in the near-boiling water.
- After the starch is dissolved in the water, remove the pot from the burner and allow the solution to cool.
- When cool, store the starch solution (at room temperature) in a clean, tightly covered glass jar that is clearly labeled.
- Rinse and dry the 500 mL graduated cylinder.
-
Make a fresh vitamin C standard solution (at a concentration of 1 milligram [mg] per milliliter, or 1 mg/mL). Do this on each day that you measure the vitamin C in your orange juice samples.
- You will use this solution to "standardize" your iodine titration solution. You will measure how much of your iodine solution it takes to oxidize a known amount of vitamin C. You can then use your iodine titration solution to determine the amount of vitamin C from test samples of juice from oranges.
-
Using a cutting board and a knife, crush a 250 mg vitamin C tablet into powder and carefully transfer all of the powder to a bowl, as shown in Figure 2.
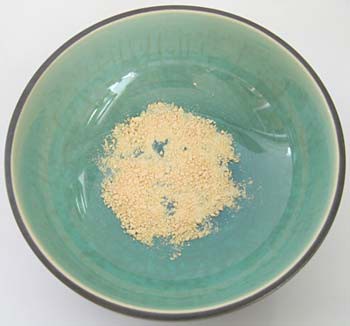 Image Credit: Teisha Rowland, Science Buddies / Science Buddies
Figure 2. Crush the vitamin C tablet into powder and then transfer all of it to a bowl.
-
Dissolve the powdered vitamin C tablet in 100 mL of distilled water, as shown in Figure 3.
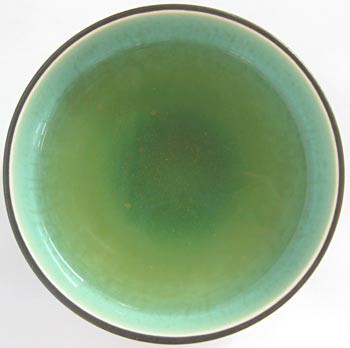 Image Credit: Teisha Rowland, Science Buddies / Science Buddies
Figure 3. Dissolve the powdered vitamin C tablet in 100 mL distilled water.
- Pour the dissolved vitamin C into the cleaned and dried 500 mL graduated cylinder and add distilled water to bring the total volume to 250 mL, as shown in Figure 4. You now have a vitamin C standard solution at a concentration of 1 mg/mL.
 Image Credit: Teisha Rowland, Science Buddies / Science Buddies
Figure 4. Carefully transfer the 100 mL of dissolved vitamin C into the 500 mL graduated cylinder and fill it with distilled water until the total volume is 250 mL.
-
Set up the 50 mL buret on the ring stand, as shown in Figure 5.
- You will first need to assemble the ring stand from the Science Buddies kit. To do this, screw the metal rod into the black metal base. Then tightly screw the buret clamp into position on the top of the ring stand's metal rod, as shown in Figure 5.
- To set up the 50 mL buret on the ring stand, carefully slide it into place between the prongs of the buret clamp, as shown in Figure 6.
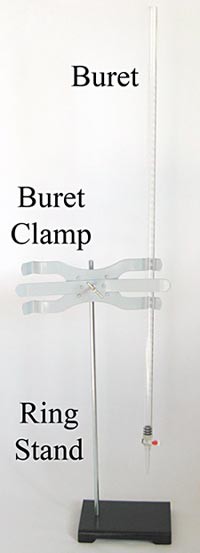 Image Credit: Teisha Rowland, Science Buddies / Science Buddies
Figure 5. Assemble the ring stand, buret clamp, and buret, as shown here.
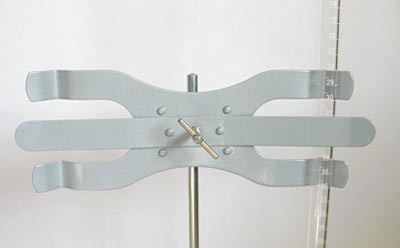 Image Credit: Teisha Rowland, Science Buddies / Science Buddies
Figure 6. Carefully slide the buret into place between the prongs of the buret clamp.
-
Titrate 20 mL of vitamin C standard solution.
- Use the 50 mL graduated cylinder to measure 20 mL of vitamin C standard solution.
-
Pour this into the 50 mL Erlenmeyer flask, as shown in Figure 7. The shape of this flask allows you to swirl the solution to mix it without spilling.
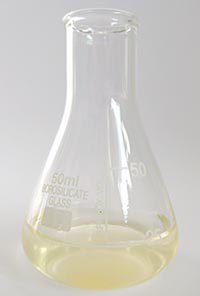 Image Credit: Teisha Rowland, Science Buddies / Science Buddies
Figure 7. Pour 20 mL of the vitamin C solution into the 50 mL Erlenmeyer flask.
- Add 10 drops of starch indicator solution to the Erlenmeyer flask.
-
Carefully adjust the position of the buret on the ring stand so that you can place the Erlenmeyer flask (containing the vitamin C and starch solutions) right under the buret, as shown in Figure 8. Leave the Erlenmeyer flask there.
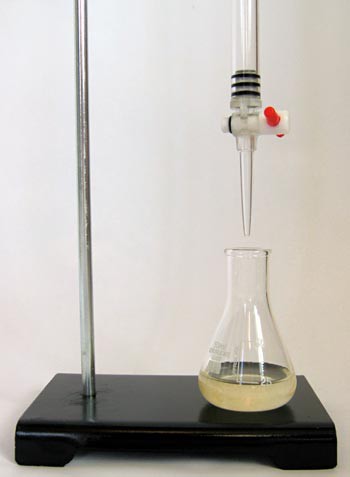 Image Credit: Teisha Rowland, Science Buddies / Science Buddies
Figure 8. Adjust the buret's position so you can place the 50 mL Erlenmeyer flask right underneath it.
-
Make sure the bottom of the buret is turned to the closed position. This is done by turning the red stopper to the horizontal position, as shown in the close-up in Figure 9, for the buret from the Science Buddies kit.
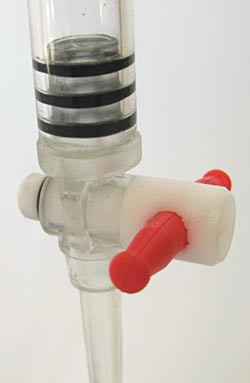 Image Credit: Teisha Rowland, Science Buddies / Science Buddies
Figure 9. Make sure the buret is turned to the closed position, as shown here with the buret from the Science Buddies kit.
- Use the funnel to carefully fill the buret with the diluted Lugol's iodine solution you prepared in step 3. Fill it somewhere between the 5 mL and 35 mL marks on the buret. The exact position is not important, as long as the fluid level is not past the graduated markings on the top of the buret.
- To make sure your measurements are accurate, fill the tip of the buret with the diluted Lugol's iodine solution. To do this, put an extra beaker below the buret and slowly turn the red stopper at the bottom of the buret (to the vertical position) to let a few drops of titrating solution flow into the beaker (or just let enough solution flow so that the entire tip of the buret is full of solution). Then, making sure the bottom of the buret is closed again, place the Erlenmeyer flask back under the buret.
-
In your lab notebook, write down the initial level (in mL) of the iodine solution in the buret. Read the level from the bottom of the meniscus, which is the curved surface of the liquid.
- For example, in Figure 10, the level should be recorded as 21.85 mL, since this is where the bottom of the meniscus is.
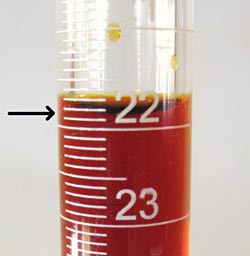 Image Credit: Teisha Rowland, Science Buddies / Science Buddies
Figure 10. When reading the level of liquid in the buret, read from the bottom of the meniscus, which is being pointed to with a black arrow in this picture. For example, the level of the liquid in this buret should be read as 21.85 mL. (Note: The long white line at the top of the buret is the mark for 21 mL.)
-
Slowly turn the red stopper at the bottom of the buret until just one drop of the iodine solution comes out into the Erlenmeyer flask below it. Then close the buret again.
- Note: It is important to only let the iodine solution be added one drop at a time because the titration reaction is very sensitive. One drop can be enough to drive the reaction to completion (if it were near completion before). If more than one drop is added at a time, the data will not be as accurate as it could be.
-
After each drop is added, swirl the flask to mix in the iodine solution.
- When adding the iodine solution, you may see a temporary color change that goes away when you swirl the flask, as shown in Figure 11.
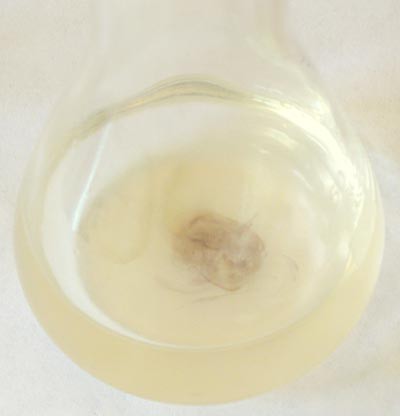 Image Credit: Teisha Rowland, Science Buddies / Science Buddies
Figure 11. When you add a drop of iodine solution, you may see a temporary color change, as shown here (the dark blue swirls), that goes away when the iodine solution is mixed in the flask by swirling it.
-
Continue adding the iodine solution, mixing in one drop at a time and swirling the flask, until the iodine creates a blue-back color throughout the solution, as shown in Figure 12, that lasts for longer than 20 seconds. At this point, the titration is complete.
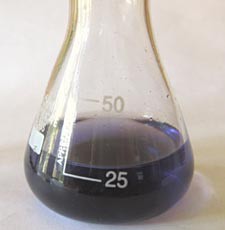 Image Credit: Teisha Rowland, Science Buddies / Science Buddies
Figure 12. When the entire solution in the flask changes to a blue-black color that lasts for more than 20 seconds while swirling it, the titration is complete.
- In your lab notebook, record the final level of the iodine solution remaining in the buret.
- The difference between the initial level and the final level is the amount of iodine titration solution needed to oxidize the vitamin C.
- Rinse out and dry the Erlenmeyer flask.
-
Repeat step 7 three times. You should get results that are within about 0.2 mL of each other. If you do not, repeat this step until you have three results that are within about 0.2 mL of each other.
- Be sure to check the level of the iodine solution in the buret before each trial. Remember, if the level is below the 35 mL mark, carefully add more iodine solution to the buret (until it is between the 5 mL and 35 mL marks). Record the new level.
-
Prepare fresh-squeezed orange juice for testing. You will want to prepare samples so that you can measure the vitamin C content of at least three oranges on the day of picking (day 1) and on days 3, 7, 14, and 21 (after picking).
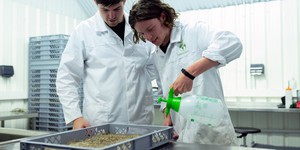
- Use the juicer to extract orange juice from three (or more) oranges, as shown in Figure 13. Make sure the oranges are all from the same time point (if you did not pick/purchase them on the same day).
- You need 20 mL of juice per titration, and you should do at least three titrations per time point, for a total of 60 mL.
- Filter the orange juice through cheesecloth to remove any pulp and seeds.
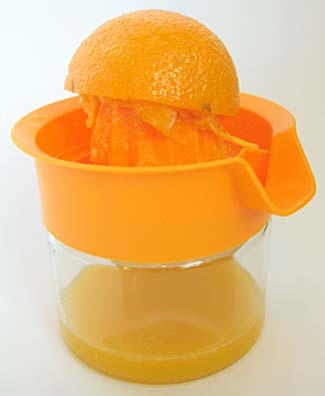 Image Credit: Teisha Rowland, Science Buddies / Science Buddies
Figure 13. Use a juicer, like the one shown here from the Science Buddies kit, to juice at least three oranges. You will need to cut each orange in half to use this juicer.
-
Titrate the fresh-squeezed orange juice you just prepared by repeating step 7, but this time, use 20 mL of fresh-squeezed orange juice in the Erlenmeyer flask instead of 20 mL of the vitamin C solution.
- Be sure to check the level of the iodine solution in the buret before each trial. Remember, if the level is below the 35 mL mark, carefully add more iodine solution to the buret (until it is between the 5 mL and 35 mL marks). Record the new level.
- In step 7.k., the titration is complete when the iodine creates a distinct color change in the juice/starch solution. This color change will be harder to see than with the vitamin C solution, since the juice starts out orange. The color will change from orange to grayish brown when the endpoint is reached, as shown in Figure 14. If you continue to add iodine, the color will darken further, but you want to note the volume of iodine added when the color first changes.
- Remember to record the final level of the iodine solution in the buret, as done in step 7.l.
- The difference between the initial level and the final level is the amount of iodine titration solution needed to oxidize the vitamin C in the orange juice.
- As you did for step 7.o., repeat the titration process for the fresh-squeezed orange juice a total of three times. You should get results that are within about 0.2 mL of each other.
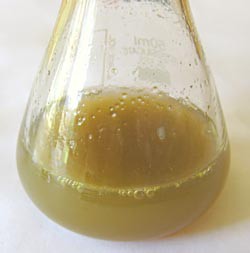 Image Credit: Teisha Rowland, Science Buddies / Science Buddies
Figure 14. When the titration is complete with the orange juice sample, the entire orange juice sample will turn from orange to grayish brown in color, as shown here.
- When you collect your other fresh-squeezed orange juice samples (on the days described in step 8), titrate each sample by repeating step 9. Be sure to make a fresh vitamin C standard solution on each day that you measure the vitamin C in your orange juice samples.
- For each time point (day 0, day 3, day 7, day 14, and day 21), calculate the average amount of iodine needed to titrate the 20 mL sample. Record your results in your lab notebook.
-
Calculate the amount of vitamin C in your samples by setting up a proportion, as shown in Equation 1. You will want to solve for Vitamin C2
Equation 1.
- Iodine1 is the average amount of iodine (in mL) needed to titrate the vitamin C standard solution.
- Vitamin C1 is the amount of vitamin C in the standard solution (in mg).
- Iodine2 is the average amount of iodine (in mL) needed to titrate the orange juice sample.
- Vitamin C2 is the amount of vitamin C in the orange juice sample (in mg).
-
You can rearrange Equation 1 to directly solve for the unknown "Vitamin C2" value, resulting in Equation 2.
- If you are not sure how Equation 2 was derived from Equation 1, take a moment to examine the equations so that you understand the derivation process.
Equation 2.
-
Here is an example (with sample numbers) to show you how to use Equation 2:
- Let us say that it took an average of 8.5 mL of iodine solution to titrate 20 mL of 1 mg/mL vitamin C standard solution. 20 mL of the vitamin C solution is equal to 20 mg vitamin C total. This means that "Iodine1" equals 8.5 mL and "Vitamin C1" equals 20 mg.
- Let us also say it takes an average of 6.8 mL of iodine solution to titrate a 20 mL test sample of orange juice. This means that "Iodine2" equals 6.8 mL.
-
Using this example, we would set up Equation 2 to look like Equation 3. Note that we do not know "Vitamin C2" because that is what we are solving for.
Equation 3.
- When solving for Vitamin C2 in Equation 3, we get an answer of 16 mg. This means there is 16 mg of vitamin C in that orange juice sample.
- Graph your results, putting the time points on the x-axis and the average amount of vitamin C on the y-axis.
- Analyze your results. Which oranges had the most vitamin C? Do you see a correlation between the amount of vitamin C in the samples and the time that passed since picking the oranges? Can you explain your results?
Troubleshooting
For troubleshooting tips, please read our FAQ: Do Oranges Lose or Gain Vitamin C After Being Picked?.
Ask an Expert
Global Connections
The United Nations Sustainable Development Goals (UNSDGs) are a blueprint to achieve a better and more sustainable future for all.

Variations
- You can extend the experiment to compare different storage methods for juice oranges. What effect does refrigerated storage have on vitamin C levels? Is refrigeration better at preserving vitamin C than room-temperature storage? Design an experiment to find out.
- Measure the amount of vitamin C in other fruits and vegetables. Which ones have the highest vitamin C content? Which ones have the lowest? Puree a 100 g sample of the fruit or vegetable, and strain it through cheesecloth with about 50 mL of distilled water. Add distilled water to bring the total volume up to 100 mL. From your measurement, you can figure out how much vitamin C there is per 100 g of the fruit or vegetable you sampled. You can use typical weights of the fruit or vegetable to calculate how much total vitamin C there is in each fruit or vegetable you test.
- Measure the vitamin C content in fruit juices. Do the amounts correspond to what is on the label? Design an experiment to find out.
- Does the amount of vitamin C in fruit juice decrease during refrigerated storage? Does the type of container (e.g., glass bottle, or paperboard carton) matter? Design an experiment to find out.
- For an experiment on investigating the amount of vitamin C in orange juice from frozen concentrate compared to the amount of vitamin C in not-from-concentrate juice, see the Science Buddies project Which Orange Juice Has the Most Vitamin C?
Frequently Asked Questions (FAQ)
- When exposed to air, vitamin C will oxidize, or break down; after any vitamin C solution is exposed to air it will have a lower, unknown concentration the next day.
- If you do not make and titrate a fresh vitamin C standard solution each day you titrate orange juice samples, you cannot compare data from one day to the next. By titrating a fresh vitamin C standard solution each day you take measurements and by observing the variability in the amount of iodine needed to titrate the Vitamin C standard solution, you can better compare your orange juice titration results to the day-to-day variations in your vitamin C standard titrations.
- Using the wrong substances. Make sure that you use Lugol's iodine solution or another iodine solution sold as a starch indicator (not a pure potassium iodine solution) and a true, soluble starch. (If you purchased the Science Buddies kit, this problem would not apply. The materials in the kit are correct for this Project Idea.)
- Using incorrect concentrations. If your vitamin C standard solution is too concentrated or your iodine titration solution is too diluted, or your starch indicator solution is not between 0.5 to 1.0%, it may require much more than 50 mL of iodine solution to titrate the standard solution and/or orange juice. The most common problem here is an overly diluted iodine solution; sometimes, the Lugol's iodine solution sold in stores is already diluted, and you do not need to dilute it more.
- Using too much orange juice. If there is a large amount of vitamin C in the orange juice that is being tested, it may require more than 50 mL of iodine titration solution for it to change color. You could try using a smaller volume of orange juice.

(Image: G. Carboni, 2004)
Soluble starch is starch that has been chemically pre-treated so that its structure is altered and it is already more soluble; it is not sold in the grocery store. The science project calls for using this type of starch because it is much easier to make the starch solution. If you choose to substitute corn starch for the soluble starch, you will need to make sure that you use very hot—even boiling—water. Add no more than 1/4 tsp. of cornstarch to 200 ml of the hot/boiling water. Stir vigorously with a fork for several minutes to dissolve as much of the corn starch as possible. Test your solution by mixing one drop of the starch solution with one drop of the iodine solution on a piece of wax paper; if your starch solution is well-made, the resulting mixture should be a dark blue-black color.
If you do substitute corn starch for soluble starch, you should make a fresh starch solution every day of testing because the corn starch is more likely to fall out of solution over time.
Careers
If you like this project, you might enjoy exploring these related careers:

Contact Us
If you have purchased a kit for this project from Science Buddies, we are pleased to answer any question not addressed by the FAQ above.In your email, please follow these instructions:
- What is your Science Buddies kit order number?
- Please describe how you need help as thoroughly as possible:
Examples
Good Question I'm trying to do Experimental Procedure step #5, "Scrape the insulation from the wire. . ." How do I know when I've scraped enough?
Good Question I'm at Experimental Procedure step #7, "Move the magnet back and forth . . ." and the LED is not lighting up.
Bad Question I don't understand the instructions. Help!
Good Question I am purchasing my materials. Can I substitute a 1N34 diode for the 1N25 diode called for in the material list?
Bad Question Can I use a different part?
Contact Us
Related Links
- Science Fair Project Guide
- Other Ideas Like This
- Chemistry Project Ideas
- Cooking & Food Science Project Ideas
- My Favorites
- Chemistry Safety Guide
- Titration Tutorial: Tips & Tricks for Titrating