Abstract
The makers of sports drinks spend tens to hundreds of millions of dollars advertising their products each year. Among the benefits often featured in these ads are the beverages' high level of electrolytes, which your body loses as you sweat. In this science project, you will compare the amount of electrolytes in a sports drink with those in orange juice to find out which has more electrolytes to replenish the ones you lose as you work out or play sports. When you are finished, you might even want to make your own sports drink!Summary
David Whyte, PhD, Science Buddies
Edited by Ben Finio, PhD, Science Buddies
This project is based on the following 2008 California State Science fair project, a winner of the Science Buddies Clever Scientist Award:
Yaeger, T.O. Jr. (2008). Electrolyte Madness.
Objective
To investigate whether or not a sports drink provides more electrolytes than orange juice.
Introduction
"Just do it!" You have probably heard that slogan, and there is no doubt that exercise is a key part of staying healthy. But exercising depletes the body's stores of fluids and minerals, which must be replaced. Most experts agree that if you are engaged in light to moderate exercise, drinking a glass or two of water should do the trick. But if you are exercising strenuously, you also need to replenish some of the salts that your body loses through sweat. These salts, or electrolytes, are found in most sports drinks, and also in natural juices like orange juice.
What advantages does a sports drink have over water? Water provides the liquid you need to avoid dehydration, but it does not have electrolytes. An electrolyte is a substance that will dissociate into ions in a solution. The ions in the solution give it the capacity to conduct electricity. Electrolytes, such as sodium and potassium, are present in sweat. Chloride, calcium, and phosphate ions are also electrolytes.
The proper concentration of electrolytes in your blood is essential to your health. Your cardiovascular and nervous systems—to name just two—require electrolytes to function well. Differences in the concentration of sodium and potassium inside and outside of cells allow your nerve and muscle fibers to send electrical impulses (which is how these cells communicate and get your body to react and move).
Your body keeps the concentration of the various electrolytes in its fluids within a narrow range, and this process depends on consuming enough water and electrolytes. The maintenance of electrolytes within this narrow range is due to the body's homeostatic mechanisms, which control the absorption, distribution, and excretion of water and its dissolved electrolytes.
To measure the electrolytes in this science project, you will use a multimeter. A multimeter is an electronic device that measures voltage, current, and resistance. You can learn more about these terms in the Science Buddies Electronics Primer. For this project, you will use just the ammeter part of the multimeter. An ammeter measures current. The procedure will describe what you need to do, but you can learn more about what a multimeter is and how to use one in the Science Buddies resource How to Use a Multimeter.
How can you use an ammeter to measure the concentration of electrolytes? You will use it to measure conductance, which is proportional to the electrolyte concentration. Because electrolytes are charged particles that carry current in solution, the conductance of the solution depends on the concentration of the electrolytes. If you increase the concentration of electrolytes in a solution, the conductance of the solution also increases. In order to measure a current in the solutions, you have to apply a voltage. You will use a 9 volt (V) battery to supply the voltage.
The symbol for conductance is G and it is measured in units called siemens (S). The symbol for current is I, and it is measured in amperes (A), commonly called amps for short. The symbol for voltage is V and it is measured in volts (also abbreviated V). Calculating the conductance is easy—it is the current divided by the voltage, as shown in Equation 1.
Equation 1.
- G is conductance, measured in siemens (S).
- I is current, measured in amperes (A).
- V is the voltage, measured in volts (V).
Note that conductance is the inverse of resistance, which is measured in ohms (Ω, the capital Greek letter Omega). The symbol for resistance is R, so G = 1/R (1 S = 1 / Ω). Equation 1 is just another form of Ohm's law, which uses resistance instead of conductance: V = IR.
Finally, in this project the amount of current you will measure is fairly small. That makes it more convenient to take your measurements in milliamps (mA), thousandths of an amp; or microamps (μA), millionths of an amp. However, before you plug your current reading into Equation 1, you must convert the measurement back to amps. The procedure will explain how to do this.
Do not worry if you find it difficult to remember all the letters and symbols. Table 1 summarizes the electrical variables, their units, and abbreviations.
| Quantity | Variable | Unit | Unit Symbol |
|---|---|---|---|
| Voltage | V | Volt | V |
| Current | I | Ampere | A |
| Resistance | R | Ohm | Ω |
| Conductance | G | Siemens | S |
Terms and Concepts
- Electrolyte
- Dissociate
- Ion
- Solution
- Conduct electricity
- Electricity
- Homeostatic mechanism
- Multimeter
- Voltage (V)
- Current (I)
- Resistance (R)
- Ammeter
- Conductance (G)
- Proportional
- Siemens (S)
- Ampere, or amp (A)
- Volts (V)
- Ohms (Ω)
- Ohm's law
- Milliamp (mA)
- Microamp (μA)
- Open circuit
- Short circuit
- Electrolysis
- Dilute
Questions
- What do electrolytes do in your body?
- What advantages do sports drinks or juices have over water in terms of electrolyte content? Why does this matter for strenuous exercise?
- Are there other reasons, besides electrolyte content, that you would pick a certain drink for before, during, or after strenuous exercise? For example, many juices have relatively high amounts of carbohydrates that add calories and require extra water to digest. Certain drinks might be more acidic and upset your stomach more easily. What other factors should you consider when picking a drink?
- What are the amounts of calories, sodium, potassium, and carbohydrates in one serving (8 ounces [oz.]) of orange juice? How does this compare with sports drinks?
Bibliography
- Medline Plus Medical Encyclopedia Staff. (2012). Electrolytes. Retrieved October 16, 2012.
- How Stuff Works. (2008). What are electrolytes?. Retrieved August 20, 2008.
Materials and Equipment 
Recommended Project Supplies
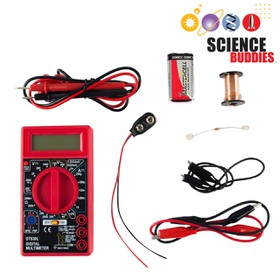
- Electrolyte Challenge Sensor Kit, available from our partner
Home Science Tools.
You will need these items from the kit:
- Digital multimeter
- Alligator clip leads (3). Colors may vary.
- Copper wire, bare, 24-gauge (1.5 meters [5 feet])
- 9 V battery
- 9 V battery clip
- 1 kΩ resistor
- You will also need to gather these items, not included in the kit:
- Disposable plastic straw
- Scissors
- Small plastic, glass, or ceramic bowls, not metal (8). Use a different one for each liquid you test or use one bowl repeatedly, being careful to wash and wipe it thoroughly between liquids.
- Masking tape or other materials for creating labels
- Permanent pen or marker
- Distilled water (dH2O), room temperature; available in the bottled water section of most grocery stores
- Tap water, room temperature
- Sports drink(s) of your choice, room temperature
- Orange juice of your choice, room temperature
- Paper towels
- Lab notebook
Disclaimer: Science Buddies participates in affiliate programs with Home Science Tools, Amazon.com, Carolina Biological, and Jameco Electronics. Proceeds from the affiliate programs help support Science Buddies, a 501(c)(3) public charity, and keep our resources free for everyone. Our top priority is student learning. If you have any comments (positive or negative) related to purchases you've made for science projects from recommendations on our site, please let us know. Write to us at scibuddy@sciencebuddies.org.
Experimental Procedure
Making a Simple Conductance Sensor
- Cut a 5 cm (2 inch) piece from the drinking straw.
- Cut two pieces of copper wire, each about 12 cm (5 inches) long.
- Wrap the two pieces of wire around each end of the straw, leaving 5 cm tails of wire, as shown in Figure 1.
- Make sure you wrap the wires snugly around the straw so they do not slide back and forth.
 Caution: Make sure the two wires do not touch. The conductance sensor will not work if the wires touch, and touching wires will blow the fuse in your multimeter.
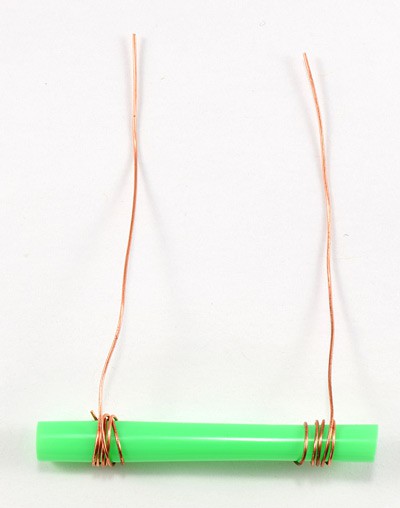 Image Credit: Ben Finio, Science Buddies / Science Buddies
Figure 1. The conductance sensor consists of a non-conducting core (a piece of disposable drinking straw) with copper wire wrapped around the ends. The ions in the solution complete the circuit, enabling current to flow between the copper wires.
Making a Conductance Measuring Circuit
- Connect the multimeter probes as shown in Figure 2.
- For now, make sure your multimeter is off.
- Plug the black probe into the port labeled "COM".
- Plug the red probe into the port labeled "VΩmA".
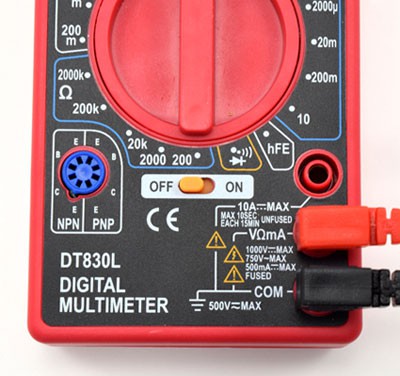 Image Credit: Ben Finio, Science Buddies / Science Buddies
Figure 2. Picture of how to connect the multimeter probes.
- Prepare your circuit as shown in Figure 3. Note: your kit may come with different color alligator clips. Usually in electronics we use red for positive and black for negative, but you can substitute other colors.
 Make sure your multimeter is off.
 When building the circuit, do not let the ends of the different alligator clips touch each other. This can cause a short circuit.
- Connect the black alligator clip to the multimeter's black probe.
- Connect the red alligator clip to the multimeter's red probe.
- Connect the snap connector to the 9 V battery.
- Connect the other end of the red alligator clip to the battery's red wire.
- Connect the green alligator clip to the battery's black wire.
 Important: do not let the free ends of the black and green alligator clips touch. This can blow the fuse in your multimeter.
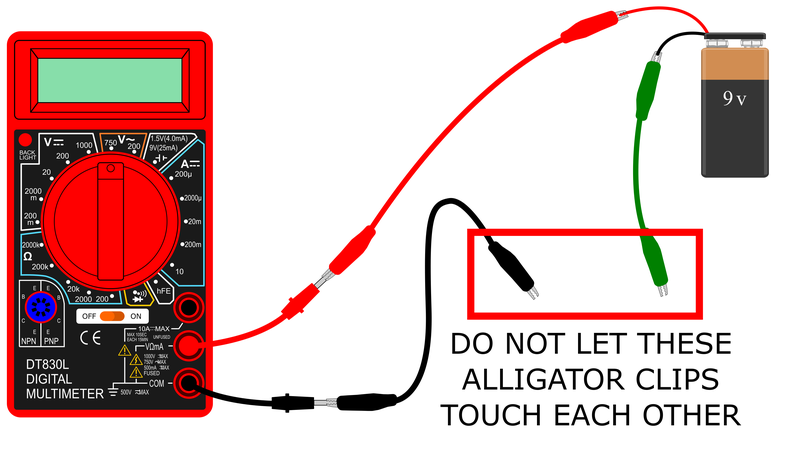 Image Credit: Ben Finio, Science Buddies / Science Buddies
circuit showing one alligator clip connecting multimeter positive probe to battery positive wire, one alligator clip connected to multimeter negative probe, and one alligator clip connected to battery negative wire
Figure 3. A schematic of how you should set up the circuit before connecting the conductance sensor.
- Connect your conductance sensor to the black and green alligator clips as shown in Figures 4 and 5.
 Do not let the two wires on the conductance sensor touch each other. This can blow the fuse in your multimeter.
 - You can use twist ties to bundle up your wires and help keep your circuit neat, as shown in Figure 5.
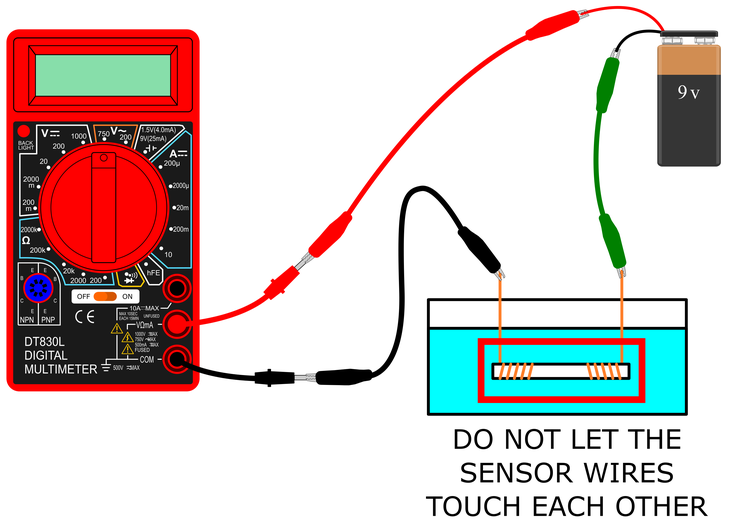 Image Credit: Ben Finio, Science Buddies / Science Buddies
Figure 4. A schematic of the completed circuit with the conductance sensor.
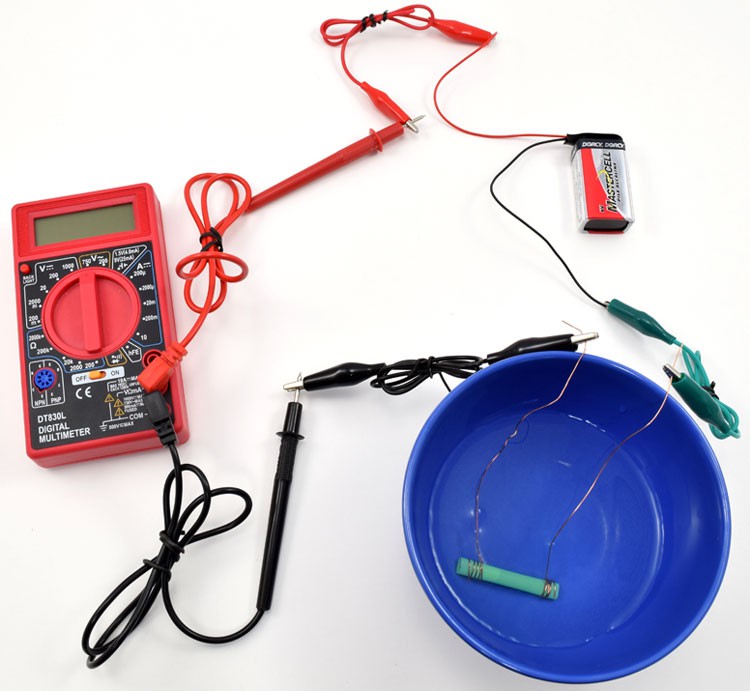
Figure 5. A picture of the completed conductance measuring circuit.
- Double-check your connections to make sure they match those shown in Figures 4 and 5 before you proceed.
- Note that this is an open circuit because of the gap between the wires wrapped around the (non-conducting) straw. You will use the electrolytes in the solutions to close the circuit. The amount of current that flows is proportional to the electrolyte concentration.
Setting Up Your Test Solutions
- Clean the eight small bowls with warm soapy water, rinse thoroughly, and dry them right away with a clean dry cloth or paper towel. This will remove ions in the tap water. If you want to be extra careful, rinse the bowls with distilled water before drying.
- Put masking tape on all eight bowls.
- Label four bowls with the following labels: Distilled Water, Tap Water, Sports Drink, and Orange Juice.
- Label one bowl Tap Water Rinse.
- Label the final three bowls as follows: dH2O Rinse 1, dH2O Rinse 2, and dH2O Rinse 3. Use these bowls to rinse the conductance sensor between uses.
- Pour each liquid into the appropriately labeled bowl. All of the solutions should be at room temperature. The liquids should be deep enough to completely submerge the coiled part of the conductance sensor. Make sure you fill each bowl to the same level, so the sensor can be submerged to the same depth. This is important because the extra surface area of the "tail" part of the wires in contact with the liquid will affect the conductance.
Measuring the Conductance
 Before you turn on your multimeter, make sure the two wires of your conductance sensor are not touching each other, and that the ends of the different alligator clips are not touching each other. If they are, this will blow the fuse in your multimeter.
- Turn your multimeter on and set it to measure direct current in the 200 μA range. This is the "200μ" on the upper-right part of your multimeter dial, as shown in Figure 6. This is a high-sensitivity setting that you will only use to measure distilled water, which is less conductive than the other liquids.
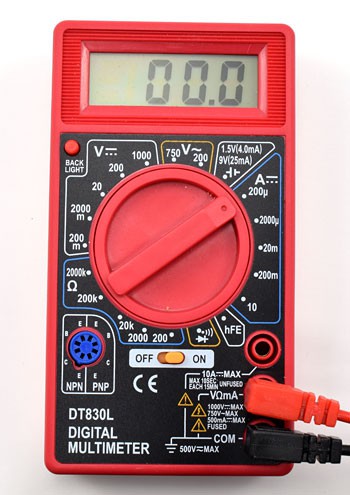 Image Credit: Ben Finio, Science Buddies / Science Buddies
Figure 6. Multimeter dial set to the 200 microamp (μA) range, represented by the "200μ."
- Place the conductance sensor in the distilled water. Make sure the straw is completely immersed. You will need to submerge the straw to the same depth each time. This is probably easiest if you let it rest on the bottom of the bowl.
- Read the current on the multimeter.
- Always make your readings quickly and remove the conductance sensor from the solutions immediately. Over time, the copper wires will start to dissolve in the solutions, skewing your results. In addition, electrolysis may take place, forming tiny bubbles on your conductance sensor that can interfere with your data.
- Your readings may fluctuate slightly, and this is normal. Try to record an "average" reading, or a number in the middle of the range that you observe.
- Record the current (the readings from your multimeter) in your lab notebook in a data table. Make sure to record that this reading is in microamps (μA). Remember that a microamp is one millionth of an amp.
- You do not need to rinse your conductance sensor this time because you used distilled water.
- Now set your multimeter to measure direct current in the 200 mA range. This is the "200m" on the right side of the multimeter dial, as shown in Figure 7. This setting can measure higher current values, which you need to do for the more conductive liquids.
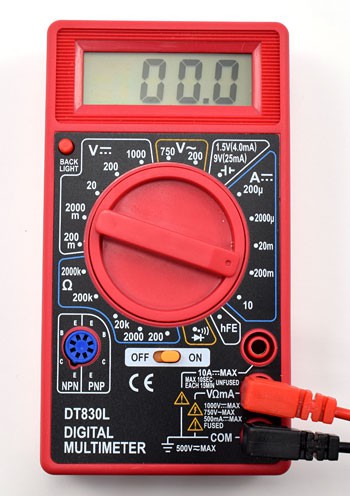 Image Credit: Ben Finio, Science Buddies / Science Buddies
Figure 7. Multimeter dial set to the 200 milliamp (mA) range, represented by the "200m". Be careful not to get this mixed up with the "200m" on the other side of the dial. That setting is for measuring voltage, not current.
- Now place the conductance sensor in the tap water. Make sure you submerge it to the same depth that you did when you measured the distilled water.
- Record the current. Again, make sure you record the correct units. Since your multimeter dial is set to 200m, this reading is in milliamps (mA), not microamps (μA).
- Tap the sensor on a paper towel to remove drops of tap water. Then rinse the sensor in distilled water, dipping it briefly in each of the three distilled water rinse bowls.
- Place the sensor in the sports drink and measure the current (you do not need to change the multimeter dial). Record the current in your lab notebook, and remember to record units of milliamps.
- Tap the sensor dry, and then dip the sensor in tap water, then in the three bowls of distilled water.
- Place the sensor in the orange juice and measure the current. Record the current in your lab notebook.
- Rinse the sensor in the tap water and then in all three distilled water bowls.
- Repeat steps 2–14 in the "Measuring the Conductance" section two more times to obtain a total of three measurements for each liquid.
- Remember that you will need to switch back to the "200μ" setting to measure the distilled water, and then use the "200m" setting to measure tap water, sports drinks, and orange juice.
- Always remember to submerge the conductance sensor to the same depth for each trial. This is important since the conductance depends on the amount of surface area of the wire that is in contact with the liquid.
- Record all data and measurements, including the proper units, in the data table in your lab notebook.
- Average your current measurements across the three trials for each liquid.
- Before you proceed, convert all of your current measurements to amps (A).
- Convert microamps (μA) to amps (A) by dividing by 1,000,000. For example, 20 microamps is 0.00002 amps (20/1,000,000 = 0.00002).
- Convert milliamps (mA) to amps (A) by dividing by 1,000. For example, 20 milliamps is 0.02 amps (20/1,000 = 0.02).
- Calculate the conductance for each liquid by using Equation 1 from the Introduction.
- The current (I) for each liquid is the average current that you calculated. Make sure you convert the current to amps. Do not use milliamps or microamps in Equation 1.
- Since the voltage was always from your 9 V battery, you can use 9 V as the voltage (V) in your calculations. In reality, the voltage is likely to be slightly less than 9 V due to internal resistance of the battery. But this change is quite small and nearly constant across the experiment. Because it is so small, you do not need to take it into account. If you have a second multimeter, you can adapt the circuit to monitor both current and voltage across the battery at the same time.
- Which liquid has the highest conductance, meaning the most electrolytes?
Troubleshooting
For troubleshooting tips, please read our FAQ: Electrolyte Challenge: Orange Juice Vs. Sports Drink.
Ask an Expert
Global Connections
The United Nations Sustainable Development Goals (UNSDGs) are a blueprint to achieve a better and more sustainable future for all.
Variations
- Try other sports drinks and juices.
- What is the conductance of fresh-squeezed orange juice?
- What about the conductance of lemonade?
- Try making your own sports drink, starting with orange juice. If the carbohydrates in the orange juice are higher than they are in the sports drink, dilute the juice with distilled water so that the carbohydrates are about the same as they are in the sports drink. How does the conductance of the diluted juice compare to that of the sports drink?
- Standardize your readings, using tap water as a reference. Divide all of the current measurements for each trial by the current you measured for the tap water. Tap water will have a conductance of 1.0. The fruit juice and sports drinks will then have conductances that are multiples of the tap water's conductance.
Frequently Asked Questions (FAQ)
- I am not sure if my multimeter is set up correctly. How should it be configured?
- My multimeter always reads 00.0 when I try to measure current. What am I doing wrong?
- What does it mean if I am getting a negative current reading on my multimeter?
- Why are my multimeter readings going up and down?
- The current readings on my multimeter seem very low for all of my samples and there is not much variation between them. What should I do?
- I am not sure if the values I am getting are correct. How should I be making my calculations and what is the range that my results will probably fall in?
- Why is it important to keep the wires on the conductance sensor from moving?
- What is the purpose of dipping the sensor in distilled water? Should I replace the distilled water between tests?
- How can I tell if I blew the fuse in my multimeter?
- My multimeter's screen just remains blank when I turn it on. Is it broken?
- One or more of the connections in your circuit may not be attached securely. If just one connection is loose, this will prevent the circuit from being complete, and the multimeter will be unable to take a reading. Double-check all of your alligator clips. Make sure all the connections are snug with metal-on-metal contact (do not clip to any of the plastic, since plastic is an insulator).
- You might not have your multimeter on the correct setting. The currents flowing through the liquids in this experiment are very small, so your multimeter must be set at a high sensitivity. Use 200 microamps (μA) for distilled water, and 200 milliamps (mA) for the other liquids. See Figures 5 and 6 in the Procedure for instructions on how to set your multimeter.
- You might not have your multimeter's probes in the correct ports. Make sure the black probe is in the port labeled "COM" and the red probe is in the port labeled "VΩMA." See Figure 2 in the Procedure.
- The 9 V battery in your circuit might be dead. This is unlikely if you are using a fresh battery from your Science Buddies kit, but the battery could drain if you accidentally left the circuit connected for a long time. You can check whether your battery still works by setting your multimeter to read 20 V DC (labeled "20" in white text on the left side of the multimeter dial) and placing the positive (red) multimeter probe on the positive battery terminal (marked with a "+" sign), and the negative (black) multimeter probe on the negative battery terminal (marked with a "-" sign). If the reading is below 7, your battery may not have enough power for this project and you should use a fresh battery.
- The wires on your conductance sensor may have become compromised in some way. There should be no material collected on them; if there is anything collected on them, clean and rinse them well and try again.
- Your multimeter may have blown a fuse. The fuse contains a thin wire that burns out if too much current flows through it, in order to protect the rest of the multimeter's circuitry. When the experiment is set up as described, but the two sensor wires (in the liquid) touch, it will blow the fuse, so be sure they do not touch. If your multimeter was working well and then suddenly started reading 00.0 all the time, there is a chance you blew the fuse in your multimeter (there is also a chance that one of your connections simply came loose. See the first bullet point above). See the question "How can I tell if I blew the fuse in my multimeter?" to confirm if you blew the fuse.
- It is normal to have very small fluctuations (for example, the reading stays around the same number but increases or decreases slightly). In these types of experiments with multimeters, it can be very difficult to get an entirely stable current.
- If your measurements decreased quickly, you may have encountered a problem with electrolysis. Electrolysis is when water is broken up into hydrogen and oxygen gas by an electrical current. If electrolysis is occurring, there will be little bubbles collecting on the wires on the ends of the conductance sensor. Electrolysis will result in a smaller surface area on the wires on the conductance sensor, and your readings will decrease. If you notice this occurring, rinse of your sensor and try again, and take your reading quickly before lots of bubbles accumulate on the sensor.
- If the wires on the conductance sensor move while you are taking measurements, this can make your measurements randomly vary from sample to sample. To fix this, see the answer for the question "Why is it important to keep the wires on the conductance sensor from moving?"
To calculate the conductance of your different samples, use Equation 1 from the Introduction. Convert your current readings from microamps or milliamps to amps, as described in step 16 of the Procedure. Divide this by the voltage of your battery (which should be about 9 V, but you can measure this with your multimeter to be sure, as described in the fourth bullet point under "My multimeter always reads 00.0 when I try to measure current. What am I doing wrong?"). This will give you conductance in siemens (S), which you can convert to millisiemens by multiplying by 1,000.
- Plug the multimeter's black probe into the port labeled "COM," and the red probe into the port labeled "VΩmA," as shown in Figure 2 in the Procedure.
- Attach the snap connector to the 9 V battery.
- Your kit includes a 1 kΩ resistor, a small tan cylinder with two metal leads sticking out of it. Connect one of the resistor's leads (it does not matter which one) to the black multimeter probe using the black alligator clip, as shown in Figure 7.
- Use the green alligator clip to connect the resistor's other lead to the snap connector's black lead.
- Use the red alligator clip lead to connect the multimeter's red probe to the snap connector's red lead.
- Important: Do not let any exposed metal from the different alligator clips or multimeter probes touch each other. This will create a short circuit and could blow your multimeter's fuse (which is what you are trying to avoid to begin with!).
- Set your multimeter to measure direct current in the 200 mA range (the dial setting labeled "200m" on the right, as shown in Figure 6 in the Procedure).
- Your multimeter should read about 9 mA (maybe slightly less if you are not using a fresh battery).
- If this works, then you know there is nothing wrong with your multimeter. If you are having trouble with your experiment, the problem is with something other than the multimeter.
- If this does not work, and you are confident that you set up the test correctly, as shown in Figure 7, please contact service@homesciencetools.com for assistance.
- When you are done, disconnect the alligator clips so you do not drain the 9 V battery, and remember to turn your multimeter off.
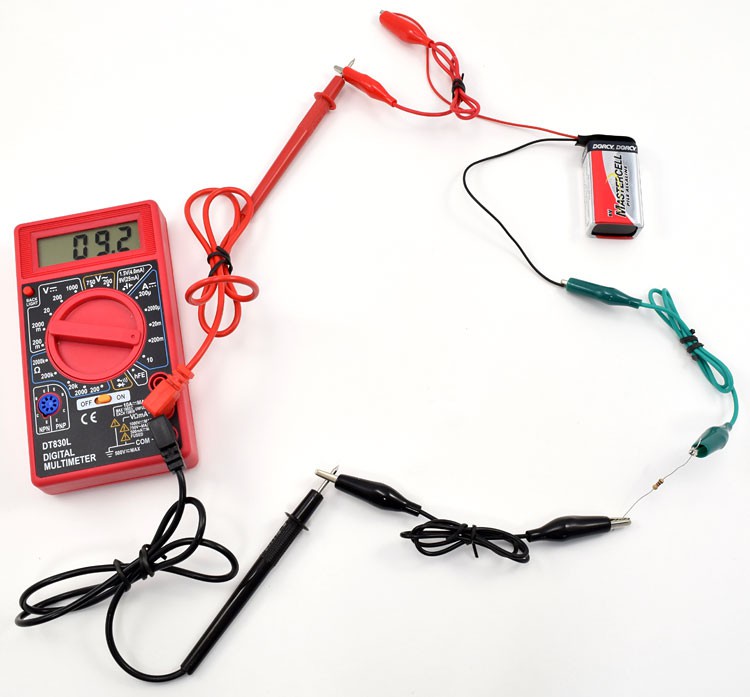 Image Credit: Ben Finio, Science Buddies / Science Buddies
Figure 7. Setup for making sure the multimeter has a working fuse.
Careers
If you like this project, you might enjoy exploring these related careers:
Contact Us
If you have purchased a kit for this project from Science Buddies, we are pleased to answer any question not addressed by the FAQ above.In your email, please follow these instructions:
- What is your Science Buddies kit order number?
- Please describe how you need help as thoroughly as possible:
Examples
Good Question I'm trying to do Experimental Procedure step #5, "Scrape the insulation from the wire. . ." How do I know when I've scraped enough?
Good Question I'm at Experimental Procedure step #7, "Move the magnet back and forth . . ." and the LED is not lighting up.
Bad Question I don't understand the instructions. Help!
Good Question I am purchasing my materials. Can I substitute a 1N34 diode for the 1N25 diode called for in the material list?
Bad Question Can I use a different part?
Contact Us
Related Links
- Science Fair Project Guide
- Other Ideas Like This
- Chemistry Project Ideas
- Sports Science Project Ideas
- Diabetes Project Ideas
- My Favorites
- How to Use a Multimeter


