Abstract
Objects that glow in the dark hold a special place in the imagination of both children and adults. The lights go out at night, but these odd things refuse to disappear. Where does the light come from? Do they work in any climate? In this science fair project, you will make a very simple electronic device to measure the light given off by luminescent materials. The device will be used to study how temperature affects luminescence.Summary
- Google SheetsTM is a registered trademark of Google, Inc.
- Microsoft® is a registered trademark of Microsoft Corporation.
- Excel® is a registered trademark of Microsoft Corporation.
Recommended Project Supplies
/-/https/www.sciencebuddies.org/cdn/Files/9151/22/SB-SENSOR-electronics-sensor-kit-image.jpg)
Objective
Build a simple device to measure the intensity of light produced by glow sticks and other glow-in-the-dark materials, and determine how temperature affects the intensity of luminescence.
Introduction
/-/https/www.sciencebuddies.org/cdn/Files/8035/7/glowing-in-the-dark-thumbnail.png)
Have you ever wondered why glow-in-the-dark objects actually glow? There is no battery attached to them and no other apparent source of energy that would explain where the light is coming from. So what makes them glow? The simple answer is that there are two types of glow-in-the-dark phenomena that make objects glow: chemiluminescence and phosphorescence. The more complicated part is how these phenomena actually work.
Chemiluminescent objects, such as glow sticks, use chemical energy to produce light. When you twist or bend a glow stick, you start a chemical reaction. One of the products of the reaction is light. There are three components of a glow stick: a solution of hydrogen peroxide, a solution of a phenyl oxalate ester, and a fluorescent dye. The basic premise of the reaction is that the reaction between the two chemicals releases enough energy to excite the electrons in the fluorescent dye from the ground state to the excited state, as shown in Figure 1. This causes the electrons to jump to a higher energy level and then fall back down and release light in a process called fluorescence. Depending on the dyes used, a variety of colors can be produced.
/-/https/www.sciencebuddies.org/cdn/Files/8034/8/principle-luminescence.png)
Diagram showing three different energy states of electrons. The ground state is a neutral state that electrons will try to return to. Electrons can gain energy and move to an excited state. When they return from an excited state to the ground state, they release energy in the form of fluorescence. Electrons can also be trapped in a meta-stable state when returning to the ground state. When an electron is able to move from a meta-stable state back to the ground state, energy is released in the form of phosphorescence.
Figure 1. Energy scheme that shows phosphorescence and fluorescence. When photons interact with a material, electrons can be excited from the ground state to an excited state. When they return to the ground state, they release their energy in the form of light (fluorescence). Electrons can also be trapped in a meta-stable state and when these electrons relax to the ground state they release light by phosphorescence.
Phosphorescent objects also produces glow-in-the-dark "magic," but by a different mechanism than that of chemiluminescence. Phosphorescent objects also do not use batteries to glow. In fact, they behave like batteries themselves—you "charge" them up with light, and they then provide a steady source of light for hours after. The basis for this afterglow is the unique way that the molecules in phosphorescent materials react to light. When you shine a light on an object, such as a glow-in-the-dark toy, you are bombarding it with photons. Photons are small packets of energy that have zero mass and travel at the speed of light. When a stream of photons collides with a solid material, the photons interact with the electrons in the material. Electrons that absorb photons move to a higher energy level, the excited state. Eventually, the electrons return to the lower "normal" energy level, called the ground state. In the case of a phosphorescent material, however, some of the electrons that interacted with the photons become trapped in a meta-stable state. These electrons have absorbed energy from the photons, which moves them into a higher energy state, but they are not able to release the energy right away. The term meta-stable implies that they are in a precarious situation—they could be knocked back down to their normal energy level with just a little jostling. An electron in a meta-stable state is like a flying disc or a ball caught in the branches of a tree—it is temporarily resisting the pull to a lower state, but a little shaking will bring it back down.
In the case of an electron in a meta-stable state, in a phosphorescent material, the "shaking" is caused by heat. The higher the temperature of the object is, the more energetic the motion of the molecules in the object will be. The molecules can bump into each other, and if a meta-stable electron is bumped just right, it will fall back to its normal energy level. The electron might stay in its meta-stable state for seconds, hours, or even days, but on average, the length of the meta-stable state decreases at higher temperatures. When the electron is eventually jostled down from its meta-stable state, it gives up the energy it possessed as a photon. The glow you see in a phosphorescent object results from the release of energy in from of photons that originate from meta-stable electrons that return to a lower energy level, as shown in Figure 1.
Now that you know how glow-in-the-dark objects work, the next question is how you can actually measure their glow. In this science project, you will do this with a simple self-made device that will allow you to measure the amount of light that is given off by luminescent objects. You will do this using a photoresistor, a special type of electrical resistor that is sensitive to light. This is handy if you want to measure the level of light. Its resistance to the flow of electricity, which is measured in ohms (Ω), is altered by light and is very high in the dark and very low in bright light. So, if you put a glow-in-the-dark object in a jar and place a photoresistor in the lid of the jar, its resistance will change depending on how much the object glows. You will use a multimeter to measure the resistance of the photoresistor. To isolate the luminescent material from the surrounding light, you will build a special measuring jar, as described in the Procedure. Get ready to measure the glow!
Terms and Concepts
- Chemiluminescence
- Phosphorescence
- Ground state
- Excited state
- Fluorescence
- Photon
- Electron
- Energy level
- Meta-stable state
- Photoresistor
- Resistance
- Ohm
Questions
- What kinds of chemicals or minerals are phosphorescent?
- What are some similarities and differences between chemiluminescence and phosphorescence?
- How would you expect temperature to affect the length of time a phosphorescent object glows after being exposed to light?
- What will happen if you put a glow stick in hot water? In other words, how does increased heat affect the rate of a chemical reaction, such as the one in a glow stick? Hint: Look up the Arrhenius equation.
- How does a photoresistor work?
Bibliography
- Helmenstine, A.M., Ph.D. (2008). How Do Lightsticks Work?. Retrieved June 14, 2016.
- Wikipedia. (2016). Phosphorescence. Wikipedia: The Free Encyclopedia. Retrieved June 6, 2016.
- Schmidt, W. (2008). Super-bright glow-in-the-dark paints. Retrieved June 14, 2016.
- Nave, R. (2008). Quantum Processes. Retrieved June 14, 2016.
- Science Buddies. (n.d.). How to Use a Multimeter. Retrieved June 14, 2016.
Materials and Equipment 
Recommended Project Supplies
- Electronic Sensors Kit, available from our partner
Home Science Tools®.
You will need these items from the kit:
- Photoresistor
- Digital multimeter
- Alligator clip leads (2)
- You will also need to gather these items, not included in the kit:
- Glass jar with lid, big enough to hold your glow-in-the-dark-objects
- Glow sticks or glow bracelets (3 of one color), small enough to fit easily in the glass jar, available at most toy stores or from Amazon
- Aluminum foil
- Black electrical tape
- Drill with 1/4-inch drill bit to make a hole in the jar lid; a stiff knife will work, too.
- Safety goggles
- Liquid measuring cup
- Heat-resistant cup
- Tap water (hot and cold)
- Ice cubes
- Timer or stopwatch
- Helper to record data
- Lab notebook
Disclaimer: Science Buddies participates in affiliate programs with Home Science Tools®, Amazon.com, Carolina Biological, and Jameco Electronics. Proceeds from the affiliate programs help support Science Buddies, a 501(c)(3) public charity, and keep our resources free for everyone. Our top priority is student learning. If you have any comments (positive or negative) related to purchases you've made for science projects from recommendations on our site, please let us know. Write to us at [email protected].
Experimental Procedure
Building Your Light-Measuring Device
- Your Electronic Sensors Kit comes with a lot of small parts. Find the photoresistor—it is a small, round part, with a squiggly line on the front and two metal leads, as shown in Figure 2.
/-/https/www.sciencebuddies.org/cdn/Files/7150/40/photoresistor-picture.jpg)
Figure 2. A photoresistor.
- Make your light-measuring device by wrapping the glass jar in aluminum foil and taping a photoresistor in the lid with electrical tape, as shown in Figure 3.
- Put on your safety goggles and drill a hole in the center of the jar lid, about 1/4 inch in diameter.
- Wrap aluminum foil around the sides of the glass jar so no light gets in and seal all edges securely with black electrical tape.
- Bend the leads of the photoresistor sideways and cover them in electrical tape, so they do not bump into each other and create a short circuit. Leave a small amount of exposed metal at the ends of the leads, so you can attach alligator clips to them later. If your jar lid is made of metal, also cover the metal lid with electrical tape.
- Tape the photoresistor over the hole in the jar top, as shown in Figure 2, so it is facing inside the jar when the lid is closed (the side with the squiggly line should be facing the inside of the jar). Make sure to let the leads of the photoresistor stick out from under the tape, so you can attach alligator clips to them later. Important: Do not let the leads of the photoresistor touch the aluminum foil. Make sure to insulate the aluminum foil and the leads with electrical tape; otherwise you will create a short circuit and the resistance of your photoresistor will always read zero.
/-/https/www.sciencebuddies.org/cdn/Files/8032/6/measuring-device.jpg)
Figure 3. Preparing your light-measuring device by inserting the photoresistor into the lid of a glass jar (left) and wrapping the jar in aluminum foil (right). Make sure to seal all edges and protect the photoresistor from creating a short circuit
- Determine the resistance baseline for your measuring device and measure the resistance of the photoresistor for the jar with nothing in it and with the lid on and off.
- Set up your measuring device in a room with as few disturbances in lighting as possible. The photoresistor is very sensitive, so variations in sunlight coming through a window on a cloudy day, or even shadows and reflections created as people walk around the room, can all affect the readings if you did not seal your jar properly.
- Set up your multimeter to measure the resistance of the photoresistor.
- Plug the black multimeter probe into the port labeled COM.
- Plug the red multimeter probe into the port labeled VΩmA.
- Connect the multimeter probes to the leads of the photoresistor using alligator clips. Make sure the metal parts of the alligator clips do not touch the aluminum foil, or this will create a short circuit.
- Set the multimeter dial to measure resistance in the 200 kilo-ohm (kΩ) range.
- Turn the power switch ON.
- If this is your first time using a multimeter, see the Science Buddies reference How to Use a Multimeter, particularly the section How do I measure resistance? to learn more.
- Leave the lid open and expose the photoresistor to the surrounding light. Read the resistance across the photoresistor and record it in your lab notebook.
- Note the units of the resistance. A "k" indicates kilo-ohms (kΩ).
- If your multimeter screen displays a "1.", that means the resistance is too high for the dial setting. Turn the dial up to the next highest range (for example, from 200 k to 2000 k) and check again.
- Close the jar with the photoresistor lid and read the resistance across the photoresistor again. In the dark, the resistance should be in the mega-ohm range. Remember that you may need to adjust the dial setting to get a measurement. Record the resistance in your lab notebook. Note: The light level in the closed, light-protected (aluminum-foil-wrapped) jar should be the same when the jar is in a lighted room or in a dim room. If it changes, that means there is a light leak. Find the problem area and cover the light leak with electrical tape.
/-/https/i.ytimg.com/vi/ts0EVc9vXcs/maxresdefault.jpg)
Measuring Luminescence
Now your light-measuring device is ready for measuring the light intensity of your glow sticks. To minimize unwanted variations during your experiment, position the glow sticks in the jar the same way for each trial, keep movement of the setup to a minimum, and work with a helper so that you can record your readouts quickly. Feel free to also vary the times given below, if you want to obtain further data.
- First, you will investigate how the light intensity of the glow-in-the-dark object changes over time.
- Set your timer to 15 minutes.
- Twist a glow stick or glow bracelet to start the reaction. Make sure to shake it enough so that it glows evenly.
- Place the glowing object in the aluminum-foil wrapped jar and place the lid on. Your measurement setup should look like the one shown in Figure 3. Start your timer.
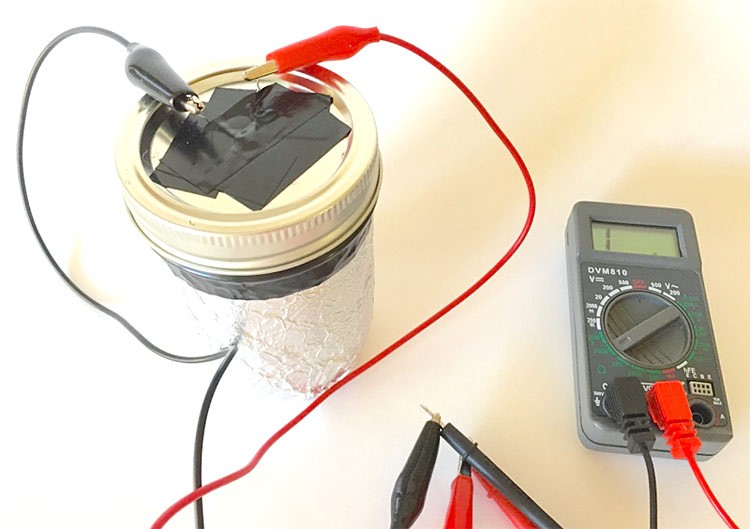
Figure 3. Setup of the light-measuring device for measuring the light intensity of glow-in-the-dark objects.
- Record the time and signal strength produced by the light of the glow stick every minute for 15 minutes.
- Next, you will investigate how temperature affects the light intensity of the glow-in-the-dark object.
- Once the 15 minutes are over, open the jar and add cold water to decrease the temperature, as follows:
- Prepare a cup of ice cold water by putting a couple of ice cubes in a cup of tap water.
- Open the jar, remove the ice cubes, and fill the jar with the cold water so that the glowing object is fully submerged.
- Carefully close the jar again.
- Set your timer to 10 minutes and record the resistance of the glow-in-the-dark object in cold water once the 10 minutes are over.
- Next, open the jar and replace the cold water with hot water to increase the temperature, as follows:
- Prepare a cup of hot water (approximately 50°C or 112°F) by either taking hot water directly from the tap or by heating some water on the stove.
- Carefully open the jar, pour out the cold water and re-fill the jar with the hot water so that the glowing object is fully submerged.
- Carefully close the jar again.
- Set your timer to 10 minutes and record the resistance of the glow-in-the-dark object in hot water once the 10 minutes are over.
- Once the 15 minutes are over, open the jar and add cold water to decrease the temperature, as follows:
- Repeat steps 1 and 2 two more times with fresh glow sticks of the same color and a new cup of cold and hot water (pour out the old water) until you have clear data showing the following:
- How the light signal decays with time.
- How temperature affects the light intensity.
/-/https/www.sciencebuddies.org/cdn/Files/8033/7/measuring-setup1.jpg)
Analyzing Your Data
- Make a data table with the resistance readings over time for each trial.
- Calculate the average resistance for each time point from all three of your trials. Plot your data showing the time, in minutes, on the x-axis, and the average resistance, in ohms or kOhms, on the y-axis. Your resistance curve should start with a low level at first and then gradually rise to a higher level as the light intensity decays. Remember that the resistance of the photoresistor increases with decreasing light intensity. Discuss the shape of the curve. Is it a straight line or something else?
- Make another data table with the temperature (room temperature, hot, and cold) and the resistance readings, in ohms or kOhms, after 10 minutes for each temperature. Graph your results in a bar graph with the temperature on the x-axis and the resistance on the y-axis. What happened to the resistance when you changed the temperature? How did the light intensity change in a hot compared to a cold environment? From your results, do you think the glow-in-the-dark objects will glow longer in summer or winter?
Ask an Expert
Global Goals
The United Nations Sustainable Development Goals (UNSDGs) are a blueprint to achieve a better and more sustainable future for all.
/-/https/www.sciencebuddies.org/cdn/Files/19752/5/E-WEB-Goal-09.png)
Variations
- Find out how long glow-in-the-dark objects actually glow. Repeat this experiment, but continue to measure the light intensity (resistance) beyond 15 minutes until you do not get any resistance reading anymore (meaning that the numbers get out of range on the highest setting 2000 k), or approach the resistance reading that you get during your baseline determination in the dark (jar with nothing inside and closed lid). Remember to adjust the measurement range on the multimeter when the resistance values get higher. Once the numbers do not change that much anymore, you can space out the resistance readings to 5 or 10 minutes.
- Does the color of the glow stick make a difference in how long or bright they do glow? Compare the light intensities and glow behavior of different colored glow sticks. Note that the photoresistor is cadmium sulfide (CdS) and its signal response is dependent on the wavelength of light. Try to find graphs online that show the spectral response of the CdS photoresistor signal and normalize your data based on the percentage response at each wavelength.
- Besides changing the brightness of the glow sticks, does the temperature also change how long the glow sticks glow? Repeat this experiment, but this time start the measurements at different temperatures by submerging the glow stick in hot or cold water and keeping the temperature constant in a water bath. Monitor the resistance (light intensity) until the glow stick stops glowing and compare the different glow times for all tested temperatures.
- How long do phosphorescent materials glow? Repeat this experiment. but this time use phosphorescent materials such as paint, glow-in-the-dark stars, or other toys. Charge the object by exposing it to light for a specific time and then put it in the jar and monitor the resistance over time. The decay might happen much faster, so adjust your readout time accordingly. Also, as phosphorescent objects are usually not as bright as chemilumenescent ones, you might have to put the photoresistor closer to the object to get good data.
Careers
If you like this project, you might enjoy exploring these related careers:
/-/https/careerdiscovery.sciencebuddies.org/cdn/Files/1223/17/iStock-971549326.jpg)
/-/https/careerdiscovery.sciencebuddies.org/cdn/Files/1242/20/iStock-113511101.jpg)
Contact Us
Our kits are developed in partnership with Home Science Tools®. If you have purchased a kit for this project, Home Science Tools® is pleased to answer any questions.In your email, please follow these instructions:
- Include your Home Science Tools® order number.
- Please describe how you need help as thoroughly as possible:
Examples
Good Question I'm trying to do Experimental Procedure step #5, "Scrape the insulation from the wire. . ." How do I know when I've scraped enough?
Good Question I'm at Experimental Procedure step #7, "Move the magnet back and forth . . ." and the LED is not lighting up.
Bad Question I don't understand the instructions. Help!
Good Question I am purchasing my materials. Can I substitute a 1N34 diode for the 1N25 diode called for in the material list?
Bad Question Can I use a different part?
Contact Support

/-/https/img.youtube.com/vi/8s9hg4C80Ik/0.jpg)
/-/https/img.youtube.com/vi/dZhmcai85Y0/0.jpg)
/-/https/img.youtube.com/vi/2MOFAHGUGps/0.jpg)