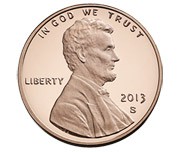
From Dull to Dazzling: Using Pennies to Test How pH Affects Copper Corrosion
Abstract
Pennies are bright and shiny when they are new, but become quite dull with time. What causes such a drastic change? Oxygen in the air combines with the copper in the penny to form copper oxide, which makes the penny look dull and dingy. You can make the pennies look like new again by soaking them in water that is corrosive enough to strip off the copper oxide layer. It turns out, however, that the same process that makes the pennies shiny has bad consequences when it comes to copper pipes: it also corrodes the pure copper thus releasing excess copper into the drinking water and wearing holes in the pipes! In this science fair project, experiment with copper chemistry using an easy test that turns copper-containing solutions a deep blue. How does making water acidic change its ability to corrode copper?Summary
David B. Whyte, PhD, Science Buddies
Recommended Project Supplies
Objective
Test how the pH of solutions influences copper corrosion using a color-based chemical copper test.
Introduction
Copper is an essential element for all known living organisms, including humans. You need a small amount of copper in your diet to stay healthy. On average, most people will eat and drink about 1,000 micrograms (μg) of copper per day—drinking water normally contributes approximately 150 μg per day. Levels of copper found naturally in ground water and surface water are typically very low—about 4 μg of copper in one liter (L) of water or less—however, drinking water may contain higher levels of copper, usually as a result of flowing through copper pipes. High levels of copper can occur if water that is corrosive comes in contact with copper plumbing and copper-containing fixtures. Many factors can make water corrosive for copper pipes: dissolved salts and minerals, bacteria, and suspended solids, such as sand, sediment, and rust. The level of copper in drinking water increases with the corrosivity of the water and the length of time it remains in contact with the plumbing. If the copper level gets too high, the water may have a metallic taste and you might notice blue or blue-green stains around sinks and plumbing fixtures similar to the stains present on the copper pipe shown in Figure 1. It will be highest in the morning because the water will have been exposed to the pipes overnight. If you are being served by a public water system, the owner of the utility will have results of copper sampling, which is a process that has been done in parts of the water-distribution system.
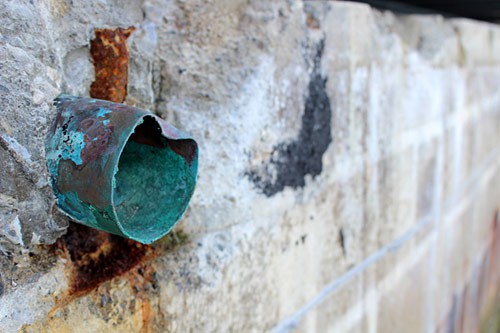 Image Credit: pictures.net by Julie Gentry / CC0 1.0 Universal (CC0 1.0), Public Domain Dedication
Figure 1. Copper pipe in a wall showing signs of corrosion.
In this chemistry science fair project, you will investigate another possible factor in making water corrosive for copper — the pH of the water. To learn more about pH, you can check out the Science Buddies Acids, Bases, & the pH Scale guide. You will test the theory that acidic water is more corrosive for copper pipes than non-acidic water. In the procedure, dingy copper pennies will be placed in either plain water or in water with acetic acid (vinegar). You may know that newly minted pennies have bright, shiny copper but over time the copper and air react and the pennies build up a layer of copper oxide on them. The copper oxide is the dull, dark coloration on well-used pennies as shown in Figure 2 on the right. In this experiment, if the water is corrosive enough to strip off the copper oxide then you will see the progress of the reaction by watching the pennies go from dull and dingy to bright and shiny. The pennies get shiny because the copper oxide is being stripped off by a reaction, which results in increasing levels of copper in the liquid. Unfortunately, water that is corrosive slowly eats away at the pure copper, as well as at the copper oxide. For houses with corrosive water systems, this can result in elevated levels of copper in the drinking water. On a purely practical level, houses with corrosive water systems might find that their copper pipes are springing leaks, and that the whole house needs to be re-piped with plastic pipes!
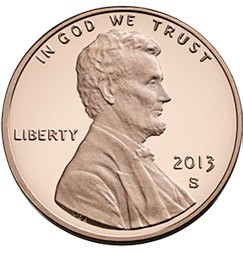 Image Credit: Wikimedia Commons Daniel Schwen / Public domain
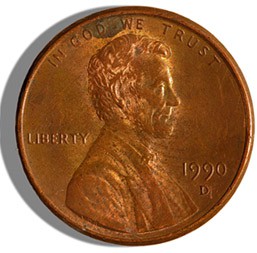 Image Credit: Wikimedia Commons, user: Dschwen / Wikimedia Commons Public domain
Figure 2. A new, shiny copper penny (left) and an old, used copper penny showing a dull layer of copper oxide.
(Image credit: Wikimedia Commons, old coin image by Daniel Schwen).
To measure the amount of copper present in the solutions that are used to clean the pennies, you will perform a color-based chemical test. The chemicals for the test are contained in a small tablet, which is dissolved in water. If copper is present, the solution will change into a different color depending on the copper concentration. There are additional tests in the kit for iron which you can use for other experiments, but this experiment focuses on the copper test. If you are interested in trying this chemistry science fair project, search your house or your parents' car for some old pennies and let's get started!
Terms and Concepts
- Copper
- Element
- Corrosive
- Acid
- pH
- Acetic acid
- Control solution
Questions
- What is the concentration of copper in your tap water, according to the government organization that supplies your drinking water? They test for copper and many other water contaminants to make sure the water supply is safe.
- What does the pH scale measure?
- Based on your research, what are some ways your body uses copper?
- Based on your research, what are some negative consequences of having too much copper in your water supply?
Bibliography
- Winter, M. (2009). Copper. Retrieved October 24, 2009.
- Wikipedia Contributors. (2009, October 26). Copper. Wikipedia: The Free Encyclopedia. Retrieved October 24, 2009.
- Wisconsin Department of Natural Resources. (2003). Copper and Your Health. Retrieved October 25, 2009.
Materials and Equipment 
Recommended Project Supplies
- Copper & Iron Test Kit, available from our partner
Home Science Tools.
You will need these items from the kit:
- Copper test tablets (8).
- Test tubes, size 16 mm x 150 mm (4)
- Graduated cylinder, 10 mL volume
- Downloadable material safety data sheets (MSDS) for all chemicals in the kit; required by some science fairs
- You will also need to gather these items, not included in the kit:
- Distilled water; available at most grocery stores (1 gallon)
- Skewers, bamboo or metal, for mixing
- White vinegar
- Permanent marker
- Lab notebook
- Plastic cups, 16-ounce (oz.) size (12)
- Pennies, should all be dull and dingy (30)
- Note: Pennies made before 1982 were 95% copper, whereas pennies made after 1982 are mostly zinc with a thin copper plating. Both kinds will work in this procedure.
- Timer or stopwatch
- Strainer with a handle, small
- Paper towels
- Liquid measuring cup, metric
Disclaimer: Science Buddies participates in affiliate programs with Home Science Tools, Amazon.com, Carolina Biological, and Jameco Electronics. Proceeds from the affiliate programs help support Science Buddies, a 501(c)(3) public charity, and keep our resources free for everyone. Our top priority is student learning. If you have any comments (positive or negative) related to purchases you've made for science projects from recommendations on our site, please let us know. Write to us at scibuddy@sciencebuddies.org.
Experimental Procedure
Important Note Before You Begin: The procedure below is designed for students who have not yet had a chemistry class in school. It can be modified to provide more-accurate readings of the copper concentration by using more-advanced test kits, if desired. See the Variations section for sources of more-advanced chemistry kits.
Creating the Control Solutions
- Using the graduated cylinder, fill one of the test tubes with 10 milliliters (mL) of distilled water.
- Fill another test tube to 10 mL with white vinegar.
- Add one copper test tablet to each tube.
- Using skewers, mix the contents in the test tubes until the tablets disintegrate and fall apart.
- Make a note of the colors of the solutions in your lab notebook. Depending on your solution, the colors can vary from reddish-orange to pink as shown in Figure 3.
- These are control solutions that show the baseline color—meaning, without exposure to copper.
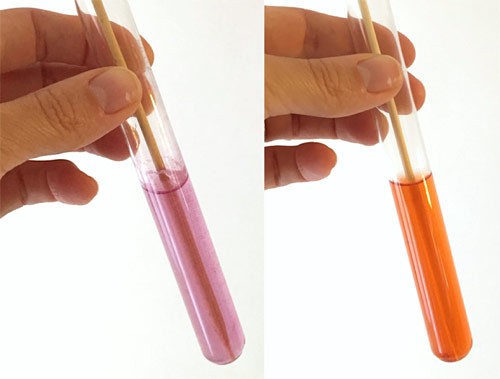 Image Credit: Svenja Lohner, Science Buddies / Science Buddies
Figure 3. Once the copper test tablets are fully dissolved, the color of your solutions should look reddish-orange or pink. These photos show the range in color you might see.
Placing the Pennies in the Water and Vinegar Solutions.
- Label four of the plastic cups, as follows:
- Water 1
- Water 2
- Vinegar 1
- Vinegar 2
- Using the liquid measuring cup, pour 100 mL of vinegar in the cup labeled Vinegar 1.
- Pour 100 mL of distilled water in the cup labeled Water 1.
- Drop five pennies into each cup.
- Note: The kit suggests adding salt, but leave it out for this procedure. Vinegar contains acetic acid, which makes the reaction proceed faster.
- Start the timer. Wait for 10 minutes.
- Remove the pennies from the cups, using the strainer, as follows.
- Pour the contents of the Water 1 cup into the Water 2 cup, catching the pennies with the strainer.
- Rinse the pennies with tap water and place them on some dry paper towels. Make sure you keep track of from which cup they came.
- Pour the contents of the Vinegar 1 cup into the Vinegar 2 cup, catching the pennies with the strainer.
- Rinse the pennies with tap water and place them on some dry paper towels, again keeping track of from which cup they came.
Testing the Solutions for Copper
- Using the graduated cylinder, fill a clean test tube to 10 mL with the water from the cup labeled Water 2 (which was originally the water from the Water 1 cup).
- Always rinse and dry the graduated cylinder between uses.
- Fill another test tube to 10 mL with vinegar from the cup labeled Vinegar 2 (which was originally the vinegar from the Vinegar 1 cup).
- Add one copper test tablet to each test tube.
- Use the skewers to mix the contents of the test tubes until the tablets disintegrate and fall apart.
- The solution will turn blue if a large enough quantity of copper is present as shown in Figure 4.
- Hold the test tube against the white part of the Copper Color Chart that is supplied with the kit.
- Match the color of the solution to the color on the chart.
- Record the results in your lab notebook.
 Image Credit
Figure 4. In the presence of large enough quantities of copper, the copper test tablets will turn the water blue as shown in this picture.
 Image Credit
Figure 4. In the presence of large enough quantities of copper, the copper test tablets will turn the water blue as shown in this picture.
Cleaning the Test Tubes and Repeating the Tests
- Pour out the contents of the two test tubes from the cups with pennies into a sink.
- Wash the solutions down the drain with running water.
- Rinse out the test tubes with water.
- Place them upside down on paper towels.
- Carry out the procedure two more times, as follows. This will demonstrate that your results are repeatable.
- Start with the Placing the Pennies in the Water and Vinegar Solutions section.
- Do not repeat the controls.
- Use fresh pennies and cups.
- When the procedure is complete, rinse out the test tubes that contained the samples and the controls and allow them to dry on paper towels.
- Make a data table showing the color of the water and vinegar test solutions for each trial.
- What do your results tell you about how pH affects the corrosion of copper pipes?
Troubleshooting
For troubleshooting tips, please read our FAQ: From Dull to Dazzling: Using Pennies to Test How pH Affects Copper Corrosion.
Ask an Expert
Global Connections
The United Nations Sustainable Development Goals (UNSDGs) are a blueprint to achieve a better and more sustainable future for all.
Variations
- Measure the concentration of copper in the solutions using a test kit that provides more-accurate readouts for copper concentration, such as the Hach Copper (Free & Total) Color Disc Test Kit, Model CU-6, product # 2194100, 0.1-4 mg/L Cu. Visit www.hach.com to find where you can buy this kit.
- Devise a procedure to determine how the rate of copper corrosion varies with the pH of the water.
- Test the copper concentration in the drinking water at your home using a copper test kit. Compare the levels in the morning vs. later in the day after the system has been flushed out.
- Devise a procedure for testing how salt (sodium chloride) affects the rate of corrosion of copper pipes.
Frequently Asked Questions (FAQ)
- The most easily visible change should be that the pennies get a bit cleaner from being in the vinegar. However, if you are using pennies that are already really clean, it's going to be difficult to see a large difference. It is still very possible that the copper of the penny reacted with the vinegar, which should be revealed using the copper test kit.
- It may take some time to be able to visibly see that the reaction has taken place between the copper in the pennies and the vinegar. After they are treated with vinegar, let the pennies sit on the paper towels for about an hour and then see if the pennies have changed.
- It is possible that that particular test just didn't work for some reason. This is why it is important to always repeat your procedure to have more data to corroborate, or back up, your claims. When repeating the project again, make sure that every step is followed carefully and see if the pennies look different!
Ask an Expert
Careers
If you like this project, you might enjoy exploring these related careers:
Contact Us
If you have purchased a kit for this project from Science Buddies, we are pleased to answer any question not addressed by the FAQ above.In your email, please follow these instructions:
- What is your Science Buddies kit order number?
- Please describe how you need help as thoroughly as possible:
Examples
Good Question I'm trying to do Experimental Procedure step #5, "Scrape the insulation from the wire. . ." How do I know when I've scraped enough?
Good Question I'm at Experimental Procedure step #7, "Move the magnet back and forth . . ." and the LED is not lighting up.
Bad Question I don't understand the instructions. Help!
Good Question I am purchasing my materials. Can I substitute a 1N34 diode for the 1N25 diode called for in the material list?
Bad Question Can I use a different part?
Contact Us
Related Links
- Science Fair Project Guide
- Other Ideas Like This
- Chemistry Project Ideas
- My Favorites
- Acids, Bases, & the pH Scale


