Abstract
Have you ever gotten a shock touching a doorknob after walking across a carpet? Static charge is responsible for that shock. Wouldn't it be cool to save up and store all of that charge in a homemade jar? It would almost be like storing lightning. This science project will show you how to do that.Summary
Michelle Maranowski, PhD, Science Buddies
This project is based on the "Charge and Carry" project on the Exploratorium website:
Exploratorium. (n.d.). Charge and Carry: Store up an electric charge, then make sparks. Retrieved March 25, 2008.
Apple® is a registered trademark of Apple Inc.
iPhoneTM is a trademark of Apple Inc.
StyrofoamTM is a registered trademark of The Dow Chemical Company.
Scotch® is a registered trademark of 3M.
/-/https/www.sciencebuddies.org/cdn/Files/3257/5/Elec_img116.jpg)
Objective
Learn about one of the building blocks for all types of circuits-the capacitor. In this science project you will build a Leyden jar capacitor out of common household materials and determine how much charge is stored as you test different charge cycles.
Introduction
Static charge is the buildup of charge on an object. In 1745, Ewald Georg von Kleist invented a tool to capture and store static charge. At approximately the same time, Pieter van Musschenbroek from Leiden, the Netherlands, invented a similar tool. This tool is called the Leyden jar. The Leyden jar provided early electrical experimenters with a way to store electrical charge and then move it to another place to use. You can read more about static electricity in the Science Buddies Electricity, Magnetism, & Electromagnetism Tutorial.
Leyden jars come in all shapes and sizes, but they all have the same design. The jar, which serves as the insulator, separates an inner conductive layer (or electrode) and an outer conductive layer (also an electrode). Examples of a conductive layer are aluminum foil and gold leaf. There is usually a metal rod with a ball on top placed in the mouth of the jar. The rod, or a chain connected to the rod, touches the inner conductor and is the conduit for electrical charge to the jar.
/-/https/www.sciencebuddies.org/cdn/Files/3253/5/Elec_img112.gif)
Benjamin Franklin was an early electricity experimenter. He built and experimented with the Leyden jar. One of Franklin's favorite experiments was the "circle shock." In the circle shock, a group of people hold hands and one person at the end of the human chain holds the outside of the Leyden jar, while the person on the other end of the human chain touches the inner conductor. If there is enough charge in the jar, every person in the circle will feel a shock. Don't try this experiment, because you can get a nasty shock!
The original Leyden jar held water as the inner conductor. Early electrical experimenters thought that the charge was held in the water. However, Benjamin Franklin was the first person to figure out that the charge in the Leyden jar is located where the insulator meets the electrode (in this case, the water). Thus, water is not required and can be replaced by attaching an electrode, such as aluminum foil, to the inside of the jar. Franklin also connected several Leyden jars together and created what he called a battery. This is not a battery like we know today, but it was a way to store lots of charge for Franklin's electrical experiments.
The Leyden jar is an interesting device because it is the precursor to the modern capacitor. A capacitor is an electrical component that is used to store charge, and along with the resistor and batteries (or voltage supply), forms the basis of all circuits. Both capacitors and batteries are similar in that they are components that store charge. The major difference between a battery and a capacitor is that a battery produces charge through a chemical reaction. A capacitor is much simpler as it can't produce charge, it can only store charge. Capacitors are used in timer circuits and logic circuits and a variety of applications. For example, the screen on the Apple® iPhoneTM is a capacitive touch screen.
In this science fair project, become Ben Franklin and build your own Leyden jar. You will also build an electrophorus. An electrophorus is a tool that is used for transferring charge to the Leyden jar. Try using small jars that you can find around the house. Experiment with how much charge your Leyden jar can hold. Remember that even a small jar can store a lot of charge, so be very careful or you can get a painful shock.
/-/https/www.sciencebuddies.org/cdn/Files/3252/5/Elec_img111.jpg)
Terms and Concepts
- Static charge
- Leyden jar
- Benjamin Franklin
- Battery
- Capacitor
- Electrophorus
- Ground
- Static electricity generator
- Charge dissipation
Questions
- What kinds of materials can you use to create static charge?
- What kinds of jars can you use to store charge?
- Does changing the size of the electrodes affect the amount of stored charge?
- Is there a limit to the amount of charge the Leyden jar can hold?
- How long will the Leyden jar hold the charge? An hour? A day? This is called charge dissipation and this is a key factor that circuit designers evaluate.
Bibliography
- Check out the "Charge and Carry" project on the Exploratorium website:
Exploratorium. (n.d.). Charge and Carry: Store up an electric charge, then make sparks. Retrieved March 25, 2008. - The following website shows different homemade Leyden jars and has some additional sources:
Leyden Jars. (n.d.). Retrieved March 25, 2008. - This website has a good general page on capacitors:
Brain, M. and Bryant, C. (2008). History of the Capacitor. Retrieved March 25, 2008.
Materials and Equipment
-
Assembling the Electrophorus
- Disposable aluminum pie pan
- StyrofoamTM cup
- Tape, Scotch® (1 roll); do not use any other kind of tape.
-
Assembling the Leyden Jar
- Small plastic jar with lid; a film canister, which is generally made with HDPE (high-density polyethylene) plastic, works very well
- Hammer
- Nail (a plain metallic nail that is slightly longer than the jar you are using)
- Small piece of aluminum foil
- Tape, Scotch® (1 roll); do not use any other kind of tape.
- Spoon
- Tap water
- Paper towel
-
Charging the Electrophorus
- Acrylic sheet; available at hardware stores or from Amazon.com. The sheet should be larger than the pie pan. Acrylic sheets occasionally come with an adhesive piece of plastic stuck to it. This is to protect the surface of the acrylic. Before starting this science fair project, make sure to peel off and remove all adhesive coverings from the acrylic sheet.
- Wool cloth (sweater, socks, or wool felt)
- Assembled electrophorous
- A stable wood table or a stable table with a wood top. Make sure that the table is completely cleared off. Also, before starting, make sure that the table is completely washed and dried off.
-
Measuring the Charge
- Small piece of an aluminum sheet (an aluminum cover for an electrical box works well, as shown in Figure 6); available at hardware stores or from Amazon.com
- Large, flat piece of Styrofoam
- Plastic travel soap dish (clamshell variety); the soap dish should be rectangular
- Scissors
- A piece of insulated wire, 6" long
- Wire strippers
- Tape, Scotch® (1 roll); do not use any other kind of tape.
- Metric ruler
-
General
- Fine-tip pen
- Insulated tongs
- Lab notebook
- Graph paper
Experimental Procedure
Safety Note: Adult supervision is recommended for this project. While the amount of current that can flow from this device is low, the amount of charge held in the device can cause a mild to moderate shock. To safely discharge the Leyden jar, take insulated tongs and touch the outside foil electrode to the nail, while holding onto the insulated handles. Always exercise caution when dealing with electricity and electrical parts.
The first step in this experiment is to make the Leyden jar and the electrophorus that is used to charge the Leyden jar.
Assembling the Electrophorus
-
Take the Styrofoam cup and place the wide end of the cup in the middle of the inside of the aluminum pie pan. Tape the cup to the pie pan. Just tape the edge of the cup. You don't need too much tape. See Figure 3. Set the electrophorus aside.
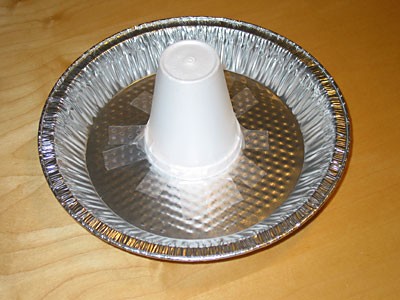 Figure 3. Simple electrophorus.
/-/https/www.sciencebuddies.org/cdn/Files/3254/5/Elec_img113.jpg)
Assembling the Leyden Jar
- Gently hammer the nail through the top and middle of the plastic jar's lid. Make sure that the nail almost hits the bottom of the jar when the lid is back on and that it is straight and not tilted in one direction or another. Ask an adult for help. Then take the lid off and set it aside.
- Take the piece of aluminum foil and wrap it tightly around the outside of the jar. Tape the edge of the foil to the jar. Rub the aluminum foil with the back of a spoon to make sure that there are no gaps between the foil and the jar. Make sure that the edge of the foil is not too close to the top of the Leyden jar. If it is too close, there could be a spark-over and no charge would be held in the Leyden jar.
- Fill the jar with tap water, about 80% full. Later in this science fair project, you will have to lay the Leyden jar on its side. There needs to be enough water in the jar that the nail is always immersed in water, even when lying on its side. Make sure that the outside remains dry. Dry off any moisture with a paper towel.
-
Snap the lid back onto the jar. Wipe any excess moisture off the outside of the jar. Make sure that the sharp end of the nail is immersed in the water. See Figure 4 for a completed Leyden jar. Note that the nail is insulated from the foil that is wrapped around the outside of the jar.
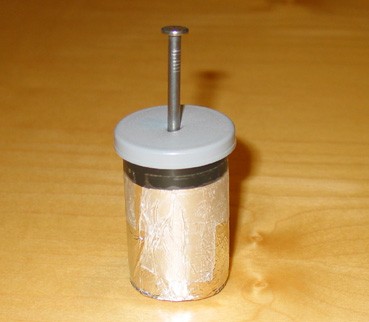 Figure 4. Leyden jar made from a film canister.
/-/https/www.sciencebuddies.org/cdn/Files/3255/5/Elec_img114.jpg)
Charging the Electrophorus
-
Acrylic sheets occasionally come with an adhesive piece of plastic covering it. This is to protect the surface of the acrylic. Before starting this science fair project, make sure to peel off and remove all adhesive coverings from the acrylic sheet. Place the acrylic sheet on top of the table. If the piece of acrylic is new, rub it with the wool for about 1 minute until you create a static charge. Pick up the acrylic sheet to discharge it. Now you are ready to start the experiment. For the experiment, place the acrylic sheet on the table and rub the acrylic for 15-30 seconds to create a static charge. You might even hear the static charge popping and crackling while you are rubbing, signaling that it's ready to use. By rubbing the acrylic with the wool you are creating an excess of electrons on the acrylic.
Note: Be consistent in rubbing the acrylic sheet. Be sure to rub for the same amount of time for each trial. For example, if you rub the acrylic sheet for 30 seconds and then transfer the charge, you should keep rubbing the acrylic sheet for 30 seconds on each successive charge cycle. Charge cycles are explained below.
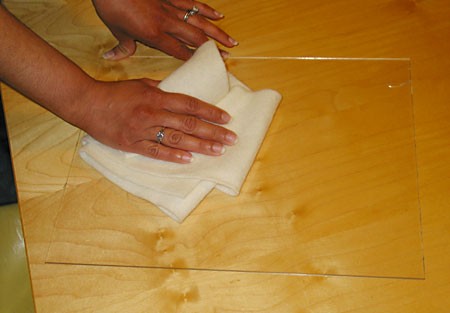 Figure 5. Rubbing the acrylic sheet with a piece of wool.
 - When you pick up or put down the electrophorus, you should do so only by holding the Styrofoam cup. Place the electrophorus on top of the acrylic sheet holding just the Styrofoam cup. You may hear a little bit of crackling and popping. The electrons on the acrylic sheet repel the electrons in the electrophorus. While the electrophorus is sitting on the acrylic sheet, touch the edge of the pie plate with the tip of your finger for just a second. You may get a little zap. When you touch the electrophorus, you create a path for the repelled electrons to go. Now the electrophorus is positively charged.
/-/https/www.sciencebuddies.org/cdn/Files/3256/5/Elec_img115.jpg)
Charging the Leyden Jar
- Now it is time to transfer the positive charge to the Leyden jar. Pick the Leyden jar up with one hand, only touching only the outside foil. You will be acting as a ground.
- Pick the electrophorus up by the Styrofoam cup with your other hand. Don't touch any other part of the electrophorus.
- Touch the head of the nail to the positively charged electrophorus (just the pie plate part). You may hear a zap when the electrophorus gets close to the head of the nail. You may also see a small spark. For the purpose of this project, Charging the Electrophorus through step 3 of Charging the Leyden Jar is called a charge cycle.
Checkpoint: After performing your first charge cycle, confirm that you have correctly charged the Leyden Jar. To do this, you will have to discharge the Leyden jar. Strip a little bit of the insulator off both ends of the insulated wire, using wire strippers. Gently tape one end of the wire to the outside of the Leyden jar, on the foil. Holding the insulated part of wire, carefully move the bare end toward the nail. If the Leyden jar is charged, you will hear and/or see a spark. If you don't, then keep trying to charge and discharge the Leyden jar until you successfully do so. Once you are confident that you can charge the Leyden jar, carefully remove the wire. Do not tear the aluminum foil. Keep the wire for the next section.
- Once you've started the experiment and you proceed with your trials, be sure to note in your lab notebook how many times you charged the Leyden jar and the duration of the time that you rubbed the acrylic sheet.
- If you followed the Checkpoint above, then your Leyden jar should now be discharged (there is no charge in the Leyden jar). Follow the steps in the Charging the Electrophorus section and steps 1–3 of the Charging the Leyden Jar section to charge the Leyden jar with one charge cycle.
Measuring the Charge
The next step is to determine how much charge is stored in the Leyden jar. Assemble your measurement setup.
- Wedge the piece of aluminum sheet upright into the Styrofoam sheet. The aluminum piece should be perpendicular to the Styrofoam sheet. See Figure 6.
- Snip off the lid of the clamshell soap dish with scissors. If necessary, use the scissors to carve a little notch in the short end of the soap dish in order to accommodate the nail. Ask an adult for assistance.
- Tape one end of the wire that you prepared in the last section to the aluminum sheet. Tape the other end of the wire to the outside of the Leyden jar, on the foil. Make sure that the wire is in good contact with both the aluminum sheet and the foil of the Leyden jar. However, you don't want to over-tape the end of the wire to the foil because you will be taking the end off and putting it back on several times. Be careful not to rip the foil.
-
Gently place the Leyden jar on its side and place it into the soap dish. When you are doing so, only touch the aluminum foil around the jar. Make sure that you don't touch the aluminum foil and the head of the nail at the same time. The Leyden jar should lie along the longer side and the nail should sit in the notch. The top of the nail head should be flush with the edge of the soap dish. Tape the Leyden jar to the edges of the soap dish so that it doesn't move around. As mentioned above, do not over-tape the Leyden jar because you need to keep the foil in one piece. Put the soap dish/Leyden jar about 3 inches in front of the aluminum plate. Place a ruler alongside the soap dish, with one end as close as possible to the aluminum sheet. Now there is a frame of reference for measurement.
-
Before you begin your experiment, create a data table in your lab notebook, like the one below:
Swipe left to see more
Leyden Jar #1
(HDPE film canister)Rubbing Duration Spark Length After 1 Charge Cycle Voltage After 1 Charge Cycle Spark Length After 5 Charge Cycles Voltage After 5 Charge Cycles Spark Length After 10 Charge Cycles Voltage After 10 Charge Cycles Trial #1 Trial #2 Trial #3 Average - Now you're ready to start your experiment. Remember, you have already completed one charge cycle for Trial #1. Start to move the soap dish slowly toward the aluminum sheet, making sure that you don't touch the aluminum sheet or the Leyden jar. Just touch the soap dish. At some point, you will get close enough that the Leyden jar will discharge and a spark will be created. When the Leyden jar discharges, you will see and hear the spark. Stop moving the soap dish when you see and hear the spark.
- With the fine-tip pen and the ruler, mark the Styrofoam with where you stopped the soap dish, using the edge of the soap dish closest to the aluminum sheet as your point of reference. Measure the distance between the aluminum sheet and the leading edge of the soap dish. This distance is the length of the spark. Note this data in your data table.
- Repeat the Charging the Electrophorus section and steps 1–3 of the Charging the Leyden Jar section. Then go through steps 1–7 of this section, Measuring the Charge. Do this again, one more time, so that you have a total of three trials. It is important to repeat your experiment at least three times so that you are confident that your results are repeatable and reproducible.
-
Then repeat the experiment three times for five charge cycles, and three times for 10 charge cycles. Remember, a charge cycle is Charging the Electrophorus, and steps 1–3 of Charging the Leyden Jar.
- Now repeat section Charging the Electrophorus and steps 1–3 of the Charging the Leyden Jar section five times. In other words, go through five charge cycles.
- Proceed with the Measuring the Charge section. Remember to record the length of the spark each time in your lab notebook.
- Repeat steps 9a.–9b. two more times for a total of three trials. Remember, it is important to have at least three trials so that you are sure that your results are repeatable and reproducible.
- Now repeat section Charging the Electrophorus and steps 1–3 of the Charging the Leyden Jar section ten times. In other words, go through ten charge cycles.
- Proceed with the Measuring the Charge section. Remember to record the length of the spark each time in your lab notebook.
- Repeat this for three trials as well. Repeat steps 9d.–9e. two more times for a total of three trials. Remember to record the length of the spark each time in your lab notebook.
/-/https/www.sciencebuddies.org/cdn/Files/3257/5/Elec_img116.jpg)
Determining Voltage
-
When you have the distance marked down, you can determine the voltage of the discharge or spark that you saw. It takes voltages of 30,000 volts (V) to make a spark 1 centimeter (cm) long in air with a pressure of 1 atmosphere (atm), or 30,000 V/cm @ 1 atm. This means that if you see or hear a spark at 1 millimeter (mm), which is 0.1 cm, then that spark had a voltage of 3,000 V.
Example:
30,000 V/cm to make a 1 cm spark. How many volts is a 1 mm spark?
1 mm = 0.1 cm
(30,000 V/cm) x (0.1 cm) = 3,000 V
- Air is an insulator. However, when the nail gets sufficiently close to the aluminum sheet, the voltage between the two is high enough to strip electrons from the air molecules. The air is then ionized. Ionized air allows current to flow between the nail and the aluminum plate. Knowing the voltage produced in the spark, can determine the amount of charge that the Leyden jar can hold.
- Plot the data in a graph where the number of charge cycles is on the x-axis and the voltage in the corresponding spark is on the y-axis. Does the voltage increase with the number of charge cycles or does it stop changing after a certain number of charge cycles?
Ask an Expert
Global Goals
The United Nations Sustainable Development Goals (UNSDGs) are a blueprint to achieve a better and more sustainable future for all.
/-/https/www.sciencebuddies.org/cdn/Files/19752/5/E-WEB-Goal-09.png)
Variations
- Try using jars made of different materials. For example, try using a small plastic food container or a small wide-mouthed glass jar. Capacitance depends upon the material that the jar is made of and the size of the electrodes, so try finding jars of similar volume. Follow the design shown in Figure 1 and make sure that the inner electrode is isolated from the outer electrode.
- Try omitting water as the inner electrode and try using foil as the inner electrode. Is there a difference in charge storage?
- How long will the Leyden jar hold the charge? An hour? A day? This is called charge dissipation and this is a key factor that circuit designers evaluate. Charge dissipation occurs when charge leaks out of the Leyden jar into the air. Charge the Leyden jar and then let it sit for 1 hour. Test the voltage in the spark using the test assembly above. Try charging the Leyden jar with the same number of charge cycles and then letting it sit for 5 hours. Test the voltage in the spark using the test assembly. Is there a difference? How long will the Leyden jar hold the charge?
Careers
If you like this project, you might enjoy exploring these related careers:
/-/https/careerdiscovery.sciencebuddies.org/cdn/Files/1223/17/iStock-971549326.jpg)
/-/https/careerdiscovery.sciencebuddies.org/cdn/Files/1242/20/iStock-113511101.jpg)
/-/https/careerdiscovery.sciencebuddies.org/cdn/Files/1233/17/unsplash-b28ac533a45f.jpg)

/-/https/img.youtube.com/vi/jBpS6W-2otk/0.jpg)
/-/https/img.youtube.com/vi/rtsq-l0AxbY/0.jpg)
/-/https/img.youtube.com/vi/7xkbXPzBTHE/0.jpg)