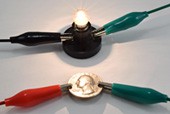
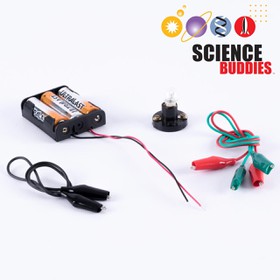
Abstract
Electricity powers many of the devices we use every day, from lights to video games and computers. Engineers have to use certain materials to make electrical devices work. In this experiment, you will find out which materials let electricity flow through them (conductors) and which ones prevent electricity from flowing through them (insulators).Summary
Objective
Test different materials to see if they are electrical conductors or insulators.
Introduction
Look around you. You can probably see at least one thing in the room that is powered by electricity. Some of them might be plugged into wall outlets, and others might be powered by batteries. All electrical devices have electrical current, or "flow," of electricity moving through them. The current usually flows through wires and other electrical parts, like the lightbulb in a lamp or the motor in a toy car. These parts combined are called an electrical circuit. Figure 1 shows a basic circuit with a battery and a lightbulb.
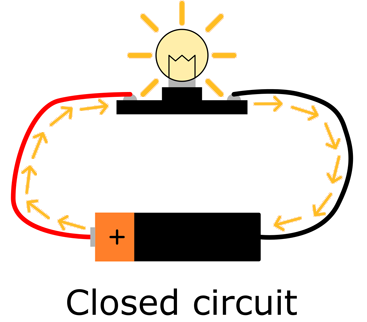 Image Credit: Ben Finio, Science Buddies / Science Buddies
Figure 1. A closed circuit with a battery and a lightbulb. Electrical current is indicated by the yellow arrows.
In order for electricity to flow in a circuit, it must have a complete "loop," or path, through which to flow. In a battery-powered circuit, this loop must connect the positive end of the battery (marked with a "+" symbol) to the negative end of the battery (indicated by a "-" symbol, but this is usually not printed on the battery). This is called a closed circuit, as shown in Figure 1. If any part of the loop is broken, this creates an open circuit and electricity does not flow at all, as shown in Figure 2.
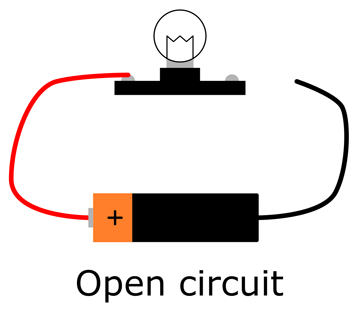 Image Credit: Ben Finio, Science Buddies / Science Buddies
Figure 2. The path for electricity to flow is broken, so this is an open circuit. The lightbulb does not light up because no electricity can flow.
If the positive and negative ends of a battery are connected directly to each other, without anything like a lightbulb or motor in between them, this creates a short circuit, as shown in Figure 3. Short circuits are dangerous because they allow a lot of electrical current to flow, and can cause the battery to get very hot or even explode. You should never connect the two ends of a battery directly to each other.
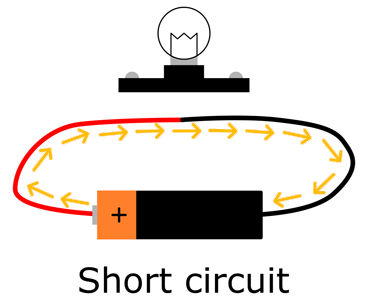 Image Credit: Ben Finio, Science Buddies / Science Buddies
Figure 3. A short circuit with the positive and negative ends of a battery connected directly to each other. This can cause the battery to overheat.
What types of materials are circuits made out of? Circuits have to let electrical current flow through them easily. Materials that let electricity flow through them easily are called conductors. Most metals are conductors; however, materials that prevent electricity from flowing are also important for circuits. These materials are called insulators. Most rubbers and plastic are insulators. Insulators are important because they can help protect you from an electric shock when you touch a wire, or help protect a sensitive circuit from damage. For example, the power cord for a lamp consists of metal wires inside a rubber insulator, and an electronic toy might have a plastic case that protects the circuit inside from damage. In this experiment, you will build a simple circuit with a battery and a lightbulb, and use it to test whether common household materials are conductors or insulators.
Terms and Concepts
- Electricity
- Current
- Circuit
- Positive
- Negative
- Closed circuit
- Open circuit
- Short circuit
- Conductor
- Insulator
Questions
- What is required for a closed circuit?
- Why are short circuits bad?
- What types of materials are usually conductors?
- What types of materials are usually insulators?
- As you look at materials and objects around your house, which do you think are conductors? Which do you think are insulators?
- What will happen if you connect a lightbulb to a battery using conductive materials?
- What will happen if you connect a lightbulb to a battery using insulating materials?
Bibliography
- Finio, B. and De Brabandere, S. (2015, March 14). Electricity, Magnetism, & Electromagnetism Tutorial. Retrieved April 20, 2016.
- Rader, A. (n.d.). Electricity & Magnetism: Introduction. Physics4Kids. Retrieved April 20, 2016.
- Henderson, T. (n.d.). Conductors and Insulators. The Physics Classroom. Retrieved April 20, 2016.
Materials and Equipment 
Recommended Project Supplies
- Basic Circuits Kit, available from our partner
Home Science Tools.
You will need these items from the kit:
- AA batteries (4)
- 3xAA battery holder
- Alligator clip leads (3)
- Mini lightbulb
- Mini bulb screw base
- You will also need to gather these items, not included in the kit:
- Multiple household materials to test, such as aluminum foil, paper clips, wood, clothing, office supplies, toys, etcetera
- Lab notebook
Disclaimer: Science Buddies participates in affiliate programs with Home Science Tools, Amazon.com, Carolina Biological, and Jameco Electronics. Proceeds from the affiliate programs help support Science Buddies, a 501(c)(3) public charity, and keep our resources free for everyone. Our top priority is student learning. If you have any comments (positive or negative) related to purchases you've made for science projects from recommendations on our site, please let us know. Write to us at scibuddy@sciencebuddies.org.
Experimental Procedure
- Watch this video for an introduction to your Basic Circuits Kit.
- Set up your test circuit, as shown in Figure 4.
- Insert three AA batteries into the battery holder (your kit comes with one extra battery). Make sure the "+" symbols on the batteries line up with the "+" symbols inside the battery holder.
- Connect a red alligator clip to the exposed metal part of the red wire from battery holder (in electronics, red wires are usually used for the "positive" connection).
- Connect a black alligator clip to the exposed metal part of the black wire from the battery holder (in electronics, black wires are usually used for the "negative" connection).
- Attach the other end of the black alligator clip to one of the screws on the lightbulb holder. If necessary, use a small Phillips head screwdriver to loosen the screw slightly so it is easier to clip to.
- Screw the lightbulb into the bulb holder.
- Attach one end of the green alligator clip to the other screw on the bulb holder.
- You will connect your test materials to the free ends of the red and green alligator clips.
- Test your circuit by touching the exposed metal ends of the red and green alligator clips together. This creates a closed circuit and your lightbulb should light up. If it does not light up, then check the following:
- Make sure the lightbulb is screwed tightly into the base.
- Make sure none of your alligator clip connections are loose.
- Make sure none of your batteries are backwards.
- Important: throughout the project, only connect the lightbulb for long enough to assess its brightness, then disconnect it when not in use. Leaving the lightbulb connected for a long time can cause it to burn out prematurely.
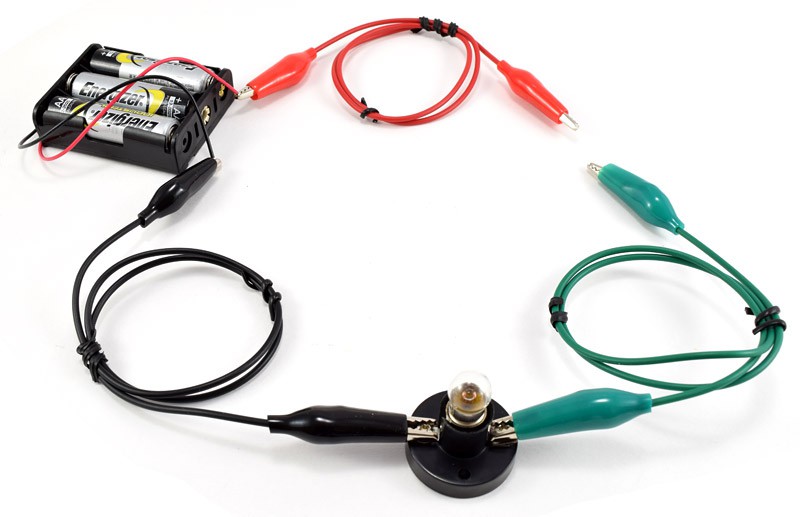 Image Credit: Ben Finio, Science Buddies / Science Buddies
Figure 4. The test circuit for this experiment. The twist ties are not required, but they can help keep your circuit neat by bundling up the alligator clip leads.
- Make a data table like Table 1 in your lab notebook.
| Material | Lightbulb (On or Off?) | Conductor or Insulator? |
|---|---|---|
- Gather the different household materials and objects you will test. Write their names down in the first column of your data table.
- Take your first object and connect opposite sides of it to the free ends of the red and green alligator clips.
- If possible, you should "clip" the alligator clips to the objects. This is easy for some objects, like a sheet of paper or aluminum foil; however, it might be difficult for rounded or larger objects, like a coffee mug or a basketball. For larger objects, you can firmly press the metal ends of the alligator clips up against the object to do your tests. See Figure 5.
 Image Credit: Ben Finio, Science Buddies / Science Buddies
Figure 5. To test small or narrow objects, you should clip them in between the alligator clips (left). For larger objects, firmly press the metal ends of the alligator clips against them (right).
- Observe whether or not the lightbulb lights up. Record your observation for that material in your data table. Remember to disconnect the material from your circuit as soon as you are done testing it. This will prolong the life of your lightbulb.
- Now determine whether the material is a conductor or an insulator. Record your result in your data table. Hint: Look back to the Introduction for the definitions of conductor and insulator. Which one allows electricity to flow, and which one does not?
- Repeat steps 4–7 for each of your additional test materials.
- Analyze your results. What types of materials (for example, wood, plastic, metal, rubber) are the objects you tested made out of? Which ones caused the lightbulb to turn on? Does this match what you predicted based on your background research about what types of materials are conductors and insulators?
Troubleshooting
For troubleshooting tips, please read our FAQ: Which Materials are the Best Conductors?.
Ask an Expert
Global Connections
The United Nations Sustainable Development Goals (UNSDGs) are a blueprint to achieve a better and more sustainable future for all.
Variations
- In this experiment, your lightbulb was probably either completely off or at full brightness. What if you wanted to control the brightness of the bulb? Could you make a dimmer switch? See the Pencil Resistors and How to Make a Dimmer Switch with a Pencil projects, which can both be done with the parts from your Basic Circuits Kit.
- Can you think of other circuit parts you could use to test besides a lightbulb? What about a motor or buzzer? See other projects like Electric Play Dough Project 1: Make Your Play Dough Light Up & Buzz! to learn more about other circuit parts.
- Can you think of other energy sources to use for this experiment besides batteries? For example, what about a solar panel?
Frequently Asked Questions (FAQ)
- Make sure you do not have an open circuit. Check to make sure none of your alligator clips are loose, and the lightbulb is screwed tightly into its base.
- Make sure your batteries are properly inserted into the battery pack. The "+" signs on the batteries should line up with the "+" signs in the battery pack.
- Finally, try connecting the red and green alligator clips to each other directly, with no pencil or other materials in between, and your bulb should light up. If you connect the alligator clips to a non-conducting material (like paper), the bulb will not light up.
Careers
If you like this project, you might enjoy exploring these related careers:
Contact Us
If you have purchased a kit for this project from Science Buddies, we are pleased to answer any question not addressed by the FAQ above.In your email, please follow these instructions:
- What is your Science Buddies kit order number?
- Please describe how you need help as thoroughly as possible:
Examples
Good Question I'm trying to do Experimental Procedure step #5, "Scrape the insulation from the wire. . ." How do I know when I've scraped enough?
Good Question I'm at Experimental Procedure step #7, "Move the magnet back and forth . . ." and the LED is not lighting up.
Bad Question I don't understand the instructions. Help!
Good Question I am purchasing my materials. Can I substitute a 1N34 diode for the 1N25 diode called for in the material list?
Bad Question Can I use a different part?
Contact Us
Related Links
- Science Fair Project Guide
- Other Ideas Like This
- Electricity & Electronics Project Ideas
- My Favorites


