Abstract
From traffic safety lights to neon signs, lights have a way of getting peoples' attention. So it makes sense that if a person wants to get attention, wearing clothing with built-in lights might help. These types of clothing, called electronic textiles (e-textiles for short), or wearable electronics, already exist. Instead of using hard surfaces for circuits (like inside your computer or cell phone), e-textiles weave electrical parts like batteries, wires, and lights directly into wearable clothing so it can do fun, interesting things like light up or respond to sound. While sometimes e-textiles are purely for decorative or fashion purposes, you can also use them to make useful tools, from traffic control devices to medical instruments. In this science project you will build a traffic control glove that has red and green LEDs to indicate "stop" and "go" signals to motorists and pedestrians. How much attention will your glove get?
Summary
Familiarity with basic electronics concepts like positive and negative terminals as well as open and closed circuits will be helpful for this science project. Students with no experience building circuits may want to try the simpler but thematically similar project: LED Dance Glove: Get the Party Started with Your Own Interactive Light Show.
This science project requires special LEDs designed for use with e-textiles, and it will be much easier to do with a soldering iron. See the Materials and Equipment list for details.
Soldering irons can get extremely hot and burn your skin if you touch them accidentally. They can also cause fires if left unattended. Adult supervision is required when using a soldering iron, especially if you are not familiar with using one. Science Buddies recommends using lead-free solder, especially in homes with pets and small children.
- SparkFun is a registered trademark of SparkFun Electronics.
- Arduino is a registered trademark of Arduino.
- SparkFun Electronics LilyPad is a registered trademark of SparkFun Electronics.
- Nintendo Entertainment System, Super Nintendo Entertainment System, and Nintendo 64 are registered trademarks of Nintendo.
- RadioShack is a registered trademark of RadioShack Corporation.
Thanks to Howard Eglowstein of Science Buddies for consultation on this project.
/-/https/i.ytimg.com/vi/KL1tAbz8k0k/sddefault.jpg)
Objective
Design and build an LED traffic glove with red and green LEDs for stop and go signals.
Introduction
Clothing that lights up might sound like something out of a science-fiction movie, but electronic textiles (or e-textiles for short) — also called "wearable electronics" — are actually used in the real world for both decorative and practical purposes. For example, some T-shirts contain strings of lights that light up in response to sound (you can find them online by searching for "LED shirt"). Some police officers use traffic control gloves that flash with built-in red and green lights to give stop-and-go signals to traffic:
/-/https/i.ytimg.com/vi/ygtQwK6vDmY/hqdefault.jpg)
In this science project, you will design and build your own light-up traffic control glove using the engineering design process, with our directions as a guide to get you started. (Note: The engineering design process is different from the scientific method that you may be more familiar with — we will provide more details in the Procedure section and you can get an overview from our Comparing the Engineering Design Process and Scientific Method page.) But before you begin, you will need to know some basics about electrical circuits. An electrical circuit is a path through which electricity flows via conductors, or materials that conduct electricity. Electrical circuits usually also have insulators, or materials that do not conduct electricity, in order to prevent electricity from flowing to the wrong places, such as outside of the circuit. For example, wires used in electrical circuits, like the ones shown in Figure 1, are usually made of a thin copper wire surrounded by rubber. The copper in the middle conducts electricity and the rubber acts as an insulator.
Before continuing this project, you should also be familiar with the concepts of voltage, current, and resistance. You can read more about these concepts in the Science Buddies Electronics Primer: Introduction. You can also read more general background information about electricity in the Electricity, Magnetism, & Electromagnetism Tutorial. In this project, you will build a circuit that uses four main components:
- A battery is the power supply for your circuit. Batteries have a positive terminal and a negative terminal. When they are connected with wires and other conductors, electrical current flows from the positive terminal to the negative terminal.
- Light-emitting diodes, or LEDs for short, are the lights in your circuit. A diode is like a one-way valve for electricity that lets current flow only in one direction. LEDs have two wires sticking out of them called leads (pronounced "leeds"), one positive and one negative. When current flows through LEDs from the positive lead to the negative lead, they light up.
- Resistors resist the flow of electrical current. They are important to use because too much current flowing through an LED can cause it to burn out. Resistors also have two leads sticking out of them, but unlike LEDs, current can flow through a resistor in either direction.
- A switch is used to turn parts of a circuit on or off (we will talk more about switches).
To do this science project, it will be helpful for you to know how to read a circuit diagram, which is a drawing that engineers and electricians use to represent electrical circuits. Circuit diagrams use different symbols for real-world circuit components. Figure 1 shows three representations of a simple circuit with a battery, resistor, and LED: a photograph, a computer drawing, and a circuit diagram.
/-/https/www.sciencebuddies.org/cdn/Files/5131/9/battery-resistor-led-circuit-photo-drawing-diagram_img.jpg)
Figure 1. Three different representations of the same simple circuit with a battery, resistor, and LED. On the left is a photograph of the actual circuit with the real components. In the middle is a computer drawing of the same circuit, except each component is drawn to look like the object in the photograph of the real circuit. On the right is the circuit diagram, which uses symbols to represent real-world objects. Notice how the symbols do not look exactly like the real world object. This might seem confusing at first, but it is useful because not all batteries (or resistors or LEDs) look the same. For example, "coin cell" batteries that power wrist watches look significantly different from AAA batteries.
A traffic control glove requires green LEDs to give a "go" signal and red LEDs for a "stop" signal, just like a real traffic light. You want to control when the right LEDs are on or off, so you must use a switch. Electrical switches come in many varieties — you are probably most familiar with the light switches in your house. Switches can be used to control whether a circuit is open or closed. In an open circuit, electricity cannot flow in a complete (or "closed") loop, so the LEDs will not light up. In a closed circuit, the electricity follows an unbroken path, so the LEDs will light up. Figure 2 shows a circuit that uses two different switches to control sets of red and green LEDs independently. If one path is closed and the other open, the LEDs on the closed path will light up while the ones on the open path will not. If both paths are closed, both sets of LEDs will light up, and if both paths are open, none of the LEDs will light up. In this science project, you will have to build switches into your traffic glove that let you control the LEDs by pinching your fingers together.
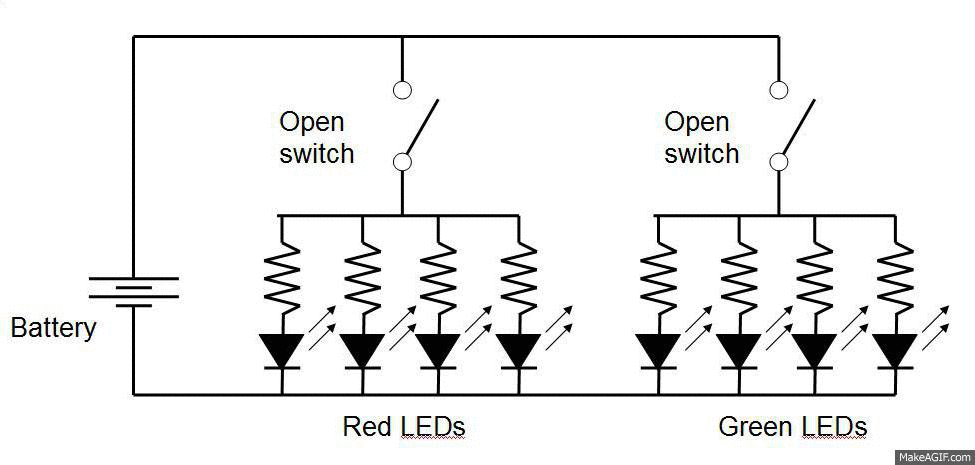
Figure 2. Each circuit diagram depicted in the animation shows eight LEDs (four red and four green) powered by a single battery.
Two independent switches control whether all eight LEDs, only red LEDs, only green LEDs, or no LEDs are turned on at any given time.
Many electrical circuits are built inside hard plastic or metal cases: for example, cell phones, TVs, and computers. However, in this science project you will design an electrical circuit that literally has to fit like a glove. You must place the circuit directly on the flexible fabric of a glove so that it is comfortable to wear and easy to use. This means that you need to consider ergonomics when you design your glove. Ergonomics is the study of how devices and products comfortably fit the human body, something design engineers take into consideration when developing many of the products you use every day. For example, the ergonomics of office chairs and computer keyboards is vitally important for office workers who might spend eight hours a day sitting at a desk. Consumer electronics devices like cell phones, MP3 players, and video game controllers must be ergonomic and fit easily into the human hand. For example, in Figure 3, can you see the differences in the design of three successive generations of Nintendo® video game controllers?
/-/https/www.sciencebuddies.org/cdn/Files/5133/10/NES-SNES-N64-controller_img.jpg)
Figure 3. Three generations of video game controllers from the original Nintendo Entertainment System® (NES), Super Nintendo Entertainment System® (SNES), and Nintendo 64® (N64). Can you see how the controllers evolved to be more ergonomic and fit the human hand better? (Wikimedia Commons user Evan-Amos, 2010)
Can you think of other products you use every day that were designed to be ergonomic? What important design criteria do you think you will use for your traffic glove that involve ergonomics?
Terms and Concepts
- Electronic textiles
- E-textiles
- Electrical circuit
- Conductor
- Insulator
- Voltage
- Current
- Resistance
- Battery
- Positive
- Negative
- Light Emitting Diode (LED)
- Leads
- Resistor
- Switch
- Circuit diagram
- Symbols
- Open circuit
- Closed circuit
- Ergonomics
- Prototype
- Parallel circuit
- Series circuit
- Ground
Questions
- What is a circuit diagram, and how do its symbols represent real-world circuit components?
- Why is it important to use a resistor when hooking an LED to a battery?
- What is the difference between an open circuit and a closed circuit? How can you use a switch to control whether a circuit is open or closed?
- Can you brainstorm some design criteria for your traffic glove? For example, how many LEDs should it have? Do you want the LEDs to form a certain shape?
- What design criteria for your glove will involve ergonomics? For example, the glove will require wires — how will you make sure the user can still pick up objects without snagging the LEDs or wires on other objects?
Bibliography
- Buechley, L. (n.d.). Build: turn signal biking jacket. MIT Media Lab High-Low Tech Group. Retrieved May 9, 2013.
- Wikipedia contributors. (2013, May 1). Human factors and ergonomics. Retrieved May 14, 2013.
- Youtube. (2010, June 16). Signal Corp. LED traffic control signal gloves usage video. Retrieved November 3, 2017.
Materials and Equipment
This is an engineering design project. We have provided a list of the basic materials required to build an LED traffic glove, but if you decide to make additional improvements or design changes to your glove, you might need to purchase materials not listed here. The basic materials are listed below and shown in Figure 4 below.
Note: The colors we suggest for LEDs and wires are intended to make a stop/go traffic glove with red and green LEDs, as well as red and black wire to easily keep track of positive/negative connections. However, if you want to decrease project cost, you can do this project with a single type of LED and only one color of wire. You can also use different colors if you want to choose a different style or design for your glove.
You will need these materials:
- Pair of lightweight gardening/work gloves or light winter gloves. We do not recommend using thick leather work gloves or thick, insulated winter gloves — they are difficult to work with. A multi-pack of cheap work gloves (instead of a single pair of expensive gloves) will work best — that way, you have extra gloves for starting over in case you mess up your first design.
- LilyPad green LEDs (pack of five), available from SparkFun Electronics®. Note these LEDs are mounted on boards with built-in resistors, and two holes for sewing them onto fabric and making electrical connections to the LED terminals.
- LilyPad red LEDs (pack of five), available from SparkFun Electronics.
- 22 AWG stranded red wire (25 foot spool), available from SparkFun Electronics.
- 22 AWG stranded black wire (25 foot spool), available from SparkFun Electronics.
- 5 mm copper tape (50 foot roll), available from SparkFun Electronics.
- 2xAAA battery holder with cover and switch, available from SparkFun Electronics.
- AAA batteries (2)
- Electrical tape
- Lab notebook
You will also need to gather these tools:
- Ruler, metric
- Wire strippers, available from SparkFun Electronics, or a hardware or electronics store.
- Optional but recommended: Soldering iron. A soldering iron can be a good investment if you plan to do more electronics projects in the future. Soldering irons are available in various models and price ranges from electronics/hobby stores like SparkFun Electronics, or at automotive parts stores.
- Optional but recommended: Lead-free solder for use with soldering iron, available from SparkFun Electronics.
- Optional: Silver conductive epoxy can be used to make electrical connections if you do not have a soldering iron. It is available in various quantities on Amazon.com.
- Adult helper (required if you use a soldering iron, but optional if you use silver conductive epoxy).
/-/https/www.sciencebuddies.org/cdn/Files/5134/8/LED-glove-materials_img.jpg)
The materials pictured are used to create an LED traffic glove that cycles through red and green lights. The materials pictured are: a gardening glove, battery pack, two batteries, a wire stripper, five green LEDs, five red LEDs, a spool of red wire, a spool of black wire, electrical tape and copper tape.
Figure 4. The materials required to build a basic LED traffic glove. You may need additional materials if you make your own design improvements. (Note: The soldering iron is not pictured.)
Disclaimer: Science Buddies participates in affiliate programs with Home Science Tools®, Amazon.com, Carolina Biological, and Jameco Electronics. Proceeds from the affiliate programs help support Science Buddies, a 501(c)(3) public charity, and keep our resources free for everyone. Our top priority is student learning. If you have any comments (positive or negative) related to purchases you've made for science projects from recommendations on our site, please let us know. Write to us at [email protected].
Experimental Procedure
- This science project follows the engineering design process. To learn more about the process, and how it differs from projects that follow the scientific method, see this Science Buddies resource on Comparing the Engineering Design Process and Scientific Method. We will provide basic directions for building a working LED traffic glove, but you are encouraged to design and construct your own glove without following our directions exactly. If you have not completed a science project using the engineering design process before, you can find out more about the process and begin with brainstorming ideas from the Science Buddies Engineering Design Process resource. Here are a couple of questions you could ask yourself to get started:
- Who is the "customer" for this product? Meaning, who will be the end user of your glove?
- What is the objective of your finished glove? What does it need to do?
- What are some important design features of your glove? What practical considerations do you need to take into account? (Tip: Remember the discussion about ergonomics in the Introduction, in the Background tab.)
- Watch the introductory video. It will explain how to build a prototype (a first, experimental or preliminary model of something, which may be improved in the future) LED traffic glove and show how it works. If you have some experience working with electronics, this video might be sufficient to get you started on your own design. If you need more help building your glove, we have included step-by-step instructions with pictures after the video. As you construct your glove, it may be helpful to refer back to Figure 2 of the circuit diagram in the Introduction (in the Background tab) to understand how your LEDs, switches, and battery pack are connected.
- Before you begin working on your LED glove, follow the steps of the engineering design process to do background research and specify design requirements for your LED glove.
- For example, your design requirements might say that the glove must have at least five red and five green LEDs, and that it must run off of two AAA batteries (those are just two design requirements — your project might have more).
- Try to draw at least three different designs in your lab notebook. Make sketches that show where you will place the LEDs, battery pack, and wires on your glove. Think about different ways to pinch your fingers together (as shown in the video) to make switches. You can make sketches of how the wires will physically fit onto your glove, and you can also make circuit diagrams, as in Figure 2 from the Introduction.
- Note: It is important that all of the LEDs in your circuit are wired in parallel. This means that all of the positive (+) terminals for each set of LEDs, and all of the negative (-) terminals for each set of LEDs, are connected. This ensures that all the LEDs will shine with the same brightness, and if one of them goes out, the rest will stay on. If your LEDs are wired in series, and one of them goes out, then none of them will light up. Figure 5 shows the difference between series and parallel circuits.
- Finally, pick the best design based on your criteria (refer to the "Choose the Best Solution" step of the Engineering Design resource for help doing this). Once you have selected a design, you are ready to start building a prototype.
/-/https/www.sciencebuddies.org/cdn/Files/4803/20/series-circuit-parallel-circuit.png)
Figure 5. In a series circuit, pictured on the left, only one path, or "loop," takes electrical current from the positive to the negative terminal of the battery. So, if one light goes out, the rest will also go out. In a parallel circuit, pictured on the right, electrical current takes multiple paths. So, even if one light goes out or breaks, electricity can still flow through the other paths, and the rest of the lights will stay on. This is why it is important to wire your LEDs in parallel, and not in series.
- The following steps describe how to build the glove shown in the video. Note: Remember that, depending on your glove design, you might not follow these steps exactly.
- First cut and strip the segments of wire that you will use to connect the positive and negative ends of five of the LilyPad LEDs, either green or red, that will indicate stop or go on the traffic glove.
- Use your wire strippers to cut four segments each of red and black wire about 2 to 3 centimeters (cm) long, depending on the size of your glove and how far apart you want your LEDs (look ahead to Figure 7 to get a better idea). Since the wire is flexible, the wire segments do not need to be exactly the same length.
- Strip about 3 to 4 millimeters (mm) of insulation off each end. Figure 6 shows wire that has been cut and stripped next to the five LEDs.
/-/https/www.sciencebuddies.org/cdn/Files/5135/9/traffic-glove-wires-LEDs_img.jpg)
Figure 6. Eight wire segments (four red, four black) and five LilyPad LEDs. You will use the wire segments to hook up the LEDs so that their positive and negative terminals are shared.
- Next, use the wires to connect the LEDs to each other. Remember that the LilyPad LEDs come mounted on tiny boards with built-in resistors, so you do not need to attach separate resistors.
- Use the red wires to connect the positive terminals of the LEDs (marked with a tiny "+" symbol) by wrapping the exposed metal ends of the wires around the holes in the LilyPad LED boards.
- In the same way, use the black wires to connect the negative terminals (marked with a tiny "-" symbol).
- Be sure to connect the LEDs of one color only with LEDs of the same color (in other words, do not mix red and green LEDs). The backs of the LEDs have a red or green stripe to indicate their color, as seen in Figure 8.
- Figure 7 shows the LEDs in a straight line — you can also arrange your LEDs in a different shape (this may require longer wires), depending on the design of your glove.
/-/https/www.sciencebuddies.org/cdn/Files/5136/9/traffic-glove-leds-connected_img.jpg)
Figure 7. Fasten the wire segments around the holes in the LilyPad LED boards to connect the positive (+) and negative (-) terminals of the LEDs.
- Now, solder the exposed metal ends of the wires to the LilyPad LED boards.
- Warning: Soldering irons get very hot and can burn your skin or cause fires if left unattended. Adult supervision is required if you have not used a soldering iron before. Figure 8 shows the bottom of the LilyPad LED boards after soldering.
- If you do not have a soldering iron or conductive epoxy, do your best to firmly twist the wires together after looping them through the holes. We suggest this only as a last resort, because doing so increases the likelihood that these connections will disconnect easily.
/-/https/www.sciencebuddies.org/cdn/Files/5137/8/traffic-glove-LEDs-soldered_img.jpg)
Figure 8. Solder the wires to the LilyPad LED boards to secure the connections. This figure shows five red LEDs, indicated by the red stripes (remember not to mix red and green LEDs).
- Repeat steps 4 to 6 for your second set of LEDs. Figure 9 shows two complete sets of LEDs (one red, one green) that each have been wired together.
/-/https/www.sciencebuddies.org/cdn/Files/5138/8/traffic-gloves-LEDs-soldered-2_img.jpg)
Figure 9. Two complete sets of LEDs, one red and one green.
- Attach the LEDs to wherever you decide you want them on the glove.
- In this prototype, the red LEDs are placed on the palm of the glove, and the green LEDs are on the back of the glove, as shown in Figure 10.
- In Figure 10, electrical tape is used to attach the LEDs because it can be removed easily if you need to make adjustments. Depending on the fabric type of your glove, electrical tape may not work very well — can you think of a better way to attach your LEDs?
/-/https/www.sciencebuddies.org/cdn/Files/5139/8/traffic-glove-electrical-tape_img.jpg)
Figure 10. Use electrical tape to attach the LEDs to your glove.
- Prepare your battery pack.
- Make sure the power switch on your battery pack is in the "off" position.
- Insert two AAA batteries into the battery pack, paying attention to the placement of the (+) and (-) symbols. The batteries should each have a (+) symbol printed on one end. Inside the battery pack are (+) and (-) symbols on the plastic. Make sure the side of the battery with the (+) symbol lines up with the (+) symbol inside the battery pack.
- Put the cover back on the battery pack and make sure the power switch is still in the "off" position.
- Solder the negative (black) lead from the battery pack to the negative terminal (marked with a "-" sign) of one of your LEDs. Since your LEDs are wired in parallel, it does not matter which one you connect to — you can decide which negative LED terminal makes the most sense based on the design of your glove and where you want your wires.
- You should also add another black wire that will be used to connect the negative terminals of your red LEDs to your green LEDs. These connections are shown in Figure 11. This ensures that all of your LEDs have a common ground, which in this case is connected to the negative terminal of the battery pack. "Ground" gets its name because in some circuits, a metal rod literally goes into the ground for safety reasons — because the ground can absorb extra electrical current (for example, during a lightning strike). In battery-powered circuits, however, "ground" usually just refers to the negative terminal of the battery.
/-/https/www.sciencebuddies.org/cdn/Files/5140/8/traffic-glove-battery-pack_img.jpg)
/-/https/www.sciencebuddies.org/cdn/Files/5141/8/traffic-glove-battery-pack-closeup_img.jpg)
Figure 11. Solder the negative lead from the battery pack to the negative lead of one LED, and solder on an additional black wire that will be used to connect the negative terminals of your two sets of LEDs.
- Use the extra black wire you attached to one of your green LEDs in step 12 to wrap around to the palm of your glove, and solder it to the negative terminal of one of your red LEDs. Remember that this step might be slightly different depending on how you arranged your LEDs. Our connection is shown in Figure 12.
/-/https/www.sciencebuddies.org/cdn/Files/5142/9/traffic-glove-ground-connection_img.jpg)
Figure 12. A black wire connects the negative terminal of a red LED on the palm of the glove to a negative terminal on a green LED on the back of the glove. This ensures that all of the LEDs share a common ground.
- Prepare the red wires that will connect your red LEDs to the copper contact pads, which you will use to turn your LEDs on and off.
- Cut two strips of red wire and strip the ends with your wire strippers. These wires will connect the positive terminals of your LEDs to the copper contact pads that you will use as switches — so their exact length depends on the size of your glove and the position of your LEDs and copper contact pads.
- Solder one end of each wire to the positive terminal of an LED. Be sure to solder one to a red LED and one to a green LED. This is shown in Figure 13. Adult supervision is required when using the soldering iron, even if you have experience using it.
/-/https/www.sciencebuddies.org/cdn/Files/5143/9/traffic-glove-red-wires_img.jpg)
/-/https/www.sciencebuddies.org/cdn/Files/5144/9/traffic-glove-red-wires-soldered_img.jpg)
Figure 13. (left) Cut and strip two segments of red wire, making sure they are long enough, as described in step 14a. (right) Solder one end of one red wire to the positive terminal of a red LED. Solder one end of the other red wire to the positive terminal of a green LED.
- Prepare the copper tape for your first switch contact.
- Cut a strip of copper tape long enough to wrap around the thumb of your glove two or three times.
- Remove the paper protecting the adhesive backing of the tape, and wrap it around the thumb once (this may be easiest to do while you are actually wearing the glove — you can get a volunteer to wear the glove so you can have both hands free to work). Leave the rest of the tape dangling off the thumb — do not finish wrapping it around yet.
- Before you finish wrapping it around the thumb one or two more times, place the exposed metal end of the red wire connected to your red LEDs in between two layers of the copper tape, and pinch the tape such that the wire gets stuck in between the layers. Then finish wrapping the copper tape around the thumb. These steps are shown in Figure 14.
- Optional: You can try to improve this connection by soldering the wire to the tape (do not do this while someone is still wearing the glove!), but copper tape can be a difficult surface on which to solder something.
/-/https/www.sciencebuddies.org/cdn/Files/5145/8/traffic-glove-copper-tape-thumb-123_img.jpg)
Figure 14. Wrap copper tape around the thumb (top left), and pinch the tape around the exposed metal at the end of the red wire so it nestles in between layers of tape (top right and above).
- Repeat step 15 for the second red wire, which should be connected to the positive terminal of one of your green LEDs.
- Wrap the copper tape around the middle finger of your glove. Remember that this step might be slightly different depending on your design — our design is shown in Figure 15. Remember that this will be easier to do with your hand (or a volunteer's) inside the glove.
- You can try soldering to improve the connection. Remember not to do this while someone is still wearing the glove.
/-/https/www.sciencebuddies.org/cdn/Files/5146/8/traffic-glove-copper-tape-middle-finger-123_img.jpg)
Figure 15. Wrap copper tape around the middle finger of the glove, and pinch the tape around the exposed metal end of the red wire (the one connected to your green LEDs) so that it sits snugly in between layers of tape.
- Next, you need to connect the positive (red) lead of the battery pack to copper tape that you will wrap around the index finger of the glove.
- Depending on the size of your glove and the desired location of your battery pack, you may need to extend the positive lead of your battery pack by soldering on another piece of red wire (shown in Figure 16).
- Follow the same procedure you used in step 15 to attach the end of this wire to the index finger of your glove (shown in Figure 17).
/-/https/www.sciencebuddies.org/cdn/Files/5147/8/traffic-glove-battery-pack-wire_img.jpg)
Figure 16. You may need to extend the positive lead of your battery pack by soldering a piece of red wire (left) to the lead and then covering it with electrical tape (right).
/-/https/www.sciencebuddies.org/cdn/Files/5148/8/traffic-glove-copper-tape-index-finger-123_img.jpg)
Figure 17. Follow the same procedure you used for the thumb and middle finger to attach the battery pack's positive lead to the index finger of the glove using copper tape.
- Until now, your battery pack has been hanging loose. You may want to figure out a better way to attach it to your glove — for example, by tucking it into the wristband, using tape, or cutting slots into the fabric of the glove and then slipping the battery into the slot and securing it with tape. Our approach uses slots and tape and is shown in Figure 18. But exactly how you engineer a solution to this problem is up to you.
/-/https/www.sciencebuddies.org/cdn/Files/5149/8/traffic-glove-battery-pack-embedded_img.jpg)
Figure 18. One possible method to attach the battery pack to the glove involved cutting slots into the wristband to hold the pack and then securing it with tape.
- You are ready to test your glove. Put the glove on and put the switch on the battery pack in the "on" position. When you pinch the copper contact pads on your thumb and index finger together, the red LEDs should light up. When you pinch the copper pads on your index and middle fingers together, the green LEDs should light up, as shown in Figure 19.
/-/https/www.sciencebuddies.org/cdn/Files/5150/8/traffic-glove-red-green-LEDs_img.jpg)
Figure 19. The copper-tape contact pads on your glove act like switches — when you press them together, the switch is "closed," which lights up the LEDs. The thumb and middle finger are used to independently control the red and green LEDs.
- Troubleshooting: If your LEDs did not light up on the first try, check the following:
- Make sure your battery pack is on and you inserted the batteries properly (aligned with the "+" and "-" symbols).
- Double-check all of your solder connections; some may have broken or loosened in the process of handling your glove.
- Double-check the "pinched" connections to the copper tape, and make sure these are secure.
- Improving your design: Once you have completed a working prototype, think of ways to improve your design. If possible, have some volunteers try out your glove and give you feedback, including what features that they think are good and problems they see or changes they would make. This will enable you to iterate, or repeat, the design process to make improvements, an important part of the engineering design process. Here are a few things you could consider:
- Does your glove have many loose wires hanging off it? Does that make it difficult for users to pick up objects without getting stuck to the glove? If so, how could you improve this?
- How secure is the battery pack, and how accessible is the on/off switch? What refinements could you make to improve both?
- Do the LEDs light up reliably when you press the copper-tape contact pads together, or is the connection unreliable? What could you do to ensure reliable contacts?
- Are the LEDs secured to the glove or do they tend to move around? If they move around unintentionally, what could you do to secure them better?
- Could you improve the visibility of the glove by using more LEDs, arranging them in a different shape, or changing their locations?
Ask an Expert
Global Goals
The United Nations Sustainable Development Goals (UNSDGs) are a blueprint to achieve a better and more sustainable future for all.
/-/https/www.sciencebuddies.org/cdn/Files/19752/5/E-WEB-Goal-09.png)
Variations
- If you search for "LilyPad" on SparkFun's website, there are many other parts, including sensors, designed to be used with e-textiles. Can you think of new things to include in your LED glove circuit that would improve its functionality?
- Can you make a more advanced LED glove with a blinking array of LEDs, or LEDs that light up in different patterns (like an "X" or "> > >" symbol")?
- LilyPad Arduino accessories are designed to be used with conductive thread (various types are available from SparkFun), so they can be sewn directly into fabric and not require wires. If you know how to sew (or have an adult helper who knows how to sew), can you make the connections in this project by sewing them in instead of using wires? The directions for this turn signal bike jacket might help you get started.
- If you enjoyed this project, you might also like the Science Buddies LED Dance Glove project.
Careers
If you like this project, you might enjoy exploring these related careers:
/-/https/careerdiscovery.sciencebuddies.org/cdn/Files/1223/17/iStock-971549326.jpg)
/-/https/careerdiscovery.sciencebuddies.org/cdn/Files/1233/17/unsplash-b28ac533a45f.jpg)
/-/https/careerdiscovery.sciencebuddies.org/cdn/Files/1242/20/iStock-113511101.jpg)
/-/https/careerdiscovery.sciencebuddies.org/cdn/Files/1147/17/unsplash-fJebhGIP0P4.jpg)

/-/https/img.youtube.com/vi/qUo6hXSV1b8/0.jpg)
/-/https/img.youtube.com/vi/AUguvwpnJ5M/0.jpg)
/-/https/img.youtube.com/vi/SLiibpsV5AQ/0.jpg)