Abstract
How do you feel when you ride your bike into a strong wind? Do your legs feel like lead? How about when the wind is at your back? Does that make you feel ready for the Tour de France? In this science fair project, you will investigate how wind-powered devices, like pinwheels, also react in different ways to the direction of the wind.Summary
Kristin Strong, Science Buddies
The wind turbine design for this project was modified from:
- The NEED Project Contributors. (2013). Wonders of Wind Teacher Guide. Retrieved April 8, 2014.
This science project was inspired by:
- Flannery, Morgan P. (2008). Wind Power-Is Bigger Better? Do large, wide wind turbine blades generate more power than small, narrow blades? PG&E 2004 Bay Area Science Fair Awards. Retrieved April 8, 2014.
/-/https/www.sciencebuddies.org/cdn/Files/5923/8/pinwheels-wind-turbines-energy-measure.jpg)
Objective
To determine how much power a pinwheel generates at different orientations to a wind source.
Introduction
On a breezy summer afternoon, have you ever watched sailboats zigzagging their way into a strong wind? When the boats point in favorable directions against the wind, they race along with their sails forming smooth, tight curves, but when they "come about" and cross through the wind, their sails temporarily become floppy, and flutter like flags, then power to the boat is lost. In this science fair project, you will investigate how wind-powered devices like wind turbines also experience changes in the amount of power they can produce when the wind direction changes.
Wind turbines are machines that change the energy in wind into mechanical energy or electrical energy. Windmills are examples of wind turbines that convert wind energy into mechanical energy. The Netherlands is a country well-known for its windmills that have been used for centuries to grind corn, drain land, and cut wood. Wind farms, on the other hand, are examples of wind turbines that convert wind energy into electrical energy. In California, you can see rows of wind turbines along windy ridges and mountain passes. The wind turbines on these wind farms connect directly into power grids and produce 5 percent of the electricity that all of California uses. Check out the resource from the U.S. Department of Energy in the Bibliography below to see wind turbines in action, converting wind energy into electrical energy for a power grid.
As shown in Figure 1, below, a wind turbine has a rotor with blades that are connected to a shaft. As wind energy hits the blades, the rotor turns, which causes the shaft to turn as well. As the shaft turns, it is able to do work and produce either mechanical or electrical energy.
/-/https/www.sciencebuddies.org/cdn/Files/3544/5/Energy_img028.jpg)
Figure 1. This drawing shows two important parts of a wind turbine, the rotor and the shaft. This wind turbine is a horizontal-axis wind turbine because the shaft is parallel (horizontal) to the ground.
In the design of a wind turbine, the shaft can be positioned either horizontally or vertically, relative to the ground. If the shaft is positioned horizontally, parallel to the ground, then the turbine is called a horizontal-axis wind turbine. If the shaft is positioned vertically, perpendicular to the ground, like a flag pole, then it is called a vertical-axis wind turbine.
The horizontal-axis wind turbines are the most commonly used around the world today in wind farms and in windmills. They have greater efficiency than the vertical-axis wind turbines, but also must be kept pointed into the wind. Small horizontal-axis wind turbines point with a simple wind vane tail, which swivels the rotor so that it faces the wind head on. Larger horizontal-axis wind turbines must rely on motors and wind sensors to position them so they point into the wind. They are mounted on tall towers, which give them access to stronger winds, but they have the disadvantages of higher and more complicated installation and higher transportation costs than vertical-axis wind turbines.
Vertical-axis wind turbines have the advantage of not needing to point into the wind, so they are a good choice when the wind direction is highly variable. They are also mounted lower to the ground, usually without a high tower, so they are easier to install and access for maintenance. The drawbacks are that the wind speeds are lower closer to the ground than on the top of a high tower, which means less wind energy is available to generate power, and the winds closer to the ground also tend to be more turbulent (changing in both direction and speed), which puts mechanical stresses on the turbine.
In this science fair project, you will build a horizontal-axis wind turbine that can do real work. OK, do not get too excited—your wind turbine will not be doing your chores or taking out the trash for you, but it will be lifting some small weights a couple of feet off the ground. You will also figure out how much power your wind turbine can generate as you move the wind source to different places around the rotor.
First, let us cover some important equations you will need to know in order to do this science fair project. Power is defined in Equation 1 as the rate at which work is performed. Rate means how something changes with time. For example, if you have to raise a rock from the ground to a table, you could raise the rock slowly or you could raise it quickly. Either way, the work you have done will be the same, but the power needed to raise the rock quickly is greater than the power needed to raise it slowly.
Equation 1:
- Power is in watts (W).
- Work is in joules (J) or newton-meters (N·m).
- Time is in seconds (sec).
You will calculate how much work you did to raise the rock from the ground to the table with Equations 2 and 3, below. First figure out the force on the rock due to gravity (by calculating the rock's weight), and then measure the distance that you moved the rock, as shown in Figure 2.
/-/https/www.sciencebuddies.org/cdn/Files/3545/5/Energy_img029.jpg)
Figure 2. This drawing shows the force and distance involved in calculating the work required to lift a rock from the ground to the table.
Equation 2:
- Force is in newtons (N).
- Mass is in kilograms (kg).
- Gravitational Acceleration is 9.81 meters per second squared (m/sec²)
Equation 3:
- Work is in joules (J) or newton-meters (N·m).
- Force is in newtons (N).
- Distance is in meters (m).
The wind turbine you will build is not ambitious enough to lift a rock, but it will be able to hoist several paper clips high into the air. Now it is time to spin some wheels!
Terms and Concepts
- Wind turbine
- Mechanical energy
- Electrical energy
- Rotor
- Shaft
- Work
- Horizontal-axis wind turbine
- Vertical-axis wind turbine
- Efficiency
- Wind vane
- Power
- Rate
- Force
- Gravity
Questions
- What are the parts of a wind turbine?
- How does a wind turbine work?
- What are the advantages and disadvantages of horizontal-axis wind turbines and vertical-axis wind turbines?
Bibliography
This source defines and describes different types of wind turbines, and highlights their advantages and disadvantages:
- Wikipedia Contributors. (2008, June 3). Wind Turbine. Wikipedia: The Free Encyclopedia. Retrieved June 3, 2008.
This source shows an animation of a wind turbine in action:
- U.S. Department of Energy. Office of Energy Efficiency and Renewable Energy. (n.d.). How Do Wind Turbines Work?. Retrieved April 8, 2014.
Materials and Equipment
- Pinwheel
- You can purchase a pinwheel locally or from an online supplier such as Amazon.com.
- Alternatively, you can create a homemade pinwheel using a 8.5 inch x 8.5 inch square sheet of paper, a nail, and the instructions in the Procedure.
- Scissors
- Ruler, metric
- Pen
- Round wooden skewer, available at grocery stores
- Tape, any kind
- Empty oatmeal canister
- Handful of rocks or other heavy objects to keep the oatmeal canister weighted down
- Small compression spring, approximately 1 cm–3 cm long and able to fit around the skewer; available at hardware stores. Alternatively, you could use a small segment of a plastic drinking straw.
- Clear tape
- Thread (a piece about 30 cm–60 cm long)
- Paper clips, #1 size (at least 3)
- Measuring tape
- Room in your home that is free from drafts
- Hair dryer
- Table or chair
- Protractor
- Sticky notes, small size. Alternatively, you could use masking or painter's tape.
- A helper
- Stopwatch
- Lab notebook
Experimental Procedure
Making Your Rotor
- If you are using a store-bought pinwheel:
- Remove the pinwheel blades from the shaft by cutting off the plastic, flanged tip of the shaft. Now you have a store-bought rotor ready to go on the skewer.
- If you are making your own pinwheel:
- Fold the square of paper along the diagonal and then unfold it back into a square again. Fold the square of paper again along the other diagonal and unfold it back into a square again. Your paper will now look like a square with a big "X," made by creases.
- Measure approximately 5 centimeters (cm) out from the center along each crease and make a dash mark with your pen, like in Figure 3, below.
- Make four holes with a nail near the corners of your square in approximately the same positions as those shown in Figure 3, represented by the black dots (the dots only represent location, not size of the holes). Use caution with the nail and be careful not to poke the nail into the surface underneath the paper.
- Make one final hole with the nail in the center of your square.
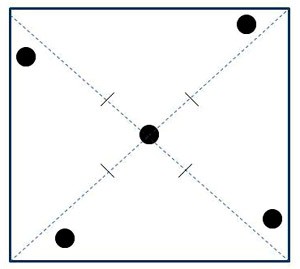
Template shows where to cut and fold a paper square to make a pinwheel. A square sheet of paper is folded from corner to corner. A hole is punched through the center of the square and four more holes are punch to the right of each corner.
Figure 3. This drawing shows the holes, creases, and cuts needed to make your own pinwheel.
- From each corner of the square, cut down along the crease with the scissors until you reach the mark you made with the pen. Now you are ready to form your pinwheel and make your homemade rotor.
/-/https/www.sciencebuddies.org/cdn/Files/3546/5/Energy_img030.jpg)
Building Your Horizontal-Axis Wind Turbine
- Using scissors or the nail, carefully cut two small holes on opposite sides of the oatmeal canister, approximately 2 – 3 cm down from the top of the canister. Use Figure 4 below as a guide.
- Remove the lid and place the rocks inside the canister.
- Thread the skewer through the two holes.
- Thread the compression spring onto one end of the skewer.
- Note: Instead of using a compression spring, you could use a small segment of a plastic drinking straw. To do this, use scissors to cut a plastic drinking straw so that you have a piece that is approximately 1 cm – 3 cm long.
- Thread the rotor, either store-bought or homemade, onto the skewer next to the compression spring.
- If using the store-bought rotor, it is ready to thread onto the skewer.
- If using the homemade rotor, it must be formed first, as follows:
- Pick up each of the holes at the corners of the square and fold them, one at a time, over onto the middle hole, so that they are all on top of one another. Then thread all five holes onto the skewer.
- On the side of the rotor that will face the wind source, tape the rotor, either store-bought or homemade, securely with tape around the skewer so that it cannot "slip" as it rotates. To make sure it is secure, blow on the rotor. If the rotor is taped securely, the skewer shaft will rotate as the blades spin.
- Cut approximately 30 cm – 60 cm of thread with the scissors.
- Tie one end of the thread to the end of the skewer that does not have the rotor on it.
- Tie the other end of the thread to one paper clip.
- Attach 2-4 more paper clips to the first paper clip to increase the weight (load) that your horizontal-axis wind turbine will be lifting. You want enough weight that the thread is not slack, but not so much weight that the turbine cannot lift it. Your wind turbine should look similar to the one in Figure 4.
- Extend the thread its full length and measure its length with the measuring tape, from the skewer to the top of the first paper clip. Note this measurement in your lab notebook. Now you are ready to start testing!
/-/https/www.sciencebuddies.org/cdn/Files/3547/5/Energy_img031.jpg)
Figure 4. These photographs show how to build a horizontal-axis wind turbine using a homemade (on the left) or store-bought (on the right) pinwheel.
Testing Your Pinwheel
- Place your wind turbine at the edge of a chair or table in a room free from drafts and close to an electrical outlet, as in Figure 4.
- You will be testing your wind turbine at five different points around the rotor, as shown in Figure 5. To mark these points on the table, do the following:
- Place a protractor so that its base is lined up directly below the point where the rotor meets the skewer and the skewer is pointing straight at 90 degrees, as shown in Figure 6, below.
- Extend and lock your measuring tape so that it is approximately 15 cm longer than the radius of your rotor.
- Hold one end of the measuring tape directly below the point where the rotor meets the skewer, and the other end of the measuring tape at the approximate points around the pinwheel, shown in Figure 5. Mark the points on the table with small sticky notes or pieces of masking tape or painter's tape
- Note: When you begin the test, you will hold the handle of your hair dryer on the sticky note and the blower end will point at the rotor. The goal is to have about 2 cm – 5 cm between the rotor and the blower. If you do not have enough room, or have too much space, then adjust your sticky notes outward or inward.
- When you are done marking the points, you can remove the protractor. Your setup should now look like the one in Figure 7, below.
/-/https/www.sciencebuddies.org/cdn/Files/3548/5/Energy_img032.jpg)
Figure 5. This top-view drawing of the homemade wind turbine shows the five approximate points around the rotor that will be marked and tested.
/-/https/www.sciencebuddies.org/cdn/Files/5923/8/pinwheels-wind-turbines-energy-measure.jpg)
Figure 6. Using masking tape, painter's tape, or sticky notes make marks about 15 cm away from where the rotor meets the skewer at the points shown in Figure 5. (Note: This setup uses a small segment of a plastic drinking straw instead of a compression spring.)
/-/https/www.sciencebuddies.org/cdn/Files/5922/7/pinwheels-wind-turbines-energy-setup.jpg)
Figure 7. When you are done measuring and marking the points, your setup should look similar to this one.
- Now you are ready to put your wind turbine to work! Although it is possible to do testing with one person, it is easier with a helper. You can have one of you operate the stopwatch and the other person hold the hair dryer.
- To get an idea of what is going to happen, you can turn your hair dryer on low and slowly move it from one sticky note to the next as you watch the pinwheel spin.
- Extend the thread and its load of paper clips to its full length.
- Place the handle of your hair dryer on the first sticky note. Point your hair dryer away from the rotor and turn the hair dryer on low.
- When the helper says, "Go!" and starts the stopwatch, point the hair dryer directly at the rotor and leave it there. Try to keep the hair dryer at the same level for each of your trials.
- Observe the motion of the paper clips. When the top of the first paperclip reaches the skewer, the helper should stop the stopwatch. If the paper clips fail to rise all the way to the skewer, then stop the stopwatch when the paper clips stop moving.
- Turn off your hair dryer and fill out the time it took to raise the paper clips or the time at which they stopped moving in a Time Data Table in your lab notebook, like Table 1, below.
| Time Data Table | ||||
|---|---|---|---|---|
| Position of Wind Source Around Rotor (deg) | Trial 1: Time to Raise Load (sec) | Trial 2: Time to Raise Load (sec) | Trial 3: Time to Raise Load (sec) | Average Time of Trials (sec) |
| 0 | ||||
| 45 | ||||
| 90 | ||||
| 135 | ||||
| 180 | ||||
| Distance and Work Data Table | |||||
|---|---|---|---|---|---|
| Position of Wind Source Around Rotor (deg) | Trial 1: Distance Paper Clips Were Raised (cm) | Trial 2: Distance Paper Clips Were Raised (cm) | Trial 3: Distance Paper Clips Were Raised (cm) | Average Distance and Conversion to Meters (m) (1 cm = 0.01 m) |
Average Work Done = Force Due to Gravity × Average Distance (N·m) |
| 0 | |||||
| 45 | |||||
| 90 | |||||
| 135 | |||||
| 180 | |||||
- Measure and record the distance that the paper clips were raised in a Distance and Work Data Table, like Table 2, above, in your lab notebook.
- Repeat steps 4-9 for all the sticky note positions.
- Then perform two more trials for each position by repeating steps 4-10 two more times. Be sure to record all your data in the tables in your lab notebook.
Analyzing Your Data
- Average the times of your trials for each hair dryer position and record your calculations in your Time Data Table.
- Average the distances that your paper clips were raised for each position of the hair dryer around the rotor, then convert your averages to meters (m). (1 cm equals 0.01 m.) Record your calculations in your Distance and Work Data Table.
- Calculate the mass of your load in kilograms (kg). One #1 paper clip has a mass of 0.00043 kg, so if you used three paperclips, then the mass of your load would be three times this number. Record the combined mass of your paper clips in your lab notebook.
- Calculate the force (in Newtons [N]) that the combined mass of the paper clips experiences due to gravity by multiplying the mass of the paper clips (in kg) by 9.81 (m/sec²).
- This calculation is also shown in Equation 2 in the Background section.
- Record this force in your lab notebook.
-
Calculate the average work you did (in joules [J] or Newton-meters [N·m]) for each position around the rotor by multiplying the force on the paper clips due to gravity by the average distance you raised the paper clips (in meters).
- This calculation is also shown in Equation 3 in the Background section.
- Record the average work done in your Distance and Work Data Table.
-
Calculate the power (in watts [W]) your wind turbine achieved for each position around the rotor using the average work that you calculated in your Distance and Work Data Table and the average time you calculated in your Time Data Table.
- This calculation is shown in Equation 1 in the Background section.
- Record your calculations in a Position vs. Power Data Table, like Table 3, below.
| Position vs. Power Data Table | |
|---|---|
| Position of Wind Source Around Rotor (deg) | Power = Average Work Done Divided By Average Time (W) |
| 0 | |
| 45 | |
| 90 | |
| 135 | |
| 180 | |
- Make a line graph of how the power changed with position around the rotor. Label the y-axis Power (W) and the x-axis Orientation to the Wind Source (deg) You can make the graph by hand or use a computer program to make the graph on the computer and print it.
- Which orientation to the wind (position of the hair dryer) produced the most power for your pinwheel? Which orientation produced the least? Were there any orientations that produced nearly equal power?
Ask an Expert
Global Goals
The United Nations Sustainable Development Goals (UNSDGs) are a blueprint to achieve a better and more sustainable future for all.
/-/https/www.sciencebuddies.org/cdn/Files/19750/5/E-WEB-Goal-07.png)
Variations
- Try this experiment again but position the hair dryer at different heights around the pinwheel. How does the hair dryer's height affect the power produced by the pinwheel?
- Compare the power to wind-source orientation curves for two different types of pinwheels.
- Determine the best orientation to the wind for an 8-blade pinwheel. Cut off one blade at a time and evaluate how the power changes.
Careers
If you like this project, you might enjoy exploring these related careers:
/-/https/careerdiscovery.sciencebuddies.org/cdn/Files/1888/17/unsplash-IU10leGdwxg.jpg)
/-/https/careerdiscovery.sciencebuddies.org/cdn/Files/1894/17/iStock-870031246.jpg)
/-/https/careerdiscovery.sciencebuddies.org/cdn/Files/1147/17/unsplash-fJebhGIP0P4.jpg)

/-/https/img.youtube.com/vi/NV6YHZ2RAqc/0.jpg)
/-/https/img.youtube.com/vi/rvyNRQ2J1_c/0.jpg)
/-/https/img.youtube.com/vi/um5-Ts41nHI/0.jpg)