Abstract
Earth, the Sun, wind, and water are all sources of renewable and sustainable energy—and sources you probably already know about. But did you know that you can get energy from such things as banana peels, coffee grounds, and newspaper? In a process called composting, you can transform kitchen and other solid wastes into a product that is beneficial for your garden: homemade fertilizer. As the waste decomposes, it also creates heat. Can this naturally created heat be put to use? In this energy and power science fair project, you will investigate whether the heat in an active compost bin or pile can be used to heat water.Summary
Michelle Maranowski, PhD, Science Buddies
Max Keller, Science Buddies Clever Scientist Award winner at the Minnesota State Science and Engineering Fair
This science fair project is based on the following project:
- Keller, M. (2009). Decomposing Energy.
/-/https/www.sciencebuddies.org/cdn/Files/3916/5/Energy_img059.jpg)
Objective
To investigate whether the heat from a compost bin or pile can be used to efficiently and effectively heat water.
Introduction
In 2007, Americans generated 254 million tons of garbage. The average American generates 4.6 pounds (lb.) of garbage every day. Have you ever thought about how much garbage you make? Just think about all the banana peels, apple cores, and candy wrappers you've thrown into your garbage can. But where does it go and what happens to it? Most of this garbage goes to a landfill. But opening and maintaining landfills is expensive. What can we do to reduce the amount of garbage that we send to the landfill? The answer is to recycle as much as possible and to compost our organic waste. In 2007, of the 254 million tons of garbage Americans created, 22 million tons was composted.
What is composting? Composting is the natural breakdown of organic material, such as banana peels and leaves, into a dark, loose and soil-like substance. This substance is called compost, and is prized by all gardeners. Compost that is added to soil improves its structure, texture, aeration, and nutrient content. Compost also helps maintain the soil's pH and improves soil fertility. You might be wondering why, if compost is so prized, the organic material is not just added to the landfill—it shouldn't hurt, right, since organic wastes should just decompose? Well, not exactly. Landfilling organic wastes is inefficient because the lack of oxygen inside the landfill causes decomposition to occur slowly. This produces methane gas and acidic leachate. Methane is a colorless, odorless gas that can cause asphyxiation and explosions if not properly managed. Acid leachate from the landfill can contaminate groundwater, which is the source for springs, wells, and drinking water.
Now that you know what composting is and why it cannot take place in a landfill, you should know how composting works. The rate at which composting occurs depends on several factors. These factors include: temperature of the compost system, the materials that are placed in the compost, the particle size of the materials, and the size and shape of the compost system. Heat is a by-product of composting. It is produced as a result of microbial breakdown of the organic material in the compost pile. The heat that is produced depends, in part, upon the carbon-to-nitrogen ratio or C:N ratio. For the best performance, the composting microbes require the right amount of carbon for energy, and nitrogen for protein production. The ideal C:N ratio is 30:1. A large-scale compost pile can produce temperatures of 60°C–70°C. Turning or aerating the compost pile reduces the temperature of the pile if it gets too hot. If the compost pile gets too hot (beyond 65°C), then the beneficial microbes that are responsible for decomposition can die. Aerating also adds oxygen, which is required for microbial cellular activity in the compost pile. Initially, in a compost pile, mesophilic bacteria break down the soluble, readily degradable material. The heat they produce causes the compost temperature to rise rapidly. At about 40°C, the mesophilic bacteria start to die or move to the outer part of the pile and are replaced by heat-loving thermophilic bacteria. The thermophilic bacteria continue to break down the proteins, fats, and complex carbohydrates in the compost pile. After the supply of high-energy compounds is exhausted, the temperature of the compost pile decreases and mesophilic bacteria take over again and cure the remaining organic material in the compost pile. Depending on the size of the compost pile or bin, the thermophilic stage can last for several weeks or months.
If a simply made compost pile can generate heat, then we should be able to take advantage of this natural source, right? Right! There are many examples of enterprising citizens who have heated water for greenhouses and homes using their own compost piles. These people have successfully converted their organic waste into valuable fertilizer and savings, since they don't have to pay for heat. In this energy and power science fair project, you will find out if you, too, can extract heat from a compost pile or bin. How long will it take for water to heat up? How hot will the water get? Do this science fair project and get the answers!
Terms and Concepts
- Organic
- Compost
- Decompose
- Leachate
- Microbial
- C:N ratio
- Aeration
- Mesophilic
- Thermophilic
- Energy
- Specific heat equation
- Power
Questions
- What are three methods of composting?
- What kinds of materials should go into a compost pile?
- Is moisture required in composting?
- What is the C:N ratio? What happens if the C:N ratio is too high or too low?
- What happens during the thermophilic stage of composting?
- What is the temperature of a typical compost pile in the thermophilic stage?
Bibliography
- United States Environmental Protection Agency. (2008, October 7). Wastes—Resource Conservation—Reduce, Reuse, Recycle, Composting. Retrieved July 28, 2009.
- United States Environmental Protection Agency. (n.d.). Municipal Solid Waste Generation, Recycling and Disposal in the United States: Facts and Figures for 2007. Retrieved July 28, 2009.
The following website, from Cornell University's Waste Management Institute, has thorough information on the physics and chemistry of composting, as well as how to calculate C:N ratios.
- Richard, T., Trautmann, N., Krasny, M., Fredenburg, S., Stuart, C. (1996). Cornell Composting. Retrieved July 28, 2009.
Materials and Equipment
- Lab notebook
For the Compost Bin
- Plastic barrel with lid, 100-liter (L); try to use a brand-new barrel, because used barrels might have previously held toxic substances.
- Safety goggles
- Keyhole saw that can cut plastic
- Metal rods, 3/8-inch (in.) diameter (5). The length of the rods should be the diameter of the barrel. You can purchase metal rods at your local hardware store.
- Drill with 3/8- in. bit and a 5/16-in. bit that can go through plastic
- Metal hacksaw
- Aluminum foil (1 roll)
- Binder clips (1 box)
- 120 VAC, 120 mm fan, available from Jameco Electronics
- AC fan cord, available from Jameco Electronics
- Tape measure
- Chicken wire, 1-in. hex (1 roll); available at your local hardware store
- Mesh or screen (1 roll); available at your local hardware store. This is same material from which screen doors are made.
- Metal snips; available at your local hardware store
- Scissors
- Duct tape (3 rolls)
- PVC pipe, 1-in. diameter, 10 feet (ft.) long; purchase a standard length so that you can make custom lengths for your barrel.
- PVC pipe cutter
- PVC cap, 1-in. (2)
- PVC cement
- Pantyhose (1 pair)
- Insulation (6 rolls). Try to find an insulation that is safe for you to handle with your hands, like UltraTouch Natural Cotton insulation, which is made from recycled cotton denim. You can find this at your local hardware stores, or online at Amazon.com.
For the Compost
- Coffee can and lid, metal (tin); emptied and cleaned
- Hammer
- Nail
- Set of clothes that can get dirty
- Disposable gloves; available from your local pharmacy or grocery store
- Work gloves
- Dirt (10 lbs); available at your local hardware or garden store
- Cow manure (10 lbs.). You can obtain manure from farms and some petting zoos.
- Hay or grass clippings (10 lbs.); available at your local feed or pet store
- Potato peelings (45 lbs.)
- Optional: Plastic bin for storing the peels, if you'll be collecting them over a period longer than a day
- Digital kitchen scale. You can purchase this item at your local home goods store or online at www.amazon.com
- Liquid measuring cup, 2-cup
- Small spade; available at your local hardware or garden store
- Digital thermometers with probes (2); available from your local home goods store, or online at www.amazon.com
Disclaimer: Science Buddies participates in affiliate programs with Home Science Tools®, Amazon.com, Carolina Biological, and Jameco Electronics. Proceeds from the affiliate programs help support Science Buddies, a 501(c)(3) public charity, and keep our resources free for everyone. Our top priority is student learning. If you have any comments (positive or negative) related to purchases you've made for science projects from recommendations on our site, please let us know. Write to us at [email protected].
Experimental Procedure
Important Notes Before You Begin:
- In this energy and power science fair project, you will be making a special compost bin. Read the entire procedure carefully and all the way through.
- Make sure that you account for all of the rod and pipe placing. You might want to make a quick design sketch so that everything fits together and you don't get any bad surprises.
- Be sure to plan ahead for enough time and resources to collect and prepare 45 lbs. of potato peelings and 10 lbs. of hay or grass clippings. Perhaps a potato peeling party is in order!
- Make sure you are home for the appropriate stretches of time, noted in the procedure below. This project might work best during a school break or if you are home-schooled.
- You can store your potato peelings in a plastic bin in your kitchen until you are ready to use them. It is ok if they start to decompose.
- Clean all of your work surfaces thoroughly with a bleach solution, since you were working with animal waste. Read the Science Buddies Microorganism Safety Guide to learn how to experiment safely.
Making the Experimental Compost Bin
- Find a location in your yard that is flat, free of debris, and near an electrical outlet. Place the plastic barrel in this location.
- Put on your safety goggles. Use the keyhole saw to make a 120 mm. hole in the side of the barrel. The hole should be a few inches from the bottom of the barrel so that the fan can be placed on the ground, but still reach the hole.
- Using the drill and the 3/8-in. bit, drill another hole 1 inch above the 120 mm. hole for the fan. It doesn't have to be right above the 120 mm. hole, but somewhere along the perimeter of the barrel.
-
Insert one of the metal rods through so that it hits the other side of the barrel. At the position where the rod hits the barrel, drill another hole. Insert the rod all the way through. Repeat this step with the other four metal rods so that they are all parallel with the first rod, as shown in Figure 1. Use the tape measure and hacksaw to cut the rods to fit into the barrel. The purpose of these rods is to help support the weight of a false bottom (explained in step 5) and the compost pile. See Figure 1, below.
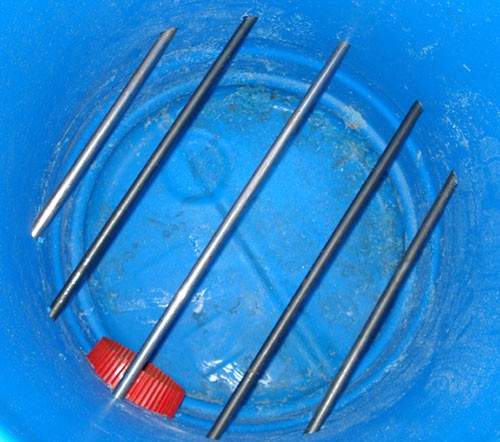
Figure 1. Layer of support rods. (Image courtesy of Max Keller.)
-
Now make a false bottom for the barrel. Take into account the placement of the 120 mm. hole and the metal rods, and place the false bottom just above the metal rods, as follows. Measure the width of the barrel at this location, using the tape measure. Use the metal snips to cut out two pieces of chicken wire to make the false bottom. Make sure that the chicken wire is a bit larger than the barrel measurement so that you can bend the excess and duct tape it to the wall of the barrel when it is time to install the false bottom. Use aluminum foil around the edge to hold the chicken wire pieces together, as shown in Figure 2.
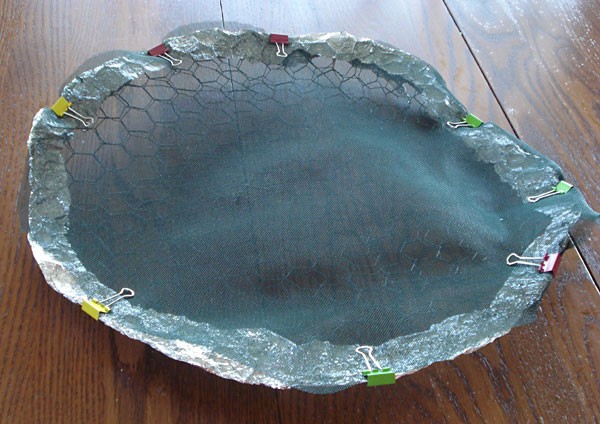
Figure 2. Chicken wire and mesh false bottom. (Image courtesy of Max Keller.)
- Using the scissors, cut out some mesh to fit into the false bottom. The mesh will prevent the compost from falling through to the space below. Use the binder clips to hold the mesh and chicken wire together.
- Measure the height of the barrel from the bottom of the barrel to just below where the lid fits the barrel. Use the PVC pipe cutter to cut two lengths of PVC the height that you measured.
- Cap each piece with a PVC cap. Glue the cap in place with the PVC cement.
- Place the PVC tubes in the barrel to make sure that the lid can still fit comfortably. If they don't fit, then cut a little bit off of the free ends.
- Now use the drill and the 5/16-in. drill bit to drill holes into the PVC pipes. Drill 32 holes around the entire length of both PVC pipes, excluding the capped section.
- Cut the pantyhose in half so that you have two legs. Put one PVC pipe into each of the pantyhose legs. The pantyhose should be snug around the pipe. Knot the pantyhose at the top of each tube and cut off the excess.
-
Now make two openings with the metal snips on either side of the chicken wire false bottom so that the PVC tubes can be inserted through. Make similar openings on either side of the mesh to accommodate the PVC tubes. The holes in the mesh should match the size and location of the holes in the chicken wire. Take a look at Figure 3 to see how the compost bin should look.

Figure 3. This image shows the inside of the compost bin. (Image courtesy of Max Keller.)
- Now assemble the compost bin. Duct tape the fan to the outside of the barrel. Make sure that it is stable and that the electrical wire is on the outside of the bin. If you wish, you can devise a way to permanently mount the fan to the wall of the barrel.
- Insert the chicken wire false bottom and duct tape it to the barrel walls. The chicken wire must be stable and sturdy, because it must support 75 lbs. of organic material. Place the mesh on top of the chicken wire so that the holes match.
- Insert one pantyhose-covered PVC tube into each hole until the end of each hits the bottom of the barrel. The capped end should be at the top of the barrel.
- Insulate the barrel to reduce heat loss, as follows. Unroll the insulation and duct tape it to the outside walls of the barrel. Make a gap in the insulation where the fan is connected to the barrel. The experimental compost bin is now complete.
/-/https/www.sciencebuddies.org/cdn/Files/3914/5/Energy_img057.jpg)
/-/https/www.sciencebuddies.org/cdn/Files/3915/5/Energy_img058.jpg)
/-/https/www.sciencebuddies.org/cdn/Files/3916/5/Energy_img059.jpg)
Creating the Compost
- Using the hammer and a nail, make a small opening in the lid of the coffee can. The hole should be large enough to insert the digital thermometer probe. Be sure you aren't hammering onto a surface that should not be damaged.
- Get into your work clothing and put on a pair of disposable gloves and on top of those, your work gloves.
- Place 10 lbs. of dirt into the barrel, followed by 10 lbs. of manure, then 10 lbs. of hay, and finally, 30 lbs. of potato peelings. Use your kitchen scale to weigh the amounts. Keep the PVC pipes vertical.
- Sprinkle 500 milliliters (mL) of water over the compost materials. Take the spade and gently, but thoroughly, mix the compost material together. Insert one of the thermometer probes into the compost pile (you will place another one in the coffee can lid later).
- Dig a hole in the compost and place the coffee can (with the lid on) in the barrel, surrounded by the compost material. The top of the coffee can should be level with the top of the compost. Once you have placed the coffee can in, add the rest of the potato peels to the barrel so that the peels are surrounding, but not covering, the coffee can.
- Cover the compost and barrel with the lid. Make sure the thermometer probe cable is outside of the barrel. Attach the probe to the display and place the display on the barrel lid. Record the initial temperature of the compost in your lab notebook.
-
After 24 hours, on day 2, put on your work clothes and gloves, open the barrel, remove the temperature probe and the coffee can, and gently turn over and rotate the compost with the spade.
- If the compost still looks moist, leave it alone. If it does not, then add another 500 mL of water, and mix.
- Replace the coffee can into the pile, reinsert the temperature probe into the compost, and replace the barrel's lid.
- Turn on the temperature display and record the compost temperature in your lab notebook.
- Over any 10-hour period within the next 24 hours, aerate the soil three times, for 15 minutes each time. To aerate the compost pile, plug in the fan and let it blow air into the barrel for 15 minutes. The air should travel up through the perforated PVC tubes and blow air into the compost pile, bringing in oxygen that is necessary for the bacteria within. Note: Just before running the fan, take a compost pile temperature reading and record the reading in your lab notebook, along with the date and the time.
- Repeat step 7 on day 3, recording your temperature readings in your lab notebook.
-
24 hours later, on day 4, open the barrel, remove the temperature probe and the coffee can, and gently rotate the soil with the spade.
- Make sure that the compost pile is still moist. If it isn't, sprinkle 500 mL of water over the compost pile and mix it in.
- Weigh the empty coffee can and lid, in grams. Record this measurement in your lab notebook.
- Fill the coffee can all the way up with water and reweigh the coffee can, in grams. Record this reading in your lab notebook.
- Subtract the weight of the empty coffee can from the weight of the water-filled coffee can to arrive at the weight of the water. Record this value in your lab notebook. The purpose of the water-filled coffee can is to help you determine how much heat energy the compost pile is producing.
-
Replace the water-filled coffee can in your compost bin, taking care to bury it within the compost such that the top of the coffee can is level with the top of the compost.
- Insert the second thermometer probe into the coffee can through the hole in the lid into the water. Bring the cable outside the barrel and replace the barrel lid.
- Take a temperature reading of the compost and an initial temperature reading of the water. Record the data in your lab notebook.
- Over a 10-hour period within the 24 hours, aerate the soil three times, for 15 minutes each time.
- Every 2 hours within that 10-hour period, record the temperature of the water and the compost in your lab notebook. You may notice that after a few hours, the temperature of the water and the compost pile is the same. At this point you can remove the can of water and replace it with fresh, cool water. Mark in your lab notebook when you changed the water and the initial starting temperature of the water.
-
On day 5, open the barrel lid at approximately the same time that you did so the previous day.
- Carefully remove both temperature probes. Remove the coffee can and empty the water.
- Rotate the soil with the spade, more quickly this time (15 minutes isn't necessary).
- Make sure that the compost pile is moist. If it isn't, then sprinkle the compost with 500 mL of water and mix it into the compost.
- Fill the coffee can with fresh water and weigh it, in grams. Subtract the weight of the can (the measurement you took previously) from the weight of the freshly filled coffee can to arrive at the weight of the water. The weight of the water should be the same as it was on the previous day. If it is not, adjust until it is by refilling, emptying, and reweighing the coffee can, in grams, as necessary.
- Rebury the water-filled coffee can into the compost pile. Insert the temperature probe through the lid of the coffee can, into the water.
- Insert the second probe into the compost pile.
- Take temperature readings of the compost and the water. Record the data in your lab notebook.
- Over a 10-hour period within the next 24 hours, aerate the soil three times, for 15 minutes each time.
- Every 2 hours within that 10-hour period, record the temperature of the water and the compost in your lab notebook. You might notice that after a few hours, the temperature of the water and the compost pile is the same. At this point, you can remove the can of water and replace the water in the coffee can with fresh, cool water. Mark in your lab notebook when you changed the water and the initial starting temperature of the water.
- Repeat step 11 on subsequent days, for at least two more days, for a total of seven days.
Analyzing Your Data
-
Now that you have several days of data, you can calculate how much heat energy the compost produced. Equation 1, the specific heat equation, describes how to calculate the amount of heat energy required to change the temperature of a substance.
Equation 1:
Q = mC∆T
- Q = Heat energy in joules (J)
- m = Mass of the water or the coffee can, in grams (g)
- C = Specific heat capacity. For water, the specific heat capacity is 4.186 joules/grams °C for tin 0.227 joules/grams °K
- ∆T = Change in temperature in degrees Celsius (°C)
- Notice that the specific heat capacity for tin is given in degrees kelvin (K). However, since the equation asks for the difference in temperatures and the difference is the same, regardless of units, you can use the specific heat capacity listed.
- Calculate the heat energy produced by the compost pile and transferred to the can for days 4, 5, and 6. Calculate the heat energy for each instance that you took a water temperature reading. Separately calculate the heat energy required to bring the tin coffee can up to the temperature that you read and the water. How much heat energy does the compost pile produce? How does it vary by hour? How does it vary by day? Do you think that it is feasible to heat water for a household using the heat energy from a compost pile?
Ask an Expert
Global Goals
The United Nations Sustainable Development Goals (UNSDGs) are a blueprint to achieve a better and more sustainable future for all.
/-/https/www.sciencebuddies.org/cdn/Files/19750/5/E-WEB-Goal-07.png)
/-/https/www.sciencebuddies.org/cdn/Files/19755/5/E-WEB-Goal-12.png)
Variations
- Can you make improvements to the compost bin design? How can you extend this science fair project to heat a larger reservoir of water?
- Calculate the C:N ratio of the compost mixture above.
- What is the power output of the compost pile?
- Devise an alternative way of aerating the compost pile. How does this affect the rate at which the compost pile heats up?
Careers
If you like this project, you might enjoy exploring these related careers:
/-/https/careerdiscovery.sciencebuddies.org/cdn/Files/20218/6/EnvEng_KeyPhoto.jpg)
/-/https/careerdiscovery.sciencebuddies.org/cdn/Files/1486/17/pexels-photo-4033018.jpg)
/-/https/careerdiscovery.sciencebuddies.org/cdn/Files/1281/17/pexels-photo-3580281.jpg)

/-/https/img.youtube.com/vi/v0oaTHb2u0Y/0.jpg)
/-/https/img.youtube.com/vi/JG9gvci1TZk/0.jpg)
/-/https/img.youtube.com/vi/xF_F4iW0D6U/0.jpg)