Abstract
What do humans need to survive? We need food, water, and warm shelter. We all need a warm place to live, particularly when it's chilly outside. How do many of us warm our houses or apartments? We depend on fossil fuels to supply gas and electricity to our heaters. But burning fossil fuels to create energy is harmful to the environment. What if there was a way to warm our homes without burning fossil fuels and it was free? In this science fair project, you will build a solar air heater and see if it can warm the air in a cool room. Take advantage of the Sun. It's always shining!Summary
Michelle Maranowski, PhD, Science Buddies
This project is derived from this solar air heater project:
U.S. Department of Energy. (1995, December). Solar Energy Science Projects. Retrieved June 16, 2008.
/-/https/www.sciencebuddies.org/cdn/Files/3469/5/EnvEng_img064.jpg)
Objective
To build a simple solar air heater and heat the air in a room.
Introduction
The Sun is a medium-sized star in the center of our solar system that is a powerful and continuous source of energy. The Sun produces 3.8 x 1026 watts (W) of power and 1.4 x 1031 joules (J) of energy every hour. On a clear day at sea level, when the Sun's rays hit perpendicular to the Earth's surface, the Earth receives 1000 watts per square meter (W/m2) of solar radiation. The Earth receives free power and energy from the Sun all the time.
/-/https/www.sciencebuddies.org/cdn/Files/3467/13/EnvEng_img062.jpg)
Figure 1. This is an image of the Sun with a large loop of gas shooting from the surface. (NASA, 2007.)
There are many ways to take advantage of the power and energy that the Sun provides. We can use solar energy to create electricity, cook food, heat water, and even disinfect water. Water disinfection is particularly important, because many underprivileged communities don't have a safe source of clean water. Using the Sun to disinfect water can be done cheaply and relatively quickly.
When you stand outside on a warm, sunny day, you can feel the warm air around you. Why not harness this effect to heat homes? A solar air heater does just that. It works by circulating air into an enclosure designed to absorb solar heat (energy) and then forcing the hot air back into a room or house. In this science fair project, use easy-to-find household items to construct a solar air heater. Determine how hot you can heat air using the solar air heater. Take advantage of the Sun's power!
Terms and Concepts
- Watt (W)
- Power
- Joule (J)
- Energy
Questions
- How is the Sun's energy used to create electricity on Earth?
- How is the Sun used to disinfect water? Are there any problems or concerns with popularly used methods of solar water disinfection?
- How are more-complicated solar air heaters built?
Bibliography
- Solar Action Alliance. (n.d.). Solar Action Alliance. Retrieved May 31, 2016.
The following references, along with additional references on their pages, give lots of information about solar energy and different methods to take advantage of free energy.
- Wikipedia Contributors. (2008). Solar energy. Wikipedia: The Free Encyclopedia. Retrieved June 12, 2008.
- The Energy Information Administration, United States Department of Energy. (2007, November). Solar Energy—Energy from the Sun. Retrieved June 12, 2008.
Check out this website to understand energy and power and the difference between the two:
- Rathjen, Don. (2001). Watt's a Joule. Science Wire. Retrieved June 16, 2008.
Materials and Equipment
- Compass
- Tape measure
- Large piece of cardboard; you can use appliance boxes or you can purchase sheets from an art supply store.
- Duct tape
- Painter's tape (1 roll); 2 inch wide tape works best
- White gesso paint; this can be purchased from an art supply store and the amount depends on the size of window and heater you construct. Read the Experimental Procedure, below, to determine how much you might need.
- Flat black acrylic paint; this can be purchased from an art supply store.
- Paintbrush (1); should be 2 inches or 3 inches wide. Can be found at your local hardware store.
- Disposable plastic plates or aluminum pie pans (2)
- Scissors
- Exacto knife
- Ruler
- Thumbtacks; you can use the ones that stick out and wrap the string around them, or use the flat thumbtacks and wrap the string between the thumbtack and the cardboard.
- Thin cotton string, 12-foot-long piece cut into two equal lengths
- Plastic wrap
- Masking tape
- Thermometer (1); either a laboratory thermometer or a thin indoor/outdoor thermometer
- Lab notebook
- Timer
Disclaimer: Science Buddies participates in affiliate programs with Home Science Tools®, Amazon.com, Carolina Biological, and Jameco Electronics. Proceeds from the affiliate programs help support Science Buddies, a 501(c)(3) public charity, and keep our resources free for everyone. Our top priority is student learning. If you have any comments (positive or negative) related to purchases you've made for science projects from recommendations on our site, please let us know. Write to us at [email protected].
Experimental Procedure
Constructing the solar air heater
- If you live in the northern hemisphere, find a window in your house or apartment that faces south. South-facing windows will receive the most sunlight throughout the day. If you need to, use the compass to help you do so. If you live in the southern hemisphere, the situation is reversed, so find a north-facing window. If you live close enough to the equator, which windows (north or south-facing) receive more sunlight will change throughout the year. Choose a window that receives more sun when you are doing this project. Ideally, the window should be sunny and have few or no obstructions in front of it.
- Use the tape measure to measure the inside dimensions (width and height) of the window. The solar air heater needs to fit snugly inside the window.
-
With the exacto knife, cut out a section of cardboard that is 10 inches wider and taller than the dimensions of the window. If the piece of cardboard that you have is not large enough, then tape a few pieces onto it to increase its size. Attach them together securely using duct tape.
- Safety Note: Be careful using the exacto knife. An adult's help is recommended. Always cut with motions and at angles that make the blade travel away from your body.
-
Cut out 5-inch squares from each corner of the cardboard. This makes four 5-inch flaps that extend from each side of the cardboard. Fold the flaps inward, toward the window. Fold the flaps carefully and accurately. The area inside the flaps (the yellow-shaded area in Figure 2) should be the same size as the window area. This is called the inward side of the solar air heater and it is the side that faces the window.
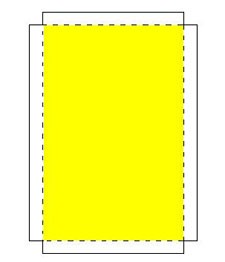
Figure 2. Cardboard piece with flaps cut out. Fold on the dotted lines. The yellow-shaded area should have the same dimensions as the inner dimensions of the window. The flaps should face the window when you place the solar air heater inside the window frame.
-
Find an area in your home or outside that is clean and has good ventilation. Squeeze out some gesso onto a disposable plate or pie pan. Using the paintbrush, apply a coating of gesso to the inward side of the cardboard—the side that will face the window—including the insides of the flaps. Paint the entire inward-facing side of cardboard completely so that there is no cardboard showing through. Keep replenishing the gesso on the plate, as needed. Let the gesso dry overnight. Clean the paintbrush and let it dry completely.
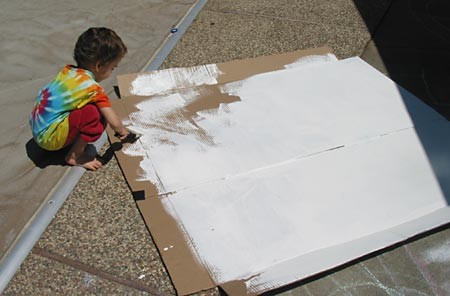
Figure 3. Apply a layer of gesso onto the cardboard so that the cardboard doesn't show.
- Once the gesso has dried, squeeze some of the flat black paint onto a clean disposable plate. Using the clean paintbrush, apply a coat of the black paint on top of the gesso. Paint the entire inward-facing side of cardboard so that there are no gaps in the paint and you can't see the layer of gesso. Keep replenishing the paint on the plate, as needed. Let the paint dry completely.
- Decide which end of the solar air heater will be the top and which end will be the bottom. Using the exacto knife, cut three vent holes at the bottom of the heater and three vent holes at the top of the heater. Each vent hole should be 3 inches wide and 3 inches long. The vent holes in the corners should be placed 1 inch away from the side and top/bottom folds. The middle vent holes should be 1 inch away from the top/bottom folds.
- On the outward, unpainted side of the heater (the side facing the room) push in three thumbtacks around the edge of each vent hole. To see exactly how to place the thumbtacks around each vent hole, see Figure 4.a. Be very careful when using the thumbtacks so they don't fall onto the floor and get lost. Keep careful track of the ones you stick into the cardboard.
-
Now take the first piece of string and tie it to one of the thumbtacks around the first vent hole to secure it. Then carefully wind it around the thumbtacks on the first vent hole at the top of the solar air heater, to form a triangle. Using the same string, carefully wrap the string around the thumbtacks around the second vent hole and the third vent hole, tying the string to the final thumbtack at the end to keep it in place. Cut off and discard any leftover string. Take your second piece of string and repeat step 9 on the vent holes at the bottom of the solar air heater. See Figure 4.b.
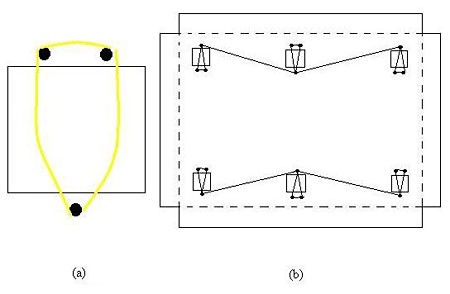
Six vent holes are cut in a sheet of cardboard, three holes on each long edge of the sheet. Two thumbtacks are placed at the top of each vent hole and a third thumbtack is placed at the bottom. On each side of the cardboard sheet one piece of string wraps around all three thumbtacks and all three vents holes of that side.
Figure 4. (a) This diagram shows thumbtacks and wrapped string around a vent hole. (b) This is how the string is wrapped around all of the vent holes.
-
Cover the thumbtacks with thin strips of duct tape. This prevents the thumbtacks from falling off of the cardboard and keeps the string in place.
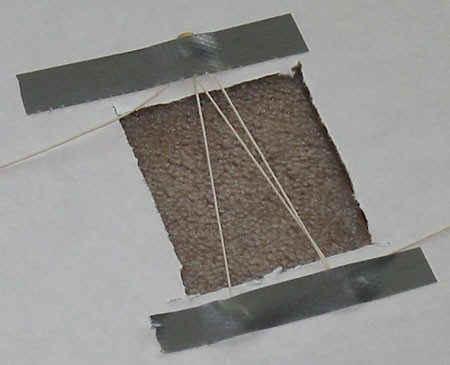
Figure 5. Shown is a vent hole surrounded by thumbtacks, string, and duct tape.
-
Cut a piece of plastic wrap long enough to cover the vent holes at the bottom of the solar air heater. Take the piece of plastic wrap and duct tape it to the top of the bottom vent holes on the black (inward) side. Do not completely tape the plastic wrap down. The plastic wrap should hang as a flap over the vent holes. See Figure 6. These vent holes will act as the heater's air intake (where the cool air comes in).
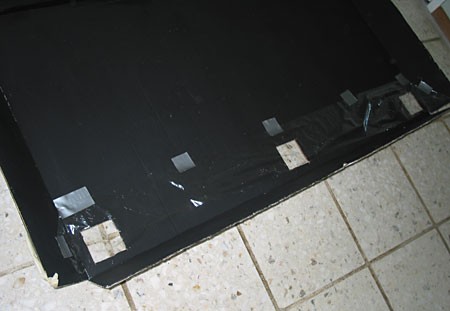
Figure 6. This is the heater's air intake.
-
Cut a second piece of plastic wrap long enough to cover the vent holes. Duct tape the plastic wrap to the top of the top vent holes on the outward (unpainted) side. Do not completely tape the plastic wrap down. The plastic wrap should hang as a flap over the vent holes. See Figure 7. These vent holes will act as the solar air heater's output (where the hot air comes out). The wrapped cotton string prevents the flaps from blowing through the intake and output vent holes. The solar air heater is complete and ready for installation.
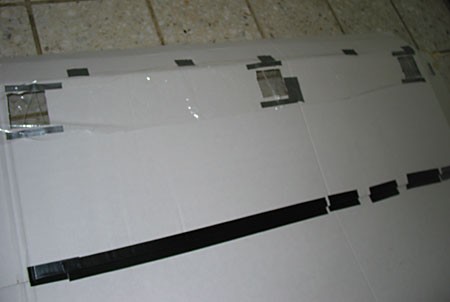
Figure 7. This is the heater's air output. Please note that the outward-facing side of the cardboard in this picture is not painted with white gesso; it is just white cardboard. Your cardboard can be brown or white, as long as the inward-facing side is painted with the white gesso and black paint.
/-/https/www.sciencebuddies.org/cdn/Files/3468/5/EnvEng_img063.jpg)
/-/https/www.sciencebuddies.org/cdn/Files/3469/5/EnvEng_img064.jpg)
/-/https/www.sciencebuddies.org/cdn/Files/3470/5/EnvEng_img065.jpg)
/-/https/www.sciencebuddies.org/cdn/Files/3471/5/EnvEng_img066.jpg)
/-/https/www.sciencebuddies.org/cdn/Files/3472/5/EnvEng_img067.jpg)
/-/https/www.sciencebuddies.org/cdn/Files/3473/5/EnvEng_img068.jpg)
Temperature Measurements
-
Fold in the cardboard flaps of the solar air heater and install it into the window that you took the measurements from. Make sure that there is a gap of air between the heater and the window pane. The way the solar air heater works is that air comes in from the bottom vent and moves up across the dark, hot surface of the heater. As it moves, the air heats up and then moves out the output vent. If there is no gap, then air will not be able to flow across the surface of the heater. Use painter's tape to securely hold the heater into the window and to close any open areas between the heater and the window frame.
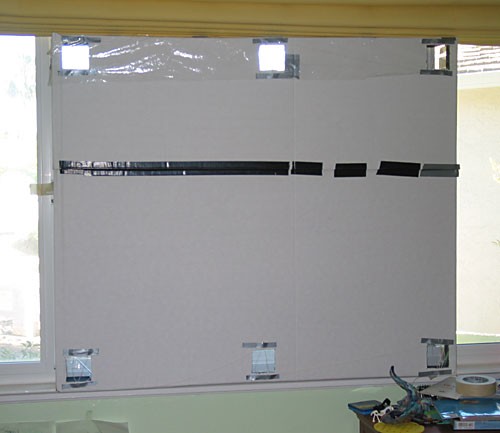
Figure 8. Here is an installed solar air heater. Please note that the outward-facing side of the cardboard in this picture is not painted with white gesso; it is just white cardboard. Your cardboard can be brown or white, as long as the inward-facing side is painted with the white gesso and black paint.
- Install the solar air heater early in the morning and let it sit for 15 minutes before starting to take measurements. Record the weather, such as if the day is sunny or cloudy, and the date in your lab notebook.
- Start taking measurements. Note the time of day in your lab notebook. Hold the lab thermometer under the plastic flap covering one of the air intake vent holes for 2 minutes. Note the temperature reading in your lab notebook in a data table similar to the one shown below. Then hold the thermometer under the plastic flap covering an air output vent hole for 2 minutes. Repeat the measurements two additional times for each hole and record the information in your lab notebook.
- Take three temperature measurements from the same intake hole and three temperature measurements from the same output hole every hour until the Sun sets. Record the information in your lab notebook.
- Wait for a day with different weather conditions and perform the same set of measurements. For example, if the first day was sunny, then choose a cloudy day for the next try. Record all data in your lab notebook. It's ok if the weather changes each day, as long as there is a predominant weather pattern each day, such as mostly sunny or mostly cloudy.
- Plot the sunny day data on two graphs. If you need help making a graph or would like to make one online, try the following Create a Graph website. Label the x-axis Time of Day on both graphs and the first graph's y-axis Average Temperature at Intake, and the second graph's y-axis Average Temperature at Output. Is there a difference between the two graphs? What time of day was the temperature at the output the highest?
- Plot the cloudy day data on two graphs. Label the x-axis Time of Day on both graphs and the first graph's y-axis Average Temperature at Intake, and the second graph's y-axis Average Temperature at Output. Compare the cloudy day graphs to the sunny day graphs. Are there any differences?
/-/https/www.sciencebuddies.org/cdn/Files/3474/5/EnvEng_img069.jpg)
| Time of Day | Intake Temperature | Output Temperature |
| 7:00 a.m. | ||
| Average: | Average: | |
| 8:00 a.m. | ||
| Average: | Average: | |
| 9:00 a.m. | ||
| Average: | Average: |
Ask an Expert
Global Goals
The United Nations Sustainable Development Goals (UNSDGs) are a blueprint to achieve a better and more sustainable future for all.
/-/https/www.sciencebuddies.org/cdn/Files/19750/5/E-WEB-Goal-07.png)
Variations
- Place the air heater in a window that is not facing south (but has the same dimensions as the south-facing window). Take similar measurements, as detailed in the above procedure. Does the solar air heater work as well in the new location?
- Try using different-colored paints. For example, does the solar air heater work better, worse, or the same if you use yellow acrylic paint instead of black acrylic paint?
Careers
If you like this project, you might enjoy exploring these related careers:
/-/https/careerdiscovery.sciencebuddies.org/cdn/Files/1789/24/ill_11.png)
/-/https/careerdiscovery.sciencebuddies.org/cdn/Files/20218/6/EnvEng_KeyPhoto.jpg)
/-/https/careerdiscovery.sciencebuddies.org/cdn/Files/1261/17/iStock-1250621440.jpg)
/-/https/careerdiscovery.sciencebuddies.org/cdn/Files/1281/17/pexels-photo-3580281.jpg)

/-/https/img.youtube.com/vi/tCtgt-VoPUk/0.jpg)
/-/https/img.youtube.com/vi/M63ew2hxEKk/0.jpg)
/-/https/img.youtube.com/vi/9RtRKIs21Ws/0.jpg)