Abstract
Have you ever looked around and noticed the plants and animals that grow in your neighborhood? Have you ever visited friends in another part of your city, state, or even another part of the country? Have you noticed whether the plants and animals where they live are similar to those growing near you? What would it be like to live where they do? Why do certain plants and animals grow in one area, but not in another? In this science fair project you will learn about biomes and how different climatic conditions affect plant growth and be one step closer to becoming an expert on our amazing home, Earth.
Summary
None
Readily available
Minor injury possible. Adult supervision is recommended during knife and scissor use.
This science fair project is based on a project called Biome in a Baggie found at https://mpt.pbslearningmedia.org/resource/tdc02.sci.life.stru.baggiezoom/biome-in-a-baggie/
/-/https/www.sciencebuddies.org/cdn/Files/3538/10/EnvSci_img042.jpg)
Objective
To investigate the effects of different biomes on plant growth.
Introduction
A biome is a community of plants, animals, and soil organisms living in a climate. Climate is defined as the average weather in a region over a long period of time. There are three major biomes: terrestrial, marine, and freshwater. Each of these is further divided into more-specific biomes. Climatic factors that play a role in where biomes are located are: latitude (which means placement on Earth in relation to the equator; how much sunlight is available depends upon latitude), humidity (the amount of moisture in the air), and elevation (how high something is). Climate is the main factor in determining the location and distribution of terrestrial biomes. Some examples of terrestrial biomes are: tundra, desert, and tropical forest. The tundra biome is characterized by extremely low temperatures, a short growing season, and poor soil nutrients. The desert has low rainfall and the plants have evolved so they can live with less water. The desert soil is very nutritive and needs only water to become productive. The tropical rainforest is known for it highly diverse plant life. The average temperature is between 68 and 77°F, and annual rainfall exceeds 200 centimeters (cm).
/-/https/www.sciencebuddies.org/cdn/Files/3539/10/EnvSci_img043.jpg)
The marine biome covers three-fourths of Earth's surface and includes oceans, coral reefs, and estuaries. Coral reefs are found around continents and islands. Examples include the Great Barrier Reef in Australia and the Tahitian reefs, which are both great places to snorkel and scuba dive because of the wide variety of fish and beautiful coral to see. Estuaries mark the region where freshwater meets the ocean. Estuaries are affected by the tides, but are sheltered from the full force of ocean wind and waves. Here, water of different salt concentrations mixes and create an interesting diversity of plant and animal life. An example of this type of biome is where the Mississippi River meets the Gulf of Mexico.
The freshwater biome consists of ponds and lakes, and streams and rivers. Freshwater means that the salt concentration in the water is low; less than 1% compared to 3.5% for ocean water. All of the plants and animals in freshwater biomes have adapted to the low salt concentration in the water. Ponds and lakes vary greatly in size and since they are isolated bodies of water, they sometimes have limited species diversity. Temperatures in ponds and lakes vary according to depth and season. At its deepest, temperatures can fall to 39°F, regardless of the season. At the top, the temperature of the water can reach 72°F in the summer and 32°F in the winter. Streams and rivers are different from ponds and lakes because they are flowing water. The characteristics of streams and rivers change from the source to the end, and the temperature at the source is usually much cooler than at the end of the stream or river.
In this science fair project, you will learn more about the different biomes on Earth and will model a couple of terrestrial biomes. By the end of this science fair project you will understand what an amazing place our home planet is.
/-/https/www.sciencebuddies.org/cdn/Files/3538/10/EnvSci_img042.jpg)
Terms and Concepts
- Biome
- Organism
- Climate
- Terrestrial
- Marine
- Freshwater
- Latitude
- Humidity
- Elevation
- Tundra
- Desert
- Tropical forest
- Soil nutrients
- Estuary
- Diversity
- Condensation
- Precipitation
Questions
- What is climate?
- What kind of climate do you live in?
- What is a biome?
- What are the major types of biomes?
- What kind of biome do you live in?
Bibliography
There is a lot of information online and in your local library on biomes. The following are just a few examples.
- Wikipedia Contributors. (2008). Biome. Wikipedia: The Free Encyclopedia. Retrieved June 23, 2008.
- National Air and Space Administration. (n.d.). Earth Observatory. Retrieved July 14, 2008.
- University of California Museum of Paleontology. (n.d.). The world's biomes. Retrieved July 10, 2008.
For help making graph paper, try:
- Create a Graph. (n.d.). Create a Graph. Retrieved September 29, 2008.
Materials and Equipment
- Lab notebook
- 2-liter plastic bottles (6), clean and empty
- Serrated knife
- Scissors
- Ruler
- Bag of river rock; available at hardware or garden supply stores
- Bag of potting soil; available at hardware or garden supply stores
- Shovel or hand trowel
- Packets of the same type of seeds; vegetables such as beans or peas work well, but flower and grass seeds work, too (need about 20 seeds, total)
- Measuring cup (1-cup)
- Water
- Resealable food storage bags, 1 gallon-size (6)
- Permanent marker
- Graph paper, or a website like Create a Graph
Experimental Procedure
- In this science fair project, you will model two terrestrial biomes: the temperate forest and the tropical forest. Find a spot in your home or apartment that is sunny (like a sunny windowsill) and another spot that is shady and a bit warmer than the first location. A good shady and warm spot is close to the dryer in your laundry room. Record the conditions of the locations in your lab notebook.
- Cut each of the plastic bottles in half. You can use the serrated knife to start the cut and then poke the scissors in and finish cutting around. Have an adult help you do this step. Recycle the top half of the bottles.
- Place a handful of river rocks in each plastic half. The rock layer should be 1 inch deep.
- Using the shovel, put a layer of potting soil on top of the rocks in all six bottles. There should be twice as much soil as there are river rocks, so approximately 2 inches.
- Now, drag your finger in the middle of the soil and make a trench as deep as your fingernail.
- Place 3-4 seeds in the trench and then gently replace the soil over the seeds. Spread the seeds out—don't put them all in one pile together. Repeat steps 5-6 for the other five containers.
- Fill the measuring cup with water and carefully water one container at a time until you see the water collect at the bottom of the rocks. The amount of water you'll use for each container should be between ¼ cup and ½ cup. Keep track of the amount of water you used in each container in your lab notebook. The soil should not be soaking wet or soupy, just moist. Make sure that the seeds remain covered after you have watered. Repeat this step for all of the containers.
- Now place each container in a resealable plastic bag. Using the permanent marker, label each bag with the amount of water in that container and the location where it will be placed. Three containers should be in one location and the other three should be at the other location. Note these details down in your lab notebook. Carefully and completely seal each plastic bag.
- You have now created an environment for your plants. And guess what! You won't have to water the seeds again, because the water in the bag recycles itself! The roots of the plant absorb the water, which then travels up the stem to all the parts of the plant. Some of the water in the leaves evaporates, as does some of the water in the soil. The evaporated water condenses on the inside of the bag and forms water drops. Some of the water drops fall back into the container like rain. This is called precipitation. Once the water falls back into the plant container, the water cycle starts again.
- Start the experiment by placing three of the bagged containers at each of your chosen locations. Record the day and time that you started the experiment in your lab notebook.
- Observe the biomes twice daily for the next week. Once in the morning and then again in the evening. Try to observe the biomes at the same times each day. Have any seedlings come up? How long did it take for seedlings to come up? Use a ruler to measure how tall the seedlings are. Has water condensed on the inside of the bag? How moist does the soil look? Record all of your observations in your lab notebook.
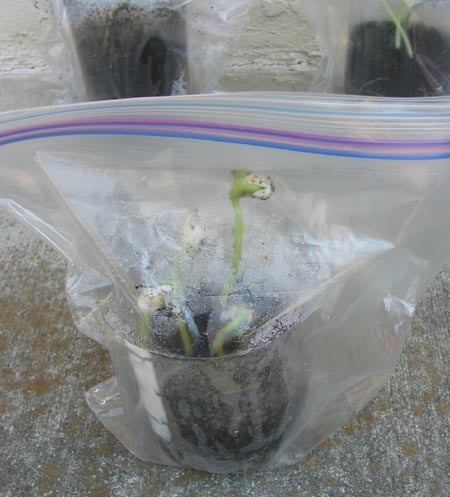
Figure 2. These are growing biomes in plastic bags. - In which biome do plants grow the fastest? Plot your data on a bar graph. Label the x-axis Biome and the y-axis Days to Germination. If you need help making your plots or just want more information on how to make a bar graph go to the following website: https://nces.ed.gov/nceskids/CreateAGraph/default.aspx. You can also present your data in data table, similar to the one below, so that all of your observations are clear.
/-/https/www.sciencebuddies.org/cdn/Files/3540/10/EnvSci_img044.jpg)
| Location/Biome | Biome/Container | Observations | ||
| Day 1 | Day 2 | Day 3 | ||
| Location 1 | a | Time 1 | Time 1 | Time 1 |
| Time 2 | Time 2 | Time 2 | ||
| b | Time 1 | Time 1 | Time 1 | |
| Time 2 | Time 2 | Time 2 | ||
| c | Time 1 | Time 1 | Time 1 | |
| Time 2 | Time 2 | Time 2 | ||
| Location 2 | d | Time 1 | Time 1 | Time 1 |
| Time 2 | Time 2 | Time 2 | ||
| e | Time 1 | Time 1 | Time 1 | |
| Time 2 | Time 2 | Time 2 | ||
| f | Time 1 | Time 1 | Time 1 | |
| Time 2 | Time 2 | Time 2 | ||
Ask an Expert
Global Goals
The United Nations Sustainable Development Goals (UNSDGs) are a blueprint to achieve a better and more sustainable future for all.
/-/https/www.sciencebuddies.org/cdn/Files/19758/6/E-WEB-Goal-15.png)
Variations
- There are animals in most terrestrial biomes. Try introducing an insect into your most successful biome. Observe the biome and record what happens to the insect.
- Try making containers with different seeds and see how your biomes affect their growth. Does seed type play a role in deciding which biome is more successful?
- Try modeling different biomes. For example, for the tundra biome you could place the container and bag in the refrigerator. You could also model the desert by adding sand to your soil.
Careers
If you like this project, you might enjoy exploring these related careers:
/-/https/careerdiscovery.sciencebuddies.org/cdn/Files/1662/17/unsplash-oz1NzV2xWXU.jpg)
/-/https/careerdiscovery.sciencebuddies.org/cdn/Files/1288/18/Career-Map-Environmental-Scientist.jpg)
/-/https/careerdiscovery.sciencebuddies.org/cdn/Files/860/17/pexels-photo-5230966.jpg)

/-/https/img.youtube.com/vi/ZaTKVjxt_kQ/0.jpg)
/-/https/img.youtube.com/vi/z4Az6-MwPJ4/0.jpg)
/-/https/img.youtube.com/vi/SV2huMdNs9c/0.jpg)