Abstract
OK, spill the beans, what's your favorite bean-rich food? Burritos? Chili? Or maybe you prefer the spicy Indian stew of lentils, known as dal? But what about fried tofu? Soymilk? Or peanut butter and jelly sandwiches? Did you know those foods come from beans as well? Beans are important to the diets of many people, and in this cooking and food science fair project, you'll learn how the liquid that beans are cooked in affects how quickly or slowly they soften.Summary
Kristin Strong, Science Buddies
Edited by Peter Boretsky, Lockheed Martin
/-/https/www.sciencebuddies.org/cdn/Files/3558/5/FoodSci_img007.jpg)
Objective
To determine which cooking liquids slow bean softening and which cooking liquids hasten bean softening.
Introduction
Peanut butter and jelly sandwiches...classic! If you love this food, you might not realize it, but you're not actually eating tree nuts (like almonds or walnuts) at all! You're eating a bean, also known as a legume. Legumes are small, but powerful sources of nutrition. After the grains, like wheat and rice (from the grass family of plants), legumes are the second most important family of plants in human diets. Their special contribution to human nutrition is protein, which they are able to make thanks to a clever bacteria known as rhizobium. These bacteria get into the roots of the plant and change the nitrogen in the air into a form that the plants can use to make amino acids, the basic building blocks of protein. The protein content in legumes is 2-3 times as great as the protein content in the grasses.
Having a reliable source of protein has been critical to the development of human civilizations. Animal protein is often hard to obtain and can be expensive, and protein from grasses is too limited to survive on over the long-term, so legumes have filled that human need for protein in many cultures throughout the world, especially in Asia, Central and South America, and the Mediterranean. They may be small and humble looking, but beans are held in high standing in many societies. For example, some cultures, like those near New Orleans, Malta, Nicaragua, and Italy, believe eating beans on New Year's Day will bring you good luck, and the Romans named powerful families after the names of legumes in the Mediterranean: Fabius was named after the fava bean, Lentulus after the lentil, Piso after the pea, and Cicero comes from the word for chickpea.
Legumes provide people not only with protein, but also with B vitamins, iron, some starch (complex carbohydrate), and, in the case of soybeans and peanuts, rich, healthy oils. Their seed coats are indigestible, which means that they are a good source of fiber, and colorful, which means they are full of antioxidants, which help prevent diseases.
Legumes are also high in defensive compounds, which are substances that the plant makes to protect itself. If dried beans are fed to people or cattle raw, or not fully cooked, the beans can make them sick. Cooking removes or disables these defensive compounds, and makes them safe to eat.
How are legumes cooked? It depends on the type of legume. A few legumes, like peas and bean sprouts, can be eaten safely fresh (without any cooking). Others with high oil content, like peanuts and soybeans, are safer cooked. Fresh, moist, shell beans in their pods (like green beans) should be simmered, sautéed, or steamed, but only for a few minutes, as they cook fairly quickly. It is the dried, mature bean seeds that require a lengthy cooking time, and these will be the focus of your science fair project.
Most beans, with the exception of soybeans and peanuts, are made up primarily of protein and starch. The nutrients are stored inside the bean seed in a part of the bean called the cotyledon, as shown in Figure 1. The two cotyledons are completely surrounded by a tough seed coat, except for the point at which the bean has a little dimple. That is where there is a break in the seed coat and you'll find a little hole or pore called the hilum. The hilum is where the bean seed was attached to the living plant before it was picked and dried. Initially, when placed in water, the dried bean seeds can only absorb water through their hilums. After about 30-60 minutes, though, the seed coats expand and become hydrated. At that point, water can move into the bean through the hilum and the entire seed coat surface.
/-/https/www.sciencebuddies.org/cdn/Files/3556/5/FoodSci_img005.jpg)
The seed coat of a bean is a thin white membrane that covers the bean, the hilum is found on the inside curve of the bean. When a bean is split open the cotyledons are revealed in the center of the bean body and an embryo that looks like a small sprout sometimes protrudes from the inside curve of the bean.
Figure 1. This photo shows the anatomy of a dried bean seed.
Cooking dried bean seeds in a liquid is necessary to soften the cotyledon cell walls and the starchy granules within them. Dried bean seeds are best cooked in just enough cooking liquid to barely cover them. If you use too much liquid, then the flavor will be weak. Also, it is best not to hard-boil them because the turbulence from the hard boil can damage the seed coats and cause the beans to break up into pieces. A slow simmer (180-200°F) is a better and gentler cooking treatment.
Food scientists have learned that several substances added to the cooking liquid can impact the softening of beans. Sometimes, slow softening over several hours is desirable, if, for example, you have a dish that needs hours of cooking to develop flavors and you don't want the beans to fall apart into mush. Other times, faster softening is desired, such as if you need the finished cooked beans more quickly, or if you want a more pureed-like end product.
Softening can be slowed by the addition of these substances to the cooking liquid:
- Acids
- Sugar
- Calcium
Acids work by making structures called hemicelluloses in the cell wall of the bean seed more stable and less inclined to dissolve in water. Sugars work in two ways: they strengthen the cell walls and slow the swelling of the starch granules within the cotyledons. Calcium also works on the cells walls, cross-linking and strengthening their pectins.
So, for example, if you live in an area with "hard water," with high levels of calcium and magnesium, and you use that water for your cooking liquid, you will slow the softening of your beans, and may even prevent them from softening fully. Or, if you add a substance like molasses to your cooking water (molasses is slightly acidic, and rich in sugar and calcium), the molasses will work to slow the softening of beans in four different ways: stabilizing hemicelluloses, strengthening cells walls, slowing the swelling of starch granules, and cross-linking pectins.
Softening can be sped up by making the water more alkaline. For example, adding 1 teaspoon (tsp.) of baking soda for every 1 quart (qt.) of water can decrease the cooking time by nearly 75 percent! Baking soda works by helping the hemicelluloses dissolve in water, and it contains sodium, which kicks out the magnesium from the pectins in the cell walls and makes them more readily dissolvable. The disadvantage, though, is that baking soda can give the finished product a slippery or soapy feel and taste.
Table salt can also speed up softening, although many cookbooks suggest otherwise. It does initially slow the rate of water absorption, but once that happens, plain salt (in amounts of 2 tsp. per qt.) will speed cooking greatly.
Finally, cooking times can be reduced, not by the addition of a substance to the cooking liquid, but by simply presoaking the beans overnight in water. This reduces cooking time by 25 percent or more so that time cooking isn't spent just getting water to the center of the bean.
So now you're ready to put some cooking liquids to the test and see which ones result in beans that are tough or tender.
Terms and Concepts
- Legume
- Nutrition
- Protein
- Rhizobium
- Amino acid
- Starch
- Complex carbohydrate
- Indigestible
- Fiber
- Antioxidant
- Defensive compound
- Cotyledon
- Hilum
- Granule
- Turbulence
- Acid
- Calcium
- Hemicellulose
- Pectin
- Magnesium
- Molasses
- Alkaline
- Control
Questions
- Why are legumes important in the human diet?
- What nutrients do they give people?
- What are the parts of the legume seed?
- What three substances can slow the softening of beans? How do they work to slow the softening?
- What substances can speed the softening of beans? How do they work to speed the softening?
Bibliography
- McGee, Harold. On Food and Cooking. New York, NY: Scribner, 2004.
To see some beautiful photos of different beans from around the world, visit this source:
- Armstrong, W.P. (2008). Legumes Vegetables & Fruits. Wayne's Word: An Online Textbook of Natural History. Retrieved October 1, 2008.
For help creating graphs, try this website:
- National Center for Education Statistics. (n.d.). Create a Graph. Retrieved May 23, 2008.
Materials and Equipment
- Dried lima beans, 16-oz. package (1); available in most grocery stores in the aisle with the dried beans, peas, and lentils
- Large container with a lid, 2-qt. size or larger
- Saucepan, 1-qt. size
- Spoon
- Timer
-
Test substances; choose 3-5 different substances, such as:
- Molasses, 1 heaping tablespoon (tbsp.)
- Chopped tomato (1)
- Lemon juice, 1-2 tbsp.
- Vinegar, 1-2 tbsp.
- Milk, ¼ cup
- Table salt, 1 tsp.
- Baking soda, ½ tsp.
- Sugar, 1 tsp.
- Small paper cups (5-10)
- Measuring cup, ½-cup size
- Small bowls (3-5, depending upon how many substances you choose to test)
- Small sticky notes (10)
- Scissors
- Roll of pennies, dimes, quarters, or other small weights (30-50), it doesn't matter what you choose, but all must be the same.
- Cheese slicer with cutting board and moveable wire cutting arm; available at home goods stores; see Figure 3, below. Note: A handheld cheese slicer will not work for this science fair project.
- Tape (optional)
- Lab notebook
Experimental Procedure
Presoaking Your Beans
- Open the bag of beans and dump them into a large container. Add water to the container until the beans are well covered (by at least 1-2 inches of water). Put the lid on the container and place the container on the counter overnight (or for at least 8-10 hours).
- After they have soaked, examine your beans and write down in your lab notebook your observations about what has happened to them. If you are not going to do any testing right away on your beans, then put them in the refrigerator in the covered container (without draining them).
Cooking the Beans Using Your Test Substances
- When you're ready to begin testing, put ½ cup of fresh water in the saucepan.
- Add one of your test substances to the saucepan and swirl or stir it gently with a spoon for a few seconds to mix the water with the test substance.
- Scoop up ½ cup of soaked beans with the measuring cup. Hold one hand loosely over the top of the cup and tilt the cup slightly over a sink to drain the beans, and then add the beans to the saucepan.
- Bring the contents of the pan just to a boil.
- Put the lid on the saucepan and turn the stove burner down to its lowest possible setting. The beans and their cooking liquid should be barely simmering.
- Set the timer and simmer the beans and their cooking liquid for 15 minutes.
- Turn off the stove, take the saucepan immediately off the burner, and pour the contents into a small bowl. Allow the beans to cool completely on a counter before touching them. Label the bowl with the name of the test substance, using a small sticky note, and set the bowl aside on the counter.
- Wash and dry the pan.
- Repeat steps 1–8 for all the bean-softening substances that you are testing.
- Now repeat step 1, skip step 2, but repeat steps 3–8. The beans resulting from this cooking trial will be your controls. No test substance should be added to the cooking water for this batch.
Preparing Your Testing Apparatus
- With the scissors, cut a slot near the top of a small paper cup, just big enough so that the handle of the cheese slicer fits through it. Be careful with the scissors and ask an adult to help you if you are having trouble. See Figure 3, below.
- Push the paper cup onto the handle of the cheese slicer through the slot in the paper cup. If the cup slides around too much, then you can use some tape to make it more secure. Observe where the cup is resting on the handle (for example, near the tip, or in the middle) and make note of that location in your lab notebook. As you perform the trials, the cup should always be positioned in the same place.
- Place the cheese slicer with the paper cup attached on the edge of a table so that when the handle falls downward, the cup does not ever hit the table.
Testing Your Cooked Beans
-
Set your cooked bowls of beans side by side on a table or counter and examine them with your eyes and hands. Are there any broken pieces? Have the seed coats fallen off some beans? Pick up one bean from each bowl and squeeze it over a sink between your thumb and forefinger. Does the bean feel soft or firm to you? Write down your observations in your lab notebook. After you squeeze each bean, throw the bean pieces away and wash your hands.
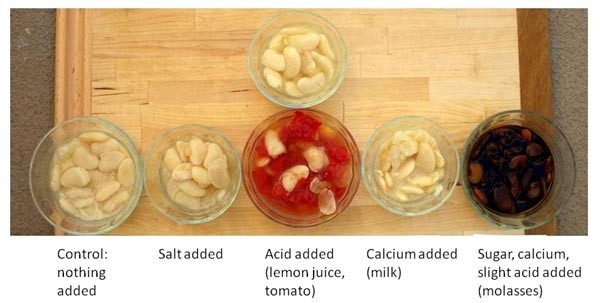
Figure 2. This photo shows example bowls of cooked beans ready to be tested.
-
In this step, you will determine the best spot on your cheese slicer cutting board for testing your beans. Locations higher up on the cutting board need less pressure to cut through the beans, while locations lower down on the cutting board need more pressure to cut through the beans. You want a spot that is not too much pressure for the softest beans, but at the same time, not too little pressure for the hardest beans. To find the ideal spot, first remove three beans from the bowl that has some of the softest beans that you felt in step 1 of this section. Place one of the soft beans across the groove in the cutting board near the top of the cheese slicer. Let the wire rest against the bean.
- If the cheese slicer wire rests against the bean (without cutting through it), then mark this spot on your cheese slicer with a sticky note, as shown in Figure 3, and go on to step 3.
- If the weight of the handle causes the cheese slicer wire to cut through the bean, remove the bean pieces from the cheese slicer and try another of the same type of soft bean in a different spot on the cheese slicer cutting board. For example, this time place a bean across the groove in the middle of the cutting board on the cheese slicer.
- If the cheese slicer wire rests against the bean (without cutting through it), then mark this spot on your cheese slicer with a sticky note, as shown in Figure 3, and go on to step 3.
- If the weight of the handle still causes the cheese slicer to cut through the bean, remove the bean pieces from the cheese slicer and try yet another of the softest beans. This time, place the bean so that it straddles the groove near the bottom of the cutting board on the cheese slicer. Mark this spot on your cheese slicer with a sticky note, as shown in Figure 3, even if the weight of the handle still cuts through the bean.
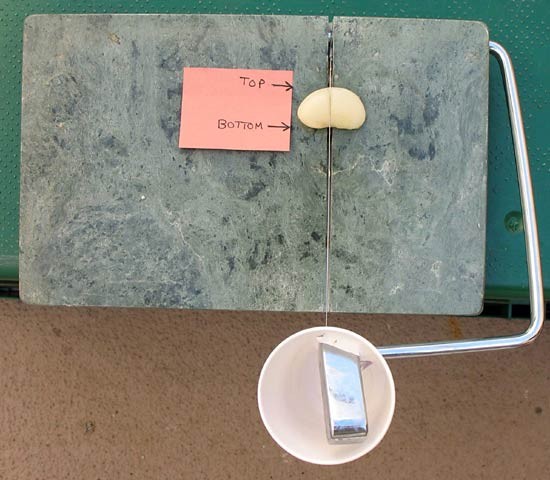
Figure 3. This photo shows how to set up the cheese slicer for testing.
- Now clear your cheese slicer of any bean pieces, but leave the sticky note in place. Remove three beans from one bowl. Place one of the beans in the position indicated by the sticky note. Let the cutting wire rest gently against the seed coat.
-
Begin adding coins or other small weights slowly to the paper cup. Count the coins or weights as you add them. See Figure 4, below. When the wire cuts through the bean, stop adding coins or weights to the small cup and write down the number that you counted in your data table in your lab notebook. If you lost count or didn't keep track, you can dump out the contents of the cup and count the number of coins or weights inside. If the wire never cuts through the bean, then try a bigger paper cup that can hold more coins or weights.

Figure 4. This photo shows the wire cutting the bean after coins have been added.
- Remove the paper cup from the handle and dump out all the coins or weights. Replace the paper cup on the handle. Position it so that it is in the same location on the handle that it was in previously. If the cup becomes torn while taking it off the handle, or putting it back on, then get a fresh paper cup and create a new slot with the scissors.
- Repeat steps 3–5 for the other two beans so that you have a total of three trials for one bowl of beans.
- Repeat steps 3–6 for all the bowls of cooked beans.
- After you are finished testing, throw away and do not eat any of the beans, as they are only partially cooked, and are not safe to eat. Wash your hands after touching the beans.
/-/https/www.sciencebuddies.org/cdn/Files/3558/5/FoodSci_img007.jpg)
/-/https/www.sciencebuddies.org/cdn/Files/3557/5/FoodSci_img006.jpg)
/-/https/www.sciencebuddies.org/cdn/Files/3559/5/FoodSci_img008.jpg)
| Data Table: Number of Coins or Weights Needed to Cut the Bean | ||||
| Control: No Substance Added to the Cooking Water | Sugar Added to the Cooking Water (example) | Tomato Added to the Cooking Water (example) | Molasses Added to the Cooking Water (example) | |
| Bean 1 | ||||
| Bean 2 | ||||
| Bean 3 | ||||
| Average | ||||
Analyzing Your Data Table
- Make a line graph showing the test substances on the x-axis, and the average counts of coins or weights on the y-axis. You can make the line graph by hand or use a website like Create a Graph to make the graph on the computer and print it. Looking at your line graph, which test substance slowed softening the most (required the most weight to cut through the cooked beans)? Which test substance slowed softening the least (required the least weight to cut through the cooked beans)? If you tested a substance like molasses, which contains both calcium and sugar, and is slightly acidic, did it slow substances more than a substance that only contained calcium, or only contained sugar, or was only acid?
Ask an Expert
Global Goals
The United Nations Sustainable Development Goals (UNSDGs) are a blueprint to achieve a better and more sustainable future for all.
/-/https/www.sciencebuddies.org/cdn/Files/19746/5/E-WEB-Goal-03.png)
Variations
- Simmer 2 cups of beans, which have not been presoaked, in enough water to cover them. Every 10 minutes, take three beans out of the saucepan, label their total cooking time, and set them aside. After 2 hours have passed, test the 36 beans with the cheese slicer and coins. Repeat this entire process again, but this time, add a cooking substance like molasses to the water. Plot how the beans soften with time, with and without a test substance. Is there a linear relationship between cooking time and softening? How does the test substance impact the relationship?
Careers
If you like this project, you might enjoy exploring these related careers:
/-/https/careerdiscovery.sciencebuddies.org/cdn/Files/1316/17/unsplash-ePJQise0OkQ.jpg)
/-/https/careerdiscovery.sciencebuddies.org/cdn/Files/947/17/pexels-photo-3825412.jpg)
/-/https/careerdiscovery.sciencebuddies.org/cdn/Files/1309/18/unsplash-vGA1ei1yxos.jpg)

/-/https/img.youtube.com/vi/WRKQGwh_Mw0/0.jpg)
/-/https/img.youtube.com/vi/Ar78O1hl7TE/0.jpg)
/-/https/img.youtube.com/vi/WtP7sxWSF9c/0.jpg)