Abstract
Maple syrup is deliciously gooey and great on breakfast foods like pancakes and waffles. But it has another amazing property. It can be turned into maple candies with a range of textures, like sticky maple taffy or molded maple sugar candy. In this science fair project, you will investigate how the temperature that maple syrup is heated up to affects what type of maple syrup-based candies can be made.Summary
David Whyte, PhD, and Teisha Rowland, PhD, Science Buddies

Objective
Investigate how the temperature that maple syrup is heated up to affects the type of candies that it makes.
Introduction

Did you know that around 300 different natural flavor compounds have been found in pure maple syrup? A maple flavor compound is in all pure maple syrups, but maple syrups also often have sugar, caramel, and vanilla flavors. Some syrups also have nutty, buttery, floral (honey), cereal, chocolate, and coffee flavors! Overall, maple syrups have complex flavor chemistry that delight your senses of taste and smell.
Chemically speaking, maple syrup is a concentrated solution of sugar in water, with many minor flavoring compounds. Maple syrup is basically made by collecting sap from certain maple trees and boiling it (at 219° Fahrenheit [F], or about 7° above the temperature of boiling water, 212° F). The sap has a lot of sugar, primarily in the form of sucrose, although there are also small amounts of glucose and fructose. The sap is gently boiled until it is the right consistency — not too watery (or the maple syrup could easily spoil) and not too thick (or the maple syrup could crystallize). You can watch the video below to get a more detailed idea of how maple syrup is produced. How does boiling the sap change its consistency? When a sugary solution is heated, some of the water evaporates off and this makes the sugar become more concentrated in the solution. As the heated maple syrup cools, the sugar molecules (the smallest particles of the sugar) can form crystals. The amount of crystals that form depends on how concentrated the sugar is.

This same principle is used to turn maple syrup into different types of sugary candies. To make maple candies, maple syrup is heated more, and this makes the sugar even more concentrated. While sugar molecules in liquid syrup are free to float around, sugar molecules in heated, concentrated syrup form crystals because there are so many sugar molecules that they bump into one another frequently. Occasionally, when they bump into each other, the molecules end up sticking together. The crystals that form can line up and arrange themselves in an orderly and repetitive pattern. This slow process is how the crystals "grow." The more crystals that form, the thicker and/or harder the resultant candy is. For example, once almost all of the water is boiled off, maple syrup can be turned into cubes of solid sugar, as shown in Figure 1, below.
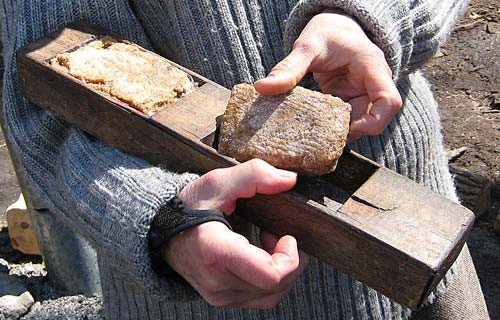 Image Credit: Wikimedia Commons user elPadawan / Creative Commons Attribution-Share-Alike 2.0 Generic
Figure 1. This is a maple sugar cube, made by boiling off all of the water from maple syrup. (Image credits: elPadawan, Wikimedia Commons, 2008)
Because of this process, the final concentration of sugar in the solution determines the texture of the candy that forms when the syrup cools. Think about the difference between the texture of caramels and lollipops — the caramel is softer and chewier, while the lollipop is hard and cracks when it is bitten. The syrup used to make caramels is cooked until it reaches 240–250°F, at which point it has an 87 percent concentration of sugar in solution and enters the firm ball stage (see the links in the Bibliography, below, for more information about this). The syrup used to make lollipops, though, is cooked until it reaches a 99 percent concentration of sugar in solution (at a temperature of 300–310°F), which makes drops of the syrup turn into hard, brittle, easy-to-break threads when placed in cold water. Heating sugary solutions to very high temperatures can also cause them to caramelize, which is a complex chemical process that gives some foods a characteristic brown color and nutty/caramel flavor. For example, sucrose, which is the primary sugar in maple syrup, becomes caramelized at 320°F.
In this food science project, you will investigate how the temperature that maple syrup is heated to affects the type of candies it can make. Maple candies can have a variety of textures and consistencies. For example, maple syrup can be turned into sticky maple taffy (sometimes called maple toffee), as shown in Figure 2, below, or firmer candies such as soft sugar candy (often molded into the shape of maple leaves) or maple sugar-based treats, as shown in Figure 1, above. (Note that when making real maple syrup-based candies, typically more processing is involved than simply heating and cooling the maple syrup — for more details on this, see the resources in the Bibliography, below.) Maple candies can also come in different shades of brown, from honey-colored to dark brown. To quantify the color of the candy samples you make, you will categorize the colors by hue, saturation, and brightness. The Bibliography, below, has references to help you understand these terms.
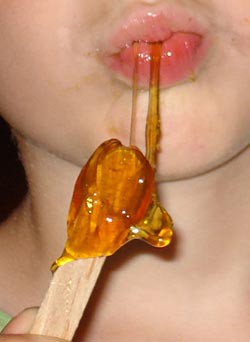 Image Credit: Wikimedia Commons user Gachepi / Creative Commons Attribution-Share-Alike 2.0 Generic
Figure 2. This picture shows a child enjoying some sticky, maple taffy. (Image credits: Gachepi, Wikimedia Commons, 2007)
Terms and Concepts
- Solutions
- Evaporation
- Concentrations
- Molecules
- Crystals
- Sucrose
- Caramelization
Questions
- What is a solution?
- What are examples of candies or other sweet treats that are made from maple syrup?
- What are the differences between imitation maple syrup and pure maple syrup?
- How does the evaporation of water from a sugary solution affect the concentration of the sugar in the solution?
Bibliography
These resources give information about maple syrup and how maple syrup-based candies and other candies are made:
- Cornell Sugar Maple Research & Extension Program. (n.d.). Maple Syrup FAQs. Retrieved November 12, 2008.
- Heiligmann, Randall B. (2002, February). Maple Candy and Other Confections. The Ohio State University Extension. Extension Factsheet. Retrieved July 28, 2014.
- Exploratorium. (n.d.) The Cold Water Candy Test. The Accidental Scientist: Science of Cooking. Retrieved July 28, 2014.
- Fultons Pancake House & Sugar Bush. (2011, July 4). Fultons - Maple Syrup Production. Retrieved July 28, 2014.
This resource has information on describing color using hue, saturation, and brightness:
- Jewett, T. (n.d.). HSB: Hue, Saturation, and Brightness. Retrieved July 29, 2014.
- Vargas, J. (n.d.). Color Picker. colpick. Retrieved February 11, 2014.
For help creating graphs, try this website:
- National Center for Education Statistics, (n.d.). Create a Graph. Retrieved June 25, 2020.
Materials and Equipment
- Baking pan or hard candy molds
- If you use a baking pan, it should be at least 38 cm x 25 cm. You will also need cooking oil or wax paper (a sheet large enough to cover the baking pan).
- If you use candy molds, you will want a tray with at least 15 identical molds. Each mold should hold about 1 tsp. Such candy molds are available through online suppliers such as Amazon.com. You will also need cooking oil.
- Pure maple syrup (at least 237 mL, or 1 C). Make sure it is not imitation syrup.
- Stove
- Saucepan (about 2 qt. in size)
- Large spoon for stirring
- Candy thermometer or a digital thermometer that can withstand temperatures of at least 310°F, or 154°C. A suitable thermometer is available from Amazon.com.
- A metal measuring teaspoon, such as this one available from Amazon.com. Note: It is important to use a metal measuring teaspoon because the heated maple syrup may melt plastics.
- Optional: Masking tape and a pen for labeling your samples
- Camera
- Apple cutter/corer or melon cutter
- Small paper cup
- Pennies (10)
- Lab notebook
- An adult helper
- Taste test volunteers (at least 3)
Disclaimer: Science Buddies participates in affiliate programs with Home Science Tools, Amazon.com, Carolina Biological, and Jameco Electronics. Proceeds from the affiliate programs help support Science Buddies, a 501(c)(3) public charity, and keep our resources free for everyone. Our top priority is student learning. If you have any comments (positive or negative) related to purchases you've made for science projects from recommendations on our site, please let us know. Write to us at scibuddy@sciencebuddies.org.
Experimental Procedure
- In your lab notebook, make a data table like Table 1, below. You will be heating the maple syrup to the temperatures listed in the data table and then making observations about the candy samples made from each temperature.
| Temperature | What color is it? | Is it transparent? | Does it feel sticky, smooth, and/or rough? | Does it seem caramelized? | Is it flexible, or does it break when bent? | How does it taste? |
| 230–235°F | ||||||
| 245–250°F | ||||||
| 255–260°F | ||||||
| 270–280°F | ||||||
| 300–310°F |
- On the counter next to the stove, place a baking pan or hard candy molds. If you are using a baking pan, cover it with a sheet of wax paper or lightly grease it with some cooking oil. If you are using hard candy molds, lightly grease the molds with some cooking oil. You will be placing your maple syrup candy samples in the prepared baking pan or in the candy molds.
- Heat 1 cup (C) of maple syrup over medium heat in the saucepan, uncovered, using a large spoon to stir it occasionally at first. Use a thermometer to carefully measure the temperature of the maple syrup as you begin to heat it up.
- Note: You will need the help of an adult for this part and the rest of the Procedure while you use the stove.
- Bring the maple syrup to a boil and allow it to cook, uncovered, while you stir frequently to make sure it does not burn. Carefully use the thermometer to measure the temperature of the maple syrup as you continue to heat it, as shown in Figure 3, below. Each time it reaches one of the temperature ranges listed in Table 1, above, take three samples by doing the following:
- Carefully use a metal 1 teaspoon (tsp.) measuring spoon to take a sample of the heated maple syrup.
- Quickly pour the teaspoon of heated maple syrup onto the baking pan or in a hard candy mold.
- Be sure to keep track of which samples were made at which temperatures. To do this you can write on the wax paper, make labels using masking tape and a pen, or take notes in your lab notebook.
- Caution: Do not touch the candies until they have cooled!
- Repeat steps 4.a.–4.b. two more times so that you have collected three samples from the same temperature range.
- You may want to group your three samples, as shown in Figure 4, below, to help you keep track of the samples taken from the different temperatures.
- It is important to take three samples to make sure your results are representative.
- In your lab notebook, record the exact temperature that you took the samples at.
- If you have time, you can record any other observations about how the maple syrup in the saucepan looks when you take your samples.
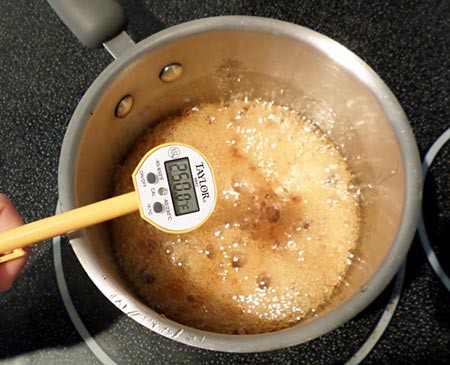 Image Credit: Teisha Rowland, Science Buddies / Science Buddies
Figure 3. Continually monitor the temperature of the maple syrup as you heat it in the saucepan. (In this picture, the thermometer's metal rod is sticking directly down below the digital readout, into the maple syrup.)
 Image Credit: Teisha Rowland, Science Buddies / Science Buddies
Figure 4. Pour 1 tsp. samples of the heated maple syrup onto your prepared baking pan (or candy molds). If you are using a pan, you may want to try to group the three samples together that you take from each temperature range.
- When you are done making your samples, you should have 15 total, or 3 for each of the 5 temperature ranges listed in Table 1, above. Let the samples cool to room temperature before you start investigating them.
- Cleanup tip: To clean the saucepan, spoons, stove, or other kitchen items that may have gotten hot maple syrup on them, soak them with hot, soapy water and then scrub the remaining maple syrup off. (Be sure not to soak anything that should not have water on it!)
- Take pictures of the candies for each temperature range. You can later print these out and put them on your Fair Project Display Board.
- Fill out the data table in your lab notebook by observing the candies you made for each temperature range. Skip the questions in the two rightmost columns for now — you will answer them in steps 10–11 (you will want to do some other tests on the candies before you break and eat them). Here are some tips for answering the other questions in the data table:
- What color is it? The candies may look honey-colored, light brown, dark brown, or a different color.
- Is it transparent? The candies may appear to be transparent (i.e., you can see through them) or opaque (i.e., not transparent).
- Does it feel sticky, smooth, and/or rough? To answer this question, you will want to both look at the surface of the candies to see if they look smooth, or rough/wrinkled, and gently touch the candies to see if they feel sticky.
- Does it seem caramelized? Caramelization gives foods a characteristic brown color and nutty/caramel flavor.
- Next you will quantify the color of the candy samples you made, and categorize the colors by hue, saturation, and brightness. (The Bibliography at the end of the Background section has references to help you understand these terms.) To do this, in your lab notebook make a second data table like Table 2, below, to record your results in, and then do the following:
- Open the Color Picker tool.
- Use the vertical color slide bar to select the right color for one of your candies.
- Then use your mouse to select the exact color from the large square (to the left of the slide bar) that matches the candy.
- Once the selected color on your monitor matches the candy, record the values for the hue ("H"), saturation ("S"), and brightness ("B") (which are on the right side of the webpage) in your second data table.
- Repeat steps 8.b.–8.d. for every candy.
- Hint: You may not need to repeat step 8.b., but instead you may be able to keep the vertical color slide bar in the same position, which keeps the hue the same.
- Calculate the average hue, saturation, and brightness values for the candies from each temperature range. Record this in your second data table.
| Hue | Saturation | Brightness | ||||||||||
| Temperature | #1 | #2 | #3 | Average | #1 | #2 | #3 | Average | #1 | #2 | #3 | Average |
| 230–235°F | ||||||||||||
| 245–250°F | ||||||||||||
| 255–260°F | ||||||||||||
| 270–280°F | ||||||||||||
| 300–310°F | ||||||||||||
- Now measure the stiffness, or consistency, of each candy. To do this, in your lab notebook make a third data table like Table 3, below, to record your results in, and then do the following:
- Place a candy on a hard surface, like a cutting board (or leave it on the baking pan).
- Arrange an apple cutter/corer or melon cutter so that it is sitting on top of the candy.
- On top of apple cutter, balance a small paper cup. Your setup should now look similar to the one in Figure 5, below.
- Put 10 pennies in the cup, one at a time.
- Remove the cup and cutter from the candy and inspect the candy. Did the cutter leave a noticeable impression on the candy? Record "Yes" or "No" in the third data table for the sample. Also use a camera to take a picture of the candy.
- Repeat steps 9.a.–9.e. for every candy.
- Add up the total number of candies that had an imprint on them for each temperature range. Record this in the far right column of the third data table.
| Did the Cutter Leave an Imprint on the Sample? (Yes/No) | ||||
| Temperature | #1 | #2 | #3 | Total Number of Candies with an Imprint |
| 230–235°F | ||||
| 245–250°F | ||||
| 255–260°F | ||||
| 270–280°F | ||||
| 300–310°F | ||||
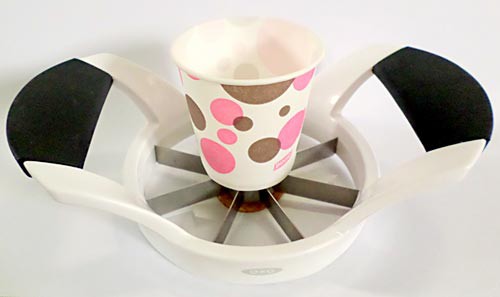 Image Credit: Teisha Rowland, Science Buddies / Science Buddies
Figure 5. To measure whether the apple cutter leaves an imprint, place the cutter balanced on the candy, and place the paper cup on top of the cutter. Add 10 pennies to the cup, one at a time, and then see whether the cutter left an imprint on the candy.
- Now answer the first data table's question "Is it flexible, or does it break when bent?" Try gently bending the candy to see if it bends (i.e., it is flexible) or snaps (or crumbles) when you try to bend it.
- Lastly, you will answer the first data table's question "How does it taste?" To do this, gather your taste testers and have them evaluate the samples for taste and texture.
- How did each candy taste to the volunteers? Which candy do they think was sweetest? Which texture did they prefer? Record your results.
- Make bar graphs of the results from your second and third data tables.
- For graphing the data from your second data table, put the temperature range on the x-axis and the average values (for hue, saturation, or brightness) on the y-axis. You should have one graph for each type of value: hue, saturation, and brightness. You can make your graphs by hand or use a website like Create a Graph to create your graphs.
- For graphing the data from your third data table, put the temperature range on the x-axis and the total number of candies with an imprint on the y-axis. You can make your graph by hand or use a website like Create a Graph to create your graph.
- Analyze your results and try to draw conclusions about how the temperature that the maple syrup was heated to affected the type of candies it made.
- Do you see any correlations between the color, consistency (i.e., stickiness or firmness), or taste of the candies made as the temperature increased?
- Which candies had the highest average hue, saturation, or brightness? What about the lowest average for each of these?
- Which temperature range had the most candies that could be imprinted? What about the temperature range with the fewest candies that could be imprinted?
- Can you relate your results to how the concentration of the sugar in the maple syrup may have changed as the temperature increased?
- Hint: Try re-reading the Introduction in the Background section to help you answer this question.
- For an advanced challenge, you could do more research into different types of candies made using maple syrup (e.g., maple taffy, soft sugar candy, and maple sugar) and relate your results to these different candy types. To get you started on this, check out the resources in the Bibliography in the Background section.
- How are the candy samples you made in this science project similar to, and different from, real maple syrup-based candies that are made commercially?
- Hint: When making real maple syrup-based candies, typically more processing is involved than simply heating and cooling the maple syrup.
- Do you see correlations between the temperatures those candies are made at and the type of candy samples you created using similar temperatures in this science project?
- How are the candy samples you made in this science project similar to, and different from, real maple syrup-based candies that are made commercially?
- Do you see any correlations between the color, consistency (i.e., stickiness or firmness), or taste of the candies made as the temperature increased?
Ask an Expert
Variations
- Maple syrup is mostly made of the sugar sucrose and water. There are many different types of sugars — do they make candies similar to how heated maple syrup does? To find out, do some research into other types of sugars (such as fructose and glucose), design a way to make up solutions of these other sugars, and then repeat this experiment.
- Does imitation maple syrup make candies the same way that pure maple syrup does? If they make different candies, how are they different? Test both syrups, side by side, to find out.
- Another way to make different candy samples is by doing The Cold Water Candy Test. Try making maple candy samples using maple syrup heated to different temperatures following this test. How do the candy samples compare to each other? How are they similar to, or different from, the candy samples made in this science project?
- A lot of processing is involved in making some types of commercially-sold, maple syrup-based candies. Do some research into how they are made and then pick a variable to change (such as the temperature they are heated to, amount of time they are heated, amount of maple syrup or other ingredient used, etc.). How does changing that variable affect how the candies turn out? To help you get started on finding recipes, check out the resource Maple Candy and Other Confections in the Bibliography in the Background tab.
- Making maple syrup from tree sap also involves heating a sugary liquid at just the right temperature. (Watch the video in the Background section, and do some more research on your own, to find out how maple syrup is produced.) How does heating the sap at a different temperature, or for a different amount of time, affect the product that is made? Is it still like maple syrup, or is it very different? If you live near a maple syrup producer, you could ask them about using some of the unrefined maple tree sap in a science project to investigate these questions.
- For another science fair project about sugar, try the Science Buddies science fair project When Science is Sweet: Growing Rock Candy Crystals.
Careers
If you like this project, you might enjoy exploring these related careers: