Abstract
Have you ever heard that nanoparticles can kill bacteria? You may have even seen some consumer products advertise that they contain antibacterial nanoparticles. A nanometer is one billionth of a meter long. Nanoparticles are usually just a few nanometers in diameter — really, really tiny! So how can something that small kill bacteria which are approximately 700 - 1400 nanometers across? Are they really effective? In this science project you will grow some E. coli bacteria and investigate the effectiveness of the antibacterial activity of silver nanoparticles when the silver nanoparticles are used at different concentrations.Summary
Catherine Nameth, Education Coordinator, University of California (UC) Center for Environmental Implications of Nanotechnology (CEIN)
Christine Truong, Education Intern, UC CEIN
Edited by Teisha Rowland, Ph.D., Science Buddies
- Q-tips® is a registered trademark of Unilever United States.
Recommended Project Supplies
Objective
Determine whether silver nanoparticles can have a noticeable antibacterial effect and, if so, what concentration of silver nanoparticles is needed to achieve this effect.Introduction
You may have heard some consumer products advertise that they contain nanoparticles that can kill germs, like bacteria. Is this really true? One type of nanoparticle these products often use is silver nanoparticles.
Silver itself has been shown to be toxic to bacteria and other microbes. In other words, it is antibacterial or antimicrobial. This is not a recent discovery; for millennia, people have thought that silver has special properties to fight disease and help the healing process. However, only recently have we started to understand how these properties work. Scientists currently think that silver ions (individual charged atoms) can interrupt important chemical bonds in bacteria, and so they disrupt important cellular functions that the bacteria need to live.
If silver itself works well for killing bacteria, why use nanoparticles made of silver? Nanoparticles are usually just a few nanometers (nm) in diameter, always less than 100 nm. (One nanometer is one billionth of a meter long, or 1.0 x 10⁻⁹ meters.) Researchers think that in addition to giving off silver ions, silver nanoparticles (also called nanosilver) may be taken up, or absorbed, by bacteria, essentially causing them to burst. If this is true, and it remains an active area of research, then silver nanoparticles would have two mechanisms for killing bacteria compared to large, solid pieces of silver. If so, then nanosilver may have either greater or more varied effects on different bacteria as compared to solid silver.
You can also imagine that it is a lot easier to incorporate silver nanoparticles into products than to use large, solid pieces of silver. Some types of products that contain (or used to contain) silver nanoparticles include food storage containers, bandages, and socks. A lot of ongoing research is investigating the antimicrobial properties of silver nanoparticles and how these properties can be used in products. Watch the video to see Dr. Robert Burrell, a professor at the University of Alberta, discuss his research on using silver nanoparticles in wound dressings, which won him the Manning Innovation Award.

For marketing purposes, many products that contain silver nanoparticles are labeled as containing "colloidal silver." Colloidal silver is usually a liquid mixture of silver nanoparticles and silver ions. In this science project, you will be using colloidal silver as a source of silver nanoparticles, rather than pure silver nanoparticles, because it can be purchased easily and relatively cheaply.
So just how effective are silver nanoparticles at killing microbes like bacteria? In this microbiology science project, you will test this by growing some Escherichia coli (E. coli) bacteria and testing the ability of different concentrations of colloidal silver to kill the bacteria. You will be using the Kirby-Bauer antibiotic testing method to evaluate the colloidal silver's effects. Using this method, a small filter disc is soaked in, or coated with, a substance thought to be antibacterial, and then the disc is placed on a plate containing bacteria. If the substance is truly antibacterial, the bacteria will not grow near the disc, creating a ring, or zone, around the disc with no bacteria in it. This is called a zone of inhibition. The more effective the concentration of a substance is at killing bacteria, the wider the zone of inhibition will be. (For an example of zones of inhibition, see Figure 4 in the Procedure section.) Will the silver nanoparticles cause some noticeable zones of inhibition? Will a really high concentration of the substance be needed to create a zone of inhibition, or will lower concentrations work too?
Terms and Concepts
- Antibacterial
- Antimicrobial
- Ions
- Nanoparticles
- Nanometer
- Nanosilver
- Colloidal silver
- Escherichia coli (E. coli)
- Kirby-Bauer antibiotic testing method
- Zone of inhibition
- Serial dilutions
- Sterile technique
- Parts per million (PPM) and micrograms per liter (µg/L)
Questions
- What are nanoparticles? How big are they?
- What kinds of nanoparticles are there? How are they different from nanosilver?
- What makes a substance antimicrobial or antibacterial?
- How does a zone of inhibition test work and what does it tell the researcher?
- At what concentrations of silver nanoparticles do you think you will be able to see a zone of inhibition?
Bibliography
- MicrobeWiki. (2010, August 10). Silver as an antimicrobial agent. Kenyon College. Retrieved November 15, 2012.
- Tenhu, H. (2010, February 24.) The toxicity of antimicrobial silver in products can be reduced. University of Helsinki. Retrieved November 15, 2012.
- Benn, T. M., and Westerhoff, P. (2008, March 24.) Nanoparticle silver released into water from commercially available sock fabrics. Environmental Science & Technology. Retrieved November 15, 2012.
- University of Alberta. (2010, April 16.) Nano-silver wound dressings earn Manning Innovation Award. Retrieved November 15, 2012.
Materials and Equipment 
Recommended Project Supplies
- Neutralizing Bacteria Kit, available from our partner
Home Science Tools. Needed from the kit:
- Nutrient agar plates (5)
- E. coli culture, freeze dried and ready to reconstitute
- Sterile disks (15)
- Sterile cotton swabs
- Nitrile gloves
- You will also need to gather these items, not included in the kit:
- Permanent marker
- Isopropyl alcohol, 70% or higher. Available in the first aid aisle of grocery stores and pharmacies.
- Glass cup or beaker
- Metal forceps or tweezer
- Bunsen burner or, if not available, a candle
- Incubator or, if not available, a warm dry location
- Baby food jars (5). Make sure they are clean.
- Distilled water (90 mL). Use a new, unopened bottle. Available in the bottled water section of grocery stores.
- Natural Path Silver Wings Dietary Mineral Supplement, colloidal silver, 500 PPM (25 mL). A 120 mL bottle is available from Amazon.com.
- Graduated cylinder, 10 mL. Available from Home Science Tools.
- Graduated cylinder, 25 mL. Available from Home Science Tools.
- Ruler, metric
- Bleach
- Lab notebook
Disclaimer: Science Buddies participates in affiliate programs with Home Science Tools, Amazon.com, Carolina Biological, and Jameco Electronics. Proceeds from the affiliate programs help support Science Buddies, a 501(c)(3) public charity, and keep our resources free for everyone. Our top priority is student learning. If you have any comments (positive or negative) related to purchases you've made for science projects from recommendations on our site, please let us know. Write to us at scibuddy@sciencebuddies.org.
Experimental Procedure
For health and safety reasons, science fairs regulate what kinds of biological materials can be used in science fair projects. You should check with your science fair's Scientific Review Committee before starting this experiment to make sure your science fair project complies with all local rules. Many science fairs follow Regeneron International Science and Engineering Fair (ISEF) regulations. For more information, visit these Science Buddies pages: Project Involving Potentially Hazardous Biological Agents and Scientific Review Committee. You can also visit the webpage ISEF Rules & Guidelines directly.
Preparing Dilutions of the Silver Nanoparticles
In the first part of this science project, you will make serial dilutions of the colloidal silver solution. Serial dilutions are stepwise dilutions of a solution, resulting in a range of concentrations. The antimicrobial abilities of the different concentrations you make will be tested in the next section. Throughout all parts of this project you will need to use sterile technique. If you have questions about sterile technique or other microbiology techniques please see the Microbiology Techniques & Troubleshooting guide.
- Find a clean counter or table to work on. Make sure you have everything you will need and that all of the items are clean.
- Check that you have everything from the Materials and Equipment list nearby.
- Make sure that the graduated cylinders, baby food jars, tweezers, and medicine dropper are all clean.
- Put on a pair of disposable gloves.
- Be sure not to rub your face, hair, or anything other than what you need to touch to do this Procedure while you have gloves on.
- Practicing good sterile technique like this will help prevent bacteria from growing on your plates that is not the E. coli K12 bacteria.
- Make a paper towel damp with some 70% isopropyl rubbing alcohol. Wipe down the work surface with the rubbing alcohol-dampened paper towel.
- Wiping rubbing alcohol on something helps to sterilize it, or kill microorganisms.
- Again, this will help prevent bacteria that is not the E. coli K12 bacteria from growing on your plates.
- Using a permanent marker, label the five baby food jars #1 to #5.
- You will be making a different colloidal silver concentration in each jar.
- Perform a 1:10 serial dilution of the colloidal silver. Notice that the bottle you purchased is labeled 500 PPM. This means that the concentration of silver nanoparticles in the bottle is approximately 500 parts per million (PPM), which is the equivalent of 500,000 micrograms per liter (µg/L). Although you are using colloidal silver, you are interested in the silver nanoparticle concentration, which is 500,000 micrograms in every liter. The concentrations you will be making and testing are 500,000 µg/L (undiluted), 50,000 µg/L, 5,000 µg/L, 500 µg/L, and 50 µg/L.
- Using the 25 milliliter (mL) graduated cylinder, measure and pour 22.5 mL of distilled water (from a new, unopened container) into each of jars #2, #3, #4, and #5.
- Using the 25 mL graduated cylinder, measure and pour 25 mL of the colloidal silver solution from the original bottle into jar #1.
- Jar #1 will hold the 500,000 µg/L (undiluted) concentration of colloidal silver.
- Transfer 2.5 mL of the undiluted solution from jar #1 to jar #2.
- Use the medicine dropper to carefully suck up some of the solution from jar #1.
- From the medicine dropper, transfer 2.5 mL of this solution to the 10 mL graduated cylinder. (Squirt any extra solution remaining in the medicine dropper back into jar #1 so that the medicine dropper is completely empty at the end of this step.)
- Pour the 2.5 mL of this solution into jar #2.
- Make sure the graduated cylinder is now completely empty.
- Use the empty medicine dropper to mix the solution in jar #2, gently swirling the medicine dropper and sucking some of the solution up and down.
- Jar #2 now holds the 50,000 µg/L concentration of colloidal silver.
- Transfer 2.5 mL of the 50,000 µg/L solution from jar #2 to jar #3.
- Do this as you did in step 5c, using the medicine dropper and 10 mL graduated cylinder, but take the solution from jar #2 (instead of jar #1) and put it into jar #3 (instead of jar #2).
- Jar #3 now holds the 5,000 µg/L concentration of colloidal silver.
- Transfer 2.5 mL of the 5,000 µg/L solution from jar #3 to jar #4.
- Do this as you did in step 5c, but take the solution from jar #3 (instead of jar #1) and put it into jar #4 (instead of jar #2).
- Jar #4 now holds the 500 µg/L concentration of colloidal silver.
- Transfer 2.5 mL of the 500 µg/L solution from jar #4 to jar #5.
- Do this as you did in step 5c, but take the solution from jar #4 (instead of jar #1) and put it into jar #5 (instead of jar #2).
- Jar #5 now holds the 50 µg/L concentration of colloidal silver.
- You should now have five jars that look similar to those shown in Figure 1.
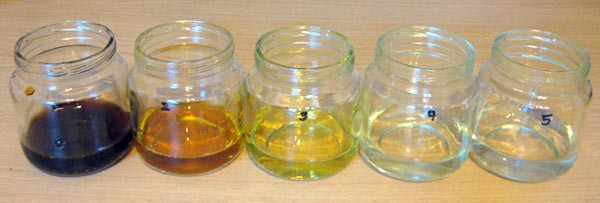 Image Credit: Teisha Rowland, Science Buddies / Science Buddies
Figure 1. After making serial dilutions of the colloidal silver solution, you should have five jars that look similar to these (with jars #1 to #5 going from left to right). - If you want to check, you can do some calculations to make sure you made the concentrations correctly. To do this, use Equation 1, solving for C2.
Equation 1:
|
- When you have finished preparing the serial dilutions, immediately start the next section of the procedure.
Testing the Antimicrobial Activity of the Silver Nanoparticles
In this part of this science project, you will test the serial dilutions of the colloidal silver solution you made on E. coli to see whether the silver nanoparticles have an antimicrobial effect, and, if so, which concentration enables you to see this effect.
- Sterilize a pair of tweezers by dipping them in isopropyl alcohol and then waiving them in the air for 30 seconds until they are dry. Using sterile tweezers, place three sterile disks into each baby food jar (#1 through #5).
- Let them soak until you need them in a later step.
- Lay out five of the nutrient-agar prepared media plates. Place the plates upside down on the clean counter or table and use the permanent marker to label the back of each one, #1 through #5.
- You will be growing the E. coli bacteria on these plates. They should grow well on the nutrient-rich agar.
- Be sure not to open the plates when handling them. Opening the plates can cause bacteria to grow on the plates that are not the E. coli bacteria you will introduce later.
- After labeling them, flip the plates over so that the lid is on top.
- To make your bacterial lawns, you will need to work in a sterile environment. Work next to a lighted Bunsen burner, but be careful around the flame! If you have long hair, tie it back. Do not wear flowing sleeves, and avoid reaching across the flame. If a Bunsen burner is not available, work next to a lit candle.
- Take out your E. coli culture and follow the instructions in the kit to reconstitute the dried bacteria. Wait 5 minutes after reconstituting, then mix the gently shake to mix the bacterial suspension one more time.
- Put 2 drops E. coli culture on the surface of an agar plate. Try to put the culture in the center of the plate.
- Use a sterile cotton swab to spread the bacteria around the entire surface of the agar plate as shown in Figure 2.
- Streak a vertical line across the surface of the agar plate.
- Starting from the top of the plate and moving downward, spread the streak back and forth (to the left and right), from edge to edge. Stop when you reach the bottom of the plate.
- Rotate the plate 60 degrees clockwise and repeat step ii.
- Rotate the plate another 60 degrees clockwise and repeat step ii.
- This approach will make sure the bacteria are spread evenly across the plate.
- Tip: Try not to pierce, or rip, the surface of the agar.
- Put the lid on the plate as soon as you are done.
- Repeat for the rest of the agar plates.
 Image Credit: Teisha Rowland, Science Buddies / Science Buddies
Figure 2. On each agar plate, streak the bacteria by first making a vertical line, then spreading this left to right (and top to bottom), rotating the plate 60 degrees clockwise and again spreading the bacteria left to right (and top to bottom), and then rotating the plate another 60 degrees clockwise and spreading the bacteria again. Note: The bacteria should all be the same color on your plates. Color has been added in this diagram to help clarify the procedure.
- Place the three filter circles from each numbered jar onto the corresponding plate so that each plate looks like the one in Figure 3.
- Using freshly sterilized tweezers, pick up a soaked filter paper circle from jar #5.
- Tap the circle on the jar's rim until you no longer see any drops coming off the circle. (This may take about a dozen taps.)
- Removing and holding the lid of plate #5 in your other hand, carefully place the circle onto the agar surface of the plate.
- You will want to evenly space out three circles on the surface of each plate, so plan space on the surface accordingly.
- Try not to let the circle move at all once you have set it on the surface.
- Using the tweezers' tips, press the surface of the circle once to ensure it is secured onto the agar.
- Repeat steps a to d with the other two circles in jar #5.
- Try to place the circles evenly from each other, and away from the sides of the plate. This should be about 3 cm from each other.
- Repeat steps a to e for jar #4, then #3, then #2, and then #1. Be sure to place the circles onto the corresponding plates.
- Going from the least concentrated to the most concentrated jar will help minimize spreading the colloidal silver solutions from a more concentrated jar to a less concentrated one.
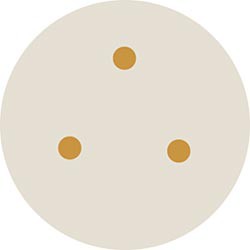 Image Credit: Teisha Rowland, Science Buddies / Science Buddies
Figure 3. Place three soaked filter paper circles onto each agar plate so that the circles are evenly spaced from each other, as shown here. Make sure to match the jar number to the plate number when placing the soaked paper circles on the plates.
- Make sure all plates are closed (with the lids on top). Secure the lid on each agar plate using a few pieces of clear tape.
- Do not flip the plates over while placing the tape on them, but hold them horizontally with the lids on top. This will help give the E. coli and circles some time to attach to the agar surface.
- Make sure the tape completely seals the lid onto the plate, with no visible openings.
- Flip the plates so that they are upside down (with the agar on the top of each plate).
- Leave the plates in a clean, out-of-the-way place in a room where they will not be disturbed for a few days. A good place would be an unused part of a desk or counter. They should not receive direct sunlight, however.
- If you want them to take up less space, you can carefully stack the plates.
- If you have access to a bacteria incubator, you can incubate the plates in it instead. They should be ready to analyze after incubating for 24 hours.
- After moving the plates, clean up the area where you spread the E. coli K12 bacteria on the plates. Sterilize the countertop or table surface and anything that touched the E. coli.
- Wipe the surface down with a paper towel dampened with 70% isopropyl rubbing alcohol.
- Sterilize the cotton swabs that touched the E. coli by soaking them in a 10% bleach solution for at least one to two hours. You can then throw them in the trash.
- Check on the plates every day after starting the experiment. Look for any bacterial colonies. They should look like small, whitish spots.
- If you are growing the plates at a normal room temperature (around 19 to 21 degrees Celsius), after about two days you should see bacteria growing on the plates.
- This may take longer if the room is colder, or shorter if the room is warmer.
- After you see some bacterial colonies, you can let the bacteria grow one more day before analyzing your results to help make them clearer.
- If you are growing the plates at a normal room temperature (around 19 to 21 degrees Celsius), after about two days you should see bacteria growing on the plates.
- Look at each plate to see if there is a zone of inhibition around the filter circles, as shown in Figure 4.
- Seeing a zone of inhibition around a filter paper circle suggests that the particular concentration of colloidal silver has antibacterial effects.
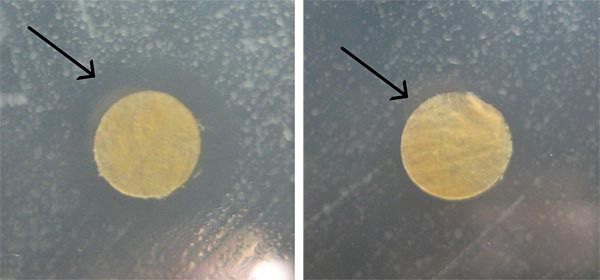
Figure 4. These are example images of zones of inhibition around filter paper circles. The image on the left shows a very visible zone of inhibition around the filter paper circle, whereas the image on the right shows a much smaller, less noticeable zone of inhibition. In both pictures a black arrow is pointing to the edge of the zone of inhibition circle.
- Flip the plates so that they are upside down and use a ruler to measure the width of any zones of inhibition you see on the plates.
- In your lab notebook, create a data table and record your data in it.
- Be sure to include the concentration of colloidal silver that the circles were soaked in.
- Write down any other observations you make.
- In your lab notebook, create a data table and record your data in it.
- If you like, use a camera to take pictures of your plates, both as a whole and close-ups of the zones of inhibition.
- We recommend taking pictures against a black background, such as a piece of black construction paper, to see the pale bacteria more easily.
- After you finish making observations, sterilize the plates by soaking them in a 10% bleach solution for at least 1 to 2 hours. You can then throw them in the trash.
- Also wipe the surface down (where the plates were growing) using a paper towel dampened with 70% isopropyl rubbing alcohol.
- Analyze your results.
- Did you see a zone of inhibition around any of the filter paper circles on the plates? If so, what was the concentration of colloidal silver on the filter circles for that plate?
- Did you see that some zones of inhibition were larger than others? Did this correlate with the concentrations of colloidal silver that you soaked the filter paper circles in?
- Based on your results, what concentration of colloidal silver is needed to show an antibacterial effect?
- What concentration(s) were too low to cause a noticeable antibacterial effect?
Bacterial Safety
Bacteria are all around us in our daily lives and the vast majority of them are not harmful. However, for maximum safety, all bacterial cultures should always be treated as potential hazards. This means that proper handling, cleanup, and disposal are necessary. Below are a few important safety reminders.
- Keep your nose and mouth away from tubes, pipettes, or other tools that come in contact with bacterial cultures, in order to avoid ingesting or inhaling any bacteria.
- Make sure to wash your hands thoroughly after handling bacteria.
- Proper Disposal of Bacterial Cultures
- Bacterial cultures, plates, and disposables that are used to manipulate the bacteria should be soaked in a 10% bleach solution (1 part bleach to 9 parts water) for 1–2 hours.
- Use caution when handling the bleach, as it can ruin your clothes if spilled, and any disinfectant can be harmful if splashed in your eyes.
- After bleach treatment is completed, these items can be placed in your normal household garbage.
- Cleaning Your Work Area
- At the end of your experiment, use a disinfectant, such as 70% ethanol, a 10% bleach solution, or a commercial antibacterial kitchen/bath cleaning solution, to thoroughly clean any surfaces you have used.
- Be aware of the possible hazards of disinfectants and use them carefully.
Ask an Expert
Global Connections
The United Nations Sustainable Development Goals (UNSDGs) are a blueprint to achieve a better and more sustainable future for all.

Variations
- Do silver nanoparticles effectively kill baker's yeast, another kind of microbe? To find out, do this project again, but this time use baker's yeast (a type of fungus available at most grocery stores) instead of E. coli K12 bacteria. Here are some tips and resources to get you started with this:
- Instead of using nutrient agar plates, you will want to use yeast-extract dextrose medium (YED) (item #173650 at the Carolina Biological Supply Company). You will need to pour your own agar plates using this.
- You may want to check out the Science Buddies resource All About Agar: An Introduction to Agar.
- Another resource that may be useful to you is Tips for Pouring and Storing Agar Plates.
- Tip: When you coat the plates with the yeast, try not to use too much yeast. An overabundance of yeast on the plate may prevent zones of inhibition from appearing.
- In this science project, you used a solution of colloidal silver as a source of silver nanoparticles, but can you obtain silver nanoparticles from other consumer products and demonstrate that they have antibacterial properties? You may need to do some searching to find products that have silver nanoparticles, which often are referred to simply as colloidal silver. Some types of products that have used silver nanoparticles in the past include food storage containers, bandages, and socks. Once you find a product that advertises having antimicrobial silver nanoparticles, design a way to test this claimed activity. Can you use small swatches of these products in the Kirby-Bauer antibiotic test? Can you somehow isolate the silver nanoparticles from the products? For some ideas, try reading the paper by T. M. Benn and P. Westerhoff in the Bibliography, in the Background tab. Safety note: Always read, and carefully follow, the safety warnings on any chemicals you use.
- Are some bacteria more susceptible to being killed by silver nanoparticles than others? One way to check this would be by using cotton swabs to take samples of bacteria from different places around your home. (Bacteria are everywhere!) Streak nutrient agar plates with the cotton swabs, using a different cotton swab and plate for each different location. Let the bacteria grow for a few days, until you see colonies. (Take photos or make drawings of the different bacteria on each plate. Does it look like there are a lot of different types around the house?) Then soak some coffee filter circles in the undiluted colloidal silver and put three soaked circles on each plate. Let the plates grow for a few more days and check for zones of inhibition. Do the silver nanoparticles seem to be more effective against some bacteria than others? Based on your results, are there certain places in your home where using silver nanoparticles may be more effective at getting rid of bacteria than others?
Careers
If you like this project, you might enjoy exploring these related careers:
Contact Us
If you have purchased a kit for this project from Science Buddies, we are pleased to answer your questions.In your email, please follow these instructions:
- What is your Science Buddies kit order number?
- Please describe how you need help as thoroughly as possible:
Examples
Good Question I'm trying to do Experimental Procedure step #5, "Scrape the insulation from the wire. . ." How do I know when I've scraped enough?
Good Question I'm at Experimental Procedure step #7, "Move the magnet back and forth . . ." and the LED is not lighting up.
Bad Question I don't understand the instructions. Help!
Good Question I am purchasing my materials. Can I substitute a 1N34 diode for the 1N25 diode called for in the material list?
Bad Question Can I use a different part?
Contact Us