Abstract
If you like playing electric guitar, this could be a cool project for you. Have you ever wondered how an electric guitar works? In this project you'll wind one or more of your own electric guitar pickups and test them out in an inexpensive electric guitar. How will the sound change with the number of turns you use in the coil? Or with the strength of the magnets you use?Summary
Sources
This project is based on the following webpage, by Sam Garfield:
- Garfield, S., 2006. How To Make a Guitar/Bass Pickup, DIY happy. Retrieved September 25, 2007.
/-/https/www.sciencebuddies.org/cdn/Files/3417/5/Elec_img117.jpg)
Objective
The goal of this project is to build and test your own electric guitar pickup. How will sound quality vary with the number of wraps used in the coil, or with the strength of the magnets used in the coil?
Introduction
An acoustic guitar has a lightweight, hollow body, with a top that is designed to resonate when the strings vibrate. The large surface area of the guitar top is much more efficient at producing sound, so it effectively amplifies the vibrations of the strings. With an electric guitar, it's a different story. If you play an electric guitar unplugged, you'll still hear sound, but the sound is not nearly as loud as the acoustic guitar. What happens when you plug the electric guitar in to an amplifier? Where does the sound come from? The key is in the pickups, which turn the vibrations of the strings into electric signals.
Electric guitar pickups work on the principle of induction, which was studied by physicist Michael Faraday. A changing magnetic field will cause an electric current to flow in a loop of wire. In a single-coil guitar pickup, there are magnets for each string on the guitar, with their poles oriented perpendicular to the string. All of these magnets are surrounded by a coil of very fine magnet wire containing thousands of wraps. When a steel string on the guitar vibrates, it perturbs the field of the magnet just beneath it. This changing magnetic field induces a current in the coil of wire. With a properly designed pickup, the perturbations in both the magnetic field and the current in the coil are synchronized with the vibration of the string. When the signal from the pickup is amplified, it produces the sound of the electric guitar.
How does the sound produced change if the strength of the magnetic field is changed? What if the number of turns (wraps) in the coil of wire is changed? These are examples of the type of questions you can explore with this project. If you like playing guitar and have an interest in physics or electronics, this could be the perfect project for you.
Terms and Concepts
To do this project, you should do research that enables you to understand the following terms and concepts:
- Induction
- Electricity and magnetism
Bibliography
- This project is based on the following webpage:
Garfield, S., 2006. How To Make a Guitar/Bass Pickup, DIY happy. Retrieved September 25, 2007. - These webpages have background information on electric guitar pickups:
- GM Arts, date unknown. Electric Guitar Pickups, GM Arts. Retrieved September 25, 2007.
- Wallace, H., 2004. How Do Guitar Pickups Work? Atlantic Quality Design, Inc. Retrieved September 25, 2007.
- Check out this safety information on using neodymium magnets:
K&J Magnetics, 2006. Neodymium Magnet Safety,. Retrieved September 25, 2007.
Materials and Equipment
To do this experiment you will need the following materials and equipment:
- Inexpensive electric guitar
- Guitar amplifier
- Guitar cable
- Popsicle sticks
-
#42 AWG or #43 AWG solderable magnet wire
-
A source for magnet wire is Whitmor/Wirenetics, 1-800-822-9473.
- Their part number for #42 AWG wire is MWRD42SPN062, cost is $0.012/ft or $20.97/lb. Minimum order per pound is 5-6 pound spool. Yield is approximately 50,000 ft/lb.
- Their part number for #43 AWG wire is MWRD43SPN062, cost is $0.011/ft or $24.77/lb. Minimum order by weight is 5-6 pound spool. Yield is approximately 50,000 ft/lb.
- For reference, an 8,000-turn pickup will require about 4,000 feet (1,220 m) of wire. For 10,000 turns, you'd need about 5,000 feet (1,525 m) of wire.
- Note: AWG stands for American Wire Gauge, and refers to the diameter of the wire. The higher the number, the smaller the diameter.
-
A source for magnet wire is Whitmor/Wirenetics, 1-800-822-9473.
-
Small magnets:
- Approximately 1/4 in (0.64 cm) diameter, 3/16 in (0.5 cm) tall
- Can be neodymium, AlNiCo (aluminum nickel cobalt), ceramic.
- You will need two magnets for each string on your guitar.
- A good neodymium magnet for this project is part number D43 from K&J Magnetics.
- Gorilla glue
- Paraffin wax
- Beeswax
- Double boiler
- Tongs
- Screwdriver
- Soldering iron
- Solder
- Wire cutter/stripper
- Electrical tape
- Optional, but recommended: digital or tape recording system so that you can save samples of the guitar played with different pickups for comparison.
Disclaimer: Science Buddies participates in affiliate programs with Home Science Tools®, Amazon.com, Carolina Biological, and Jameco Electronics. Proceeds from the affiliate programs help support Science Buddies, a 501(c)(3) public charity, and keep our resources free for everyone. Our top priority is student learning. If you have any comments (positive or negative) related to purchases you've made for science projects from recommendations on our site, please let us know. Write to us at [email protected].
Experimental Procedure
- Do your background research so that you are knowledgeable about the terms and concepts above.
-
If you have a recording system for your guitar (recommended), start by recording the unmodified guitar.
- Decide on a set of music that you can play for each test.
- At a minimum, your test should have sections of single notes that span the entire musical range of the guitar.
- Use the same guitar, amplifier, and recording settings for each test. The only thing that should be changing between tests is the pickup used.
- If you don't have a recording system, you'll have to rely on your memory of how the guitar sounds with each different pickup. Listen carefully and take notes right after you play!
- The procedure for making the pickup was written by Sam Garfield (Garfield, 2006). The original procedure was designed for a four-string bass. To make a pickup for a six-string guitar, you will need 12 magnets (two for each string) instead of the 8 magnets described below.
- Center one of the popsicle sticks over the strings, and mark where each string hits. This will be a guide for where you need to place the center of each magnet. You are now ready to begin construction.
-
You will need to glue the first four magnets to the Popsicle stick.
- This is not as easy as it sounds since all the magnets will just stick together until the glue is set.
-
The second set of magnets can be temporarily placed on the other side of the stick from the magnets being glued to hold them in place.
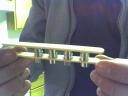
Figure 1. Use a second set of magnets to hold the first magnets in place while the glue sets. The photo shows a completed pickup "frame." The "holding" magnets are at the bottom, and are no longer needed at this point.
- It does not matter if you have the negative or positive pole facing up, as long as you do each one the same.
- Once you've got your glue dried, take the placeholder magnets off and stick them to the four magnets you just glued.
- After the glue for the second set of magnets dries, you can hold a second popsicle stick to the top with an extra set of magnets (or lightly glue it in place. You'll remove the top popsicle stick after potting, before installing the pickup in your guitar.
-
Now start wrapping the wire.
- Leave a foot or two sticking out before you start wrapping. This is important, because you need to connect your electronics to two leads.
-
We found it helpful to stick the whole thing to the refrigerator while you wrap it. Get comfortable because you're going to be there a while. Standard single coil pickups in guitars have thousands of turns (typically 8 to 10 thousand)!

Figure 2. Photo on the right shows the pickup during wrapping, stuck to the refrigerator. Photo on the left shows the wrapping process. Get comfortable-it takes a lot of wraps!
- Keep wrapping until it gets barely big enough to fit inside the plastic of your old pickup (it isn't necessary to have an enclosure-it just looks nice). This will be several thousands of wraps, but we didn't really count. It should look about like the completed picture here.
- Tip: if the wire breaks while you are wrapping you will need to start over (or carefully splice the wire), so don't break the wire! Since the wire is so thin, it is also very fragile.
- Another experiment you can do is to try multiple pickups with different numbers of turns. In general, more windings = hotter output. One thing to look out for with more windings is that the high frequencies may start to get cut off.
- Remember to count your turns!
-
Potting: the completed pickup needs to be "potted" in wax before using. The wax keeps the turn of the coil in place.
- Be careful with this step! Paraffin wax is flammable, and melted wax is hot enough to burn your skin.
- Use a double boiler to melt enough paraffin wax to completely cover the pickup.
- Some people recommend a mix of 80% paraffin wax and 20% beeswax. Beeswax melts at a higher temperature than paraffin wax, which will make the potting more stable in high-temperature environments later.
- Leave the pickup in the liquid wax for a minute, and then take it out with tongs. Try to hold it near the edge so that the wax completely covers the coil.
- Some people recommend placing it on a plate and putting it in the refrigerator to harden the wax more quickly.
- The protruding ends of the lower popsicle stick can be trimmed off, and the top popsicle stick can be carefully removed.
-
Connect the pickup to your guitar.
- You'll need to take off the pickguard in order to remove the existing pickup and install your homemade one(s). In order to take off the pickguard, you'll need to slacken and then remove the strings.
- Find the wires connecting the existing pickup to the guitar, and clip them at an accessible point.
- Remove the existing pickup.
- Strip the ends of the wires inside the guitar.
- Carefully strip the ends of the two leads of magnet wire from your coil. You can use your fingernail or carefully scrape with a utility knife. Use little pressure and be careful not to nick the wire.
- Install the homemade pickup in place of the previous one. The magnets should line up beneath the strings when everything is reassembled.
- Solder each lead from the coil to one of the stripped ends of the wires inside the guitar.
- Make sure the connection is solid, then cover the solder joint with electrical tape.
- Replace the pickguard and restring the guitar, then you'll be ready to try out your new pickup.
- Make a test recording to compare the new pickup to the previous one(s). How does the new pickup affect the sound quality?
/-/https/www.sciencebuddies.org/cdn/Files/3416/3/Elec_img110.jpg)
/-/https/www.sciencebuddies.org/cdn/Files/3417/5/Elec_img117.jpg)
Ask an Expert
Global Goals
The United Nations Sustainable Development Goals (UNSDGs) are a blueprint to achieve a better and more sustainable future for all.
/-/https/www.sciencebuddies.org/cdn/Files/19752/5/E-WEB-Goal-09.png)
Variations
- Try making pickups with magnets of different strengths. Use the same number of turns for each pickup coil, and test the pickups in the same position on the guitar. How does the strength of the magnets affect the sound produced?
- Try making pickups with identical magnets, but with various numbers of turns for the pickup coils. How does the size of the coil (i.e., number of turns) affect the sound produced by the coil?
- How does the position of the coil (closer to the end of the string or closer to the middle of the string) affect the sound of the guitar?
- An alternative to making your own pickups would be to use pre-made custom pickups that you can purchase for your guitar. You would need to do background research so that you understand the materials and construction methods used in the pickups that you purchase. You could then compare the sound produced using different pickups, using a recording setup as described above.
- For an experiment on making an acoustic guitar pickup, see the Science Buddies project There's Something Fishy About That Fertilizer.
Careers
If you like this project, you might enjoy exploring these related careers:
/-/https/careerdiscovery.sciencebuddies.org/cdn/Files/1223/17/iStock-971549326.jpg)
/-/https/careerdiscovery.sciencebuddies.org/cdn/Files/1801/18/pexels-photo-4988130.jpg)
/-/https/careerdiscovery.sciencebuddies.org/cdn/Files/1692/17/unsplash-G1Xk2C87Rb8.jpg)
/-/https/careerdiscovery.sciencebuddies.org/cdn/Files/1233/17/unsplash-b28ac533a45f.jpg)

/-/https/img.youtube.com/vi/CuUS2429KT4/0.jpg)
/-/https/img.youtube.com/vi/9ITx0WJKU0I/0.jpg)
/-/https/img.youtube.com/vi/w8j1ZHAhu3g/0.jpg)