Abstract
The banjo's roots trace all the way over to Africa. The unique sound that a banjo makes depends, in part, on the resonator. The purpose of the resonator is to amplify and project the sound that is made by strumming and plucking the strings. In this music science fair project, you will experiment with a resonator on a banjo and see if you can hear the difference in sound.Summary
Michelle Maranowski, PhD, Science Buddies
Steven Maranowski, PhD, Philips-Lumileds

Objective
To determine if the pot or resonator of a banjo affects the sound coming from the instrument.
Introduction
A banjo is a stringed instrument that is used in many different types of music—from bluegrass and jazz to American old-time. This instrument was developed by African slaves in the southern United States and Appalachia. It is thought to be based on African gourd banjos.
The banjo can have four, five, and in some cases, even six strings. There are two varieties of banjos, open-back and resonator. Because the sounds that these banjos make are different, they are used to play different types of music. The open-back banjo is used in American old-time music. The resonator banjo's back is closed, and it is used in country or bluegrass music. The resonator tends to push the sound that is produced forward. Therefore, in bluegrass music, the banjo is generally the lead instrument. In American old-time music, however, the banjo is part of the rhythmic background.
Although it looks simple, the banjo is a complex musical instrument. Each of the parts plays a role in the appearance and sound of the instrument. The way that it is put together, the fit, and the tension of the components all affect the sound. The basic parts of the banjo are the neck, the fingerboard, the strings, the bridge, tuning pegs, and the head. Resonator banjos have an additional part, the tone ring. While the head of an open-back banjo is just a stretched skin, the head of a resonator banjo is made up of the stretched skin and the pot, or resonator. When the strings are plucked in either type, the vibrations are transmitted to the head, which amplify the sounds. In a resonator banjo, the vibrations bounce around the pot or resonator.
In this music science fair project, you will get to experiment with this historic instrument by building and testing your own banjo. You will try adding a resonator to the stringed neck to see if the sound changes. With the instrument that you make, you might just be able to start your own bluegrass band!
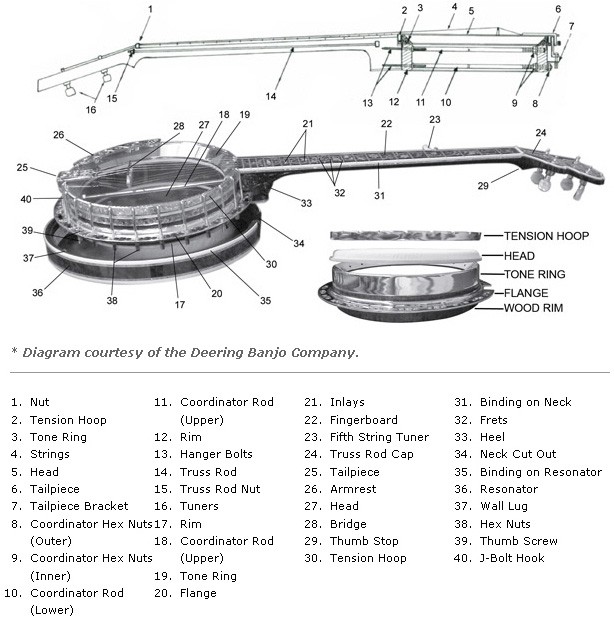 Image Credit: Musician's Friend Inc. / Granted by Deering Banjo Company and David Bandrowski
The body of a banjo consists of five main parts: the tension hoop, head, tone ring, flange and wood rim. A neck similar to a guitar is attached to the body and has four strings that run between the body and tuners at the top of the neck. The neck has a fingerboard and frets to play different notes and the body has a bridge that helps to keep tension on the strings.
Figure 1. This image shows the components of a banjo. (Courtesy of David Bandrowski and the Deering Banjo Company, 2008.)
Terms and Concepts
- Banjo
- Resonate
- Tension
- Vibration
- Amplify
- Decibel
Questions
- What are the differences between an open-back banjo and a resonator banjo?
- How is sound produced in a resonator banjo?
- How is sound produced in a guitar and in other stringed instruments?
- Do you think the size and shape of the pot or resonator affects the sound produced by the instrument?
Bibliography
- Blair, C. and Simmons, R. (2004, June.) Banjo Adjustments for Improved Tone. Retrieved February 25, 2009.
- Isaiah (Ed.) (n.d.). How Does a Banjo Work?. Retrieved February 25, 2009.
The following website has interesting information about different kinds of banjos.
- Deering Banjo Company. (n.d.). Banjo "Info-Guides.". Retrieved February 25, 2009.
The following website offers a free sound editing program.
- Audacity. (n.d.). Audacity: Free Cross-Platform Sound Editor. Retrieved February 25, 2009.
Materials and Equipment
- Wood, 3 1/2 feet (ft.) long X 2 1/2 inches (in.) wide X 3/4 in. thick
- Bench-top vise
- Saw
- Safety goggles
- Gloves
- Ruler
- Permanent marker
- Metal, 2 1/2 in. long X 1 in. wide X 1/16 in. thick; available at your local hardware store
- Hacksaw, metal
- Rubber mallet
- Drill with 3/16-in. bit
- Phillips head screwdriver
- Screws, Phillips head (8), 1/4-in. length
- Fishing line (1 roll)
- Scissors
- Glue, school
- Plastic container without lid, should be 1 ft. wide at the opening and should hold 1.8 quarts (qt.)
- Computer with microphone, spreadsheet program, and an Internet connection
- Audio editor and recorder, such as Audacity Audio Editor and Recorder. This is a free download from: http://audacity.sourceforge.net
- Lab notebook
- Graph paper
Experimental Procedure
Making the Banjo
- To start this science fair project, you should take the length of wood, clamp it in the vise, and saw off a 3-ft. length. Remember to wear your safety goggles and gloves when working with tools. Save the 6-in. length for use later in the science fair project. The 3-ft. length will be the neck of the banjo.
- Measure 3 1/2 in. up from one end of the neck. Draw a line across the width of the neck with the permanent marker.
- Put on your gloves and safety goggles and put the 3-ft. piece back into the vise. Using the saw, make a notch on the marker line. The notch should be 1/4 in. deep. Remove the neck from the vise and set it aside.
- Clamp the metal piece in the vise, lengthwise. Using the ruler and the marker, mark off four equally spaced spots along the length of the metal piece. This metal piece is called the bridge.
- Using the hacksaw, cut four notches at the four marks on the bridge. Remove the bridge from the vise and set it aside.
- Pound the metal bridge into the notch on the wooden neck with the rubber mallet. Make sure that it is secure. If needed, cut the notch a little deeper or pound harder. The notches on the bridge should face up.
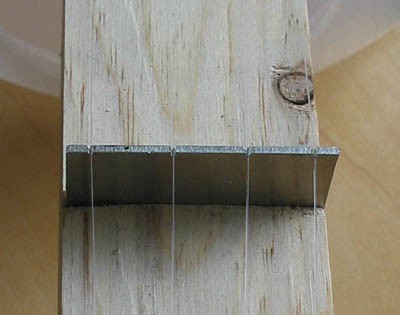 Image Credit: Michelle Maranowski, Science Buddies / Science Buddies
Figure 2. Notched bridge inserted into the banjo neck
- At the end closest to the bridge on the neck, measure 1/4 in. from the end, with the ruler. Draw a line across the neck at this position. Using the ruler, mark a spot on the line that corresponds to the first notch on the bridge. Angle the ruler from the first notch on the bridge to the line to make it easier. Repeat for the other three notches.
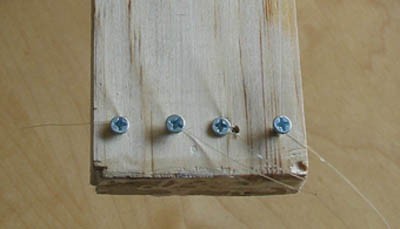 Image Credit: Michelle Maranowski, Science Buddies / Science Buddies
Figure 3. Screws near the bridge are 1/4 in.f from the bottom.
- Drill shallow pilot holes at the four spots (don't drill all the way through the wood), then use the Phillips head screwdriver and partially screw in a screw at each of the four spots.
- Now move to the other end of the neck. Mark four spots. Mark the first spot 1/2 in. from the end. This spot should also be in line with the first notch on the metal piece. Mark the second spot 3 in. from the end. The second spot should align with the second notch on the bridge. Mark the third spot 5 in. from the end. The third spot should align with the third notch on the bridge. Mark the fourth spot 7 in. from the end. This fourth spot should align with the fourth notch on the bridge.
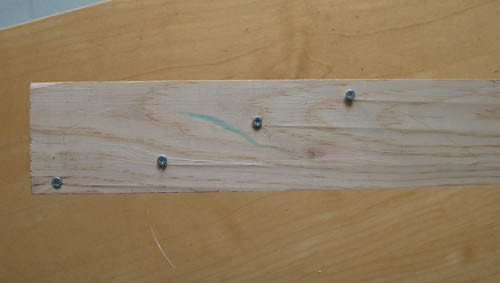 Image Credit: Michelle Maranowski, Science Buddies / Science Buddies
Figure 4. Screws at the top of the neck are offset from each other.
- At each of these four locations, slowly and carefully drill shallow pilot holes (don't drill all the way through the wood) and partially screw in a screw with the Phillips head screwdriver.
- Cut four lengths of fishing line. Each piece should be 3 1/2 ft. in length.
- Tightly wind a piece of fishing line around the first screw, close to the metal bridge. Tie knots to secure the line to the screw, and also wind the fishing line 3–4 times around the screw and then tighten the screw with the screwdriver.
- Take the fishing line across the bridge, placing the fishing line across the first notch. Tie knots to secure the line to the corresponding screw on the other end of the neck and wind the fishing line 3–4 times tightly around the screw. Pull and rotate the knots around the screw to tighten the line. Tighten the screw with the screwdriver to clamp the line. The lines must be taut to vibrate properly.
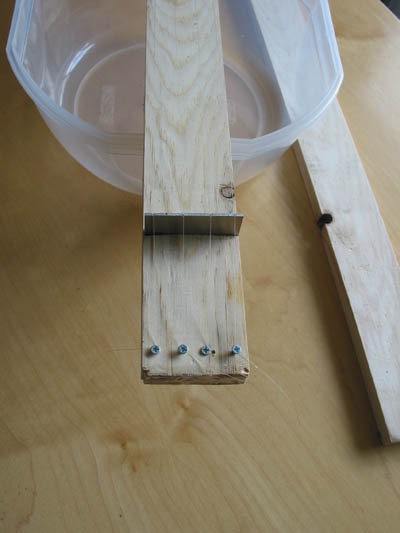 Image Credit: Michelle Maranowski, Science Buddies / Science Buddies
Figure 5. The fishing line is lying across the bridge in the notches and is tightened down at the screws.
- Repeat steps 13–14 with the other pieces of fishing line and the 2nd, 3rd, and 4th screws and notches. The neck is now strung.
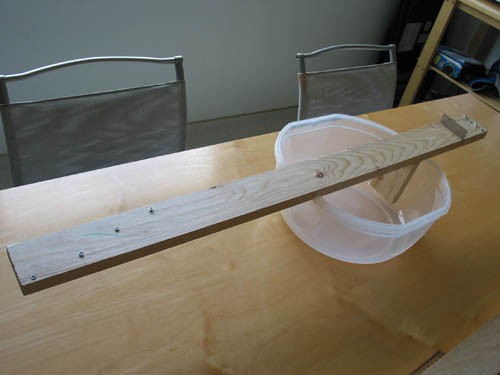
- Now take the plastic container and cut a notch in one end with the saw, large enough to hold the banjo neck. Remember to wear your safety goggles and gloves. The notch in the plastic container should be 3/4 in. deep in order to accommodate the neck.
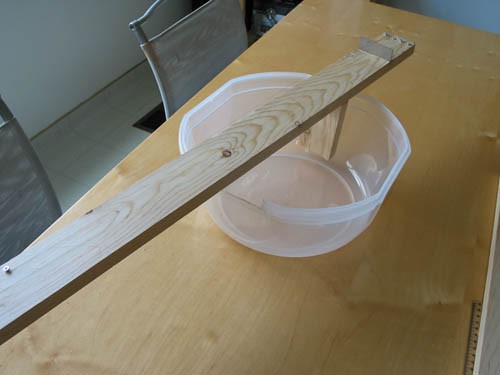 Image Credit: Michelle Maranowski, Science Buddies / Science Buddies
Figure 6. This image shows the notch in the plastic container and the support glued to the bottom of the neck.
- Measure the depth of the container. Use the extra piece of wood that you reserved earlier in the project to fashion a support for the neck that is as deep as the container. The support will be held by a helper so you can strum the strings for the first part of testing, when it's not secured to the bucket. Saw the extra piece of wood to size, if necessary. Glue the support to the bottom of the neck. The banjo is now complete.
Testing the Banjo
- Set up the computer's microphone so that it doesn't move. You can use a stand or tape it to the computer desk. The microphone must not move for the rest of the science fair project and you must pluck the banjo at exactly the same position under the microphone.
- Go to http://audacity.sourceforge.net and download the Audacity freeware program. Audacity is a program that allows you to record and edit sound. Spend some time getting to know this free software. The software is complicated and powerful and for this science fair project, you will just be using it in a basic mode for a simple frequency analysis. The buttons on the top left of the screen allow you to record and play back sounds. Try recording and playing back your voice. Hit the record button (red circle) and talk into the microphone. Hit the stop button (the orange box) to stop recording. Using your cursor, select the recording by clicking and dragging across the screen. Then hit the play button (the green arrow). You should hear your voice.
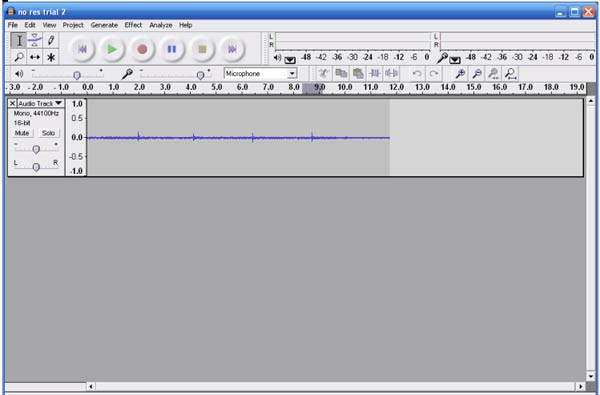 Image Credit: Michelle Maranowski, Science Buddies / Science Buddies
Large playback buttons can be found at the top of the window in the program Audacity. Audio tracks are listed in the center of the screen and display decibel levels in the recording.
Figure 8. This is a screenshot of the Audacity freeware.
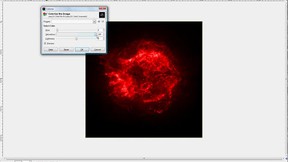
- Now select the recording and hit the Analyze tab at the top of the screen. Select "Plot Spectrum" from the drop-down menu. This will plot the decibel level of the various frequencies of your voice.
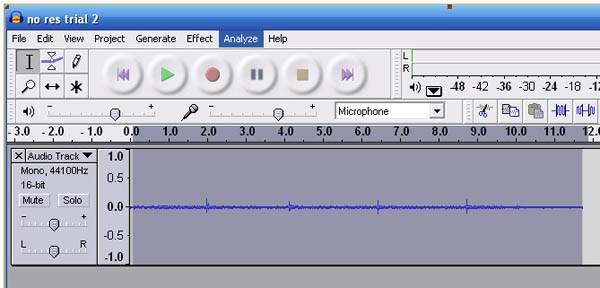 Image Credit: Michelle Maranowski, Science Buddies / Science Buddies
Figure 9. This screenshot shows the scan highlighted and the "Analyze" tab selected.
- Open a fresh screen of Audacity. Have a helper hold the support so the neck is in a horizontal position under the microphone. Record plucking the neck without the plastic container. Note down the distance between the neck and the microphone and how you are holding the neck. You will have to play the banjo at this distance and hold it in the same way for the rest of the science fair project. Choose a string and pluck it four times. Note the location on the neck that you are plucking. It should be close to the bridge and it should be located in a position where it will be over the container once it's placed over it later. Record the sound of the four plucks. Select one pluck and choose the "Plot Spectrum" option.
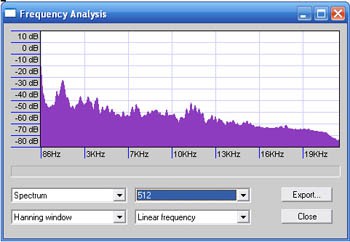 Image Credit: Michelle Maranowski, Science Buddies / Science Buddies
The program Audacity can create a frequency analysis chart that graphs the frequencies in an audio recording. Four drop down menus at the bottom of the analysis chart window allow different options to be selected for the graph.
Figure 10. This is the resulting screen after choosing Plot Spectrum.
- Export the data into spreadsheet program you are using. Hit the "Export" button after plotting the spectrum (shown in Figure 10). This transfers the data into a text file. Open the text file in the spreadsheet program. Label this data "Without Resonator." Save the spreadsheet file.
- Place the neck into the notch and over the surface of the container. Now record four plucks of the same string. Make sure that the banjo is in the same position under the microphone, as before, and that you are plucking the string in the same position. Try to pluck the string in the same way as you did before.
- Select one of the plucks, hit "Analyze," and plot the spectrum. Export the data into the spreadsheet file that is holding the data without the resonator. Label the data "With Resonator."
- Plot both sets of data on a line graph so that you can compare them. Can you see a difference? Which recording shows higher decibel levels? Are the decibels higher across the spectrum or for certain frequencies only? If so, can you think of why only certain frequencies "resonate"?
- Repeat steps 4–8 for the other three strings. Can you see a difference in the decibel level with and without a resonator (the plastic container)?
Ask an Expert
Variations
- Make a resonator from a container that is made from a material other than plastic. Try a wood container or a metal container. How do the different materials affect the sound coming from the banjo?
- Does the size of the container affect the sound coming from the instrument? Perform the experiment with different-sized containers and find out.
Careers
If you like this project, you might enjoy exploring these related careers: