A Magnifying Discovery
Summary
/-/https/www.sciencebuddies.org/cdn/Files/16844/7/magnifying-discovery-thumbnail.jpg)
Introduction
Have you ever looked through a magnifying lens? Why does an object look different when you look at it through the magnifying lens? Even though the object appears to get larger or smaller, it really stays the same size. Each lens has its own unique power of magnification; how powerful is your lens?
Materials
- Large magnifying glass with a sturdy handle
- Scotch® tape
- Wax paper or other non-stick surface
- Permanent marker
- Ruler, 30-cm-long
- Scissors
- Optional: Pipe cleaners (2); plastic or paper drinking straws work, too.
- Chunk of clay
- Low table or floor on which you can place a piece of clay
- Small objects to measure (penny, typed or printed alphabet letter—especially a "p" or other asymmetric letter, bean, an eraser, etc.)
- Pencil
- Lab notebook
Instructions
- Cut off a piece of Scotch tape and place it on a non-stick surface, like a piece of wax paper.
- Using your ruler and permanent marker, mark points along the tape indicating centimeters and millimeters.
- Using scissors, cut the length of the tape to fit inside the diameter of your magnifying lens.
- Stick the tape to the diameter of the lens. You will use this as a guide to take your optical measurements.

- Perform this activity on a low table or uncarpeted floor. If you choose the table, make sure you have enough space to look down at the table with an outstretched arm and still have 30 cm between your hand and the table.
- Jab the end of the ruler into a chunk of clay and secure the clay to the table or floor so that your apparatus will not topple over. Ensure that the end of the ruler is touching the surface of the table or floor. This will ensure that your measurements of the lens height will be accurate.
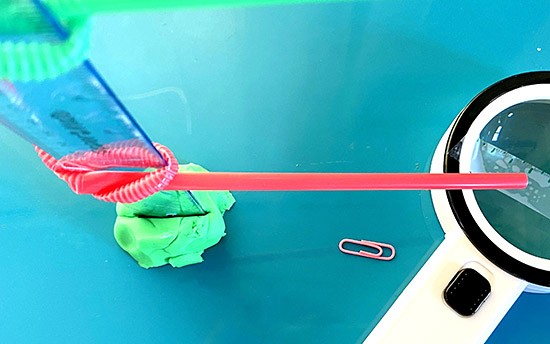
- Optional: Twist a pipe cleaner around the ruler at 10 cm, and another at 20 cm so you can easily find the location 10 cm and 20 cm above the table or floor. A plastic or paper straw works, too. Note: We placed the observation points at 10, 20, and 30 cm from the object. If you have a very strong lens, you might want to switch to 5 cm, 10 cm and 15 cm.
- Now you are ready to measure your objects with your magnifying lens apparatus. First, collect items to measure and organize them into a data table in your lab notebook. Add at least one item that is asymmetric, like the letter "p." The data table will help you keep track of your measurements.
Swipe left to see moreObservations with Lens at Arm's Length from the Eye Object Actual size
(mm)Height of Lens
(cm)Perceived size Size on Lens
(mm)10 cm 20 cm 30 cm 10 cm 20 cm 30 cm 10 cm 20 cm 30 cm - Take one of your objects and measure the actual size of the object along the length (if it is a long object), its width, or its diameter (if it is a round object like a penny). Write down your measurement in the data table.
- Place the object near your apparatus (clay and ruler).
- Place the magnifying glass lens at the 10 cm height so you can see the object on the table or floor through the lens. Have your arm holding the lens stretched out and look straight down at the object through the lens.
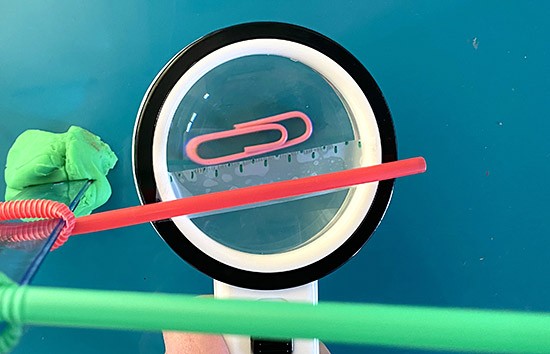
- Look through the lens of the magnifying glass at the object. You might need to close one eye to make the image sharp.
 How does your object look? Do you perceive it as a lot smaller, a little smaller, about the same size, larger, or a lot larger?
 - Write what you perceive in your data table. If you have an asymmetric object, like a "p," you might want to see if it is upside down, or if it flipped right to left.
- Observe again from the 10 cm mark. Using the taped-on ruler on your magnifying glass as a guide, measure the size of the object as it appears in the magnifying lens. This is the "Size on Lens" for the "Height of Lens" being 10 cm. Fill in this value in your data table.Does this measurement on the lens match the actual size of the object? Does it match how you perceive the object? Why would this happen?
- Move your lens to the 20 cm mark.Do you expect the object to look different? Do you expect the measurement on the lens to be different? If so, in what way will it look different?
- Look through the lens from arm's length and observe with the lens at the 20 cm mark. You might have to move around your lens a little to find the object. If you cannot focus your eye on anything, that is fine too, just write it down. If you can get a clear image, repeat steps 13–14 holding the lens at the 20 cm mark.Are your observations as you expected?
- Repeat steps 15–16 for the 30 cm mark.Does your perception of the object change when you change the distance between the object and the lens? Does the object's size as it appears in the lens change when you change the distance between the object and the lens? Do you think this will happen when you look at other objects, too?
- Take a second small object and repeat steps 9—17. If you would like, repeat with a third object.What do you notice?
/-/https/www.sciencebuddies.org/cdn/Files/2221/3/Phys_img012.gif)
/-/https/www.sciencebuddies.org/cdn/Files/16845/6/clay-with-ruler.jpg)
/-/https/www.sciencebuddies.org/cdn/Files/16846/6/look-top-down-in-magnifying-lens.jpg)
What Happened?
You probably noticed that the perceived image got larger when you moved the lens farther away from the object, and noticed a similar trend in the measurements on the lens. This trend happens when you hold the lens close enough to the object and look from far enough through the lens.
If you had a lens with a strong magnifying power, you probably noticed this trend does not hold forever. With a strong lens, you probably reached a distance from the object where you could no longer see the object clearly. If you moved the lens even farther, you could probably see a clear image again, but your image probably looked inverted. Moving the lens even farther probably made its appearance decrease in size.
In this activity, the measurement of the image you made on the lens probably showed a similar trend as the size of the perceived object. Note that this trend is not always true. Play around, try to hold the lens at different distances from your eye and see what happens!
Digging Deeper
Optics is the study of light and how light travels through different objects in different ways. Have you ever looked through a glass of water at something? You will notice that the object looks smaller through the glass than when you look through the air. This is because light travels differently through the glass and the water, causing the light rays to bend each time they change medium. Your eyes perceive this as a smaller object, even though your brain knows that the object is still the same size.
Physicists use the power of optics to make many different kinds of lenses to see objects better than with the naked eye. Powerful telescopes can see far into space, making far away objects look closer and brighter. Powerful microscopes make microscopic objects look much bigger so that our eyes can see them in more detail. Many important discoveries in biology, chemistry, astronomy, and other sciences have been made using the power of optics.
We also use optics around the house. If you or your parents wear glasses, your doctor used optics to find a prescription for a lens to help you or your parents see better. If you like to bird-watch, you might use a pair of binoculars to see birds in far-off distances. A magnifying lens, on the other hand, can be used to read tiny print, look at insects, or to do a small hobby or craft.
One important factor for any magnifying lens is the power of magnification, which is a measurement of how much bigger the lens will make an object appear. When you use a magnifying lens to look at an object you can compare the actual size of the object (the real size of what you are looking at) to the apparent size of the object (the size your object looks like it is when you look through the lens). Lenses with more curvature will usually have a larger magnifying power.
There are additional factors that can make the object look larger or smaller. The apparent size of the object also depends on how far you hold the magnifying lens from the object, and how much your eye corrects to get a clear image (or how near or far you hold the lens to your eye). It is important to note that the size you measure on the lens does not match or follow the same trend as the size of the object you perceive. Play around a little more as explained below, and you will notice some interesting phenomena.
Ask an Expert
For Further Exploration
- In this activity, you keep the distance of the lens to the eye constant and change the distance of the object to the lens. What happens if you fix the distance of the object to the lens, but change the distance from the eye to the lens? Can you find a situation where the size measurement on the lens is identical to the real size of the object, but perceive the object as larger?
- In this activity, you examined a relatively short interval in distance from the object to the lens (10 cm to 30 cm). What happens when you allow these distances to become much larger or smaller?
- Examine how different magnifying lenses change your observations.
- The focal length of a lens is a measure of how much the lens bends light rays; a shorter focal length means the lens bends light rays more sharply. Try to find the focal length of the lens you are using by shining a flashlight through the lens onto a wall. Move the distance from the lens to the wall until you find the spot where all the light passing through the lens gets concentrated on one point. The distance from the lens to the wall that creates this condition is the focal length of the lens.
/-/https/www.sciencebuddies.org/cdn/Files/13516/6/reflections-in-curved-mirror-thumbnail.jpg)
/-/https/www.sciencebuddies.org/cdn/Files/12939/7/water-drop-lens-on-letters-thumbnail.jpg)
/-/https/careerdiscovery.sciencebuddies.org/cdn/Files/1570/17/iStock-930864180.jpg)
/-/https/img.youtube.com/vi/b1pvMBIhYjE/0.jpg)
/-/https/img.youtube.com/vi/74RnO_wHX7k/0.jpg)
/-/https/img.youtube.com/vi/yBgMJssXqHY/0.jpg)