Abstract
Ever wonder why it is harder to keep your balance with a heavy backpack on? Or why it is difficult to make a toddler's sippy cup tip over? Maybe you are the kind of person who wonders about circus balancing acts and would like to learn how to ride a bike on a rope. Or perhaps you want to know how to make your toy car less prone to toppling over when racing through a sharp curve. In this science project you can learn about balance using marshmallows, skewers, and toothpicks. Sticky, yummy balancing fun!Summary
Sabine De Brabandere, PhD, Science Buddies
/-/https/www.sciencebuddies.org/cdn/Files/4334/5/Phys_img187.jpg)
Objective
Create marshmallow-and-stick constructions, observe the forces that enable you to balance them, and understand why those forces act the way they do.
Introduction
The balance of an object has everything to do with the distribution of mass in the object. As an example, you might find it easy to stand upright on a balance beam or the edge of a curb with a heavy backpack hanging down in front of you, but it gets quite a bit more challenging when that backpack is on your back. Can you balance when holding it up over your head? In this experiment, you will play around with the distribution of marshmallows on sticks, understand the key components of balancing objects, and amaze your friends with your balancing talents!
In physics, the center of mass, or barycenter, of an object is a point where, for the purpose of various calculations, the entire mass of the object may be assumed to be concentrated. Cool, right? In your imagination, you can replace a complicated object like a car or a bike or a simple one like a spoon by one tiny point representing all the mass of the object and use that point to predict how the car, bike, or spoon will react to certain forces.
Theoretically, the center of mass is defined as the weighted average location of the mass particles of the object, or body. Sounds complicated? Do not be intimidated. It basically means the center of mass will be in the center of the object if the mass is uniformly distributed (as it is with a bowling ball or a hula hoop) and will shift to the heavier side of an object if the mass is not uniformly distributed (as with a spoon).
Let us explore the impact of the center of mass on balance. Keep in mind that an object "acts" (or, as a physicist says, "behaves") as if there were a point where all the mass of the object is concentrated. If you have a single heavy point-like object like a tiny marble, where should you put the support so that you can balance it? Directly under it, right? Figuring this out, you correctly conclude that you can balance an object only if you support it under the spot where its center of mass is located.
Take a ruler as an example. A ruler is uniform in that its weight is uniformly distributed, meaning that its center of mass is located in the middle of the ruler. It will behave the same way as a point, with all the mass located in the middle of the ruler. You can therefore conclude that if you support it in the middle with your index finger, the ruler will balance on your finger.
Can you explain what would happen if you attached an eraser to one end of the ruler? Will the center of mass shift toward one or the other end of the ruler? Will you need to shift the support point in order to balance the ruler with an eraser attached?
So far, you have learned how to balance an object by putting a support under the center of mass of an object. But what if the center of mass is not a point where you can support the structure? In some cases, the center of mass is a point in space outside the actual object. Think of a hula hoop. This is a uniform object, so the center of mass is in the center of the object, in this case the middle of the hula hoop. No actual material except air is present at that spot, so it is not possible to put the support directly under the center of mass.
But before you go to the explanation, can you predict how the hula hoop will behave when it is balanced at various points of the hoop? The drawings in Figure 1 might give you some ideas. The point where an object is supported or suspended is referred to as the balance point in the rest of this Project Idea. In this case, the balance point is the tip of a finger. Can you also find the center of mass of the hula hoop in the drawings? Is it under, above, or to the side of the balance point?
/-/https/www.sciencebuddies.org/cdn/Files/4327/5/Phys_img180.jpg)
Figure 1. Three situations for examining the behavior of a hula hoop when you try to balance it on your index finger. In situation A, the point where the finger touches the hula hoop (or balance point) is straight above the center of the hula hoop, in situation B it is straight below the center of the hula hoop and in situation C it is to the side of an imaginary vertical line passing through the center of the hula hoop.
You just learned that, for the purpose of balance, an object acts as if there was a point located at the center of mass with all the mass of the object in that point. Think of the hula hoop as a point located at the center of the hoop with all the mass of the hula hoop concentrated in that point.
To predict the behavior of the hula hoop, imagine a stick with one end having the balance point and the other end holding the center of mass of the object. Imagine all of the mass located at one end of the stick, the end where the center of mass is located. Figure 2 shows how this works for Situations A, B, and C shown in Figure 1.
/-/https/www.sciencebuddies.org/cdn/Files/4328/5/Phys_img181.jpg)
Figure 2. An imaginary stick (drawn in blue) extending from the balance point (the fingertip) to the center of mass (red target) of the hula hoop helps predict the behavior of the hula hoop in the three balancing situations shown. The blue arrow in situation C shows the swinging motion the hula will make, it will behave like a pendulum.
Do you agree that in Situation A, the hula will balance easily on the finger? The imaginary stick hangs down, with all of its mass at the end of the stick. A small push will make the hula hoop swing back and forth but eventually bring it back to its original position. This is called a stable balance position.
In Situation B, the hula can also balance on the finger. The stick can "stand up" on your finger with the mass on top. This is a hard position to hold. Any tiny push will unbalance the hula and eventually bring it to Situation A. This is called an unstable balance position.
In Situation C where we try to balance the hula hoop at a position to the side of a vertical line passing through the center of mass, the hula hoop will not balance on the finger. The imaginary stick will swing back and forth as indicated by the blue arrow in Figure 2, so the hula will swing back and forth. Finally, it will reach Situation A, the stable balance position. The imaginary stick and thus the hula hoop behave as a pendulum
The laws of physics show an object will balance if the vertical line or plumb line from the center of mass passes through the balance point. Can you apply this to the hula hoop example? Does this explain why the hula hoop balanced in Situations A and B but not in Situation C?
The same laws of physics also predict a balance will be stable if the center of mass is under the balance point and unstable if the center of mass is above the balance point. Do Situations A and B of the hula confirm this?
Using the definition of the center of mass to find its location quickly becomes harder for non-uniform, irregular objects, where weight is not uniformly distributed. Knowing how to predict the balance of a structure when you know its center of mass, can you come up with an experimental method to find the center of mass of any object?
You learned that an object will balance if the vertical line, or plumb line, from the center of mass passes through the balance point. Turning this around, you know that if an object is balanced, a plumb line drawn from the balance point will always go through the center of mass of the object. What if we repeat this procedure for two or more balance points? Would this show two or more plumb lines that go through the center of mass? Can you find out how this helps you locate the center of mass of an object?
In this physics science project, you will discover the answer yourself by creating structures made of marshmallows and trying to balance them.
Terms and Concepts
- Mass
- Center of mass, or barycenter
- Stable and unstable balance positions
- Plumb line
Questions
- What determines the center of mass of an object?
- Why is it important to know where the center of mass of an object is located?
- What is needed to balance an object on a support?
- How can we create a stable balance position?
- What is a plumb line and what is its connection to balance?
Bibliography
- Wikia contributors. (n.d.) Center of mass. Wikia: High School Online Collaborative Writing. Retrieved May 10, 2012.
- Colwell, C. H. (2012). Resource lesson: Center of mass. PhysicsLAB Online. Retrieved May 10, 2012.
Materials and Equipment
- Toothpicks (at least 20)
- Wood or bamboo skewers (at least 20)
- Large marshmallows (1 bag)
- Lab notebook
- Optional: Camera. You may want to take pictures of your balancing structures for your Science Fair Project Display Boards.
Experimental Procedure
Build a Basic Marshmallow Structure
- On a skewer, place one marshmallow in the middle and one on each end, as shown in Figure 3.
/-/https/www.sciencebuddies.org/cdn/Files/4329/13/balancing-marshmallows-skewers.jpg)
Figure 3. Basic structure using three marshmallows on a single skewer.
- Place the tip of your finger under the middle marshmallow (as shown in Figure 3) and try to balance the structure on your finger. Can you balance it? Is it easy or difficult? If you cannot balance it, move the middle marshmallow a bit to one side or the other until you find just the right spot that enables you to balance the structure with your finger.
- This is your Basic Structure. You will use this structure as a starting point for building all your other structures in this Project Idea.
- The middle marshmallow in the basic structure will be your original balance point. For all the structures you build, you will always use this original balance point as the first place you go when trying to balance the structure on your finger.
- Once you can balance your basic structure, poke a toothpick pointing up into the top of the marshmallow in the center of the skewer. Add one marshmallow on top of the toothpick and push it down until it touches the marshmallow in the middle of the original structure. See if you can still balance your structure.
- Record your results in a data table, like Table 1, in your lab notebook.
| Structure | Did It Balance Easily?
(Yes/No) |
Location of Center of Mass
(Above/ Below/ Way Below the Original Balance Point) |
Load Added to a Structure
(Number of Marshmallows) |
| Basic Structure | |||
| Test Structure #1 | unloaded | ||
| Loaded Test Structure #1 | |||
| Test Structure #2 | unloaded | ||
| Loaded Test Structure #2 |
Build Test Structure #1
- Make another Basic Structure. Now, poke a toothpick into each end marshmallow. Add one marshmallow to the end of each of the toothpicks and connect the marshmallows with a skewer so you get a rectangular shape, as shown in Figure 4.
/-/https/www.sciencebuddies.org/cdn/Files/4330/11/balancing-marshmallows-structure.jpg)
Figure 4. Test Structure #1.
- Place the tip of your finger under the original balance point and try to balance this structure on your finger. Can you balance Test Structure #1? Is it easier or more difficult than balancing your basic structure? If you can not balance this structure, move the middle marshmallow a bit to one side or the other until you find just the right spot that enables you to balance the structure.
- Record your results in your data table.
- Once you can balance it, determine the center of mass of your structure.
- Draw the structure on a sheet of paper in your lab notebook. Note that the two skewers are of equal length and the two toothpicks are also of equal length. Is this reflected in your drawing?
- In your drawing mark the balance point (the marshmallow you put your finger under when balancing the structure) with an X.
- Place the structure on your finger. Observe what the structure is doing. Is it flat? Is it a little inclined? Rotate your lab notebook so that the structure on your drawing has the same angle of incline as your observation. Now draw a vertical line down from the point you marked with X. As noted in the Introduction, this line is called a plumb line. In the example
shown in Figure 5, the top skewer inclined slightly when balanced on your finger.
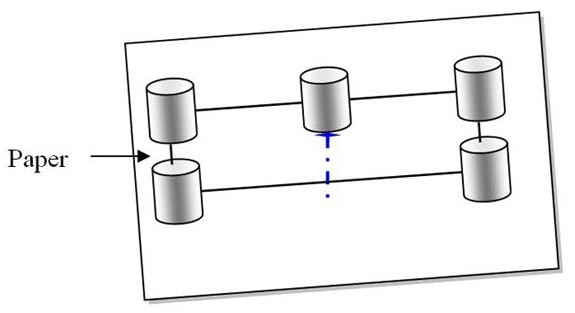
Figure 5. Example of a drawing (in your lab notebook) showing the first step in finding the center of mass of a test structure. Note that the notebook paper is at a slight angle to reflect that the structure inclined slightly when balanced on your finger.
- Choose a different balance point (e.g. the middle of a toothpick) and repeat steps b-c.
- The location where the two lines drawn in steps c and d cross is the center of mass of your structure. Determine this location and record your results in your data table.
- If you like, you could choose more balance points on your structure and repeat steps b-c. Do you observe that all the lines indeed go through one point, the center of mass of your structure? In Figure 6, four balance points were used to get the center of mass of the structure.
/-/https/www.sciencebuddies.org/cdn/Files/4331/11/balancing-marshmallows-drawing.jpg)
/-/https/www.sciencebuddies.org/cdn/Files/4332/11/balancing-center-of-mass.jpg)
Figure 6. Drawing of Test Structure #1 with the center of mass determined. The plumb lines (blue dashed lines) cross in one point, the center of mass of this structure.
- Now, determine how stable Test Structure #1 is. To do this, measure how much load it can keep balanced. Here is the procedure:
- Add a toothpick to the top of the marshmallow in the center of the original skewer. Poke the toothpick in, pointing up, and push a marshmallow down on it.
- Place the tip of your finger under the original balance point. Can you balance the new structure? Is it easier or more difficult than without the extra marshmallow?
- Record your results in your data table.
- If it balances, add one more marshmallow to the toothpick and repeat step b. (If the toothpick is too small to hold all the marshmallows, add another toothpick to hold them.) Try to cluster them all close together, near the balance point. Figure 7 shows an example.
- Repeat steps b and c until you can no longer balance the structure on your finger. Count the number of marshmallows that could be added before unbalancing the structure occurs. This is called added load. The structure with load added is referred to as a loaded test structure.
- Record your observations, including the number of marshmallows balanced, or added load, on your drawing and in the data table in your lab notebook.
- Make a second drawing of this structure, this time including the load (the marshmallows you added). Using the same procedure as in step 3, find the center of mass of this loaded structure. Did it change? If you have difficulty figuring out the center of mass, see Figure 7 for an example.
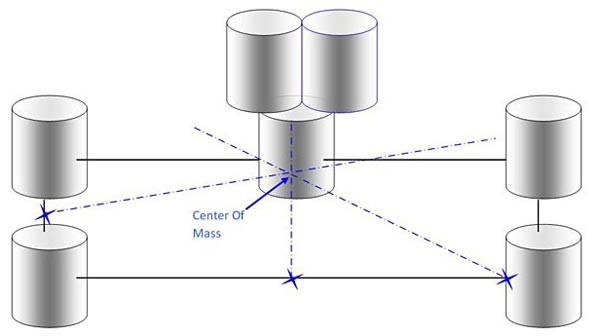
Figure 7. Drawing to determine the center of mass of Loaded Test Structure #1.
- Record the data for Test Structure #1 and Loaded Test Structure #1 in the data table in your lab notebook.
/-/https/www.sciencebuddies.org/cdn/Files/4333/12/balancing-center-of-mass-determine.jpg)
Build Test Structure #2
- Start with another basic structure. This time, poke a skewer into the bottom of each marshmallow on the ends of the first skewer. Connect these two skewers together with a marshmallow, resulting in a triangular structure like the one in Figure 8.
/-/https/www.sciencebuddies.org/cdn/Files/4334/5/Phys_img187.jpg)
Figure 8. Test Structure #2.
- Place the tip of a finger under the original balance point and try to balance your structure on your finger. Can you balance it? Which is easier to balance, this structure or Test Structure #1?
- Record your results in your data table.
- Now determine the center of mass of this structure. Follow the same procedure as outlined in step 3 for Test Structure #1. When drawing this structure in your lab notebook, note that the three skewers are of equal length. Can you see this on your drawing?
- Record your results in your data table.
- The next step is to determine how stable this structure is by measuring how much load it can keep balanced. Use the same procedure as outlined in step 4 for Test Structure #1. Can this structure balance more or fewer marshmallows? Record your observations, including the number of marshmallows balanced, or added load, on your drawing and in your data table.
- See if you can find the center of mass of your structure with the added marshmallows. What is your observation? While you do this, see if there are balance points on the loaded structure that make it much easier to balance. Does this give you ideas on how to make it easier to balance constructions?
- Be sure to record all of the data for Test Structure #2 and Loaded Test Structure #2 in your data table.
Design and Test More Marshmallow Structures
Build a couple more Basic Structures to test constructions that you design. Try to design constructions that you think will be very stable. Follow the same procedure as steps 3 and 4 of Test Structure #1 to:
- Find the center of mass of the structures.
- Find the load (number of marshmallows) that can be balanced on the structures.
- Compare the center of mass of the loaded versus unloaded structures.
- Add lines to your data table to record your findings.
Analyzing the Data
- Where was the center of mass located with respect to the original balance point (under, above, to the right or left) for the unloaded structures?
- What happens to the center of mass when you add a load to the structure?
- Which of the structures could balance the most load (the greatest number of marshmallows)? Where is the center of mass located for those structures?
- Do your findings support what you learned in your background study?
Ask an Expert
Variations
- For a more challenging balancing act, balance constructions on a toothpick by sticking a toothpick down in the marshmallow at the original balance point. If the marshmallow becomes too soft, replace it with a cork.
- Study how the distribution of weight in your backpack influences your balance.
- Study how the distribution of mass in a toy truck will influence its balance when parked on a hill.
- Look around the house and find various examples or weight distributions and how they are balanced.
- Create your own version of a (toy) bike riding on a tight rope. An example can be seen on http://www.myspace.com/video/vid/28744803#.
- Ever seen a balancing bottle holder? Can you invent more balancing objects?
- For an advanced challenge, you can try calculating the center of mass of your constructions. Do your calculations match your observations? To find out more on how to do these calculations, take a look at the following resources (you only need to look at the first few pages of the second resource):
- Nave, C. R. (n.d.). Center of Mass. HyperPhysics, Department of Physics and Astronomy, Georgia State University. Retrieved March 22, 2013, from http://hyperphysics.phy-astr.gsu.edu/hbase/cm.html
- Webb, S., Croft, T., Mustoe, L., and Ward, J. (n.d.). Calculating centres of mass. Engineering Mathematics: Open Learning Unit Level 1. Engineering Mathematics Open Learning Project. Loughborough University. Retrieved March 22, 2013, from http://www3.ul.ie/~mlc/support/Loughborough%20website/chap15/15_3.pdf
Careers
If you like this project, you might enjoy exploring these related careers:
/-/https/careerdiscovery.sciencebuddies.org/cdn/Files/1640/26/Fyysikot_tyossaan.jpg)
/-/https/careerdiscovery.sciencebuddies.org/cdn/Files/1450/21/iStock-1227179796.jpg)
/-/https/careerdiscovery.sciencebuddies.org/cdn/Files/1133/17/pexels-photo-3862135.jpg)
/-/https/careerdiscovery.sciencebuddies.org/cdn/Files/1457/17/pexels-photo-3861938.jpg)

/-/https/img.youtube.com/vi/YqFcL95QHFE/0.jpg)
/-/https/img.youtube.com/vi/rbmk1qtVEmg/0.jpg)
/-/https/img.youtube.com/vi/xXqoGwIPiK8/0.jpg)