Abstract
You might not know it, but plants are able to sense their environment and actually respond appropriately. One of the key parameters that every plant must respond to is the direction of gravity: stems go up (opposite to the pull of gravity) and roots go down (in the same direction as the force of gravity). In this project, you will construct simple devices that hold several germinating seeds, which allow you to watch how growing rootlets respond as you rotate the devices, effectively altering the direction of gravity.Summary
David Whyte, PhD and Teisha Rowland, PhD, Science Buddies
- Plexiglas® is a registered trademark of Rohm and Haas Co.
/-/https/www.sciencebuddies.org/cdn/Files/3200/5/PlantBio_img062.jpg)
Objective
In this science project, you will study how growing rootlets respond to gravity.
Introduction
Geotropism (also called gravitropism) is the directional growth of an organism in response to gravity. Roots display positive geotropism when they grow downward, while shoots display negative geotropism when they grow upward. Among the first scientists to study geotropism was Charles Darwin, who, along with his son Francis, published The Power of Movement in Plants in 1880. Despite a long history of studying this subject, there are many questions about how geotropism actually works. Watch this time-lapse video to see a corn seedling root display geotropism.
/-/https/i.ytimg.com/vi/zpbjnGzT_7Q/hqdefault.jpg)
The process can be broken down into three phases: perception, transduction, and response.
Perception is the sensing of environmental stimuli. Perception allows organisms to gain information about properties and elements of the environment that are critical to their survival. The perception of gravity by root tips is thought to be mediated by special cells called statocytes (see Figure 1). These cells contain small bodies that sink to the bottom of the cells in response to gravity. The term for this type of body is statolith. This perception process that takes place in the statocyte is essentially the same as dropping a rock to determine which way is down. The statocyte cell senses where the statolith touches inside the cell; now it "knows" which way is down.
The next step is for the statocyte to communicate this information to other parts of the root. The goal is to tell the part of the root that is growing which direction to go. To do this, it has to convert the signal generated by the falling statolith into a chemical signal. The term used for converting information from one form to another is transduction. The process of signal transduction is very important in biology. For example, your eyes transduce light energy into electrical signals that are sent to the brain for processing, which allow you to see your environment. In the case of the statocyte, the signal from physical contact of the statolith is "transduced" into a chemical signal that is able to communicate with other cells.
The final step is the response of the growing cells to the signal indicating which way is down. Signal transduction from the statocytes to the root-tip cells results in a specific response: growth in the direction of the gravitational field. Molecular genetics, fine-laser ablation (this destroys very specific regions of the root to see how this affects growth), and zero-gravity environment experiments are some of the tools that are used to tease out the molecular mechanism by which plants sense and respond to gravity.
/-/https/www.sciencebuddies.org/cdn/Files/3197/8/PlantBio_img022.jpg)
The cells in a plant root are protected by an outer layer called the root cap that is colored in red. The inner layer of cells are called statocytes (colored in yellow) and in each statocyte are small structures called statoliths (colored in white) that move in response to gravity.
Figure 1. This diagram of a plant root illustrates the regions of gravity perception. Within the root cap at the apex (red), some cells develop into the gravity-sensing cells called statocytes (yellow). These cells contain statoliths (small white dots) that move in response to the direction of the gravity (toward the bottom). (Drawing by David Whyte, 2008).
In this science project, you will be watching and recording three sets of seeds to see how the growing root tips respond to the change in the direction of gravity. The first set will be germinated while held vertically between two plastic panes. The second set will be germinated between horizontal plastic panes, so the roots will be blocked from growing in the same direction as the gravitational field. The last set will be rotated 90 degrees to observe how quickly the roots respond to the change in direction of gravity (this could be every day, or at longer intervals, depending on how fast the root tips are growing).
Terms and Concepts
To do this science project, you should know what the following terms mean. Have an adult help you search the Internet or take you to your local library to find out more.
- Geotropism
- Statocyte
- Statolith
- Signal transduction
- Stimulus perception
- Cellular response
Questions
- Does geotropism cause the root to grow faster, or does it just determine the direction of growth?
- Do roots grow in random directions when they are blocked from growing downward?
- What other types of tropism are displayed by plants?
- How would plants develop in a zero-gravity environment?
Bibliography
You might want to start your research by checking out a botany book from your local library and reading what it has to say about germination and tropism. Some other sources of information are listed below.
- Kiss, J.Z. (2006, January 24). Up, down, and all around: How plants sense and respond to environmental stimuli. Proceedings of the National Academy of Sciences. Published online. Retrieved September 13, 2022.
- Johnson, Gregory B. "Tropism", World Book Encyclopedia. 1999.
- Hangarter, R. (n.d.). Corn root gravitropism. Plants-In-Motion. Retrieved February 28, 2012.
Materials and Equipment
- Blotting paper, cut to fit the plastic panes
- Radish seeds (1 package). Note: Radish seeds are good because they germinate quickly. Tomato, basil, and thyme seeds may also be substituted.
- CD "jewel" cases (18). You will use 6 cases for each procedure. You'll need 18 cases to run three trials concurrently. (Alternatives to CD "jewel" cases: panes of glass from 4" X 6" photo frames, Plexiglas® from your local hardware store, clear plastic sheet protectors, or plastic baggies)
- Rubber bands
- Permanent marker
- Modeling clay
- Shallow pie plates (6) (Alternatives: cardboard boxes lined with foil or wax paper)
- Eyedropper or squirt bottle filled with water
- Dark closet or large lightproof cardboard box
- Lab notebook
- Ruler and protractor
- Graph paper
Experimental Procedure
To start this experiment, you should bring all of your materials together on a flat work surface. The surface might get a little wet, so have some paper towels handy.
- Begin preparing your "seed sandwiches." Cut the blotting paper to fit into the CD jewel cases. You can also use a folded paper towel.
- Place blotting paper in six of the CD cases (or glass panes, plastic sheet protector or plastic baggie).
- Moisten the blotting paper. It should not be dry or dripping wet.
- Place four seeds in the middle of the moist paper, roughly evenly spaced from each other. None of the seeds should be close to the sides of the paper. You can vary the number of seeds if desired.
-
Close the CD cases. Repeat the steps above for the other seed sandwiches. The seed sandwiches should look like the one in Figure 2.
- If you are using the glass panes, loop two rubber bands top to bottom, and two rubber bands right to left around the glass panes. If you are using a plastic sheet protector, trim the edges with scissors and use paper clips or staples to hold it together. If you are using a baggie then close it carefully and leave a small amount of air in the bag. Repeat the steps above for the other seed "sandwiches."
/-/https/www.sciencebuddies.org/cdn/Files/3199/5/PlantBio_img061.jpg)
Figure 2. Seed sandwiches made in CD cases should look similar to this one. Note how the modeling clay is used to keep the seed sandwich upright.
- Label the backs of all six seed sandwiches 1, 2, 3, 4, 5, and 6 with a permanent marker (or tape and a pen). Mark the four edges on the front side of each sandwich: Up, Down, Left, and Right.
-
Using the modeling clay to hold them in place, set two sandwiches (#1 and #2) upright, each in
their own shallow pie plate, with Up on the top edge.
- If you are using the plastic sheet or the baggie, you can keep the seed sandwiches upright by pinning them or taping them to a vertical surface, which will be discussed below.
- Place two different sandwiches (#3 and #4) horizontally (flat) in two more shallow pie plates. These sandwiches lie flat so that the rootlets cannot grow in the direction of gravity. You may want to use modeling clay under the sandwiches to lift them off the surface of the pie plate, allowing water that you'll be adding and that might drip into the pie plate to dry.
- The final two seed sandwiches (#5 and #6) should set vertically in the modeling clay on two more pie plates, upright with the label "Up" at the top. You will rotate these sandwiches 90 degrees clockwise every 2 days to see how this changes the direction of the root growth. Keep careful records of when you rotate these seed sandwiches #5 and #6.
-
Put all of your seed sandwiches inside a dark closet or large, light-proof cardboard box where they will not be disturbed. This prevents the effect of light on developing plants from interfering with your observations on the effect of gravity on plants.
- If you are using plastic sheets or baggies, pin or tape them to the inside of the cardboard box or a vertical wall in the closet where they will not be disturbed.
- Check the seed sandwiches once a day. Keep the seeds moist by carefully opening the CD cases and using the eyedropper or squirt bottle to slowly and carefully add a little water to each seed sandwich, if necessary, each day. Be careful not to dislodge the seeds.
- Watch for the seeds to germinate and the rootlets to start growing. If you are using radish seeds, about half of the seeds may have sprouted two days after you set up the experiment.
-
Observe how the rootlets grow under the different conditions.
- Measure and record the length of root growth for each seedling daily in your lab notebook. If the root is straight you can measure with a ruler. If the root bends or curves, use a piece of string to follow the root as shown in Figure 3 below. Cut the string at the root tip and measure the length of the string. Record the total string length as the root length.
- Optional: You could also record the angle of growth daily with a protractor. Use the direction directly toward the bottom edge, "down," as zero degrees; to the left as 90 degrees; directly up as 180 degrees; and to the right as 270 degrees.
- If you have questions about measuring root length or angle see the FAQ for additional explanations and photographs.
/-/https/www.sciencebuddies.org/cdn/Files/3200/5/PlantBio_img062.jpg)
Figure 3. How to measure a radish's seed root length using string.
-
To calculate the length of a curving root like this one, overlay the root with a piece of string and then measure the string. The black line
in the photo shows where you would overlay the string. If you are using radish seeds, about one
week after you started the experiment may be a good time to stop it and analyze your data. Graph the
root length (and angle if you chose to measure this) over time. Did they grow faster when growing in
the direction of gravity vs. growing horizontally? How quickly did the growing root tips respond to
the change in the direction of gravity in sandwiches 5 and 6? Did they grow faster when growing in the
direction of gravity vs. growing horizontally? How quickly did the growing root tips respond to the
change in the direction of gravity in sandwiches 5 and 6?
- Either use graph paper, an spreadsheet program like Excel, or an online graphing program like Create a Graph to make your graphs.
- Repeat the entire experiment, with fresh materials, at least two more times. Label the sandwiches for the second trial 7-12 and for the third trial 13-18. Space out the start of each trial by a few days.
- Combing the data from all three trials into a single table. Graph the root length (and angle if you chose to measure this) over time. Did they grow faster when growing in the direction of gravity vs. growing horizontally? How quickly did the growing root tips respond to the change in the direction of gravity?
Troubleshooting
For troubleshooting tips, please read our FAQ: How Do Roots Grow When the Direction of Gravity Changes?.
Ask an Expert
Global Goals
The United Nations Sustainable Development Goals (UNSDGs) are a blueprint to achieve a better and more sustainable future for all.
/-/https/www.sciencebuddies.org/cdn/Files/19758/6/E-WEB-Goal-15.png)
Variations
- Investigate how rotating the seeds 180 degrees for various times affects root-tip growth. Make five sandwiches with germinated roots. Keep #1 vertical for the length of the experiment. Rotate plates #2–#5 by 180 degrees (so that the root tips are pointing up) for various periods of time each day. During this trial time, the direction of gravity relative to the direction of root-tip growth is reversed. After this period of "upside-down" growth, rotate the panes again so that the root tips are once more pointing downward. Try this for several different time intervals. For example, 10 minutes, 1 hour, and 6 hours per day.
- Make a seed sandwich in which the seeds are germinated while held at a 45-degree angle to the vertical. Use four plastic triangles, 90° x 45° x 45°, and the modeling clay to hold the seeds at 45 degrees. Question: does reducing the angle from 90 degrees increase the "scatter" in the data for the direction of growth? Why or why not? Try other angles and graph the scatter for each angle. A simple measure of scatter might be the number of roots growing at 30 degrees or more, away from the vertical.
-
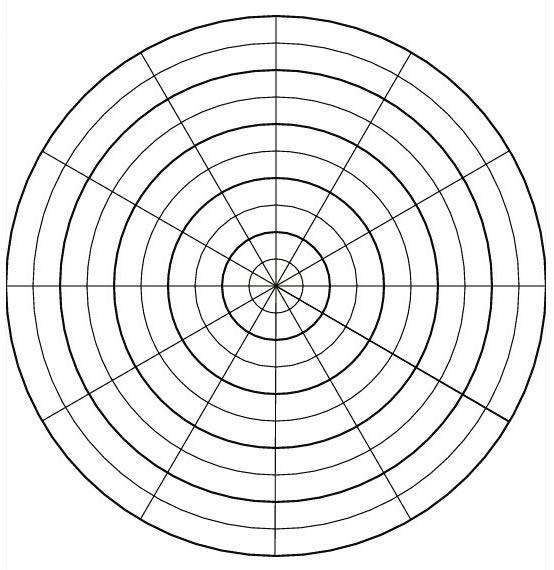
Graph the results of your experiments on polar graph paper. (You can download polar graph paper). Figure 4 below shows the length and direction for three roots, taken at three different times. What trends do your graphs demonstrate?
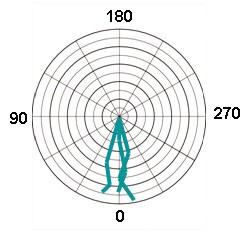
Figure 4. Polar graph of rootlet growth. (Drawing by David Whyte, 2008). - Perform the experiment so that one set of seeds is protected from light and the other is exposed to light. Does the light affect your results?
- You might try to use a scanner to record the positions of the root hairs. Be very careful not to break the glass or cause any water damage to the scanner.
/-/https/www.sciencebuddies.org/cdn/Files/3201/5/PlantBio_img024.jpg)
Frequently Asked Questions (FAQ)
Here are some tips to help you tell the root from the shoot when a seed begins to germinate:
- The root is the first part of the seedling to come out of the seed. The root will be whitish in color and thread-like. See Figure 1.

Figure 1. The root is the first part of the seedling to come out of the seed. - The root will grow down, towards the ground, if nothing gets in its way. However, if roots are not allowed to grow downwards (like in the sandwiches that are horizontal, lying flat), then this tip is not applicable.
/-/https/www.sciencebuddies.org/cdn/Files/5049/6/FAQ_PlantBio_p034-1.jpg)
Here are some tips to tell the difference between the root and the shoot once the seedling is a little older.
- The shoot is the second part of the seedling to come out of the seed, and it will grow upwards (when not obstructed). (If the lightproof box is not completely lightproof, the shoot will also grow towards the light.) The seed coat will remain on the end of the shoot as it grows for a while, until leaves emerge.
- As the seedling grows, the shoot (which includes the stem) will be thicker than the root. There may be a point on the seedling where this change in thickness is very clear; this should be where the root and shoot meet. See Figure 2.
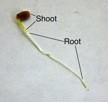
Figure 2. The differences between the root and the shoot - The shoot, but not the root, will develop tiny leaves. See Figure 2.
/-/https/www.sciencebuddies.org/cdn/Files/5050/6/FAQ_PlantBio_p034-2.jpg)
/-/https/www.sciencebuddies.org/cdn/Files/5051/5/FAQ_PlantBio_p034-3.jpg) Figure 3. Two seedlings with directions (up, down, left, right) labeled. |
/-/https/www.sciencebuddies.org/cdn/Files/5052/5/FAQ_PlantBio_p034-4.jpg) Figure 4. A protractor that shows 360 degrees. |
- If you are measuring an angle that goes left, and your protractor only has 180 degrees, turn the protractor so that 0 degrees pointing "down" and 90 degrees at the "left."
- If you are measuring an angle that goes right, and your protractor only has 180 degrees, turn the protractor so that 0 degrees is pointing "up" and 90 degrees is at the "right," measure your angle, and add 180 degrees.
- If the root is too short to reach the markings on the protractor, use your ruler to follow the root line until it hits the protractor, and then read off the angle measurement.
- If you have a short, straight root, then measure the angle from the top of the root to the tip of the root. See Figure 5.
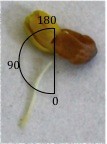
Figure 5. Simple root measurement - If you have one turn in the root (and it may only be a minor turn), then measure from after that turn to the tip of the root. See Figure 6.
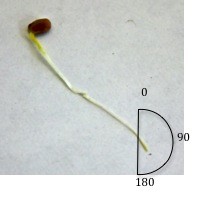
Figure 6. Angle measurement with one turn - If your root winds back and forth, start at the tip and follow the root until it begins to turn and is no longer straight. Measure the angle from the beginning of the turn to the tip of the root. See Figure 7.
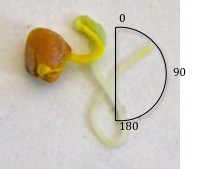
Figure 7. Angle measurement for turning root - The main root may have small, thread-like growths, called secondary roots, coming off of it. When measuring the root, make sure to measure the main root, not one of the secondary roots.
/-/https/www.sciencebuddies.org/cdn/Files/5053/6/FAQ_PlantBio_p034-5.jpg)
/-/https/www.sciencebuddies.org/cdn/Files/5054/5/FAQ_PlantBio_p034-6.jpg)
/-/https/www.sciencebuddies.org/cdn/Files/5055/5/FAQ_PlantBio_p034-7.jpg)
The most important thing is that you are consistent in how you measure root angles. Measure similar roots the same way, and make notes in your lab notebook about how you measure the angles.
-
If the root is straight you can simply use your ruler to measure the root from the beginning to the tip. See Figure 8.

Figure 8. Simple length measurement
- If your root turns, you have a few options for measuring the length of the root.
- Use a string to follow the root from beginning to end, making sure to follow all the turns in the root. Cut the string at the tip of the root and measure the length of the string. See Figure 9.
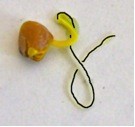
Figure 9. Length measurement using string
Alternatively, you could use a ruler to measure the length of the root until it starts turning. Then measure from the point you left off, continuing down the root until it turns again. Continue this pattern until you reach the tip of the root, and then add the measurements to get a total root length. See Figure 10.
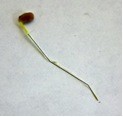
Figure 10. Length measurement using segments
Again, it is important to be consistent in how you measure root length. In your lab notebook, write down your procedure for measuring root length. - Use a string to follow the root from beginning to end, making sure to follow all the turns in the root. Cut the string at the tip of the root and measure the length of the string. See Figure 9.
/-/https/www.sciencebuddies.org/cdn/Files/5056/5/FAQ_PlantBio_p034-8.jpg)
/-/https/www.sciencebuddies.org/cdn/Files/5057/5/FAQ_PlantBio_p034-9.jpg)
/-/https/www.sciencebuddies.org/cdn/Files/5058/5/FAQ_PlantBio_p034-10.jpg)
If just one or two of your seeds are not sprouting, then there is no need to worry. It is actually quite common for a few seeds to not germinate. Use your lab notebook to record which seeds do not germinate.
If it has been long enough that the seeds should have germinated, but most of the seeds have not sprouted yet, wait a couple of days more. If they still have not sprouted, it may be that the seeds cannot grow under the conditions you have them in or that some of the seeds have not been handled well. Whatever the case is, make sure you make notes about it in your lab notebook so you can look back and determine what may have caused the problem. If none of the seeds have sprouted after a week, you may need to buy new seeds.
If you have two roots but it does not look like either of them are secondary roots; that is, they both look like main roots, you may actually have two seeds instead of one. Check the seeds closely to see if you have two seeds that may have stuck together when you put them in the case. If you do have two seeds, randomly remove one of the seeds by flipping a coin to pick which seed you remove.
For your next test, try this: make sure your seeds are far away from the edges of the case (try to place them all near the center), do not make the blotting paper too damp, and use a single layer of paper towel if you are using multiple layers of paper towels now. If the roots still run into the bottom of the CD case, you can start over with slower growing plants or run the project for fewer days.
Ask an Expert
Careers
If you like this project, you might enjoy exploring these related careers:
/-/https/careerdiscovery.sciencebuddies.org/cdn/Files/1662/17/unsplash-oz1NzV2xWXU.jpg)
/-/https/careerdiscovery.sciencebuddies.org/cdn/Files/860/17/pexels-photo-5230966.jpg)

/-/https/img.youtube.com/vi/rbhzoCb0xWM/0.jpg)
/-/https/img.youtube.com/vi/Eg4KbgAoA0o/0.jpg)
/-/https/img.youtube.com/vi/QLcmEqBayr0/0.jpg)