Abstract
What do an octopus, an elephant's trunk, and an earthworm have in common? They are all squishy, bendable and flexible because they do not have any bones inside. You might not typically think of robots as "squishy," but scientists are increasingly trying to create soft robots that look and move like animals. In this project you will use a "soft robot simulator" to design and race your own squishy robots. Can you come up with the fastest design?Summary
Ben Finio, Ph.D., Science Buddies
VoxCAD is open-source software originally developed by Jonathan Hiller in the Creative Machines Lab.
- Windows is a registered trademark of Microsoft Corporation.
Objective
Use simulation software to design, simulate, and race different squishy robots.
Introduction
Do you ever wonder how engineers design large, complicated systems like cars, bridges, airplanes, or robots? Building and testing designs for such objects can be very expensive — and potentially highly dangerous or even catastrophic if something goes wrong. Since the invention of computers, engineers have increasingly used simulations to test their ideas. A simulation is a model of a real-world object that uses mathematics and physics to predict how something will behave over time. There are many types of computer simulations (more than we can list here — see the References section for more). To give a few examples engineers use:
- Simulations of bridges to determine what forces heavy traffic will exert on the steel beams or other elements of the bridge, to make sure it is strong enough.
- Simulations of air flow inside a computer from the cooling fans, to make sure the components will not overheat.
- Simulations to predict how machines will move — for example, walking robots, which is what you will do in this project.
Engineers use these simulations to compare and refine their designs before they move on to building and testing a physical prototype — an early model of the finished product.
One type of frequently used simulation is called finite element analysis, or FEA for short. A finite element simulation breaks an object into tiny bits, or "elements" — this enables a computer to simulate an object as if it were made up of many (hundreds, thousands, or even millions) of tiny connected blocks. For example, Figure 1 shows a solid beam that has been broken up into a grid of cubes to study the weak areas when the beam bends.
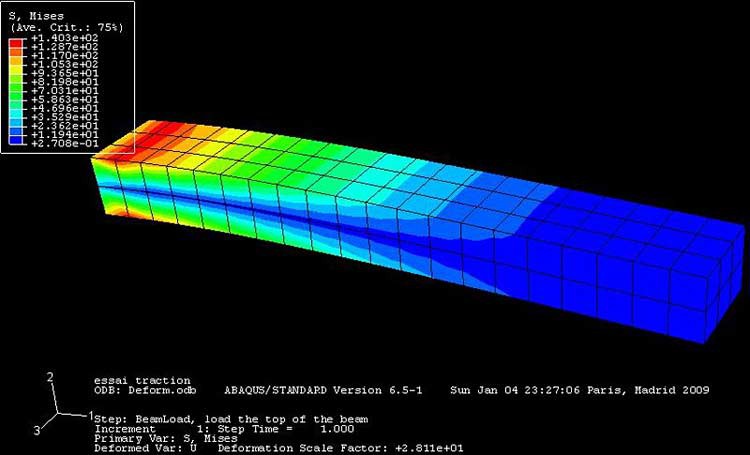 Image Credit: Wikimedia Commons / Creative Commons Attribution-Share Alike 3.0 Unported
A rectangular prism bent at one end is shown in a program that colors the prism based on which areas are experiencing the most force. The outside faces at the end of the beam are colored red due to high stress in that area when the beam is bent. As the bending and stress decrease further away from the end of the beam, the color of the beam also changes from red to orange, yellow, green and finally blue in the areas where there are almost no stress at the center of the beam.
Figure 1. A finite element model of a rectangular beam as it bends. The colors represent the internal forces in the beam (engineers refer to this as "stress"). The red represents areas of high stress where the beam is most likely to break (Wikimedia Commons user abaqus, 2009).
As the elements get smaller, it will take more of them to make up the same-sized object — for example, in a 1 meter (m) cube, you can fit many more 1 millimeter (mm) cubes than 1 centimeter (cm) cubes. In general, as the number of elements increases, the simulation will become more accurate — but it will also require more computing power and take longer to run. Figure 2 shows how the simulation of a car crash would be much more complicated than the simple rectangular beam simulation shown in Figure 1.
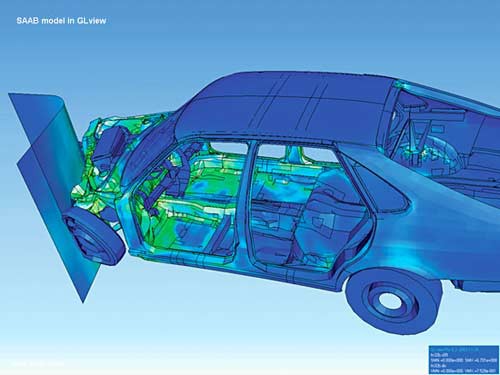 Image Credit: Wikimedia Commons / Public domain
Figure 2. A finite element simulation of a car crashing into a wall. Simulations like these help engineers design cars to be stronger and safer for passengers. Unlike the simple simulation in Figure 1, this one is much larger and more complicated (Wikimedia Commons user Maksim, 2006).
In this project you will use a program called VoxCAD to design and simulate your own moving robots, with the objective of designing the fastest robot possible. VoxCAD is a combination of the words voxel and CAD. Voxel stands for volumetric pixel — instead of a two-dimensional pixel on a computer screen, it is a three-dimensional pixel in a computer model. CAD stands for computer aided design — the use of a computer program to aid in the design process. VoxCAD is an open source program, which means that it is free to download, use, or modify.
VoxCAD has simple drawing tools (similar to programs like Microsoft Paint®) that let you draw three-dimensional objects consisting of voxels. You can also assign different material properties to the voxels. Material properties are the physical attributes of a material that determine how it behaves. Several material properties are crucial for how your robot will behave in VoxCAD:
- Stiffness is how hard it is to stretch or bend a material. For example, metals like steel and aluminum are much stiffer than rubbers and plastics.
- Density is the weight of a material per unit volume.
- The coefficient of thermal expansion refers to how much a material expands or contracts as its temperature changes.
Note: Because this project is intended as an introduction to VoxCAD, we will provide a file that you can download with pre-determined settings that you can use to do this project. If you want to learn more about material properties and how changing them can affect your robot, you can check out this advanced VoxCAD project.
By creating three-dimensional objects with different materials, you can make all sorts of fun shapes and many different kinds of robots. This video will give you an introduction to what you will do with VoxCAD in this project.
In the Procedure section, you will get started with step-by-step directions for using VoxCAD and designing your own robots.
Terms and Concepts
- Simulation
- Model
- Prototype
- Finite element analysis
- Voxel
- Computer aided design (CAD)
- Open source
- Material properties
- Stiffness
- Density
- Coefficient of thermal expansion
Questions
- Why do engineers use computer simulations? Can you find more examples than those listed in the Introduction?
- Search for images on Google using the phrase "finite element analysis." For what kinds of things do engineers use finite element analysis?
- Can you make a list of other material properties? Which ones do you think will matter for this project?
Bibliography
- Hiller, J. (n.d.). VoxCAD. Retrieved December 20, 2016.
- Hiller, J. (April 27, 2011). VoxCAD Tutorial 1: Intro. YouTube. Retrieved December 20, 2016.
- Wikipedia contributors. (2013, March 12). Voxel. Retrieved March 22, 2013.
- Wikipedia contributors. (2013, April 8). Simulation. Retrieved April 11, 2013.
Materials and Equipment
- Computer running Microsoft® Windows®
- VoxCAD software, available for free download from https://sourceforge.net/projects/voxcad/
- (Recommended): Computer mouse with scroll wheel. VoxCAD was designed for use with a scroll-wheel mouse for zooming in and out. Future versions of VoxCAD may include support for laptops with touchpads, but a scroll wheel is recommended.
- Note: This project was written in July 2013 using VoxCAD version 0.9.9. New versions of VoxCAD may become available in the future, and may be slightly different from what you see in the screenshots and videos in this project.
Disclaimer: Science Buddies participates in affiliate programs with Home Science Tools, Amazon.com, Carolina Biological, and Jameco Electronics. Proceeds from the affiliate programs help support Science Buddies, a 501(c)(3) public charity, and keep our resources free for everyone. Our top priority is student learning. If you have any comments (positive or negative) related to purchases you've made for science projects from recommendations on our site, please let us know. Write to us at scibuddy@sciencebuddies.org.
Experimental Procedure
Setup
- Download and install VoxCAD from https://sourceforge.net/projects/voxcad/ by clicking the "Download VoxCAD" link. Save the installation file to your computer, then double-click it to begin the installation and follow the on-screen instructions.
- Download our template file, VoxCAD-Starter-Settings, and save it to your computer (do not try to open the file directly — you need to import it into VoxCAD, as described in Step 4). We recommend creating a new folder on your computer where you will save all your work for this project. Depending on your internet browser and operating system, you may need to right-click the link for the file and select "Save link as..." in order to download it.
- Open VoxCAD from the desktop icon or your computer's start menu. You should see a screen with a blank model, as in Figure 3.
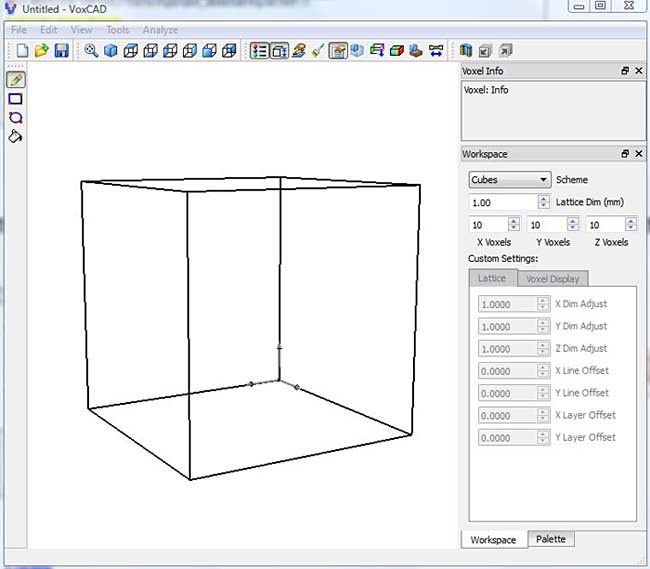 Image Credit: Ben Finio, Science Buddies / Science Buddies
Screenshot of the opening screen in the VoxCAD program shows the outline of a cube visible in the display area on the left side of the program and a sidebar with dimensions listed on the right side of the program.
Figure 3. The opening screen in VoxCAD.
- Import the template file. Do this by selecting File → Import → Simulation. Then navigate to the folder where you saved VoxCAD-Starter-Settings.vxa, select it, and press Open.
-
Click on the Palette tab in the bottom right of the screen. Your VoxCAD window should now look like Figure 4. Notice how different materials are now listed on the right side of the screen. We will explain more about those later.
Note that you cannot just Open the template file. The Open option opens a physical object made of voxels, but not the settings needed for the simulation of how it moves. The Import option includes both the physical model and the simulation settings like friction and gravity.
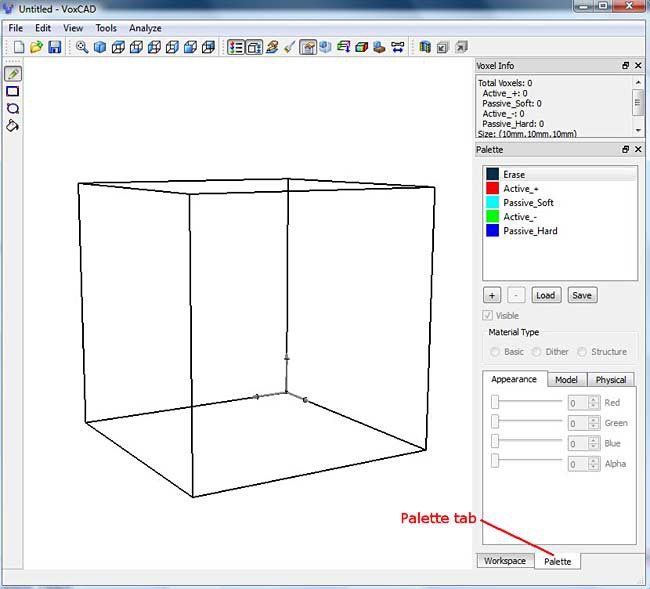 Image Credit: Ben Finio, Science Buddies / Science Buddies
Screenshot of the VoxCAD program shows the outline of a cube visible in the display area on the left side of the program and a palette tab located at the bottom-right of the program underneath a sidebar. The sidebar contains palette options for the cube in the display area and voxel information near the top.
Figure 4. The template file opened in VoxCAD. If you click the Palette tab (lower right), you should see five materials (shown with colored squares next to them) called Erase, Active_+, Passive_Soft, Active_-, and Passive_Hard listed on the middle right side of the screen.
Learning to Create Objects
The first thing you will need to do is learn to create a physical object in VoxCAD.
- Click the Edit Voxels button, the one with the hand and pencil in the toolbar at the top of the screen, as seen in Figure 5.
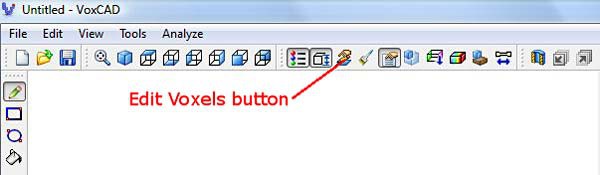 Image Credit: Ben Finio, Science Buddies / Science Buddies
Screenshot of the program VoxCAD shows an edit voxel mode that can be toggled by pressing an icon with a pencil in it. The icon is in the row of tools at the top of the program slightly to the right of the center of the toolbar.
Figure 5. The Edit Voxels button.
This will bring you into a two-dimensional drawing mode, one very similar to programs like Microsoft Paint. You will use several basic functions in this mode. Each item in this list is also labeled in Figure 6.
- The Drawing Tools on the left column enable you to select different options for drawing, including pencil, rectangle, circle, and bucket fill options. You can hover your mouse pointer over each icon and pop-up text will display the icon's name.
- The View Menu lets you select top, bottom, front, back, left, and right views of your model. This enables you to draw in different planes.
- The Layer Forward and Backward buttons let you scroll between layers. You can only draw in one layer at a time.
- The Materials Palette lets you select different materials. The template we have provided has four materials as well as an "erase" material, which you can use to erase voxels in your model.
- The 3D view window gives you a preview of your three-dimensional model while you are drawing in two dimensions. The translucent gray plane shows the current plane you are viewing. While your mouse cursor is inside the 3D view window, you can scroll the mouse wheel to zoom in and out, and click and hold the mouse wheel while moving the mouse to rotate your view. The 3D view window opens automatically when you enter Edit Voxels mode. If you accidentally close it, you can re-open it by selecting View → Reference View from the top menu bar.
 Image Credit: Ben Finio, Science Buddies / Science Buddies
Screenshot of the program VoxCAD shows an edit voxel mode where a drawing area appears on the left side of the program window. At the top-left there icons for drawing tools. Different views of the model and different layers can be selected through icons on the top navigate bar. Materials can be selected from the palette tab on the right side of the program. A small pop-up window contains a 3-D image of the outline of a cube, scrolling the mouse wheel will zoom into the image and clicking and dragging will allow the image to rotate.
Figure 6. The different features available in Edit Voxels mode.
- Experiment with the drawing tools. Take your time getting used to the program — there is no rush, and you can always erase what you drew and start over. Start out by drawing a two-dimensional shape in one plane. Can you draw a smiley face similar to the one shown in Figure 7?
 Image Credit: Ben Finio, Science Buddies / Science Buddies
Screenshot of the program VoxCAD shows a happy face in the drawing area using colored squares on a grid. The face shape is made of red colored squares while the eyes and mouth are made of blue colored squares. Palette and appearance options are adjustable in the sidebar on the right-side of the program.
Figure 7. A two-dimensional smiley face created in Edit Voxels mode.
- It is a good idea to save your work periodically. Important: To save your model, select File → Export → Simulation, and rename the file. Like the Open option, the Save option will only save your drawing, and not the simulation settings, which you will need later. Always remember to use Import and Export Simulation to save and open your files for this project.
- Once you are comfortable creating a two-dimensional drawing, try creating a simple three-dimensional object (Note: Make sure to export your new 3D object with a different file name, so you do not overwrite your 2D drawing). Now you will need to use the Layer Forward and Backward buttons to draw in different layers. Remember that you can also use the View buttons to look at your model from different directions. Can you create a simple 3D shape, like the pyramid shown in Figure 8? When you have finished drawing, click the Edit Voxels button again to return to full 3D-view mode.
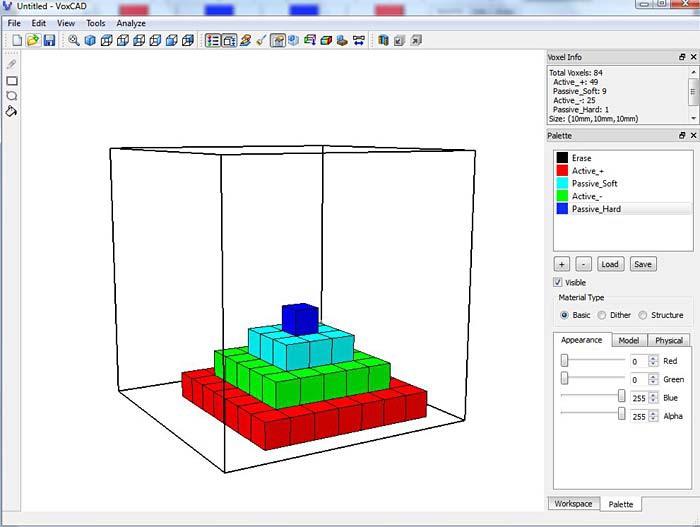 Image Credit: Ben Finio, Science Buddies / Science Buddies
Screenshot of the program VoxCAD shows a multi-colored pyramid made using colored blocks within a cube. The base layer is red, the next layer is green, the next layer is blue and the final layer is dark blue. Palette and appearance options are adjustable in the sidebar on the right-side of the program.
Figure 8. A 3D pyramid created in multiple layers in Edit Voxels mode.
- Make sure you export your 3D object with a new file name before moving on. You can continue to play with the Edit Voxels mode to create different shapes until you are comfortable using VoxCAD.
Editing the Workspace
You might have noticed that this model seems smaller than the one shown in the video in the Introduction. How are you supposed to fit more than one robot in that tiny box? You can fix that by making the workspace bigger.
- Click on the Workspace tab at the bottom right. It is next to the Palette tab. (See Figure 9.)
- In the Workspace tab, you can change the values for width, depth, and height (X, Y, and Z) of your model. The default is 10x10x10 voxels, but you can make this bigger. Change the X and Y values to 30 each. This should give you plenty of space to create multiple robots. Now that you have more space, can you create a larger, more complicated 3D model?
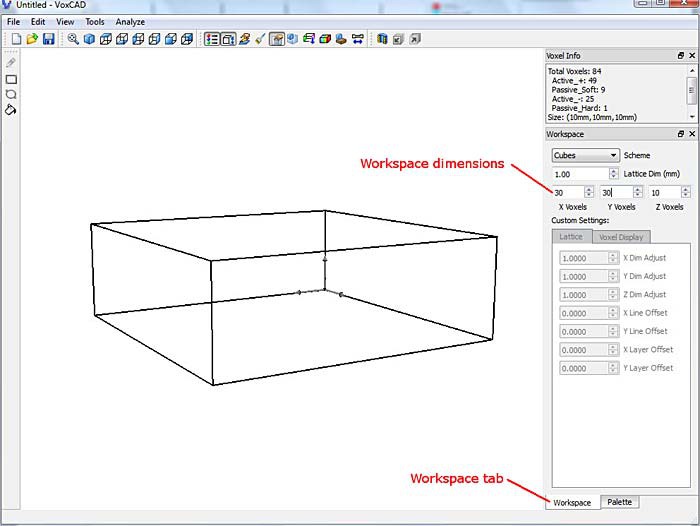 Image Credit: Ben Finio, Science Buddies / Science Buddies
Screenshot of the program VoxCAD shows a workspace tab located at the bottom-right of the program. Dimensions for the outline of a rectangular prism are visible in the workspace tab in the sidebar on the right-side of the program.
Figure 9. The Workspace tab enables you to change the X, Y, and Z dimensions of your workspace. Making it bigger means you can create larger models or include multiple robots in a single simulation.
Using the Physics Sandbox
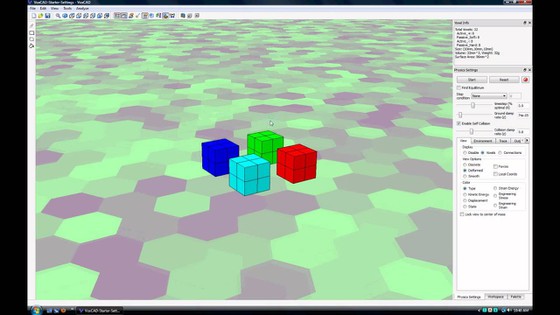
The Physics Sandbox mode simulates the motion of the model you have created. You will use the Physics Sandbox to "race" your different robot designs against each other.
- Create a simple three-dimensional model in Edit Voxels mode. Make sure you use all four materials. Remember:
- The red and green materials expand and contract, out of sync with each other. These voxels act like "muscles" — they are active.
- The blue materials are passive — they do not expand and contract. The dark blue material is hard, and the light blue material is soft.
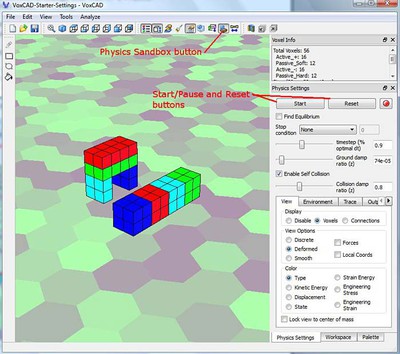
- When you are ready, click on the Physics Sandbox button, which shows a blue cube above a brown rectangle, in the top toolbar (see Figure 10). This will activate Physics Sandbox mode, so your model should start moving immediately. You can use the buttons on the right to start/stop and reset your simulation (see Figure 10). You can use the same mouse controls to change your view in Physics Sandbox mode as you do in 3D view mode:
- Scroll the mouse wheel to zoom.
- Click and hold the middle mouse button while moving the mouse to rotate your view.
- Click and hold the ctrl button and the middle mouse button while moving the mouse to pan the view.
- Note to laptop users: If you are using a laptop with a touchpad, you will need to look up directions for how to click the middle mouse button. For example, on some laptops you click the left and right button at the same time, and this acts as the middle button. This feature will not be the same on all laptops, so you will need to look up directions for your model.
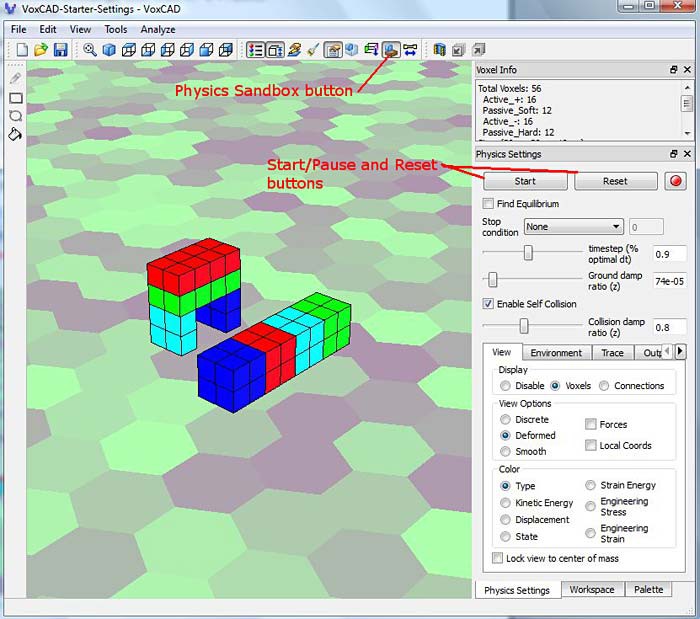 Image Credit: Ben Finio, Science Buddies / Science Buddies
Screenshot of a physics sandbox in the program VoxCAD. A menu where physics settings can be changed is found at the bottom-right of the program. In the display area there are two shapes made of different colored blocks, the left is an arch and the right is a rectangular prism.
Figure 10. Access Physics Sandbox mode by clicking the Physics Sandbox button in the toolbar. Use the buttons on the right to start/stop and reset the simulation. This figure shows two example robot designs.
- Do not change any of the settings on the right-hand side of your screen in Physics Sandbox mode just yet. Changing these settings can drastically alter your simulation and possibly cause it to crash. We have set up these values so your simulation should work reasonably well. If you want to learn more about what these settings mean and what changing them will do, check out this advanced VoxCAD project.
- Now it is time to start really experimenting with VoxCAD. By switching back and forth between Edit Voxels mode and Physics Sandbox mode, you can design different objects and then see how they move. Play around to get a sense of how different combinations of materials result in different types of motion.
Racing Robots
Once you are comfortable using Edit Voxels and Physics Sandbox modes, you are ready to start designing and racing robots.
- Try to design an object that makes forward progress when it moves. If you need inspiration, you can go back and watch the end of our Introduction video. You have many possible ways to make something move: rolling, bouncing, using legs, inchworm, or snake motions. Can you think of more?
- Use the Physics Sandbox mode to make sure that your design moves forward. If it just bounces in place or does not move at all, go back to Edit Voxels mode, modify your design, and try again.
- Once you have one successful design, create a second robot that is not connected to the first one (similar to those in Figure 10). Try to design it so that it will move in the same direction as your first design. You have a choice to make with your second design:
- Create a design that is completely different from your first robot (for example, compare a robot with legs versus a bouncing robot).
- Create a design that is very similar to the first one, but with small modifications (for example, a walking robot with legs that are two voxels long, and one with legs that are three voxels long).
This choice is up to you and may depend on how much time you have to do your project. If you have plenty of time, you can create multiple versions of different robots and race them all. If you do not have much time, you may only want to create two or three variations of a central design, so you are not trying to test too many different things.
- Once you have two separate designs, access Physics Sandbox mode and determine which design moves faster. Remember to design your robots so they move in the same direction — otherwise it will be difficult to tell which one is winning the race.
- Continue to experiment, modifying your existing designs and, if you have time, creating new ones. Remember, your goal is to create the fastest robot possible. What changes can you include to make your robots go faster? Do certain types of robots always appear to move faster than others?
- Keep going until you cannot make any of your designs go any faster. What is your fastest design? How does it move? Is it much faster than all your other designs, or is it a close race?
- If you finish this project but want to do more with VoxCAD, check out the Variations section for some advanced projects and other ideas. And of course, remember to have fun!
- If you want to make videos of your creations like the ones you saw in this project, try searching for a free screen-capture program (be careful to avoid malware when downloading and installing free programs). Note: Future versions of VoxCAD may include a built-in screen capture function in Physics Sandbox mode. This option was not fully functional when Science Buddies created this tutorial, so we did not include directions to use it.
Ask an Expert
Global Connections
The United Nations Sustainable Development Goals (UNSDGs) are a blueprint to achieve a better and more sustainable future for all.

Variations
- This project provided you with a template file with pre-determined settings for the material properties and Physics Sandbox settings. If you want to learn more about what these settings do and how to change them, check out these two abbreviated project ideas:
- In the real world, engineers do not just care about how fast things can move — they also care about efficiency. You might have a very fast robot that uses a lot of active voxels, which in real life would consume a lot of energy and not be very efficient. Check out this project if you want to challenge yourself to design the lightest, most efficient robot instead of the fastest.
- Do you actually want to build a real-world squishy robot? Check out the Science Buddies project Squishy Robots: Build an Air-Powered Soft Robotic Gripper.
Careers
If you like this project, you might enjoy exploring these related careers: