Abstract
If you had to choose between having your favorite dessert, going to a movie, or spending the night at a friend's house, which would you choose? This science project shows you how you can "ask" a sowbug (or pillbug) a similar question in order to learn about their preferences. Give it a try to find out what types of microenvironments these tiny crustaceans prefer.
Summary
None
If you do not have sowbugs or pillbugs available locally, they will need to be specially ordered. See the Materials and Equipment section for details.
Adult supervision is recommended for using the utility knife.
Sources
This project is based on:
- Lent, G.J. (2004). The Sowbug's Dilemma: Shelter, Shade, or Swamp? California State Science Fair Abstract.
- Burnette, R., 1999. The Pillbug Project: A Guide to Investigation., NSTA Press, Arlington, VA.
/-/https/www.sciencebuddies.org/cdn/Files/2218/8/Zoo_img014.jpg)
Objective
To investigate what types of microenvironments are preferred by sowbugs (or pillbugs).
Introduction
You can often find sowbugs and pillbugs in damp, dark places, like the soil under rocks or decaying wood. Do you think that they are insects? Think again! Unlike insects, they have seven pairs of legs (insects have three pairs). Sowbugs and pillbugs are both crustaceans (specifically a type called isopods). Other crustaceans include shrimp, lobsters, and crabs. This means that sowbugs and pillbugs are more closely related to lobsters and shrimp than to insects like bees and ants. Crustaceans belong to a larger group of animals, called the arthropods, which includes insects, spiders, and others.
Sowbugs and pillbugs, which are also called woodlice, look fairly similar to each other. Pillbugs are commonly known as "roly-polies" for their defensive behavior of rolling up into an armored ball. Sowbugs do not roll themselves up, and also have a pair of tail-like structures on the last segment of the body. The pictures below (Figures 1 and 2) show examples of each type of "bug."
/-/https/www.sciencebuddies.org/cdn/Files/2218/8/Zoo_img014.jpg)
Figure 1. Photograph of a sowbug (Ames, 2005).
/-/https/www.sciencebuddies.org/cdn/Files/2219/8/Zoo_img015.jpg)
Figure 2. Photograph of a pillbug (Eigelsreiter, 2006).
Unlike insects, sowbugs and pillbugs breathe with gills, so they need moisture in order to breathe. But these tiny crustaceans have still had very successful lives on land, as there are now about 5,000 known species of pillbugs and sowbugs, living just about anywhere from beaches to deserts. Wherever they go, sowbugs and pillbugs eat decaying material, like plants and even dead animals, and through this process help recycle nutrients in the soil.
In this zoology science project, you will observe how these bugs behave in an experimental habitat that you construct in order to learn about their preferred microenvironments, or small-scale environments. Your habitat will be divided into two compartments that each have a different microenvironment, e.g., dry soil, damp soil, leaf litter, wood pieces, etc. Which microenvironment do you think they will prefer and spend the most time in?
Terms and Concepts
- Crustacean
- Gills
- Habitat
- Microenvironments
Questions
- How do sowbugs and pillbugs breathe?
- Are sowbugs and pillbugs insects?
- What do sowbugs and pillbugs eat?
Bibliography
Here are some sources to get you started on researching isopods:
- Schimming, L. (May 2, 2013). Suborder Oniscidea - Woodlice. Iowa State University, Department of Entomology. Retrieved February 17, 2014.
- Nendick-Mason, H. (October 6, 2005). Species Oniscus asellus - European Sowbug. Iowa State University. Department of Entomology. Retrieved February 17, 2014.
- Rowland, T. (August 27, 2013). Common Crustaceans: Pillbugs and Sowbugs. Biology Bytes. Retrieved February 17, 2014.
For photographs, check out these webpages. Note: Sowbugs belong to the family Porcellionides while pillbugs belong to the family Armadillidiidae.
- BugGuide. (n.d.). Family Porcellionidae. Retrieved February 17, 2014.
- BugGuide. (n.d.). Family Armadillidiidae – Pillbugs. Retrieved February 17, 2014.
This book is a teacher's guide to using pillbugs in the classroom for science investigation:
- Burnette, R., 1999. The Pillbug Project: A Guide to Investigation., NSTA Press, Arlington, VA.
Materials and Equipment
- Sowbugs or pillbugs (at least 12). Be sure that all of them are either sowbugs or pillbugs.
- You can collect these yourself by looking under stones, decaying wood, old leaves, in gardens in the soil near plants, and along house foundations and basements.
- Alternatively, you can purchase them online from Carolina Biological, item # 143050.
- Clean, empty cardboard milk cartons or shallow plastic containers (2). If the plastic containers do not have flat sides that can touch each other, you will also want a cardboard tube, such as from a toilet paper or paper towel roll, to connect the containers. See the Procedure for details.
- Sharp utility knife
- Ruler, metric
- Scissors
- Tape
- Dry soil
- Spray bottle with water. Spray bottles are available from Carolina Biological, item # 665565.
- Timer, stopwatch, or clock
- Other materials for testing different microenvironments (pick at least 2):
- Leaf litter
- Small pieces of wood. Make sure they have not been treated with pesticides.
- Small rocks
- A different type of soil, such as sand
- Compost
- Lab notebook
/-/https/www.sciencebuddies.org/cdn/Files/5678/8/sowbugs_pillbugs_materials.jpg) |
| Figure 3. To do this science project, you will need materials like the ones shown here. One plastic container contains dry soil and the other holds sowbugs Note: You could use shallow, plastic containers instead of milk cartons. If you use round plastic containers, you will need a cardboard tube to connect them. |
Disclaimer: Science Buddies participates in affiliate programs with Home Science Tools®, Amazon.com, Carolina Biological, and Jameco Electronics. Proceeds from the affiliate programs help support Science Buddies, a 501(c)(3) public charity, and keep our resources free for everyone. Our top priority is student learning. If you have any comments (positive or negative) related to purchases you've made for science projects from recommendations on our site, please let us know. Write to us at [email protected].
Experimental Procedure
- Build your experimental habitat for testing sowbug (or pillbug) microenvironment preferences by connecting two cardboard milk cartons or two shallow plastic containers and cutting access holes between the two containers so that the bugs can pass from one container to the other.
- If you are using two milk cartons, do the following to build your habitat:
- Carefully use the utility knife and scissors to cut the tops of the milk cartons completely off about 8 centimeters (cm) (or higher) up from their bottoms. Have an adult help you use the utility knife to start cutting the cartons, and then continue cutting the cartons with the scissors. Discard the top parts of the cartons. You should be left with two square-shaped carton containers (with open tops), as shown in Figure 4, below.
Figure 4. Cut the tops off of each milk carton, about 8 cm up from the bottom.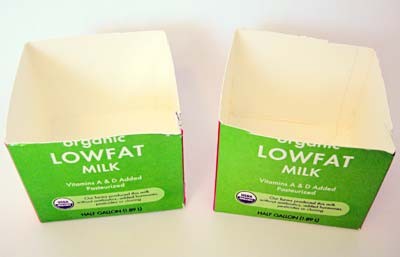
- About 2 cm up on each carton bottom, cut out rectangles that run the length of the side of the carton and that are about 3 to 4 cm tall, as shown in Figure 5, below These will be the access holes between the cartons, so make sure they line up well between the two carton bottoms.
Figure 5. Make access holes between the cartons about 2 cm up and running the length of the side of each carton.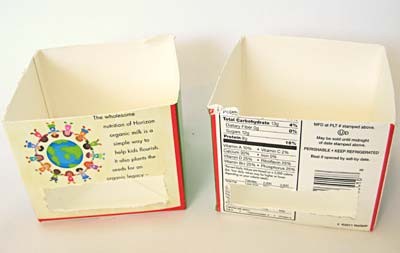
- Turn the carton bottoms so that their access holes line up and then tape the two cartons together, as shown in Figure 5, below. Make sure there are no gaps that any bugs could escape through.
Figure 6. Tape the two cartons together so that their access holes line up.
- Carefully use the utility knife and scissors to cut the tops of the milk cartons completely off about 8 centimeters (cm) (or higher) up from their bottoms. Have an adult help you use the utility knife to start cutting the cartons, and then continue cutting the cartons with the scissors. Discard the top parts of the cartons. You should be left with two square-shaped carton containers (with open tops), as shown in Figure 4, below.
- If you are using two shallow plastic containers that have flat sides, like the milk cartons, then connect them as described for the milk cartons in step 1.a., above (but skip step 1.a.i.). If the plastic containers do not have flat sides, but are round instead, then you will need to use a cardboard tube (such as from a toilet paper or paper towel roll) to connect them by doing the following:
- Carefully use the utility knife and scissors to cut out a circular hole about 2 cm up on each container, as shown in Figure 7, below. Make the hole have the same diameter as the cardboard tube. Have an adult help you use the utility knife to start cutting the containers, and then continue cutting the containers with the scissors.
Figure 7. Cut out a circular hole in the side of each round plastic container that is about 2 cm up from the bottom and the same diameter as the cardboard tube.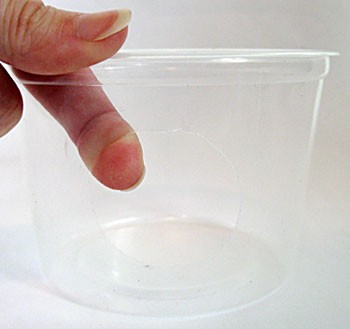
- Turn the containers so that their holes are facing each other and then connect the containers using the cardboard tube, as shown in Figure 8, below. Adjust the size of the holes if needed so that the tube snugly fits in them. Use the smallest segment of tube possible because you do not want the bugs spending much time in the tube.
Figure 8. Join the two round plastic containers using a short segment of cardboard tube.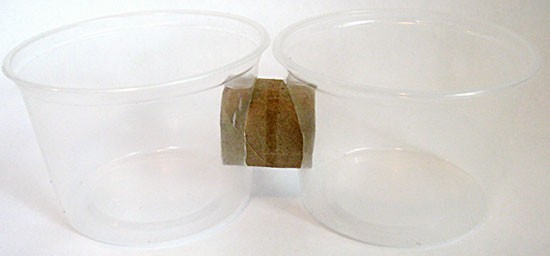
- Tape the two containers to the tube. Make sure there are no gaps anywhere that bugs could escape through.
- Carefully use the utility knife and scissors to cut out a circular hole about 2 cm up on each container, as shown in Figure 7, below. Make the hole have the same diameter as the cardboard tube. Have an adult help you use the utility knife to start cutting the containers, and then continue cutting the containers with the scissors.
- If you are using two milk cartons, do the following to build your habitat:
- In your lab notebook, make a data table like Table 1, below. You will record your results in this data table for the first two microenvironments you test.
/-/https/www.sciencebuddies.org/cdn/Files/5679/8/sowbugs_pillbugs_cartons_cut.jpg)
/-/https/www.sciencebuddies.org/cdn/Files/5680/8/sowbugs_pillbugs_cartons_holes.jpg)
/-/https/www.sciencebuddies.org/cdn/Files/5681/8/sowbugs_pillbugs_cartons_taped.jpg)
/-/https/www.sciencebuddies.org/cdn/Files/5682/8/sowbugs_pillbugs_plastic_hole.jpg)
/-/https/www.sciencebuddies.org/cdn/Files/5683/8/container_joined_cardboard.jpg)
| Microenvironment | ||
| Time (min) | Damp Soil | Dry Soil |
| 5 | ||
| 10 | ||
| 15 | ||
| 20 | ||
| 25 | ||
| 30 | ||
| 35 | ||
| 40 | ||
| 45 | ||
| 50 | ||
| 55 | ||
| 60 | ||
| 90 | ||
| 120 | ||
- Create separate microenvironments in each container to test the bugs' preferences. Start by testing a dry soil microenvironment in one container and a damp soil microenvironment in the other container, as shown in Figure 9, below.
- Use the same original dry soil for both microenvironments. Remove any large pieces of wood or rocks. Try not to get any soil up on the sides of the containers when you add it because the bugs may then be able to crawl up the sides.
- To create a dry soil microenvironment, fill one container with the dry soil until it just reaches the bottom of the access hole (or is about 2 cm deep). Smooth out the surface of the soil so it is flat and there are no crevices that bugs could crawl into.
- To create a damp soil microenvironment, fill the other container with the same amount of dry soil. Then use a spray bottle to spray the soil with water, mixing in the water as you spray the soil. Do this until the soil has a cookie dough consistency. As you did with the dry soil, smooth out the surface of the damp soil so it is flat and there are no crevices that bugs could crawl into, but do not press down hard on the soil because you do not want to compact it. Be sure not to get the dry soil damp while you prepare the damp soil.
- Release a dozen or more bugs into the containers (put an equal number in each container), and allow them to explore while you observe. Make sure to see whether any of the bugs dig down into the soil because they will be difficult to find later, and watch that none of the bugs climb out of the containers (if there is dirt on the sides of the containers they may be able to do this). Every five minutes for one hour, count the number of bugs in each container, and record the results in the data table in your lab notebook. Count them again at 90 minutes (min) and 120 min after releasing the bugs and record your results.
/-/https/www.sciencebuddies.org/cdn/Files/5684/8/sowbugs_pillbugs_soil_habitats.jpg)
Figure 9. This shows how to create the dry and damp soil microenvironments in either habitat setup you may have made, the top picture using milk cartons and the bottom picture using round plastic containers.
- Repeat steps 2–4 at least two more times to test a total of at least three pairs of microenvironments. Make a new data table for each pair you test. Change only one variable at a time.
- For example, you could next try dry soil and dry pieces of wood, or damp soil and damp pieces of wood.
- Some other microenvironment materials you could use include leaf litter, small rocks, a different type of soil (such as sand), and compost. You could also test preferences for light vs. darkness and potential food sources.
- Make one graph for each of the pairs of microenvironments you tested, making at least three separate graphs total. You can make your graphs by hand or use a program like Create a Graph to make your graphs on a computer and print them out.
- On each graph, put the time (in minutes) on the x-axis (the horizontal axis) and the number of bugs on the y-axis (the vertical axis).
- Plot the data for each microenvironment and connect each microenvironment's data points with a line. This means each graph should have two different lines (which should be labeled and/or made in different colors).
- Analyze your results and try to draw conclusions. Which microenvironment(s) do the bugs seem to prefer the most? Which do they avoid the most? Why do you think this is? Based on your results, what do you think would be the overall best microenvironment for the bugs? Do your results make sense to you?
Ask an Expert
Global Goals
The United Nations Sustainable Development Goals (UNSDGs) are a blueprint to achieve a better and more sustainable future for all.
/-/https/www.sciencebuddies.org/cdn/Files/19758/6/E-WEB-Goal-15.png)
Variations
- An alternative method would be to use time-lapse photography to estimate how much time the bugs spend in each available microenvironment when given a choice. How frequently do you need to take pictures to make this work? Keep in mind that you will want to be able to see when any bugs dig down into the microenvironment.
- You could try this science project using other small, common animals, such as crickets, earwigs, ants, slugs, snails, mealworms, and waxworms. Crickets, mealworms, and waxworms can usually be purchased at a local pet store. The other animals may be found locally by looking under rocks, garden plants, rotting logs, and leaf litter. What type(s) of microenvironment do these other animals prefer? Note: Be sure to adjust the containers if needed — some of these animals, such as crickets and ants, will need lids for the containers to prevent them from escaping.
- For a longer-term science project, you could investigate which microenvironment the bugs best reproduce in. Try using some of the best microenvironments from your initial experiment for this. Start with the same number of bugs in each microenvironment. Be sure to provide the bugs with suitable food and watch for baby bugs to appear over time. They will look similar to the adults, but will be extremely small, so they may be difficult to see at first.
- For a similar science project that uses earthworms, check out Science Buddies project idea Squirmy Wormy: Which Soil Type Do Earthworms Like Best?
Careers
If you like this project, you might enjoy exploring these related careers:
/-/https/careerdiscovery.sciencebuddies.org/cdn/Files/1900/17/iStock-1191167137.jpg)

/-/https/img.youtube.com/vi/SLiibpsV5AQ/0.jpg)
/-/https/img.youtube.com/vi/CFP-Kp_enU4/0.jpg)
/-/https/img.youtube.com/vi/yqmXAm1Cw3k/0.jpg)