Abstract
Earthworms are important for the soil and fun to study. In this science project, you will find where earthworms like to stay when food is around. Will they gather around the food, take food with them in their tunnels, or not be attracted to the food at all? You will fill four pots with dirt, add food and worms, and track their activity over one week to find out!Summary

Objective
Study where worms can be found in the soil when food is around.
Introduction
Earthworms are very important for farmers and gardeners. These little animals enrich the soil. Their burrows—or tunnels—loosen the soil and their droppings add valuable nutrients to the soil. Even though they have no feet, no eyes, and no teeth, they do move, shy away from light, and eat. Quite amazing!
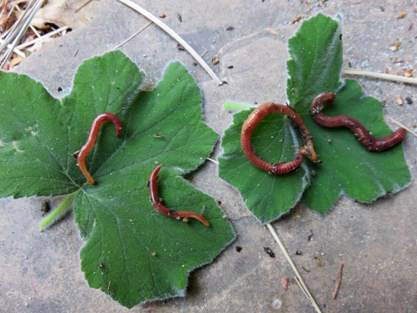
Figure 1. Examples of earthworms.
Earthworms have tiny bristles along their body. These help the worms move through the soil. They have no eyes, but do have tiny parts that are sensitive to light, which help them shy away from light. Earthworms have no teeth, but they have strong mouth muscles. They eat dirt and decaying organic material. Organic material is any material that comes from plants or animals, or byproducts of these, like paper. Decaying means rotting or decomposing.
Worms like moist soil. They breathe air trapped between soil particles through their skin. If the soil is too wet, the holes in the soil fill with water, leaving no air for the worms to breathe. If the soil gets too dry, the worms dry out. That is why worms like moist environments, because there is just the right balance between water and air.
There are lots of types of earthworms (over 2,000), ranging in length from about 1 centimeter (cm) to several meters (m) long. Different types have different habits. Some make deep burrows, while others stay near the surface. Some take food down to their tunnels, others do not. Some thrive in a cold climate, others need a moderate-to-warm environment.
It is fascinating to observe earthworms, and this project will help you do just that! You will create comfortable homes for your worms. Then you will hide organic material at different locations and see what the worms do. Will they stay around the food, take the food with them in their tunnels, or will they not care about the food you provide?
Terms and Concepts
- Burrows
- Organic material
- Decaying
- Hypothesis
- Composting worm
- Control
Questions
- What do earthworms eat?
- Which surroundings or conditions do earthworms like?
- The Introduction states there are different types of earthworms. How are these alike and how are these different?
Bibliography
- National Geographic Kids. (n.d.). Earthworm. Retrieved December 28, 2015.
- Knudsen, J. (2015, August 31). Worms are wonderful. SciShow Kids. Retrieved December 28, 2015.
- Noren, A. (n.d.). Working Worms. Retrieved December 28, 2015.
For help creating graphs, try this website:
- National Center for Education Statistics, (n.d.). Create a Graph. Retrieved June 25, 2020.
Materials and Equipment
- Clear plastic deli containers (used as pots), 32 oz and 14 cm (5.55 inches) high (4); like these, available from Amazon.com.
- Push pin
- Scissors or nail
- Permanent marker
- Optional: Ruler, metric
- Cutting board
- Knife for cutting fruit
- Fruit (1/2 lb); melon or melon rind work well; harder fruits, like apples, are good but might take a little more time to start decaying. This will increase the total time of the test by a few days. Stay away from citrus fruits, as worms do not like these.
- Loose dirt; potting soil works well (enough to fill 4 pots)
- Newspaper, to be cut up and placed on top of the pots
- Earthworms (60)
- Red wigglers (composting worms); available locally in worm compost bins, from well-equipped gardening stores, or from numerous online vendors, including Amazon.com or Carolina Biological.
- You can also use other earthworms found in your yard, at bait shops, or bought from an online vendor like Carolina Biological. You will need fewer worms if your worms are long (on average more than 7 cm). Note that some species require special care (like refrigerator temperatures.) Make sure you can give your worms the care they need (like storing your pots with worms in a refrigerator).
- Spray bottle (1), like this one available from Amazon.com. If you do not have one available, you can wring out a wet cloth over the dirt to moisten the soil.
- Newspaper
- Brown paper bag or closable cardboard box (1); big enough for 4 32 oz pots
- Lab notebook
Disclaimer: Science Buddies participates in affiliate programs with Home Science Tools, Amazon.com, Carolina Biological, and Jameco Electronics. Proceeds from the affiliate programs help support Science Buddies, a 501(c)(3) public charity, and keep our resources free for everyone. Our top priority is student learning. If you have any comments (positive or negative) related to purchases you've made for science projects from recommendations on our site, please let us know. Write to us at scibuddy@sciencebuddies.org.
Experimental Procedure
In this project, you will fill pots with dirt and food. One pot will have food only near the bottom of it, one will have food only in the middle, and one will have food only near the top of the pot. A last pot will not have any food. You will add worms and observe, over a number of days, where the worms spend time.
Science Buddies' staff tested this project with red wigglers, a composting worm. Composting worms are used to turn food scraps into compost, a mixture of decaying organic material that is used to improve soil. Other common names for this type of worm are redworm or red Californian earthworm. These are small worms. You can use other worms, too, like the worms you find in your garden, which might be larger. You do not need bigger pots to host bigger worms, but you should host fewer worms per pot. In Figure 2, the smaller worms are the red wigglers.
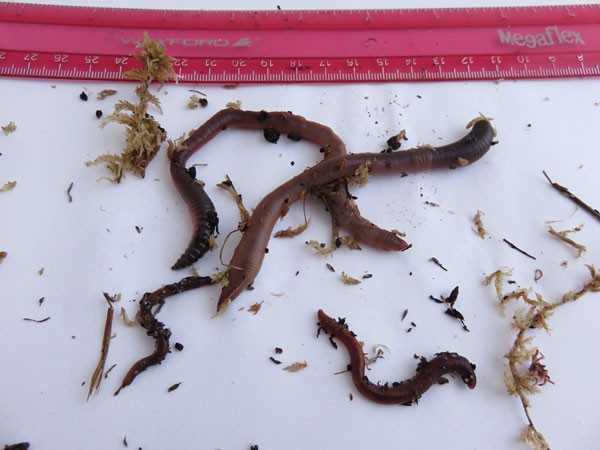 Image Credit: Sabine De Brabandere, Science Buddies / Science Buddies
Figure 2. Earthworms come in different types and sizes.
If you have not yet done so, read the Introduction and maybe also do some background research about the worm type you will use, then state what you expect to find. Will your worms stay close to the food, take the food and burrow down in the dirt, or not care about the food? Scientists call what they expect from a test the hypothesis. Write down your hypothesis in your lab notebook.
Setting Up Your Experiment
- You will host your worms in pots. To prepare a pot:
- Use a push pin to carefully poke four tiny holes, spread out, over the bottom of the pot, as shown in Figure 3.
- Ask an adult to enlarge the holes with scissors or a nail. The holes will allow excess water to drain.
- Put the pot on its side and spin it as you use a permanent marker to draw three lines dividing the pot in three equal layers (see Figure 4) with some space left on top.( Note: If you would like, use a ruler; each layer should be about 4 cm high, and 2 cm should be left on the top.) These divisions will help you observe where the worms go.
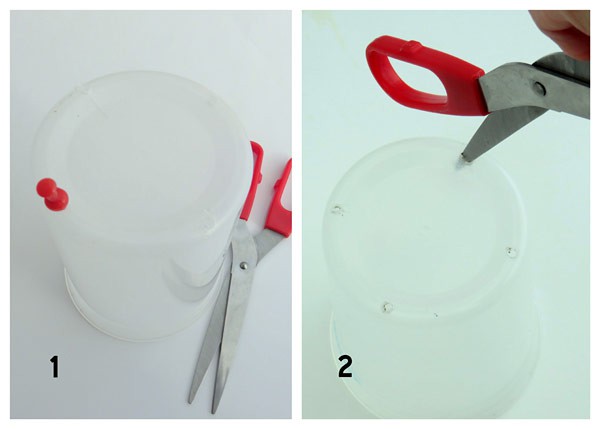 Image Credit: Sabine De Brabandere, Science Buddies / Science Buddies
Figure 3. Prepare your pot to host worms by making holes in the bottom, with an adult's help.
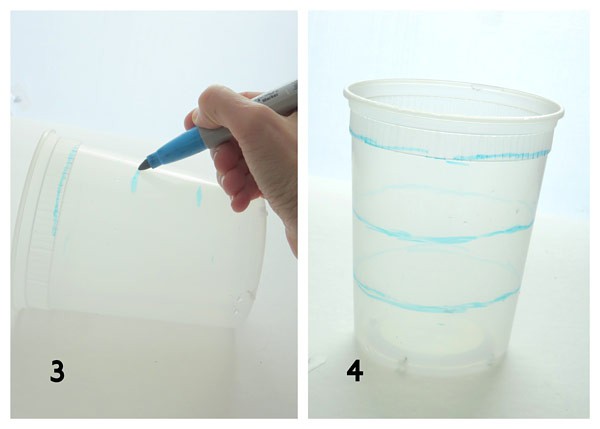 Image Credit: Sabine De Brabandere, Science Buddies / Science Buddies
Figure 4. Draw lines that divide the pot in three equal layers. This will help you observe where the worms are.
- Your first pot is ready! Repeat step 1 for the other three pots. This is a lot of work. Feel free to ask for help.
- Prepare food for the worms:
- Ask an adult to help cut your fruit into small pieces, as shown in Figure 5. Caution: Be careful! Knives are sharp!
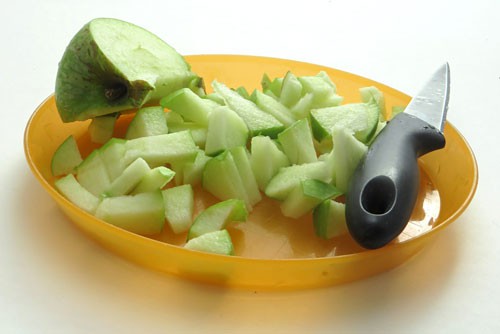 Image Credit: Sabine De Brabandere, Science Buddies / Science Buddies
Figure 5. Cut-up fruit to be used as food for worms.
- Fill a pot that has food near the bottom.
- Add a shallow layer of moist dirt to a pot (about ½ –1 cm high). Add a couple of sprays of water if the soil feels dry.
- Place pieces of fruit against the side wall of the pot, as shown in Figure 6. Note: Putting food against the wall of the pot increases your chances of seeing worms that are attracted to the food.
- Add moist dirt until the dirt reaches the very top mark.
- Place moist newspaper on top of the pot, as shown in Figure 7. This will keep the dirt moist longer.
- Use a permanent marker to mark the pot with a "B" (for "Bottom layer").
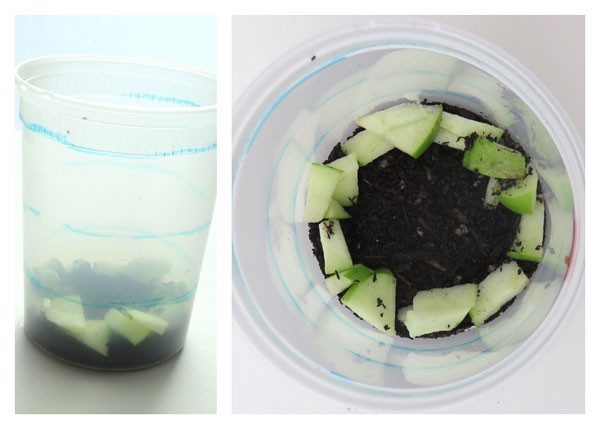 Image Credit: Sabine De Brabandere, Science Buddies / Science Buddies
Figure 6. Fill the pot with dirt and cut-up fruit in the bottom layer.
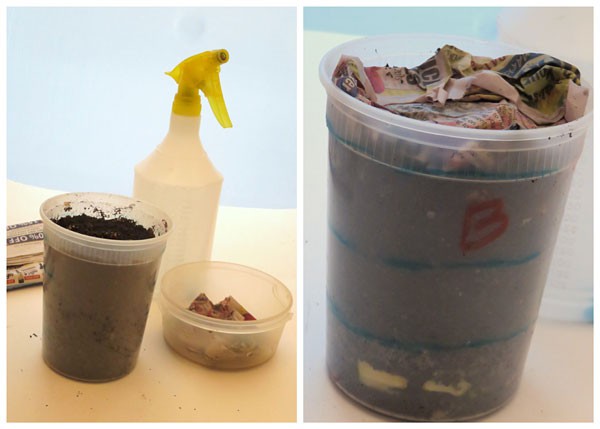 Image Credit: Sabine De Brabandere, Science Buddies / Science Buddies
Figure 7. Add a layer of moist newspaper on top to keep the dirt moist.
- Fill a pot with food in the middle.
- Repeat step 4, but now put your food in the middle of your pot, as shown in Figure 8.
- Use a permanent marker to mark this pot with a "M" (for food "in the Middle").
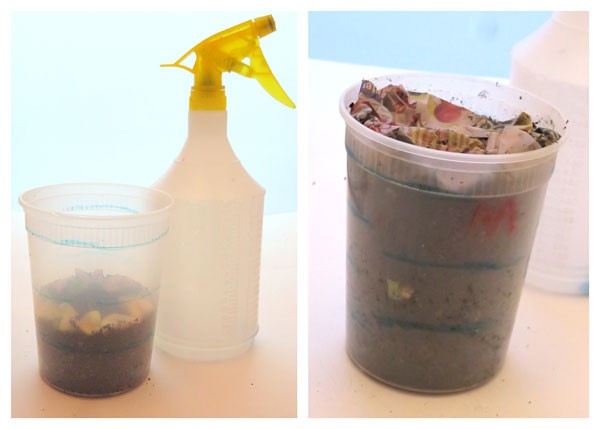 Image Credit: Sabine De Brabandere, Science Buddies / Science Buddies
Figure 8. Fill the pot with dirt and place cut-up fruit in the middle.
- Fill a pot with food in the top layer.
- Repeat step 4, but now put your food near the top of your pot, as shown in Figure 9. Add a thin layer of dirt on top of your food.
- Use a permanent marker to mark the pot with a "T" (for "Top layer").
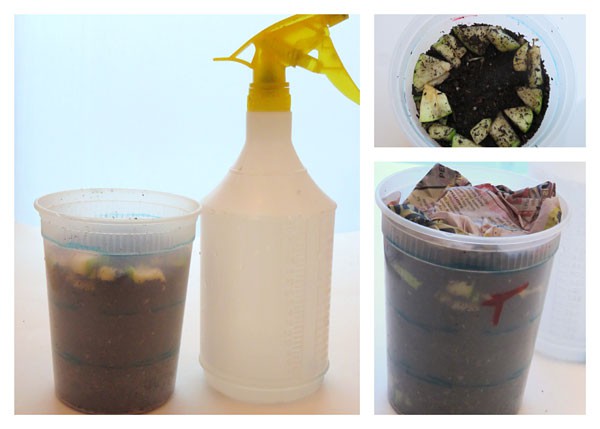 Image Credit: Sabine De Brabandere, Science Buddies / Science Buddies
Figure 9. Fill the pot with dirt and place cut-up fruit in the top layer.
- Fill a pot without any food. This will be your control pot. A control is a test sample that does not receive any special treatment (in this project, cut-up fruit), and it is used as a basis of comparison for the test samples that do receive special treatment.
- Add moist dirt to your last pot until the level reaches the top line.
- Place moist newspaper on top the pot to keep the dirt moist longer.
- Use a permanent marker to mark the pot with an "N" (for "No food").
- Add the worms.
- Take a pot.
- Remove the moist newspaper for now; set it aside.
- Place 15 worms on top of the dirt. Note: You may want to use fewer worms if your type of worm is big, as shown in Figure 10.
- If you would like, watch the worms burrow themselves in.
- Place the moist newspaper back.
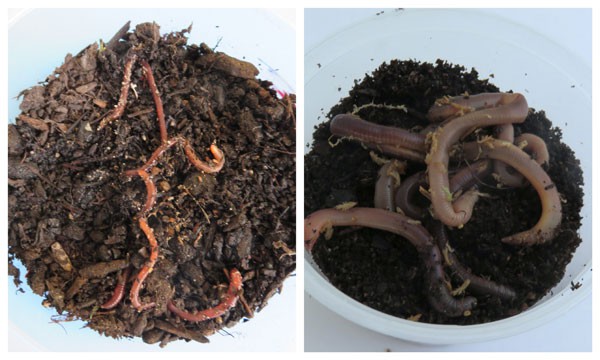 Image Credit: Sabine De Brabandere, Science Buddies / Science Buddies
Figure 10. One pot can host about 15 small worms, like red wigglers (left) and 5–10 larger worms (right).
- Repeat step 8 for your other three pots.
- Keep your pots in a dark place; inside a brown paper bag or a cardboard box works well. Close the bag or box. This will make it always dark for your worms. Note An airtight plastic pot is not a good choice. Air needs to be able to flow between the inside and the outside of your bag or box.
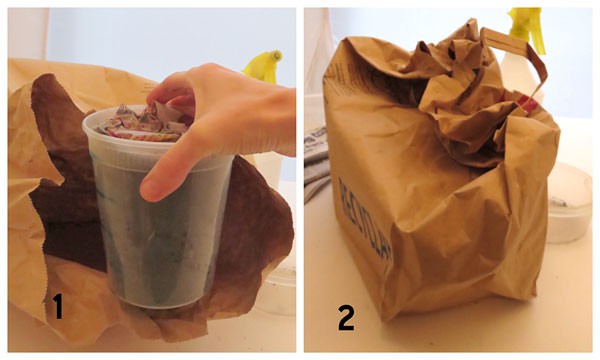 Image Credit: Sabine De Brabandere, Science Buddies / Science Buddies
Figure 11. Place your pots in large paper bag or in a box in a welcoming climate for your worms.
- Place your box or bag in a favorable climate. Room-temperature works well for red wigglers. If you test a different type of worm, research at which temperature they thrive.
- For room temperature, we suggest a corner of the kitchen or in the cupboard under the sink.
- Note: If people in your house do not like the idea of worms in the kitchen, you can keep them in a cooler place, like the garage or the basement. Red wigglers will do fine there, they will just be a little less active and your food will decay a little more slowly. You might want to extend the observation period a little to make up for this.
- Nice work! You can rest for three days now. This will give the worms some time to adjust to their new homes and give your food time to decay.
Observations
- Before you observe, make one data table, like Table 1, in which to record your findings. Also, prepare a graph, as shown in Figure 12, for each pot.
| Layer Where Most Worms Are Visible | |||||
|---|---|---|---|---|---|
| Date | Pot B (Food at the bottom) | Pot M (Food in the middle) | Pot T (Food at the top) | Pot N (No food) | |
| Day 3 | |||||
| Day 5 | |||||
| Day 7 | |||||
| Day 9 | |||||
| Most Common | |||||
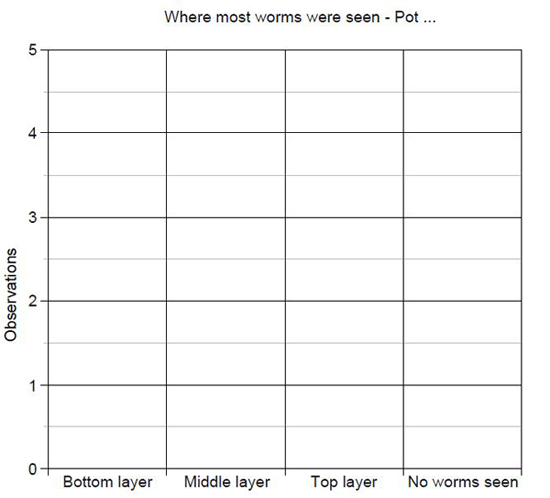 Image Credit: Sabine De Brabandere, Science Buddies / Science Buddies
Example graph created to track observations of worms in a soil pot. The example graph is empy but the y-axis is labeled observations and the x-axis is split into 4 groups: bottom layer, middle layer, top layer and no worms seen.
Figure 12. An empty bar graph. You need one for each pot. You will add one block for each observation in the column where you see the most worms (further explained below).
- Start observing three days after you started the experiment:
- Take out one pot. Look at the letter on the pot (B, M, T or N).
- Observe. What do you see from the sides of the pot: worms, burrows, food dragged down or up?
- Count how many worms you see in each layer from the sides of the pot.
- Optional: Make a page in your lab notebook for detailed observations. You could copy a data table, like Table 2, for each pot and fill in the number of worms you counted in each layer. Write down any other interesting observations.
Table 2. Data table in which to record how many worms you see from the outside of a pot.Pot: Observation Day: Top Layer Middle Layer Bottom Layer
- Optional: On your first observation day, choose one or a few areas where food is visible on one or several pots to follow in detail. Indicate this area with permanent marker on the pot. Make drawings of this area on each observation day. Do not forget to label the drawings with a date, the pot identification, and the area identification.
- Write the layer in which you can see the most worms in your table, like Table 1 (bottom, middle or top layer). If no worms are visible from the sides, write "No worms seen" in the table. If two (or more) layers have the same number of worms visible, write both (or all) layers down. Note there is one column per pot.
- Take the graph for this pot and add one block for this observation in the stack where you found the most worms. If you have a tie between two layers, split the block in two and add a half block to both layers. Figure 13 shows what your graph might look like after six observations.
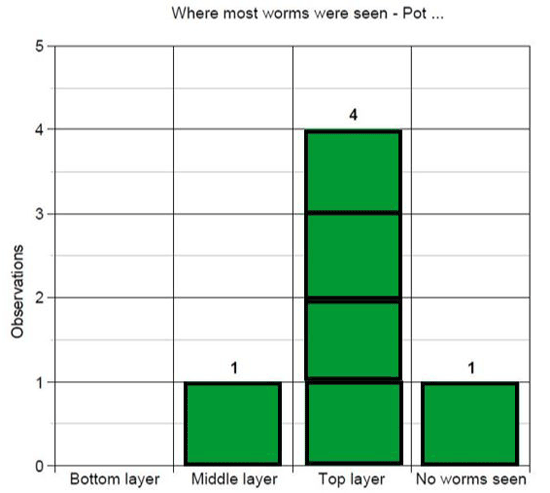 Image Credit: Sabine De Brabandere, Science Buddies / Science Buddies
Example graph to track observations of worms in a soil pot. The example graph has a y-axis labeled observations and the x-axis is split into 4 groups: bottom layer, middle layer, top layer and no worms seen. In the example graph, 4 observations were recorded of the worms in the top layer and 1 observation was recorded for both the middle layer and no worms at all.
Figure 13. An example bar graph showing the layer where most worms were observed. Note the pot identification is intentionally left out in the title to remind you this is just an example graph. Your results might look different. You should have one graph for each pot.
- Moisten the dirt or the newspaper on top if it seems dry.
- Place your pot back in the bag or cardboard box.
- Repeat steps a–i for the other three pots.
- Repeat step 2 every other day (3 days, 5 days, 7 days, and 9 days after you started the experiment).
- You can choose to stop after 9 days, or to continue until the food has almost disappeared.
- Optional: Until now, you observed from the sides of the pots. Now is your opportunity to see inside the pots.
- Take one pot, identify which pot you are examining.
- Take off the newspaper.
- Take out dirt, layer by layer, and see where you can find worms. Can you find them around the food? Do they all gather in a specific place, like at the bottom or the top? Are they scattered all over?
- Write down your final observations in your lab notebook.
Analysis
- Consolidate your data.
- Look at your bar graph, one pot at a time. Were your worms seen most often in a particular layer? (If in your graph, one column is higher than all others, your worms were most often in that particular layer). Write that layer in the "On average" row for the column representing this pot. If you have a tie (two (or more) columns are as high) write both (all) layers down.
- If working with graphs is hard for you, look at your data table, like Table 1, one pot (one column) at a time. Do you see a pattern? If your worms were seen most often in a particular layer, write that layer in the "On average" row for that column. Example: If you wrote "Middle Layer" on three of the four observation days for a particular pot, you would write "Middle Layer" in the "Most Common" row. If you had "None" most often, write "None." If you have a tie, write both layers down.
- Repeat step a. or b. for the other three pots.
- Draw a conclusion.
- Looking at your data, where would you say red wigglers (or the type of worm you used) can be seen most often when there is food available?
- Could your study help a gardener who is trying to attract red wigglers (or the type of worm you used) to their garden?
Ask an Expert
Global Connections
The United Nations Sustainable Development Goals (UNSDGs) are a blueprint to achieve a better and more sustainable future for all.

Variations
- See how different types of worms have different habits. Would one type stick around the food while others take the food down in their burrows?
- See if food disappears faster if more worms are hosted in a pot.
- Do some background research about the temperature range your type of worm can live in, then study if the worms are more or less active in a warmer or cooler environment by placing the pots in various ambient temperatures for a couple of days.
- These other projects might interest you as well:
Careers
If you like this project, you might enjoy exploring these related careers:

