Sewing Electronics: Wearables that Light Up
You don't have to channel Katniss or Elsa to wear something that lights up! Adding LEDs to a favorite bag or jacket is easier than you might expect. With some basic e-textile knowhow, you can create your own wearable circuits, so grab a needle, conductive thread, a coin cell battery, and some LEDs to sew your own custom wearable electronics!
Wearable electronics have hovered on the fringe of fashion and design for a while, a space where engineering and creativity meet to allow creators to "wear" work that is wired with technology. It is in this space that fans of high tech storylines like Iron Man converge and design neat things like light-up arc reactor t-shirts, a la Tony Stark. Despite the popularity of Stark and the Marvel series, LED-infused wearables that are less "sci-fi" and more "runway-ready" really grabbed mainstream attention with the Hunger Games movie.
The dress Katniss wore that appeared to catch on fire gave audiences a tantalizing and breathtaking look at wearable electronics. The magic of e-textiles hit theaters for an even younger audience with the smash Disney movie, Frozen. Near the end of the movie, Elsa's change of heart (accompanied by the hallmark Let It Go song) is signified visually by a transformation of her dress—a change that moves from bottom up in a wave of twinkling lights.
The wonders of cinematic special effects make these big-screen examples amazing, but from a practical standpoint, dresses like the ones worn by "the girl on fire" or by Elsa really can be created by sewing circuity into fabric. Students can explore e-textiles and the kind of circuitry involved by adding LED circuits to jackets, shirts, bags, or any favorite wearable.
Incredibly sophisticated and complicated designs are possible with wearable circuits, but starting off simple may be an important key to success for students. Kids can jump in with an e-textile project by making fun wristbands, buttons, or patches that involve a single light-up component. As a DIY craft or science fair exploration, kids will be learning about basic electronics, serial and parallel circuits, conductivity, and more—all while sewing something they can wear.
Experimenting with e-textiles is awesome hands-on science you can see and a great way for kids who love creative projects, or have an interest in fabric and sewing, to turn an exploration of electronics into art!
Trying It Out
It has been a few years since the LED Dance Glove project came out at Science Buddies. That electronics science fair project is a cool introduction to the world of e-textiles and wearable electronics.
Experimenting with e-textiles is awesome hands-on science you can see and a great way for kids who love creative projects, or have an interest in fabric and sewing, to turn an exploration of electronics into art!
Students who do the science project create a glove with fingers that light up. In the dark, this kind of glove can be used to create a spectacular light show or light painting. (A more advanced version of this science project involves customizing a glove with red and green LEDs for traffic control.)
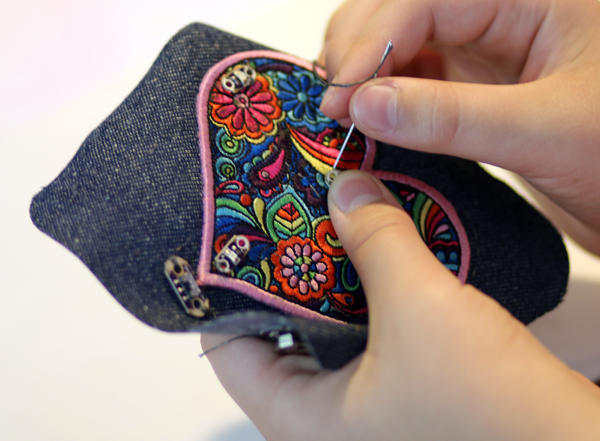
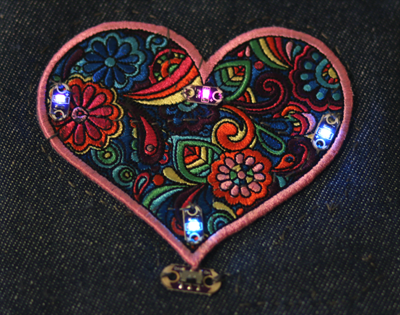
After reading the LED Dance Glove project procedure, I decided to do something using the wearable circuit concept as a summer project with my kids. The combination of electronics and sewing is cool and has a maker flair that I really like. I didn't want to make a glove, however, so I spent a good bit of time researching wearables and e-textiles, contemplating what we might make that would be a fun learning experience but would also yield a result we would want, use, or wear. Inspired by a light-up messenger bag patch I saw, I decided to make e-textile patches that we could put on our bags or backpacks.
Planning to use the Science Buddies procedure as a guideline for sewing the circuit, I gathered the necessary electronics parts, got out permanent markers and a piece of canvas, and spent time working on a sample e-textile patch. My general plan went as follows:
- Draw my own design on the canvas with permanent markers.
- Finish the edges of the patch with fabric binding.
- Sew the circuit, including an on/off switch.
- Velcro the patch to the bag.
- Flip the switch and admire.
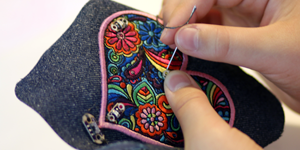
The process is seemingly straightforward—sew a path of stitches connecting the LEDs to the power supply. There is, however, more to it than that, and my first attempts didn't turn out nearly as awesome as I expected. Some of them didn't work the first time through, but as I troubleshot my circuits, I learned a lot about successfully creating sewn circuits and fabric-based electronics.
I didn't end up with a patch I liked enough to put on a bag that summer, so this year, I resurrected the idea again as a summertime engineering activity, with one major change—I scrapped the idea of drawing the patch itself. Instead, I decided to use a readymade patch as the base for the project.
And this year, we were successful! Check back tomorrow for a closer look at our project and some suggestions for making your own e-textiles projects successful.
DIY Note: I still think making the patch from scratch is the way to go for a home creative science project, especially if you have kids who will totally groove on the idea of first using a bag of permanent markers to draw their own designs—Minecraft creepers, funny monsters or robots, or even graffiti-style initials, if nothing else comes to mind!
But in my house, needing to design the patch itself ended up an unnecessary stumbling block. It was a pitfall rather than a crafty enabler, and the goal, really, was to get hands-on with the circuitry, not the Sharpies. So this year, we bought patches and left the focus on the electronics. (If Sharpies are favorites in your house, don't miss this fun family science activity, too!)
Sewing Your Own E-textiles
Students interested in sewing circuits and making something to wear that "lights up" can learn the basics of wiring circuits with LEDs and conductive thread in the following projects:
- LED Dance Glove: Get the Party Started with Your Own Interactive Light Show
- LED Traffic Glove: Build a Safety Device to Direct Traffic
- Red, White, and Blue with Soft Circuits
Students interested in innovative circuits may also enjoy the following projects and activities:
- Make a Paper Circuit (activity)
- Paper Circuits: Make Electrifying Art (project)
- Electric Paint: Light Up Your Painting (project)
- Creative Circuits with Copper Tape (blog)
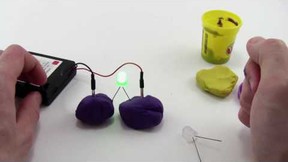
- Squishy Circuits: Light Up Your Play Doh® Creations! (activity)
- Electric Play Dough Project 1: Make Your Play Dough Light Up, Buzz, & Move! (project)
- Electric Play Dough Project 2: Rig Your Creations With Lots of Lights! (project)
- Electric Play Dough Project 3: Light Up Your Sculptures! (project)
- Electronics and Play Dough: Fun, Tactile Family Science (blog)
Reading Connections
The fourth book in the Nick and Tesla series involves the twins building a "gadget glove" that contains circuitry similar to what is used in these projects.
See also: Wearable Electronics: Sewing an LED Patch
Categories:
You Might Also Enjoy These Related Posts:
- Plastics and Earth Day - Science Projects
- Arduino Science Projects and Physical Computing
- 10+ Robotics Projects with the BlueBot Kit
- 5 STEM Activities with Marshmallow Peeps
- March Madness Basketball Science Projects: Sports Science Experiments
- Women in STEM! More than 60 Scientists and Engineers for Women's History Month
- Explore Artificial Intelligence and Machine Learning with Student AI Projects
- 10 Reasons to Do the Rubber Band Car Engineering Challenge