Students 3D Design and Print Their Own Robots with Autodesk Tinkercad
Being able to translate ideas into 3D models that can be printed and used is an important skill for students with an interest in design and engineering. A recent robotics workshop gave students in New Jersey the opportunity to experiment with 3D design and then to see their models printed as real-life parts they could use in building their individual robots.

Students attending a recent two-part 3D design and robotics workshop at SoHa SMART in New Jersey learned something very important about robotics—making a robot doesn't have to be a cookie-cutter process. Robotics, in fact, isn't only about wires, sensors, and circuits. Design, creativity, and innovation are all important in robotics engineering. For students who love to design and build, the combination of 3D design and robotics offers an exciting blend of design and hands-on engineering.
With the goal of building custom robots using 3D printed parts they designed themselves, a small group of students, ages 12 to 15, gathered at SoHa SMART. During the first of two weekly sessions, the makers dove into the world of 3D design using Autodesk® Tinkercad®, a 3D computer aided design (CAD) and modeling program that makes it easy for students to take first steps in 3D design. The participants had a great time imagining what their robots might look like and then bringing their robot body ideas to life on the screen as 3D models.
Before the second week, the participants' designs were 3D printed so that they were ready to go when the students arrived for week 2.
Getting Hands-on with Robotics
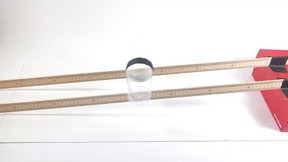
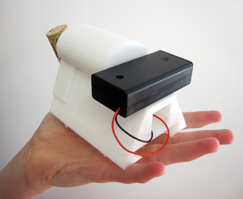
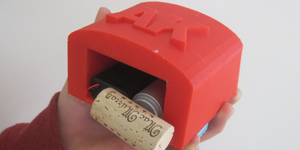
With simple circuits and limited parts, Artbots and Bristlebots are excellent introductory robotics projects for students and may provide a stepping stone to more advanced robotics projects, like light-tracking, line-following, and solar-powered bots. An Artbot is often built using a common lightweight plastic cup for the body. This choice makes it easy to salvage a robot body from the kitchen (or local grocery store), and a plastic cup bot that shuffles about on toothbrush heads or marker legs can be fun to assemble and explore. With the use of 3D design software, kids can take things a step further and create a body that matches their own creative vision.
According to Ben Finio, staff scientist for Science Buddies and instructor for the SoHa SMART workshop, an Artbot-style robotics activity is a great way to also get kids started exploring 3D printing. A student's first 3D models may not come out quite as expected (which happened at this event), but an Artbot-style robot is very flexible in terms of assembly. As a "vibrobot," its primary function is simply to wobble around, powered by the vibrating motor.
"This type of robot is very forgiving in that it doesn't require any complex, interlocking mechanical parts (like gears) to move around," explains Ben. "This makes it a great project for an introduction to 3D printing--students can be creative and design the 'body' of their robot (which would typically be a craft item, like a plastic bottle or cup) in a CAD program like Tinkercad, without worrying about exact dimensions for various moving parts. Ultimately, their robot should 'work' no matter what they design, which helps ensure a positive experience for first-time CAD and 3D printing users."
Workshop participants were not given design plans or templates for their 3D models, says Ben. Instead, they were invited to design a robot exactly the way they wanted, with some basic parameters on sizing. With open terrain in front of them, the students rose to the challenge.
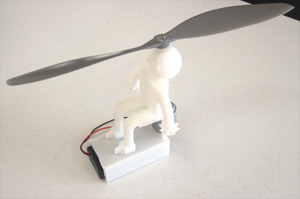
Their innovative designs for robot bodies included a person seated on a chair, a box with legs, a spider with a backpack, and a car. There wasn't a cup-like body in sight on week 2 when the students gathered with their newly printed 3D bodies and got to work wiring, soldering, and building their bots.
Trying 3D Modeling with Tinkercad
Even with no prior experience using 3D design software, the kids were able to bring their creative ideas to life using Tinkercad. According to the students, working with Tinkercad was fun, and the process of using 3D design software to create their 3D models was easier than they expected. Dan Pfeiffer, who made a spider-shaped robot inspired by the popular Hexbug line of robots, said that he really enjoyed working with Tinkercad. "The most fun part was the designing part, because I love to build and design," says Dan, age 15.
Luca Caruso, age 12, ended up designing a robot that, well, looks like a robot. He says his design was inspired by other robots he has seen before, but what he liked most about working with Tinkercad was the freedom it offered. "I enjoyed the limitless ideas of what I could create," says Luca.
Not everyone's 3D printed part turned out exactly as they expected. Luca's for instance, ended up as multiple parts rather than a single part, and his opening for the motor wasn't quite the right size. Similarly, Connor Stine, age 15, was surprised that his 3D printed piece had extra material on the bottom that he hadn't realized was part of how his "person sitting on a chair" design would print.
The experience of seeing how their 3D models rendered in real life was a great real-world learning experience. If the final part doesn't look the way you expected, you get the opportunity to really see what happened and to return to the software, look at the 3D model, and figure out why it printed as it did and what you might have done differently.
3D Design: Just Do It
According to Ben, Tinkercad was a natural choice for the 3D design and robotics workshop. "Tinkercad is the most beginner-friendly CAD program for students who have no prior experience with CAD," explains Ben. "Its colorful, almost cartoonish interface doesn't 'look' like a CAD program, so it can be very inviting to young students," he continues, comparing Tinkercad to other professional-grade Autodesk CAD software programs like Inventor®. "A few quick tutorials can get students started creating their own parts within minutes," adds Ben, "making sure they are rewarded early on in the 3D design process and have a positive experience."
This approach proved successful for students at the SoHa SMART workshop. When asked what he would tell other students about learning to use 3D design software like Tinkercad, Dan put it on the line: "Dude, just do it. It's awesome and really, really, really easy to use!" When asked the same question, Connor replies, "If you use Tinkercad, it is easy!"
Amy King, parent of one of the participants, commented afterward on the experience of watching her son's enthusiasm for the workshop and his eagerness to learn and explore the technology. Amy notes that she looks for out-of-school opportunities like the 3D and robotics workshop as a way to supplement what is available, hands-on, in her son's school. When they signed up, she says her son Aidan, age 12, was especially interested in seeing a 3D printer in action. Amy, on the other hand, was excited for him to have the chance to explore CAD software with a guided activity. In the end, Amy was impressed by how quickly students like Aidan can pick up 3D design skills and start putting them to use in ways they can then hold in their hands as 3D printed parts.
"I was amazed at Aidan's ease of use with the CAD software. I was also impressed with his math skills while using the program. He really persisted to make his 'robot' design fit the size suggestions."
Taking It Further
Students looking to explore 3D design can get started with Tinkercad by working through tutorials available on the Autodesk Tinkercad site. After trying a simple project like an Art-bot style robot where shape and size doesn't have to be exact, Ben suggests students tackle something else "functional" as a next step in 3D design.
"As a next step, I'd encourage students to move on to a project where they need to consider the size and shape of what they are making," says Ben. "How about something that would be useful around the house, like a pencil holder for a desk, or a custom case/stand for a cell phone? Kitchen items like cups and bowls are also common 3D design projects, and even jewelry."
For additional robotics engineering projects and information, see the following posts and projects:
- Family Robotics: Toothbrush Bots that Follow the Light
- Building Bristlebots: Basic Toothbrush Robotics
- Design and 3D-Print Your Own Robot! *
- Building a Halloween Brushbot: Family Robotics
- Create a Carnival of Robot Critters this Summer
- Dive Into Robotics with Robotics: Discover the Science and Technology of the Future
- Squishy Robots: Build an Air-Powered Soft Robotic Gripper
- Bristlebots at the Museum
- Bristlebot Kit (kit from the Science Buddies Store)
- Advanced Bristlebot Kit (kit from the Science Buddies Store)
- Build a Solar-Powered Bristlebot
- Build a Light-Tracking Bristlebot
For additional information related to 3D design and printing, see the following posts and resources:
- Level Up Your Science Fair Project: Design in 3D with Free Autodesk Software
- Students Use Autodesk 3D Design Software to Create Model Playgrounds
- A Dolphin Tail and Prosthetics Engineering
- Build a Helping Hand *
- Design and 3D-Print Your Own Robot! *
- 3D Modeling Layer by Layer: A Glue It Together Introduction to 3D Printing
About Autodesk
Autodesk helps people imagine, design and create a better world. Everyone—from design professionals, engineers and architects to digital artists, students and hobbyists—uses Autodesk software to unlock their creativity and solve important challenges. For more information visit autodesk.com or follow @autodesk.
Autodesk is a registered trademarks or trademarks of Autodesk, Inc., and/or its subsidiaries and/or affiliates in the USA and/or other countries. All other brand names, product names or trademarks belong to their respective holders. Autodesk reserves the right to alter product and services offerings, and specifications and pricing at any time without notice, and is not responsible for typographical or graphical errors that may appear in this document.
Categories:
You Might Also Enjoy These Related Posts:
- Plastics and Earth Day - Science Projects
- Arduino Science Projects and Physical Computing
- 10+ Robotics Projects with the BlueBot Kit
- 5 STEM Activities with Marshmallow Peeps
- March Madness Basketball Science Projects: Sports Science Experiments
- Women in STEM! More than 60 Scientists and Engineers for Women's History Month
- Explore Artificial Intelligence and Machine Learning with Student AI Projects
- 10 Reasons to Do the Rubber Band Car Engineering Challenge