Students Use Autodesk 3D Design Software to Create Model Playgrounds
Middle school students may think they are too "big" for the neighborhood playground structures, but chances are good they grew up climbing, swinging, sliding, and playing hide and seek at a local playground. Students in an 8th grade class in Berrien Springs, MI brought their firsthand knowledge of playgrounds to the classroom and combined it with imagination, creativity, science, math, and steps of the engineering design process to design their own playgrounds using Autodesk® Inventor® software for 3D modeling.
Ask students in Emma Haygood's 8th grade science class at Berrien Springs Middle School what it takes to design and improve a community playground, and you will hear a story of innovation, engineering, and invention. Thanks to an exciting classroom project, these students know that there are many steps involved in planning, designing, and building a
Last semester, Haygood challenged her students with a creative project that, in keeping with the ideas behind Next-Generation Science Standards (NGSS), required students to synthesize what they had been learning in math and science and put it to use in a fun, multi-faceted project—design your own playground. To succeed, they needed to spend time with a pencil and exploring 3D design on a computer.
What theme will the playground have? What kinds of safety features need to be taken into account? How much space is available? What pieces of playground equipment will the playground feature? These are all questions that Haygood's students had to consider.
Challenging Students in the Classroom
Haygood's playground assignment asked a lot of her students. They had to brainstorm, research, sketch, think creatively, plan, use 3D design software on the computer, and, finally, present their playground concept to the class. Haygood's students were up to the task, and at the end of December, groups shared their collaborative 3D playground projects. Their results show how successfully students can tackle 3D design and modeling when presented with an engaging challenge and access to Autodesk's 3D design software.
Getting Hands-on with Engineering and Design
This is the first year that teachers at Berrien Springs Middle School are working with Project Lead the Way. As part of a Design and Modeling component of Project Lead the Way's Gateway middle school curriculum, Haygood's 8th grade students explore the process of creating 3D models using Autodesk software.
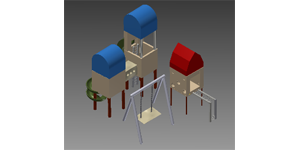
Haygood adapted the core project a bit for her class. She summarizes the playground project she taught as follows: "The students are required to choose a theme for their playground (jungle, sports, space, etc..), research playground safety online, and take measurements of actual playground equipment. As a group of 4, the students decide who is designing a tube slide, spiral slide, climbing feature, monkey bars, and a piece of equipment of their group's choice (swing set, teeter-totter, etc...). Each student is responsible for drawing an isometric sketch of their piece, with dimensions labeled. Then they individually create a 3D model of this piece of playground equipment in Autodesk Inventor. After all the parts are created in Inventor, then the group assembles the playground into one final model."

At the end of the project, Haygood's students shared their playground projects with the class. "They had to demonstrate how they followed each step of the design process to complete their final product," notes Haygood. "We also analyzed as a class which design would most likely be acceptable as an actual playground for children."
Beyond the classroom presentations, Haygood hopes to ultimately take the projects even one step further. "I'm hoping to print out these models once we get a 3D printer," she says, a step which would give students a way to even more concretely see the outcome of 3D design and modeling.
A Rewarding Introduction to 3D Design
For Haygood, teaching the playground project and introducing her students to 3D design was exciting. "I have always integrated technology in my curriculum," says Haygood. "I want my students to be creators and critical thinkers. Autodesk Inventor allows a deeper level of problem solving that I haven't been able to create before."
Despite her interest in technology, this was her first time working with Autodesk Inventor. Most of her students, too, had no previous experience with 3D design software. "There was a lot of 'How do I do this?', and I had to answer, 'I don't know.' So students utilized resources like YouTube, Inventor tutorials, and each other to problem-solve."
To make things easier for students who might need extra handholds while getting started with the project, Haygood provided sample sketches students could use as a framework for their modeling. To her surprise, students were excited to branch out on their own. "Most students didn't want to use the examples because they wanted to create their own part from scratch. I had students using functions of Inventor I didn't even know existed!"
The biggest challenge with the project, says Haygood, is that the newness of the material increased student desire for 1:1 support. "There is one of me and 30 of them (students)," says Haygood. "Often times I had several students with questions, and they had to wait until I was done helping other students." What Haygood saw happen, however, is that within a few days of using the software, some of her students had really connected with the software and 3D design process and were able to help others in the classroom as peer "Experts."
Haygood says the playground project was definitely a success and gave her 8th grade students a stronger real-world understanding of 3D design and engineering. "My students are excited to 'see' in 3D now that they have created parts in Inventor. It's hard for most to visualize 3D models unless they actual create the models themselves in the 3D program."
Putting Technology within Reach
A project like the playground assignment requires a good bit of hands-on time spent using computers, a reality that can sometimes present a stumbling block for schools thinking about incorporating computer science and design projects. Haygood is fortunate to have a cart of 30 laptop computers that are part of her classroom, and students were not required to work on computer models at home. In addition to class time, Haygood opened her classroom twice a week after school so that students could work on their 3D models or presentations using computers in the classroom.
From Haygood's perspective, the playground project was a good stepping stone for students in her class. Thanks to the multi-year focus on science and engineering in her school district, these students are being given the chance to explore science and engineering in exciting, real, and hands-on ways. "80% of science in my building is hands-on," notes Haygood. "Students 'do' science at our school! We build, test, design, research, read, and write science!"
Starting this year, that hands-on experience includes 3D design and modeling, thanks to Project Lead the Way and Autodesk.
Take It Further
Giving kids the opportunity to explore 3D design often involves sparking interest with something they already care about, enjoy doing, or interact with day to day in the real world. Learn more about encouraging, inspiring, and supporting student interest in 3D design and civil engineering:
- Level Up Your Science Fair Project: Design in 3D with Free Autodesk Software
- Making a Game of City Planning: Students Explore Civil Engineering
- From Parking Space to Parklet: Civil Engineering and City Planning
- 3D Modeling Layer by Layer: A Glue It Together Introduction to 3D Printing
Premier Design Tools for Educational Use
Autodesk gives students, educators, and educational institutions free access to professional design software, creativity apps, and real-world projects. For more information, details about educational use, and to download software, visit the Autodesk Education Community.
thanks to support from sponsors like Autodesk.
About Autodesk
Autodesk helps people imagine, design and create a better world. Everyone—from design professionals, engineers and architects to digital artists, students and hobbyists—uses Autodesk software to unlock their creativity and solve important challenges. For more information visit autodesk.com or follow @autodesk.
Autodesk is a registered trademarks or trademarks of Autodesk, Inc., and/or its subsidiaries and/or affiliates in the USA and/or other countries. All other brand names, product names or trademarks belong to their respective holders. Autodesk reserves the right to alter product and services offerings, and specifications and pricing at any time without notice, and is not responsible for typographical or graphical errors that may appear in this document.
Categories:
You Might Also Enjoy These Related Posts:
- Making Recycling Sorting Machines—STEM Success
- Mini Trebuchets and a NM MESA Challenge
- Helping Students Build Coding Skills with Drones and Self-Driving Cars
- Middle School Student Codes to Improve Life with Visual Impairment
- Student Science Project - Designing and Coding a Video Game to Help People with Alzheimer's
- Teacher Combines Computer Science and Engineering Design for Middle School Students - STEM Success Story
- A Mirror Maze Success Story
- Paper Roller Coasters and Energy Transformation: STEM Teacher Success Story