Abstract
Why do so many people use cell phone cases? Do cell phones really need the extra protection, or is it just because cases look fancy? In this engineering science project, you will test the durability of calculators instead of cell phones, find out if cases increase the durability of the device, and build some of your own cases that do!Summary
Sabine De Brabandere, PhD, Science Buddies

Objective
Perform a drop test to evaluate the strength of a calculator and detect vulnerable areas, then use this input to design cases that improve the durability of the calculator measured by its performance in a drop test.
Introduction
You drop your new cell phone. Your heart races. You pick it up, anxious, afraid, nervous ... but it looks fine. You call your best friend to see if it still works. Whew. What a relief! With each drop, you feel a little less anxious. This phone seems sturdy — wonderful! And then, it happens! You drop your phone, pick it up, and the screen is broken! (See Figure 1, below.)
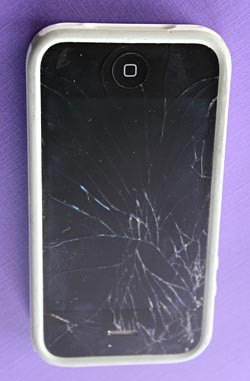 Image Credit: Yame Burke
Figure 1. The broken screen of a dropped cell phone.
Is this just bad luck? Maybe. It is more likely that micro-fractures — small invisible cracks that you cannot see with the naked eye — gradually accumulated until finally, the screen became too weak and shattered due to the impact of this final drop.
Cell phones increasingly feature a rather high durability, meaning they have a long life expectancy. A durable product can last for a long time without significant deterioration by resisting the effects of heavy use, like 24-7 active operation of a cell phone, or even abuse, like dropping it on the floor or leaving it in a wet environment.
Durability is an important aspect of product development in the early stages, when designers write a product specification. These specifications include a detailed description of the acceptance requirements, the characteristics the product must meet to be accepted. Products go through rounds and rounds of tests and improvements. Each round is called an iteration and contains a development phase and a test phase, as shown in the flow chart in Figure 2, below.
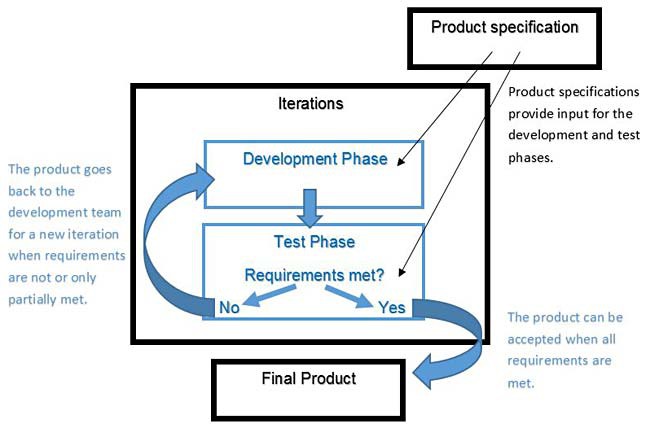 Image Credit: Sabine De Brabandere, Science Buddies / Science Buddies
A simplified flow chart shows an iteration block that contains two phases: development and testing. Product specfications are inputs in both phases and determine what the requirements for the product are. Products move from the development phase to the testing phase, if requirements are not met they go back to the development phase. If requirements for a product are met in the testing phase than they are accepted as a final product.
Figure 2. Flow chart of a product-development process showing how products can go through several iterations of improvements.
During the development phase, engineers se the product specifications and, when available, information on where the current product fails to create a new or improved version. During the test phase, the new or altered product is evaluated against acceptance requirements. The evaluation shows if and how much improvement was made during this iteration. It indicates not only if the product can be accepted as final, but it also reveals its vulnerable areas — valuable input for a possible next iteration of developments and tests.
In this science project, you will put an existing product — a calculator, serving as a substitute for a more expensive cell phone — through two iterations with the goal of increasing the durability of the product. You will focus on one aspect of durability: dropping it on a hard floor. A drop test will tell you about how well the initial calculator performs and reveal the vulnerable areas, the parts that fail first.
At that point, you'll become the design engineer, developing a new case to increase the durability of the calculator.
Terms and Concepts
- Durability
- Product specification
- Acceptance requirements
- Iteration
- Development phase
- Test phase
- Drop test
- Sample size
Questions
- Can you list at least five different characteristics in the durability of a cell phone?
- What are some "exceptional" or "abusive" uses of a cell phone that might be more likely to cause it to break?
- Why do you need to test several identical phones (not just one) to evaluate if that version meets the acceptance requirements?
- What are the stages in the process of improving an existing product?
Bibliography
- Design Squad Nation. (n.d.). The Design process in action. PBS Kids. Retrieved March 28, 2014.
- Science Buddies. (n.d.). The Engineering design process. Retrieved March 26, 2014.
For help creating graphs, try this website:
- National Center for Education Statistics, (n.d.). Create a Graph. Retrieved June 25, 2020.
Materials and Equipment
- Calculators (10 or more of the same kind) — Look for cheap calculators at a discount or department store. If possible, determine if the calculators are working before you buy them.
- Table or countertop with hard floor (like concrete or tile) underneath. Note: Wooden floors are not hard enough for this project. A table outside on a hard patio, sidewalk, or paved driveway would work well.
- Meter (metric) measuring stick
- Optional: photo camera
- Your selection of materials to create cases, such as:
- Scissors
- Tape
- Glue
- Cardboard
- Fabric
- Foam rubber
- Notebook
Experimental Procedure
Preparation for the Drop Tests
- Find a place to perform the drop tests: a drop from a height between 0.7 and 1.2 meters (m). This is the height from which calculators generally fall in daily use.
- Choose an area with a hard floor:
- Tiles, concrete, or asphalt are good options.
- Any type of real or imitation wooden floor is not a good option. You might indent or damage this type of floor when dropping the calculators.
- Carpet is not a good option because it reduces the impact of a drop considerably.
- Ask an adult if it is OK to drop calculators on this floor.
- Find a surface from which to drop the calculators on the selected hard floor:
- The surface should be between 0.7 and 1.2 m from the floor. This is the typical height of a tabletop or kitchen counter.
- The calculators should be able to gently slide off the surface or the table or counter (no elevated borders).
- Choose an area with a hard floor:
- Check all calculators and discard all nonworking or damaged calculators. These would bias your test results.
- Check if the calculator can do a simple sum.
- Check for any visible damage.
- Copy the following table in your notebook. You will fill in the columns as you analyze the results of consecutive sets of drop tests.
| Original calculator | Altered Calculator - Iteration 1 | Altered Calculator - Iteration 2 | |
|---|---|---|---|
| Average number of drops where first visual damage occurs | |||
| Average number of drops that renders the calculator unusable | |||
| Acceptance requirement | |||
- You start this engineering project by evaluating the initial calculators using a drop test. This will inform you about how these calculators perform in a drop test (such as the number of drops they undergo before becoming unusable) and the most vulnerable areas of the calculators when being dropped (the location where damage occurs first). The instructions for the drop test are explained in the section below.
Calculator Drop Test
This procedure uses a sample size of three. This means you will test three identical calculators and combine the results to draw conclusions. You need a sample size of at least three to obtain a reliable result. Industry engineers use sample sizes that are much larger. Any increase in the sample size will provide more precise data. This science project uses the minimum sample size to keep the cost down.
- Copy the following table in your notebook. It will help you keep track of the results of one set of drop tests. During the test, write short notes in the columns of the table, describing how the calculator performs after each drop, such as "No visible damage - calculator still functioning" or "Top protection flap broke off at the hinges - calculator still functioning" or "Calculator buttons falling out - calculator no longer usable." Leave plenty of space to add rows, as you might need to add lines depending on your results.
| Original Calculator* Condition of the calculator after drop | |||
|---|---|---|---|
| Calculator 1 | Calculator 2 | Calculator 3 | |
| Tabletop drop 1 | |||
| Tabletop drop 2 | |||
| Tabletop drop 3 | |||
| ... | |||
* Remember to change the title as you perform the drop tests on consecutive iterations of altered calculators.
- Take your calculators and notebook to the place you selected to perform the drop tests.
- Prepare the calculator for the drop test.
- Take one calculator.
- If the calculator has a part that closes, close it.
- Put the calculator in position:
- Resting on its back on the surface.
- Long side parallel to the border of the surface.
- Gently slide the calculator off the surface so it falls on the hard floor.
- Inspect the calculator for damage:
- Check for any visible damage — be precise and pay attention to details. You might note "Cover broke horizontally in the middle" (instead of "Broken cover") or "Five keys near the top of the calculator came off" (instead of "Keys broken").
- Check if the calculator is still usable: can it perform a simple calculation?
- Note your findings in your table like Table 2, above.
- If you choose, take pictures of the damage. Pictures are a nice addition to your display board. Examples of damaged calculators are shown in Figure 3, below.
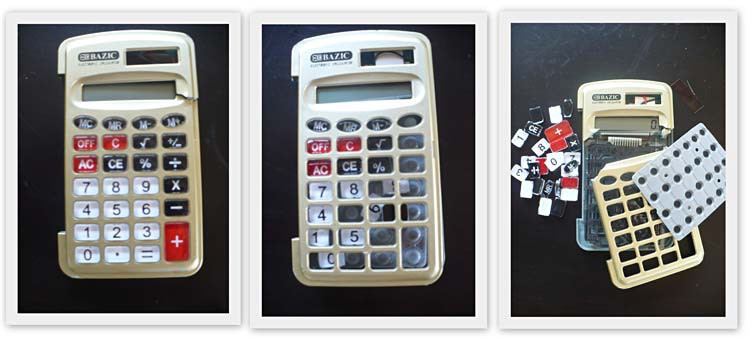 Image Credit: Sabine De Brabandere, Science Buddies / Science Buddies
Figure 3. Examples of damaged calculators. The calculator on the left is damaged but still functional. The other two images show unusable calculators. Note that for all these calculators, the top protection flap broke off, leaving the calculator damaged but still functional.
- Repeat steps 4 and 5 until the calculator is no longer usable.
- Note: If you are testing your first calculator and it is still not broken after 50 or more drops, this test might be too gentle for your type of calculator. It is up to you to decide whether you would like to continue and increase the number of drops (and be prepared for lots of them on your altered versions) or switch to a harder durability test. You can find ideas for harder durability tests in the Variations section. Note: You need to perform the same test(s) on all calculators — the original calculators and at least two altered versions of calculators.
- Repeat steps 3 to 6 for each of the other two unaltered calculators, for a total of three (sample size) calculators tested. Note : If you would like to improve the precision of your results, you can increase the number of calculators tested (equaling an increase in sample size). Before you do so, make sure you have enough calculators left to create and test the alterations you will make to them (at least three calculators are needed per iteration).
- Create a visual indication of how well the calculators perform:
- In dark green, color each row where the calculator showed no visible or functional damage in your table like Table 2.
- In light green, color each cell where the calculator showed visible damage but was still functional. (Make sure to keep your text readable.)
- More green in your table indicates a better performance, and better durability.
- Analyze how your calculator performed under the drop test:
- Calculate the average number of drops needed to arrive at the first detectable damage.
- Calculate the average number of drops after which the calculator is no longer usable.
- Note your findings in Table 1, above.
- Note: Did your calculators show damage or become unusable after approximately the same number of drops, or do you see a wide spread in your test results? Increasing the sample size generally decreases the spread, and the average will reflect reality better.
- Analyze how your calculators failed.
- What type of damage appears first?
- What damage made the calculator no longer usable? Is this damage related to damage occurring in prior drops?
- In your opinion, what is this version's most vulnerable spot? Which single improvement would probably lead to a higher durability — or make the calculator survive more drops?
Consecutive Iterations of Improvements
Now for the development part of your project: Your task is to create a more durable calculator. Before you begin, you need to set the acceptance requirement.
For this engineering design science project, a 50% improved performance under the drop test is chosen as the acceptance requirement. The number of drops that renders the calculator unusable is chosen as the test variable. As an example, if your original calculator became (on average) unusable after 30 drops, your altered calculator will be accepted if it is — again, on average — still usable after 45 drops (this is 50% improved performance).
To calculate the acceptance requirement in your case:
- Take the average number of drops that renders your original calculator unusable (as you listed in Table 1, above).
- Multiply this number by 150/100 (or 1.5, reflecting an increase of 50%).
- Note this number in the last row of Table 1.
- To start the development phase of this iteration, take a working calculator.
- Change the calculator in a way that fulfills the following specifications:
- The altered calculator is still usable — its functionality stays intact.
- The altered calculator is more durable, measured by a better performance under the drop test.
- As an additional guideline, you can consider user friendliness and aesthetics. As last options, you might keep the price or the footprint of your new product in mind.
- Feel free to first disassemble the existing calculator and create a completely new case or add on to the existing case.
Note: In this step, let your creative juices flow! Keep track of what you are doing, as you need to be able to reproduce the alterations and create several identical calculators to be subjected to the drop test.
Note: For easy reference, this science project calls your new creations "altered calculator" or "altered calculator — Iteration X" where "X" stands for the iteration number. - When you feel comfortable with your creation, create two more for a total of three identical altered calculators. These make up your sample, which you will submit to the drop test. The figure below shows some examples of the first iteration of altered calculators.
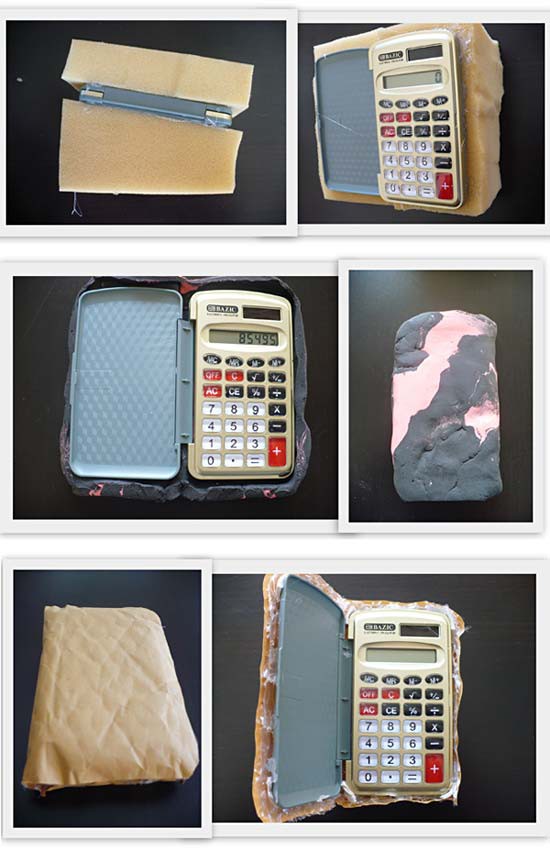 Image Credit: Sabine De Brabandere, Science Buddies / Science Buddies
Figure 4. Images of three first-iteration altered calculators. Note these are three different designs — you will create one design of your own. The first design (top images) uses foam rubber; the second (middle images) uses model magic (a type of clay) and the third uses bubble wrap to create a case.
- Once you have completed the development phase of your first iteration of the altered calculator, you will test this iteration.
- Perform a set of drop tests on all three (or more) of your altered calculators. See the drop test described in section "Calculator Drop Test," above. Here is a brief overview:
- Recopy Table 2, above, in your notebook. Remember to change the title for the new table to "Altered Calculator – Iteration 1."
- Take your calculators to the test area (the same as the one used to test the original calculators).
- Slide one altered calculator off the edge in the same way you did for the original calculators.
- Inspect the dropped calculator for visible and functional damage, and write the results in your table.
- Continue dropping this calculator, inspecting for damage and noting it in your table like Table 2 until the calculator is no longer functional.
- Repeat steps 5c through 5e until you have tested three (or more) altered calculators.
- Analyze your test results of the altered calculator as you did in steps 8 through 10 of the drop test procedure, above.
- Look at Table 1 and compare the average number of drops. Did the altered calculators survive more drops than the original calculators?
- If not, go back to step 1 of this section, and start over with a different design for your altered calculator. After you redesign an altered calculator, repeat the drop tests and see if the new design survives more drops.
- If so, move on to the next step to start your second iteration.
- If you reached 50% improvement in drop test results with your first iteration, consider setting a new acceptance requirement for the second iteration of your design. For example, you could set an upper limit on the weight or size of the altered calculator, to make sure it is not too bulky. You could set a limit on the material cost for a single calculator, to make sure they are not too expensive. You could require that only environmentally friendly products be used, keeping the environmental footprint of the product low. You could require that the case have an aesthetically pleasing design, but still be able to survive the drop test. Can you think of other possibilities? There are many options here — try to think of just one that you would like to test.
- Create three more "altered calculator — iteration 1" calculators. These will be used as the starting point for your new changes as you enter the development phase for the second iteration. The result of this phase will be called "altered calculator — iteration 2."
- Repeat steps 2 through 5 from this section. (Remember to change the title of Table 2 to "Altered Calculator – Iteration 2.")
- Figure 5, below, shows a collage of images depicting examples of altered calculator — iteration 2.
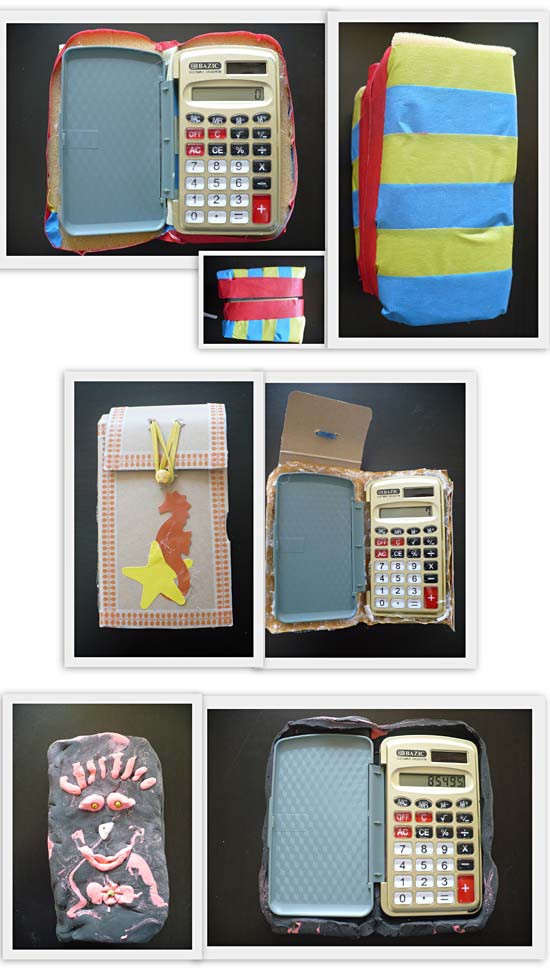 Image Credit: Sabine De Brabandere, Science Buddies / Science Buddies
Figure 5. Collage of three different types of the second iteration of the calculators. The design on the top has tape around the foam rubber added in the first iteration; the middle design has a cardboard box case enclosing the bubble wrap added in the first iteration; and the last design adds a layer of glue between the model magic and the calculator in this iteration. Note: you will only create one design; your second iteration should be a continuation and improvement of your first iteration design.
- Look at Table 1 and compare the average number of drops. Did the second iteration of improvements create more durable calculators? Did you meet the acceptance requirements for this product?
- If not, you may decide to go back to step 7, starting again by engineering a second iteration with a different approach.
- You may add a third iteration if you wish, or just accept this as your final creation.
Visual Representation of Your Results
For your project display board, be sure to include:
- Your acceptance requirement(s)
- A graph representing the average number of drops, showing the changes over iterations:
- Use the calculator versions (original, iteration 1, and iteration 2) as variables for the horizontal axis (x-axis).
- Use the average number of drops as variables for the vertical axis (y-axis).
- Graph the average number of drops where the first damage is visible in one color.
- Graph the average number of drops rendering the calculator unusable in a different color.
- Remember to properly label the axes on your graph. The horizontal axis should be labeled "Calculator Design Iteration" and the vertical axis should be labeled "Number of Drops." Include a legend to indicate which color is for the number of drops where visible damage first occurred, and which color is for the number of drops that rendered the calculator unusable. (Check the Bibliography if you need help making graphs.)
- If available, pictures of original and altered calculators.
- If available, pictures of damaged calculators showing the vulnerable areas of the calculators.
Ask an Expert
Global Connections
The United Nations Sustainable Development Goals (UNSDGs) are a blueprint to achieve a better and more sustainable future for all.

Variations
- Some calculators survive lots and lots of drops from a short height. A drop test with a larger impact (created by a drop from a greater height) can help evaluate these calculators. To do so, find a surface to drop the calculators from:
- The calculator should fall on a hard floor (like concrete or tile).
- The surface should be at a height 2 m or more above the floor. The greater the fall, the larger the impact will be on the calculator and thus, the harder the drop test will be. Some suggestions are:
- the railing of the stairs on the first floor, letting the calculators drop to the ground floor;
- a windowsill on the first or second floor, letting the calculators drop outside to the ground floor; or
- the top of the refrigerator or a high bookshelf.
- If you are desperate to find a high place, hold your arm straight up and slide the calculators from your palm, held so that it forms a horizontal surface.
- For a different type of durability test, let a heavy object (like a textbook or even a brick) fall onto the calculator. Be careful not to damage the floor underneath the calculator — it might be better to do this test outside on asphalt or concrete.
- Think of testing other durability traits of a cellphone/calculator, such as using it in the rain (you could simulate rain with a spray bottle) or dropping it in a puddle (hold it just under the water level for a specific number of seconds).
Careers
If you like this project, you might enjoy exploring these related careers: