Abstract
Imagine that you could make an important piece of laboratory equipment in your kitchen. With this science project idea, you can! You will create your own centrifuge out of a salad spinner and some putty. In science labs, centrifuges are used to separate different liquids and/or solids from each other. You can load your homemade centrifuge with samples and see how they separate. What do you think happens to melted butter in a centrifuge?Summary
Teisha Rowland, PhD, Science Buddies
- Elmer's® is a registered trademark of Elmer's Products, Inc.

Objective
Make a centrifuge from a salad spinner and use your centrifuge to investigate what butter is made of.
Introduction
Have you ever dropped a rock into a river and watched it sink? The rock sinks because it is denser than water. Some objects do not sink in water because they are less dense than water. For example, think of a small Styrofoam "peanut" and a rock that is the same size and shape. If you dropped the Styrofoam and the rock in a glass of water, what do you think would happen to each? The rock would sink while the Styrofoam would float. This is because the rock is denser than the Styrofoam, making the rock weigh a lot more than the Styrofoam peanut. Density is based on how heavy something is, but also on how big something is. More specifically, density is the mass per volume of an object. (Mass is basically how much something weighs and volume is how much space it takes up). As demonstrated here with the rock and Styrofoam peanut, two objects that are the same size (or volume) could have a different density.
Can two things be separated based on their density? Clearly the answer is yes. When you drop a rock in water, the rock "separates" from the water, sinking to the bottom. The rock sinks because of the force of gravity on the mass of the rock, pulling the rock down. If you mix other substances together that have different densities, they will often separate from each other again, due to gravity. (The tendency for substances to separate out of a fluid is called sedimentation.) However, sometimes it takes substances a long time to separate, especially if their densities are similar. A centrifuge is a machine that can speed up the process of separating substances based on their density. Scientists use centrifuges in laboratories all the time to separate one chemical compound or biological substance from another.
How does a centrifuge help separate things based on their density? By spinning really fast! It all comes down to force. For an object to move, it must experience a force that makes it move in a certain direction. Once the object experiences this force, it is set in motion and will continue this motion until it experiences a new, different force. For example, if you are riding in a moving car and it suddenly stops, you will rock forward because your body keeps moving at the same speed and in the same direction. However, a centrifuge is a machine that spins objects in a circle, not in a straight line. What forces act on an object when it is spinning in a circle? When an object moves in a circle, the object is forced to move out, away from the center of the circle. For example, as you ride in that same car and it makes a turn, you experience this circular motion as your body moves to the outside of the turn, away from the direction of the turn. The force that keeps you moving in a circular path, even though your body wants to move away from the center of the circle, is called centripetal force.
What do these forces have to do with a centrifuge? As we mentioned, a centrifuge spins really fast. Substances, or samples, are put in tubes and spun inside of the centrifuge. The samples are usually made up of a mixture of particles in liquid. As the tube spins, these particles hit the side of the tube because they move to the outer edge, away from the center of the centrifuge, just as when your body is pushed to the side of a car making a turn. When the particles hit the side of the tube, they slide down it because of sedimentation. Just as the rock sunk and the less dense Styrofoam peanut floated when put in the glass of water due to the force of gravity, circular motion and gravity cause denser particles to move faster and end up closer to the bottom of the tube than the less-dense particles. This separates the sample into layers, where each layer is made up of particles of the same density, as shown in Figure 1. As more of these denser particles slide to the bottom of the tube, a precipitate may form. A pellet is a relatively hard, solid clump.
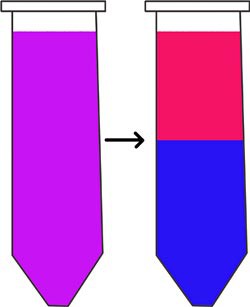 Image Credit: Teisha Rowland, Science Buddies / Science Buddies
Figure 1. When a sample is spun in a centrifuge, particles of different densities separate into layers, as diagrammed here with a tube containing a purple sample (left) separating into red and blue layers (right). The tube on the left contained a mixture of particles that gave it a purple color. In the tube on the right, the blue layer is made up of particles that are denser than those of the red layer. If the blue layer were much smaller and hard and solid, it might be referred to as a precipitate.
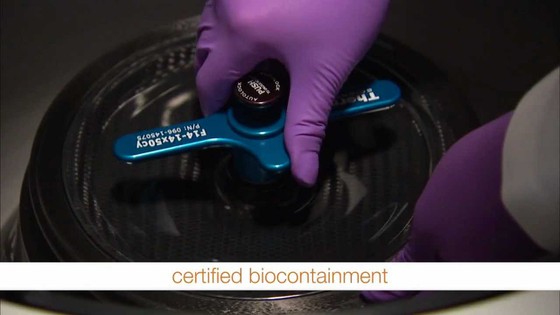
Now that you know how a centrifuge works, you can see what one looks like by watching the video. This video shows a scientist placing samples in a large refrigerated centrifuge. Notice how the scientist types the number 14,000 for the rotations per minute (rpm) setting? This means that the samples will spin in a circle (a rotation) fourteen thousand times in a single minute! That kind of speed generate a lot of force.
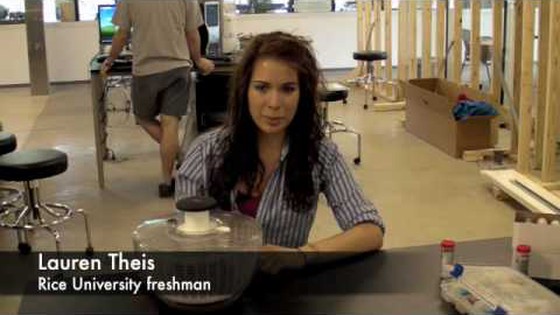
In this biotechnology techniques science project, you will build your own centrifuge using a salad spinner to investigate what butter is made of. A salad spinner can be made into a centrifuge relatively easily. Although a salad spinner centrifuge can not spin at super high speeds like the one in the laboratory video it is still useful. In fact, such a centrifuge has even been used to analyze human blood samples! (Watch the video to hear about two students at Rice University who made a centrifuge from a salad spinner to do this.) When you centrifuge melted butter, it will separate into two layers. But what are those two layers made of? You will be mixing melted butter with milk and then with olive oil to try and find out!
Terms and Concepts
- Density
- Mass
- Volume
- Force
- Gravity
- Sedimentation
- Centrifuge
- Circular motion
- Centripetal force
- Particles
- Layers
- Pellet
- Rotations per minute (rpm)
- Homogeneous
Questions
- How does a centrifuge separate particles based on their density?
- How is a clothes dryer like a centrifuge? How are they different?
- What is butter made of? How do you think butter may be similar to milk or olive oil?
- Knowing that oil is less dense than water, if you mixed oil and water together in a tube and they formed two layers, which layer do you think the oil would be in? The top or the bottom layer?
Bibliography
- Wood, C. (2011, July 15). Centrifuges. Explain That Stuff. Retrieved August 20, 2012.
- The Physics Classroom. (n.d.). The Centripetal force requirement. Retrieved August 20, 2012.
- Wikipedia contributors. (2012, August 17). Butter. Wikipedia. Retrieved August 20, 2012.
- Thermo Fisher Scientific. (2012, October 22). Sorvall LYNX, Superspeed Centrifuge Series. Retrieved June 20, 2013.
- Rice University. (2010, April 30). The Sally Centrifuge. Retrieved August 20, 2012.
Materials and Equipment
- Elmer's® Tac 'N Stik reusable adhesive or a similar moldable adhesive putty. Elmer's® adhesive putty is available from Amazon.com.
- 50 mL centrifuge tubes (12). A package of 50 centrifuge tubes is available from Amazon.com.
- Salad spinner. The basket in the salad spinner should be at least 17 cm in diameter and 11 cm tall; if it is smaller than this, the tubes may not fit. It should use a hand turning mechanism or pull chord (a pump mechanism might make the interior of the salad spinner too small to fit tubes in correctly). You may want to try placing tubes in the salad spinner to see if they fit before deciding to use it. A salad spinner that fits these criteria, the Xtraordinary Home Products large salad spinner, is available from Amazon.com.
- Rubber bands (3 or 4)
- Timer or clock that shows seconds
- Butter (three 4-oz. sticks)
- Microwave and microwaveable cup or bowl. Alternatively, a stove and pot or pan can be used with adult help.
- Forks (3)
- Cup with a pour spout. It must be able to hold at least 1 cup.
- Paper towel or rag
- Optional: Drinking glasses or vase (large enough to hold 9 centrifuge tubes standing up straight)
- Optional: Camera
- Milk (1/3 cup)
- Olive oil (1/3 cup)
- Adult helper
- Lab notebook
Disclaimer: Science Buddies participates in affiliate programs with Home Science Tools, Amazon.com, Carolina Biological, and Jameco Electronics. Proceeds from the affiliate programs help support Science Buddies, a 501(c)(3) public charity, and keep our resources free for everyone. Our top priority is student learning. If you have any comments (positive or negative) related to purchases you've made for science projects from recommendations on our site, please let us know. Write to us at scibuddy@sciencebuddies.org.
Experimental Procedure
Make Your Centrifuge
In the first part of this science project, you will make your centrifuge using a salad spinner, adhesive putty, and rubber bands.
- Take out two small sticks of adhesive putty, or an amount of adhesive putty that you think could easily cup the bottom of a 50 milliliter (mL) centrifuge tube.
- Stretch the adhesive putty out and fold it over on itself.
- Repeat step 2 until you have made a flat, roundish piece of adhesive putty that is a little larger than a silver dollar.
- Mold the adhesive putty around the bottom of a 50 mL centrifuge tube, covering the cone part (up to about the mark that says "5"). It should look like Figure 2.
- Mold the putty fairly thickly around the tube.
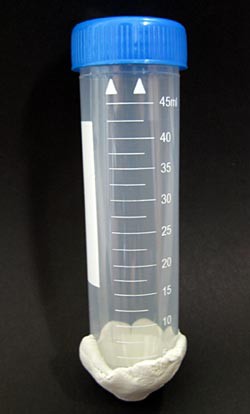 Image Credit: Teisha Rowland, Science Buddies / Science Buddies
Figure 2. Mold the putty so that it fits in a thick layer around the very bottom of the 50 mL centrifuge tube.
- Repeat steps 1-4 with a second tube.
- Place the two tubes in the salad spinner basket as shown in Figure 3. Put each of the tubes on opposite sides of the basket and tilt them so that their tops meet in the center.
- Wedge and push the putty ends of the tubes into the bottom edge of the basket.
- Try to keep tubes in place by molding the putty to the basket a little.
- Do not worry if the tubes fall over. You will be securing them in place more firmly in the following steps.
- Wedge and push the putty ends of the tubes into the bottom edge of the basket.
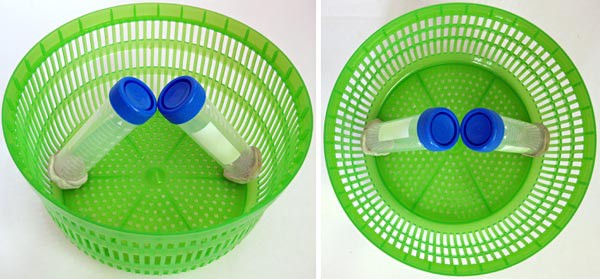 Image Credit: Teisha Rowland, Science Buddies / Science Buddies
Figure 3. Tilt the two tubes so that their putty ends are wedged in the bottom edge of the basket and their tops meet in the center. The pictures show the tubes from two different angles in the basket.
- Using two new tubes, repeat steps 1-6 so that you have a total of four tubes with putty on one end. Place the two new tubes in the basket as shown in Figure 4. Put the new tubes between the ones already in the basket and tilt the new tubes so that their tops also meet in the center.
- Again, wedge and push the putty ends of the tubes down into the edge of the basket.
- Try to keep tubes in place by molding the putty to the basket a little.
- Each tube should be about the same distance from the tube on its left or right.
- Do not worry if the tubes fall over. Just try to keep them roughly in place.
- Again, wedge and push the putty ends of the tubes down into the edge of the basket.
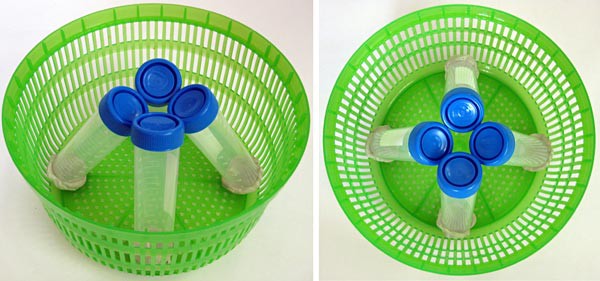 Image Credit: Teisha Rowland, Science Buddies / Science Buddies
Figure 4. Place four tubes with putty on their ends in the salad spinner basket so that each tube has its putty end wedged into the bottom edge of the basket and the tubes' tops meet in the center. Keep all tubes equally spaced from each other. The pictures show the tubes in the basket from two different angles.
- Place four small pieces of putty in between the tubes where they meet at the center of the basket, as shown in Figure 5.
- This will help keep the tubes in place when they are being spun.
- Try to adjust the tubes so that they are as centered as possible.
- Using thicker pieces of putty will work better.
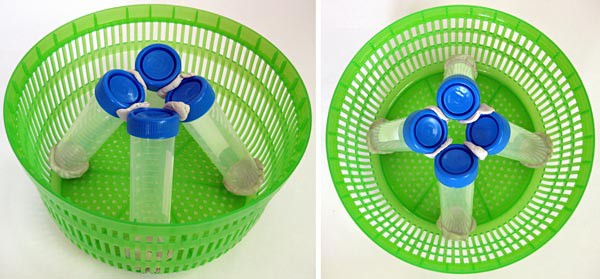 Image Credit: Teisha Rowland, Science Buddies / Science Buddies
Figure 5. Place four small pieces of putty in between the tubes where they meet at the basket's center to help keep them in place. The pictures show the tubes in the basket from two different angles.
- Once the tubes are well-centered and seem stable, put a rubber band tightly around the tops of the tubes, as shown in Figure 6. Put 3 or 4 rubber bands on the tubes in this way.
- This will help keep the tubes in place when they are being spun.
- Make sure the rubber bands are tight around the tubes' tops.
- If you have larger rubber bands, fold the band on itself and put both loops around the tubes' tops.
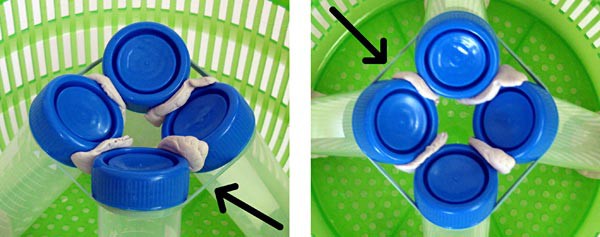 Image Credit: Teisha Rowland, Science Buddies / Science Buddies
Figure 6. Put 3 or 4 rubber bands around the tubes' tops, as shown here with one rubber band (marked by the arrow). This will help keep the tubes in place. The pictures show the tubes in the basket from two different angles.
- Put the lid on the salad spinner and make sure it fits with the tubes inside.
- If it does not quite fit, try slightly adjusting the positioning of the tubes to see if you can get the lid to fit.
- If you still cannot fit the lid on, you may need to use a larger salad spinner or a different style of salad spinner for this project. Note: See the Materials and Equipment list for details on the kind of salad spinner needed.
- Set a timer for one minute or have a clock nearby.
- Spin the salad spinner with the tubes inside for one minute.
- Tip: Try holding the salad spinner flat on a counter with one hand while spinning the salad spinner with your other hand. You might want to ask an adult helper to hold the salad spinner in place.
- If the tubes do not stay in place, try any of the following:
- If it looks like the tubes' tops are not centered and equally spaced from each other, try to adjust them.
- Add more putty between the tubes.
- Put another rubber band around the tubes' tops.
- If it is the putty ends that came loose, push the ends more into the edge of the basket, molding the putty into the basket.
- If the tubes stay in place, your salad spinner is ready to be used as a centrifuge.
Centrifuging Melted Butter
In this part of the science project, you will test your salad spinner centrifuge on butter and other household foods to determine what butter is made of and see a centrifuge in action.
- First, copy Table 1 into your lab notebook.
- In your lab notebook, you will be writing down your observations into this data table.
| Melted Butter | Melted Butter with Milk | Melted Butter with Olive Oil | ||||
| Top Layer | Bottom Layer | Top Layer | Bottom Layer | Top Layer | Bottom Layer | |
| Tube #1 | ||||||
| Tube #2 | ||||||
| Tube #3 | ||||||
Table 1. In your lab notebook, make a data table like this one to record your results from centrifuging three different samples in the salad spinner.
- Remove the tubes from the centrifuge, one by one.
- Take off the rubber bands and remove all of the putty from each tube.
- If the putty gets wet, it may not work well anymore, so try to keep it dry.
- In a microwave or on a stove, melt three 4 ounce (oz.) sticks of butter (each stick has 8 tablespoons [tbsp.]). When the butter is melted, it should look like Figure 7.
- To melt the butter in the microwave, put it in a microwaveable cup or bowl and microwave it for two minutes at 50% power. Then stir it with a fork, using the fork to break up any pieces. If all of it is not a very warm liquid, put it back in the microwave for 30 seconds at 50% power. Repeat this until all of the butter is very warm and completely melted.
- To melt the butter on a stove, put it in a pot or pan and use low heat until the butter is completely melted. Ask an adult to help you do this.
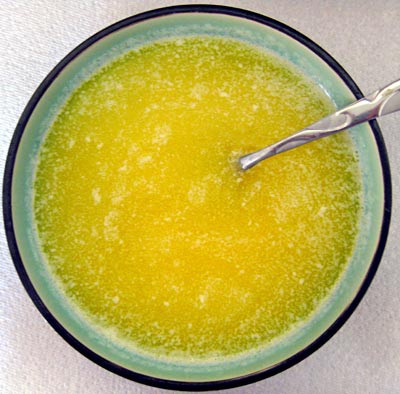 Image Credit: Teisha Rowland, Science Buddies / Science Buddies
Figure 7. Melt three 4 oz. sticks of butter using a microwave or a stove. After melting, stirring, and cooling a little (although it should still be warm), it should look like the melted butter shown here.
- Mix the melted butter well with the fork.
- Stir the mixture until it looks fairly homogeneous, or until all parts of the mixture look similar.
- Fill each of three centrifuge tubes with 40 mL of melted butter.
- You might want to first transfer the melted butter to a cup with a pour spout. This will make pouring the melted butter into the tubes easier.
- Right before pouring the butter into the tubes, stir it well using the fork.
- Use the markings on the tubes to see how much 40 mL is. The "40" mark near the top is where you should stop pouring to get 40 mL.
- After pouring melted butter into a tube, put its lid on tightly.
- If some melted butter leaks in the centrifuge, it can be messy and may even damage the centrifuge.
- Fill a fourth tube with 40 mL of water.
- This tube will be used to balance one of the other three tubes when you spin them in the centrifuge.
- Wipe all four tubes down with a paper towel or rag.
- If liquid gets on the adhesive putty it can damage it and make it unusable in the centrifuge.
- Arrange the tubes in the centrifuge, as shown in Figure 6 in the previous section.
- Set the centrifuge up with these tubes as you did in the section titled "Make Your Centrifuge," following steps 4-10, using the putty pieces you already molded and prepared.
- Spin the tubes in the centrifuge for one minute.
- Do this as you did in the "Make Your Centrifuge" section in steps 11-12.
- Try to spin the centrifuge at a regular speed for most of the minute.
- When the minute is up, stop spinning the centrifuge and let the tubes slowly come to a stop (do not quickly stop the centrifuge from spinning; doing that might cause your samples to remix).
- Tip: If one of the tubes comes loose while you are spinning them, stop the timer and the centrifuge. Try to figure out why the tube came loose and troubleshoot the problem by following step 12b in the previous section. After securing the tube, continue the timer and continue spinning the tubes.
- Carefully remove the tubes from the centrifuge and remove the putty from the tubes. Look at the tubes again.
- You should be able to see two layers. What are the colors of the two layers? Does one take up more space in the tube than the other one? Does one seem oilier than the other? Which layer do you think is made of denser particles? Why?
- In your lab notebook, record your observations in your data table. Also determine and write down the approximate size of each layer using the marks on the tube (which are in milliliters).
- If you want to examine the layers in more detail later, you can set the tubes in a glass or vase so that they are sitting up straight. Or, if you have a camera, you can take a picture of your tubes.
- Next you will be centrifuging melted butter with milk, which contains milk proteins, to see if this is similar to something in the butter. What do you expect to see if something in the butter is similar to something in the milk? Do you think the layers will change? How? Start by measuring 1/3 cup of milk and warming it up using a microwave or a stove.
- Why do you think the milk should be warmed before adding it to the butter? Hint: If you cannot figure this out, try melting some more butter and mixing it with cold milk.
- To warm up the milk in the microwave, put it in a microwaveable cup or bowl and microwave it for one minute and 30 seconds at 50% power. Ask an adult to help you see if the milk is warm. If it is not warm, put it back in the microwave for 15 seconds at 50% power. Repeat this until the milk is warm.
- To warm the milk on a stove, put it in a pot or pan and use low heat until the milk is warm. Ask an adult to help you do this.
- In a cup with a pour spout, add 1/3 cup warm milk and 1/3 cup warm melted butter. Stir the mixture well with a fork.
- If you notice any solid clumps, the melted butter may have cooled down enough that it is starting to re-solidify. If this happens, microwave or heat the milk-and-butter mixture on the stove until it is all warm again.
- Stir the mixture until it looks fairly homogeneous.
- To three new tubes, add 40 mL of the warm milk-and-melted-butter mixture.
- Stir the mixture well right before pouring it in the tubes.
- Again pour the liquid up to the "40" mark on the tubes.
- Keep the fourth tube filled with 40 mL of water.
- Repeat steps 7-10.
- How different do the layers look from the layers you saw when you spun melted butter alone? Are the sizes of the layers larger or smaller? How do the layers look similar? Why do you think this is so and what does this tell you about what is in butter?
- Hint: Keep in mind that you are using half the amount of melted butter as you did before (20 mL now, mixed with 20 mL of milk, instead of 40 mL of butter). This means that the butter component alone should make layers that are half the size as they were before.
- In your lab notebook, record your observations in your data table for the columns on testing melted butter with milk. Also determine and write down the approximate size of each layer using the milliliter marks on the tube.
- If you want to examine the layers in more detail later, you can set the tubes in a glass or vase so that they sit up straight. Or, if you have a camera, take a picture of the tubes.
- Lastly, you will be centrifuging melted butter with olive oil, which is a fat, to see if this is similar to something in the butter. Do you think something in the butter is similar to olive oil? Start by measuring 1/3 cup of olive oil and warming it using a microwave or a stove.
- To warm the olive oil in the microwave, put it in a microwaveable cup or bowl and microwave it for 30 seconds at 50% power. Ask an adult to help you see if the oil is warm. If it is not warm, put it back in the microwave for 15 seconds at 50% power. Repeat this until the olive oil is warm.
- To warm the olive oil on a stove, put it in a pot or pan and use low heat until the olive oil is warm (if it starts smoking, it is too hot). Ask an adult to help you heat the oil till warm.
- Repeat steps 12-14, but this time substitute warm olive oil for milk.
- How do the layers look different from the layers you saw when you spun melted butter alone? Are the sizes of the layers different? How do the layers look similar? Why do you think this is so and what does this tell you about what is in butter?
- In your lab notebook, record your observations in your data table for the columns on testing melted butter with olive oil. Also determine and write down the approximate size of each layer using the marks on the tube.
- If you want to examine the layers more later on, you can set the tubes in a glass or vase so that they are sitting up straight. Or, if you have a camera, you can take a picture of your tubes.
- Once you have finished writing your observations, look at the data table in your lab notebook and analyze your results.
- How were the layers different between the mixtures of melted butter alone, melted butter and milk, and melted butter and olive oil?
- What do you think is in the different layers you saw? Why do you think that? Hint: Think about how the layers changed in size, and what milk and olive oil are made of mainly. You may also need to go back to your background reading and learn about what butter is made of.
Ask an Expert
Global Connections
The United Nations Sustainable Development Goals (UNSDGs) are a blueprint to achieve a better and more sustainable future for all.

Variations
- A centrifuge separates particles based on density, but gravity can also do this over time. Try this project again but also time how long it takes the tubes to separate into layers just by making them sit vertically (straight up in a drinking glass or vase). How long does it take the mixed mixtures to completely separate into the layers you saw from centrifuging? Does it take much longer than the minute it took for centrifuging? How efficiently does the centrifuge separate other mixtures?
- In this science project you centrifuged butter with milk or olive oil to investigate butter, but there are many other things you can centrifuge to learn more about them. For example, water-soluble liquids and fat-soluble liquids do not generally mix well and can be separated easily. You can try to determine the solubility of a liquid by mixing it in equal parts with carrot juice or another water-soluble liquid and olive oil. Centrifuge the mixture and see which layer got bigger. Did the liquid turn out to be water-soluble or fat-soluble? Some things you could test include rubbing alcohol, molasses, corn syrup, honey, maple syrup, petroleum jelly, vinegar, different kinds of oils, and liquid dish detergent.
- If you spin a sample faster in the centrifuge, will it separate better? Make a mixture of something (you can use melted butter again or try something else, such as olive oil, carrot juice, and sand) and see what happens when you spin it slowly in the centrifuge for one minute. Compare how this looks to when you spin it faster in the centrifuge for one minute. You can count the number of turns you do in a minute so you know how slow or fast you are spinning the sample. How did spinning the mixture fast compare to spinning it slow? Is this what you would expect?
- How can you make your salad spinner centrifuge work even better? Think of how to improve upon the design of your centrifuge, such as by using other kinds of tubes, other ways to attach the tubes, making it more durable, or even using a different kind of system to spin the tubes (such as a different salad spinner style or even a bicycle wheel). Determine how you can measure your centrifuge's efficiency, perhaps by looking at how quickly two layers of a mixture are separated in a tube or determining how many times the tubes make a full rotation in the centrifuge in one minute (or rotations per minute [rpm]). Can you make your centrifuge more efficient? Is it close to being as efficient as a laboratory centrifuge?
- As an example of another kind of salad spinner centrifuge, here is one design used to spin small tubes: Baichtal, J. (2010, March 16). Make a lab centrifuge out of a salad spinner. Make. Retrieved August 21, 2012, from http://blog.makezine.com/2010/03/16/make-a-lab-centrifuge-out-of-a-sala/
- For more science project ideas on density and centripetal force, see:
Careers
If you like this project, you might enjoy exploring these related careers: