Abstract
Suspension bridges, with their tall towers, long spans, and gracefully curving cables, are beautiful examples of the work of civil engineers. How do the cables and towers carry the load that is on the bridge? Can a suspension bridge carry a greater load than a simple beam bridge? This science project shows you how to find out.Summary
Edited by Andrew Olson, Ph.D., and Teisha Rowland, Ph.D., Science Buddies
Sources
The experiment procedure for this science project idea is from:
- WGBH Educational Foundation. (2001). Building Big: Bridges PBS Online. Retrieved June 13, 2006.
Objective
Compare the strength of two simple bridge designs: a beam bridge vs. a suspension bridge.
Introduction
The Akashi-Kaikyo Bridge, shown in Figure 1, is the longest suspension bridge. in the world, at the time of this writing (January, 2014). The bridge is 3911 meters (m) long overall, with a central span of 1991 m. The bridge is in Japan, where it connects the city of Kobe (on the large island of Honshu) with Iwaya (on Awaji Island, a smaller island in Japan). In addition to the sheer length of the bridge, the engineers who designed it also had to consider the environment: high winds, strong sea currents, salt air, and the potential for earthquakes in the area.
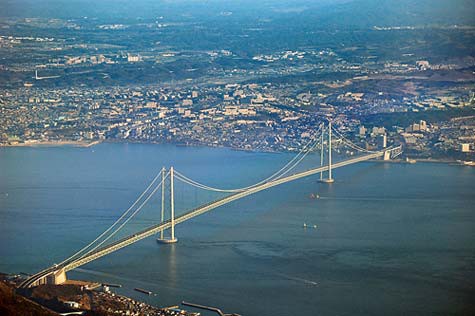 Image Credit: Kim Rotzel, Wikimedia / Creative Commons Attribution-Share Alike 3.0 Unported license
Figure 1. The Akashi-Kaikyo Bridge, in Japan, is the longest suspension bridge in the world. (Image credit: Kim Rötzel)
In a suspension bridge, the bridge deck (the part of the bridge that supports the load, such as cars and their passengers) hangs from, or is suspended by, massive cables. These cables stretch between the bridge's towers, and are securely anchored at each end. The cables are thus under tension (they are being tightly pulled on) while the bridge towers are under compression (they are being compressed, or pressed down on).
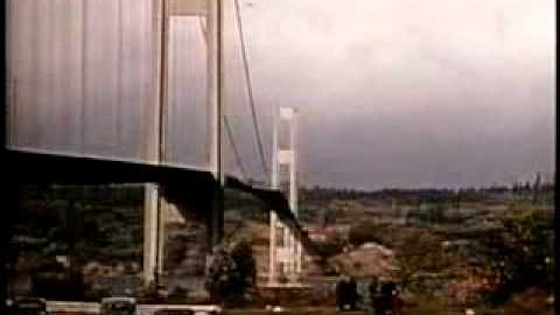
For long spans, the suspension bridge is usually the most economical choice, because the amount of material required per unit length is less than for other bridge types. However, since suspension bridges are relatively flexible structures, stress forces introduced by high winds can be a serious problem. The dramatic collapse of the Tacoma Narrows Bridge, captured on film, is a pointed example. You can watch the video below to find out more about the Tacoma Narrows Bridge and its collapse in 1940.
In this engineering science project, you will use simple construction materials to build and test two types of bridges: a simple suspension bridge and a beam bridge. A beam bridge is the simplest type of bridge, and is supported by a raised part on either end. For example, a beam bridge could be as simple as a wood plank put down to cross a stream. Which type of bridge do you think can support a heavier load?
Terms and Concepts
- Suspension bridge
- Bridge deck
- Tension
- Compression
- Beam bridge
Questions
- In a suspension bridge, which parts of the bridge are under compression?
- Which parts of a suspension bridge are under tension?
- How is a suspension bridge different from a beam bridge? Why might they be used in different situations?
- How does an engineer decide which type of bridge to use for a particular site?
Bibliography
This science project idea came from the PBS website, "Building Big." Their page on bridges is a good place to start your background research:
- WGBH Educational Foundation. (2001). Building Big: Bridges. PBS Online. Retrieved June 13, 2006.
On this website, you can learn about different types of bridges (arch, beam, suspension, and cable-stayed), and then play "Build A Bridge." You will be given a site description, and you have to decide which bridge type would work best there.
- NOVA Online. (1997). Super Bridge. WGBH. Retrieved June 13, 2006.
What can happen when the design is not quite right:
- Ketchum, M. (n.d.). Mark Ketchum's Bridge Collapse Page. Retrieved June 13, 2006.
- Youtube, CalPolyPomonaDemos. (2013, July 8). Tacoma Narrows bridge collapse. Retrieved October 27, 2017.
Check out this Science Buddies resource on building materials and forces:
- Pruitt, B., T. Bailey, and A. Tung. (2006). Stress, Strain, & Strength: An Introduction to Materials Science. Department of Mechanical Engineering, Stanford University (published by Science Buddies with permission)
Materials and Equipment
- Box of drinking straws
- Masking tape or painter's tape
- Thread
- Scissors
- Paperclips (4). At least two of the paperclips should be large ones.
- Paper cup, at least 8-oz.
- Pennies (at least 350). Alternatively you could use other coins, such as quarters (at least 150), as long as you use all of the same type of coin.
- Metric ruler or tape measure
- Chairs, tables, or desks that you can arrange to build a bridge between (2)
- Optional: Scale, accurate to 1 g, such as the digital pocket scale available from Amazon.com
- Lab notebook
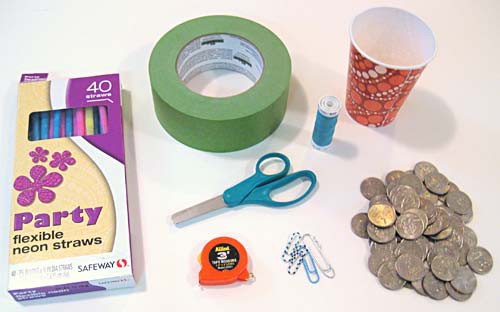 Image Credit: Teisha Rowland, Science Buddies / Science Buddies
Figure 2. To do this science project, you will need materials likes the ones shown here. Note: At least two of the paperclips should be large ones, and you can use other coins instead of quarters.
Disclaimer: Science Buddies participates in affiliate programs with Home Science Tools, Amazon.com, Carolina Biological, and Jameco Electronics. Proceeds from the affiliate programs help support Science Buddies, a 501(c)(3) public charity, and keep our resources free for everyone. Our top priority is student learning. If you have any comments (positive or negative) related to purchases you've made for science projects from recommendations on our site, please let us know. Write to us at scibuddy@sciencebuddies.org.
Experimental Procedure
- If your straws are the flexible type, cut the flexible part off (so that you are left with a long, straight, non-bendable straw piece), as shown in Figure 3. Cut 10 straws this way. Make sure they are all the same length; trim some using the scissors if necessary.
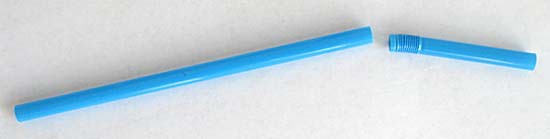 Image Credit: Teisha Rowland, Science Buddies / Science Buddies
- Cut two short pieces of straw, each 3 centimeters (cm) long, as shown in Figure 4.
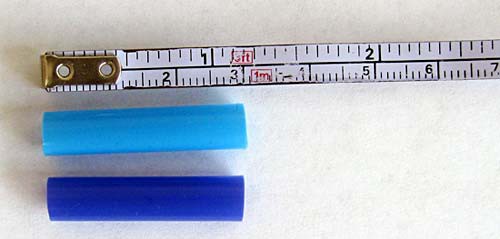 Image Credit: Teisha Rowland, Science Buddies / Science Buddies
-
Tape two long straws on either side of one of the short pieces of straw. Do this at one end of the long straws. Then, tape the long straws together at the other end, as shown in Figure 5. This is a tower for your suspension bridge.
- If you are using flexible straws, the "long" straws will be the ones you prepared in step 1, above. If you are using non-flexible straws, use uncut straws for the long straws.
- Repeat step 3 to create a second tower.
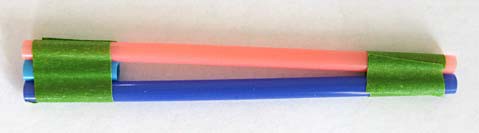 Image Credit: Teisha Rowland, Science Buddies / Science Buddies
-
Tape one tower to the edge of a desk, table, or chair, as shown in Figure 6. Tape the second tower to a second piece of furniture at the same height. Position the towers far enough apart so that you could fit a straw between them, as shown in Figure 7.
- If you are using flexible straws, you may need to position the towers about 13 cm apart.
- If you are using non-flexible straws, you may need to position the towers about 17 cm apart.
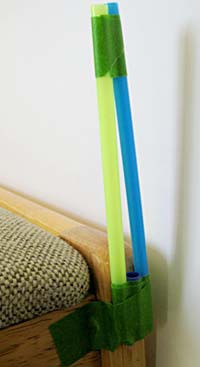 Image Credit: Teisha Rowland, Science Buddies / Science Buddies
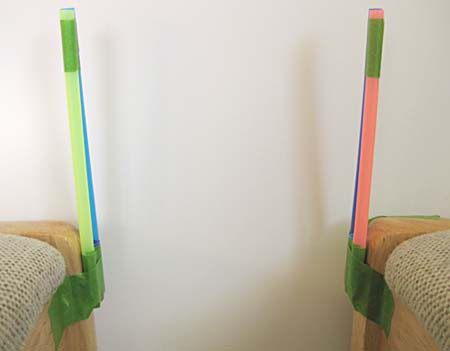 Image Credit: Teisha Rowland, Science Buddies / Science Buddies
Move the tower positions so that you could fit one long straw between them.
-
Place another straw between the towers so its ends rest on the short pieces, as shown in Figure 8. This straw is the bridge deck. Now you have a simple beam bridge.
- If you are using flexible straws, use one of the straws you cut in step 1, above, as the bridge deck.
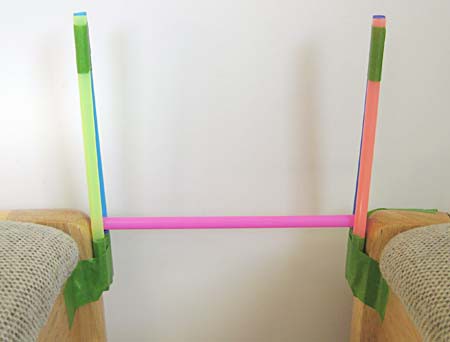 Image Credit: Teisha Rowland, Science Buddies / Science Buddies
You now have a simple beam bridge.
- Make a load tester by unbending a large paperclip into a V-shape. Poke the ends of the paperclip into opposite sides of a paper cup, just below the thick rim, as shown in Figure 9.
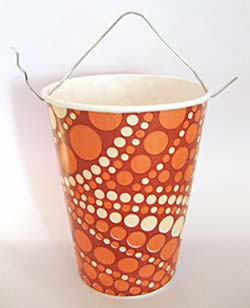 Image Credit: Teisha Rowland, Science Buddies / Science Buddies
- Use a second large paperclip to hang the load tester over the bridge deck. Do this by attaching the two large paperclips together, and then sliding the new one around the bridge deck straw, as shown in Figure 10.
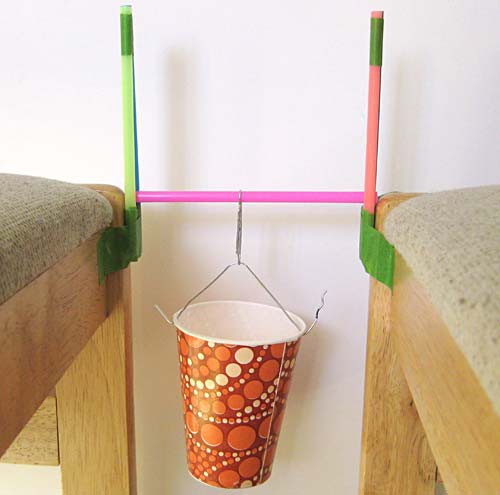 Image Credit: Teisha Rowland, Science Buddies / Science Buddies
- In your lab notebook, make a data table like Table 1. You will be recording your results in this data table.
| Bridge Design | Trial | Number of Pennies | Average Number of Pennies |
|---|---|---|---|
| Beam Bridge | 1 | ||
| 2 | |||
| 3 | |||
| Suspension Bridge | 1 | ||
| 2 | |||
| 3 |
If you use coins other than pennies, be sure to change the words in your data table.
-
Add pennies (or other coins, all of the same type) one at a time into the load tester cup. In your data table, record how many pennies the paper cup can hold before the bridge fails. This will be trial 1. Record any other observations you make, such as how the bridge failed, in your lab notebook as well.
- If you have a scale, you could also weigh the mass (in grams [g]) of all of the pennies together that caused the bridge to fail. If you do this, make another data table like Table 1 in your lab notebook but instead of "Number of Pennies" label the columns "Mass of the Load (in grams)."
-
Replace the straw that was the bridge deck with a new straw.
- If you are using flexible straws, this would be one of the other ones you cut in step 1.
- You are replacing the bridge deck straw because it likely became bent and damaged when the bridge failed.
- Repeat steps 10–11 at least two more times so that you have done a total of at least three trials using the beam bridge design.
- Now change the beam bridge into a suspension bridge. Tie the center of a 100 cm piece of thread (acting as your bridge cable) around the middle of a new bridge deck straw. Place the straw between the towers. Pass each end of the cable over a tower and down the other side.
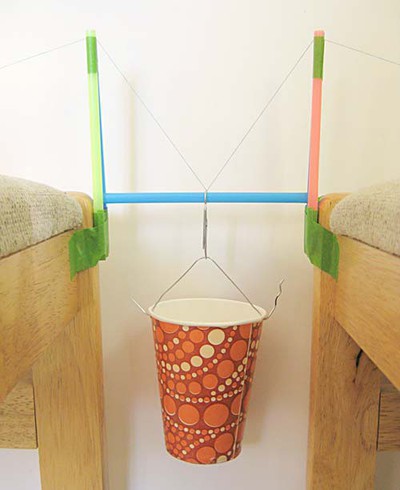
- To anchor the suspension bridge, tie each end of the cable around a paperclip. Slide the paperclips away from the towers until the cable pulls tight. Then tape the paperclips firmly to the furniture, as shown in Figure 11. Overall, the suspension bridge setup should look similar to Figure 12.
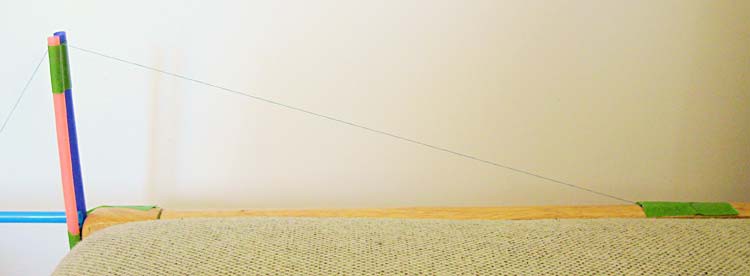 Image Credit: Teisha Rowland, Science Buddies / Science Buddies
as shown here (for only the right side of the bridge), so that the cable is tight..
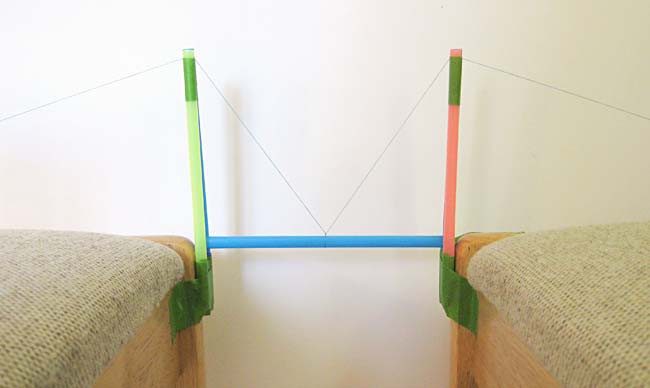 Image Credit: Teisha Rowland, Science Buddies / Science Buddies
The cables are taped to the furniture outside of the picture, to the right and left sides.
- Attach the load tester cup, as shown in Figure 13, and repeat steps 10-12 so that you have tested the suspension bridge design in at least three trials. Be sure to record your results in your data table.
 Image Credit: Teisha Rowland, Science Buddies / Science Buddies
-
Calculate the average number of pennies needed to make each bridge design fail and record your results in your data table.
- For example, if for the beam bridge it took 180 pennies in trial 1, 190 pennies in trial 2, and 195 pennies in trial 3 to make the bridge fail, the average number of pennies needed to make the bridge beam fail would be 188 (since 180 + 190 + 195 = 565, and divided by 3 equals 188).
- Make a bar graph of your results. On the x-axis (the horizontal axis) put the name of the bridge design and on the y-axis (the vertical axis) put the average number of pennies needed for that design to fail.
- If you weighed the mass of the pennies, you can repeat steps 16 to 17 to calculate the average mass of the load (in grams) needed to fail each bridge design and then make a bar graph of your results.
- Analyze your results. Looking at your data and graph(s), which bridge design could hold more pennies? Which bridge design is stronger? Is it a little stronger, or a lot stronger? Why do you think you got the results that you did?
Ask an Expert
Global Connections
The United Nations Sustainable Development Goals (UNSDGs) are a blueprint to achieve a better and more sustainable future for all.

Variations
- If you eliminate the portion of the cable from the towers to the anchorage (leaving only the portion of the cable from the bridge deck to the towers) what happens when you test your bridge? Why?
- Failure analysis. When your suspension bridge failed, what part (or parts) failed first? For example, was the failure due to weakness of materials used or weakness at a joint? Can you think of ways to redesign your bridge to make the part (or parts) that failed stronger? Build your proposed solution and test it.
- Can you design and build a straw suspension bridge that spans a gap twice as wide and supports the same amount of weight? What parts of the bridge design need to change? Try it!
Careers
If you like this project, you might enjoy exploring these related careers: