Abstract
Sorry, you don't get to use a jackhammer for this project, but you'll find out another way to break concrete (not to mention what makes it strongest).Summary
Andrew Olson, Ph.D., Science Buddies
Sources
This project is based on:
- Carstens, R.A., 2004. Concrete Breakers, California State Science Fair Abstract. Retrieved November 17, 2006.
Objective
The goal of this project is to find out how the ratio of sand to cement changes the strength of concrete.
Introduction
Concrete is one of those things that most of us don't think about much, yet we use it every day. We walk on concrete sidewalks, drive on concrete roads, and live and work in buildings with foundations made of concrete. It is a durable material, that is very strong in compression. It can be strengthened in tension by adding reinforcing bars made of iron or steel. It can be poured into many different shapes.
What is concrete made of? Concrete is a mixture of Portland cement, construction aggregate (usually a mixture of sand and gravel), and water. The ratios of these materials make a big difference in the strength of the final product. In this project you'll make concrete bricks to determine the ratio of sand to Portland cement that produces the strongest material.
Terms and Concepts
To do this project, you should do research that enables you to understand the following terms and concepts:
- concrete,
- cement (Portland cement),
- construction aggregate,
- hydration,
- curing.
Questions
- What happens to the components of concrete during the curing process?
- How long does concrete take to cure for maximum strength?
Bibliography
Here are some good resources on concrete to get you started on your background research:
- Wikipedia contributors, 2006. Concrete, Wikipedia, The Free Encyclopedia. Retrieved November 17, 2006.
- MAST, 1995. Concrete: Table of Contents, Department of Materials Science and Engineering, University of Illinois Urbana-Champaign. Retrieved November 17, 2006.
- PCA, 2006. Cement and Concrete Basics: Frequently Asked Questions, Portland Cement Association. Retrieved November 17, 2006.
Materials and Equipment
To do this experiment you will need the following materials and equipment:
- materials for making concrete brick forms:
- 2 × 4 lumber,
- plywood,
- double-headed nails (for easy removal when disassembling forms),
- hammer,
- saw,
- tape measure,
- pencil;
- materials for making concrete mixes:
- dust mask,
- gloves,
- Portland cement,
- sand,
- water,
- bucket for mixing concrete,
- trowel,
- chalk for labeling bricks after setting;
- materials for testing cured bricks:
- about 15" length of pre-drilled angle iron (e.g., for shelf supports),
- hacksaw,
- 3 each bolt, washer, lock washer, nut, for attaching angle iron pieces together to make a sturdy hanger,
- S-hook,
- 5-gallon bucket,
- 2 sturdy tables or workbenches for supporting bricks during testing,
- steel weights (several tens of kilograms),
- bathroom scale.
Experimental Procedure
- Using 2 × 4 lumber and plywood, make a form for concrete bricks. Each brick should be the same size, e.g., 4 × 4 × 20 cm. Use plywood for the bottom of the form, and 2 × 4 lumber for the sides and ends. You should make at least 3 bricks from each concrete mix. We recommend testing 5 different concrete mixes, so you'll need enough forms to make 15 bricks.
- It's a good idea to wear a dust mask when handling the dry Portland cement. You may want to wear rubber or vinyl gloves when mixing and handling the wet concrete.
-
Mix batches of concrete using sand and Portland cement in the following ratios. Read the directions on the bag of cement to determine how much water to use for each mixture.
- 20% sand, 80% cement,
- 30% sand, 70% cement,
- 40% sand, 60% cement,
- 50% sand, 50% cement,
- 60% sand, 40% cement,
- 70% sand, 30% cement,
- 80% sand, 20% cement.
- For each concrete batch, mix sand, cement, and water thoroughly, then pour into forms to make 3 bricks. Label each form with sand/cement ratio of concrete used.
- Allow the bricks to set overnight. Label each brick with sand/cement ratio used, then disassemble forms to remove the bricks. Allow the bricks to cure for at least two weeks before testing.
- To test the bricks, you will place each brick between two sturdy workbenches (or tables).
-
Construct a metal hanger from pre-drilled 1" wide (2.5 cm) angle-iron.
- Cut two 10 cm pieces (horizontal), one 15 cm piece (vertical) and one 2.5 cm piece (brace).
-
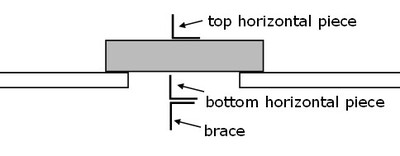
You'll have one horizontal piece resting on top of the brick. Cut away a 2.5 cm section of the horizontal flange from the end so that you can attach the vertical piece hanging down from the pre-drilled hole at the end (see Figure 1).

Figure 1. Drawing of angle iron with one-inch section of horizontal flange cut away. Use this for the top horizontal piece of the hanger apparatus.
-
Bolt the top horizontal angle iron to the vertical angle iron. Then bolt the lower horizontal angle iron to the vertical angle iron. Bolt the small brace in place below the lower horizontal angle iron. The brace is to keep the lower horizontal piece from sagging as weight is added to the hanger. The assembled hanger is shown schematically in Figure 2 (side view, brick cross-section is in gray).
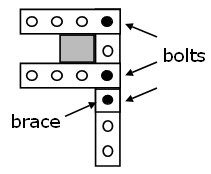
Diagram showing a cross-section of a brick that is surrounded on three sides by pieces of angle irons that are bolted together. Two angle irons lay across and extend past the top and bottom sides of the brick, they are then connected at the end to a vertical piece of angle iron with bolts. The assembled angle iron brace resembles a backwards letter F.
Figure 2. Schematic side view of hanger apparatus. Brick cross section is shown in gray.
- Hang the S-hook from the lower horizontal piece as shown in Figure 2, using the hole that is closest to the center of the brick.
-
Figure 3 shows a schematic diagram of the brick and hanger, viewed from the front.
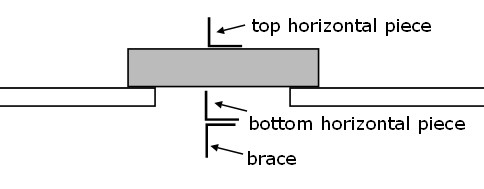
Diagram showing a side-view of a brick bridging a gap between the ends of two tables. In the center of the brick there is an angle iron laying horizontally across the top of the brick. A horizontal angle iron on the bottom side of the brick is held In place by a brace piece.
Figure 3. Schematic front view of hanger apparatus. The brick is supported firmly at each end (use two tables or workbenches). Slide the hanger apparatus over the middle of the brick. (For clarity in the drawing, the vertical hanger piece is not shown.)
- Hang a bucket from the S-hook, and gradually add steel weights to the bucket until the brick breaks. Use caution when adding weights to the bucket and keep hands and feet clear of the area beneath the bucket! Eventually the brick will crack in two and the bucket will fall.
- Use the bathroom scale to weigh the load that caused the brick to fail. Record this weight for each brick.
- For each brick type, calculate the average load that caused failure.
- Make a bar graph of failure load (y-axis) vs. concrete mix (x-axis) to summarize your results.
- If your bricks do not break, try moving the tables slightly farther apart and re-doing the experiment. The distance between the two supporting tables can have a large effect on the strength of the brick. A brick placed on two tables that are very close together will be able to hold more weight than a brick placed on two tables that are spaced farther apart. Make sure you keep the distance between tables the same as you test each brick.
Ask an Expert
Global Connections
The United Nations Sustainable Development Goals (UNSDGs) are a blueprint to achieve a better and more sustainable future for all.

Variations
- In this experiment you used the same amount of water and varied the ratio of sand to cement. Does changing the amount of water used to mix concrete affect the strength of concrete? Design an experiment to find out. You may want to investigate how to measure the slump of your wet concrete mix.
- You could also investigate how curing time affects concrete strength. Make five sets of three bricks each from a single batch of concrete. Allow each set of three bricks to cure for progressively longer times. For example, test one set of bricks after 2 days, one set after 4 days, one set after 1 week, one set after 2 weeks, and one set after 4 weeks of curing.
- In this experiment you made concrete using only sand and Portland cement. How is strength altered when gravel is added to the mix? Design an experiment to find out.
- What happens to concrete that freezes during curing?
- Research the different kinds of strength that a material might possess (compressive strength, tensile strength, etc.). Design a test for a different kind of strength than measured by this experiment.
Careers
If you like this project, you might enjoy exploring these related careers: