Abstract
Do you love it when your hair is nice and fresh? The key to keeping your hair nice and clean is to use a good shampoo. But with so many different products in the store, how do you know which one works best for you? In this science project, you will put a variety of shampoos to the test, including your own homemade organic shampoo recipes. Do you think these will perform better than a store-bought product?Summary
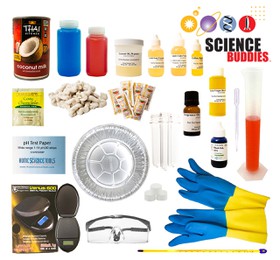
Recommended Project Supplies
Objective
Make your own shampoos and do some quantitative testing to compare their performance to a store-bought product.
Introduction
Do you care about your hair and how it looks? Most of us do. After all, your hair is visible to everyone and we usually don't want it to appear all greasy and messy! There are countless hair care products on the market, from conditioners and sprays to gels, mousses, waxes, and dyes. But by far the most commonly used hair product is shampoo. If you browse the hair care aisle in a store, you will find dozens of different shampoos (Figure 1). Some people do not like the synthetic chemical products used in most shampoos, so they choose "organic" products or even make their own shampoo at home! Whether they are made in a factory or in your kitchen, all shampoos have the same purpose: to clean your hair and scalp from dirt and grease. Your hair tends to get greasy because it accumulates an oily substance called "sebum," which is made by your body. Sebum moisturizes your scalp and prevents your hair from drying out. When sebum builds up, your hair can feel greasy. How can shampoo remove all this built-up grease?
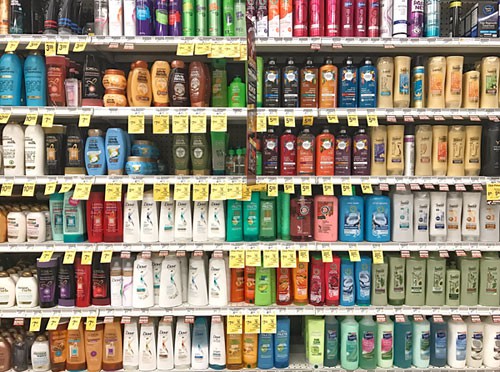
Figure 1. There are many different types of shampoo— how do you know which one works best?
To find out, we will take a closer look at the shampoo's ingredients, also called its formulation. Besides water, the main ingredients in shampoos are surfactants. Some common surfactants include sodium lauryl sulfate, sodium laureth sulfate, and cocamidopropyl betaine. Surfactants are unique chemicals as their chemical structure has a hydrophobic (water-repelling) tail and a hydrophilic (water-loving) head, as shown in Figure 2. This property allows them to react with both water and oil, which normally do not mix with each other.
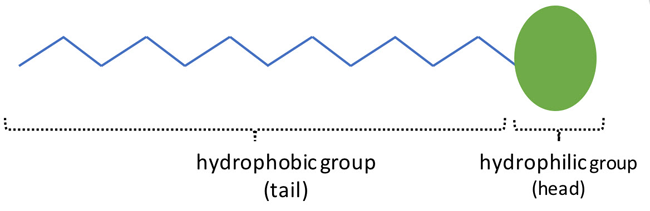 Image Credit: Svenja Lohner, Science Buddies / Science Buddies
Figure 2. The molecular structure of a surfactant contains a hydrophobic "tail" and a hydrophilic "head."
The surfactants in shampoo account for its cleaning power. When you wash your hair, the part of the surfactant that is compatible with oil (the hydrophobic tail) sticks to the greasy and oily materials in your hair, whereas the water-soluble part (the hydrophilic head) faces the surrounding water. If many surfactant molecules do this, they form a micelle structure, which traps the grease and oil in its middle, as shown in Figure 3. This way, the oil that is trapped in water with surfactants can easily be washed away, while water without surfactants fails to remove the grease from your hair.
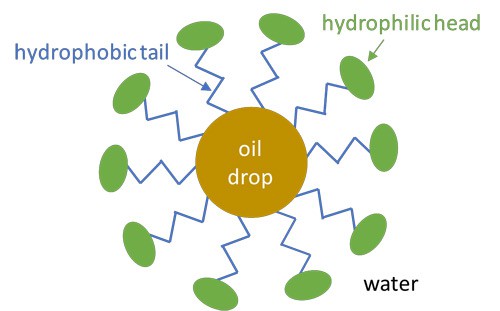 Image Credit: Svenja Lohner, Science Buddies / Science Buddies
Figure 3. Schematic view of a micelle structure (not to scale). In a micelle, the hydrophobic tails of surfactant molecules stick to the oily particles, whereas the hydrophilic heads face the surrounding water.
Although cleaning power is probably the most important criterion for a good shampoo, there are many other aspects that contribute to its quality. In fact, a shampoo needs to meet many requirements in oder to appeal to customers. This is why, besides surfactants, there are also additives in each shampoo that optimize its look, feel, or performance. These additives can include foam builders, thickeners, conditioning agents, or preservatives. The ability to create lots of foam is important because people associate more foam with more cleaning power. Although it is not necessarily true that more foam means cleaner hair, a shampoo sells much better if it makes more foam. Therefore, extra synthetic surfactants may be added as foam builders. Think about why you like your favorite shampoo! Does it meet the criteria below?
- It removes the dirt and grease from your hair
- It makes a good amount of foam so it feels nice and you can spread it easily through your hair
- It does not stick to your hair and can easily be rinsed
- It makes your hair nice and soft
- It smells nice
- It does not irritate your scalp or your hands
In order to create products that meet all these criteria and more, the cosmetics industry needs scientists. Scientists constantly research new shampoo formulations and they have developed specific quantitative tests to evaluate each of these properties for every new product they create. The results allow them to compare different shampoo recipes based on quantitative data in order to find the one formula that performs best overall.
In this science project, you will create your own shampoos using two different recipes based on organic ingredients. Many people prefer "organic" or natural beauty products because they want to avoid synthetic (or manufactured) chemicals that they believe might damage their skin or harm their bodies. The most common organic replacement for synthetic surfactants are soaps based on olive oil or coconut oil. One of the shampoo recipes you will prepare and test is made with castile soap, a surfactant made from olive oil. Other natural shampoo formulations avoid surfactants entirely because they can alter the pH balance of your scalp or irritate your skin. The second recipe you will prepare and test has no surfactants and is based on coconut milk. Do you think these organic shampoos are as good as a store-bought product? Start the shampoo testing and find out!
Terms and Concepts
- Shampoo
- Sebum
- Formulation
- Surfactant
- Hydrophobic
- Hydrophilic
- Micelle
- Additive
- Synthetic
- pH
Questions
- Why do people use shampoo?
- What ingredients are in shampoo? Can you figure out the purpose of each ingredient?
- Which properties are most important for a shampoo and how would you test these? Which tests do commercial companies use?
- What are the reasons why some people use their own organic shampoo formula? Do you think these products can perform as well as synthetic shampoo formula?
Bibliography
- How Products are Made. (n.d.). Shampoo. Madehow.com. Retrieved March 10, 2017.
- Schwarcz, J. (1998). Secrets of Shampoo. Special to The Washington Post. Retrieved December 16, 2021.
- Moore, H. (2001). Surfactants and Shampoos. The Trichological Society. Retrieved December 16, 2021.
- Manimaran V. (n.d.) Formulation & Evaluation of Shampoo. Lecture (Unit V), Department of Pharmaceutics, SRM College of Pharmacy. Retrieved March 10, 2017.
- Kumar A., Mali R. R. (2010). Evaluation of Prepared Shampoo Formulations and to Compare Formulated Shampoo With Marketed Shampoos. International Journal of Pharmaceutical Sciences Review and Research Volume 3, Issue 1, p 120–126. Retrieved March 10 2017.
Materials and Equipment 
Recommended Project Supplies
- Make Your Own Shampoo and Test It Kit, available from our partner
Home Science Tools.
You will need these items from the kit:
- Materials for shampoo recipe 1 and 2:
- Bottles for shampoo, 16 oz (2)
- Full-fat coconut milk (14 fl oz)
- Honey (6 single-use packs)
- Golden jojoba oil (15 mL)
- Extra virgin olive oil (60 mL)
- Apple cider vinegar (30 mL)
- Fragrance oil, lavender (10 mL)
- Herbal teabag, chamomille (1)
- Castile soap, unscented (60 mL)
- Materials for evaluation and testing:
- 100% wool yarn (10 pieces)
- Digital scale
- Coconut oil (50 g)
- Safety goggles
- Nitrile gloves
- Bottle for artificial sebum, 16 oz (1)
- Bottles for wool washing, 8 oz (3)
- Aluminum bowls (3)
- Thermometer
- pH test strips
- 250 mL measuring cylinder
- Graduated pipette (3 mL)
- Black ink, 10% (30 mL)
- Test tubes with lid (3)
- Materials for shampoo recipe 1 and 2:
- You will also need to gather these items, not included in the kit:
- Bowls to mix shampoos in (2)
- Heat-resistant cup
- Scissors
- Acetone or pure acetone nail polish remover (900 mL or 30 oz). Note: Acetone cannot be shipped, but can be bought locally at hardware stores.
- Hair dryer
- Paper towels in case of a spill
- Permanent marker
- Scissors
- Tablespoons (at least one)
- Teaspoons (at least one)
- Tap water
- Oven
- Oven or microwave to heat up water
- Store-bought shampoo of your choice
- Stopwatch or timer
- Lab notebook
Disclaimer: Science Buddies participates in affiliate programs with Home Science Tools, Amazon.com, Carolina Biological, and Jameco Electronics. Proceeds from the affiliate programs help support Science Buddies, a 501(c)(3) public charity, and keep our resources free for everyone. Our top priority is student learning. If you have any comments (positive or negative) related to purchases you've made for science projects from recommendations on our site, please let us know. Write to us at scibuddy@sciencebuddies.org.
Experimental Procedure
Making the Shampoos
You will start by preparing two different shampoo formulations as shown in Table 1.
| Recipe 1: Coconut milk shampoo | Recipe 2: Castile soap herbal shampoo | ||
|---|---|---|---|
| Ingredient | Amount | Ingredient | Amount |
| Coconut milk (full fat) | 1 can | Herbal-infused water | 4–5 oz |
| Honey | 2 tablespoons | Castile soap | 2 oz |
| Jojoba oil | 1 teaspoon | Jojoba oil | 0.5 teaspoons |
| Olive oil | 1 teaspoon | Fragrance oil | 1 teaspoon |
| Apple cider vinegar | 2 tablespoons | ||
| Fragrance oil | 1 teaspoon | ||
- Start with the coconut milk shampoo recipe and gather all the necessary ingredients.
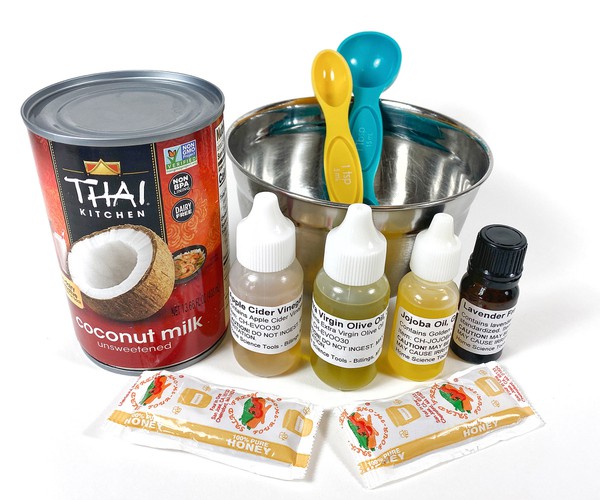 Image Credit: Svenja Lohner, Science Buddies / Science Buddies
Figure 4. Ingredients for the coconut milk shampoo.
- In one of your bowls, mix together the coconut milk, honey, jojoba oil, olive oil, apple cider vinegar, and fragrance oil as listed in Table 1 under Recipe 1 and stir with a spoon until smooth (Figure 5). Note: The coconut milk might have separated in the can, so you have to stir it well. You can also use a whisk to smooth the shampoo mixture.
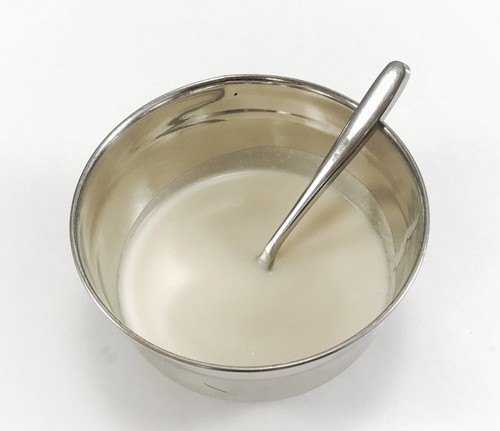 Image Credit: Svenja Lohner, Science Buddies / Science Buddies
Figure 5. The coconut milk shampoo after everything is mixed together. - Once everything is mixed, label one of the 16 oz bottles "Coconut milk shampoo" and fill it with your prepared shampoo.
- Get the ingredients for the castile soap herbal shampoo recipe ready.
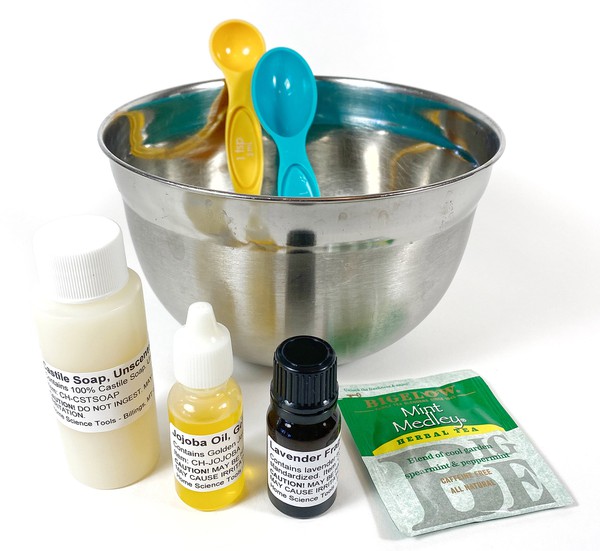 Image Credit: Svenja Lohner, Science Buddies / Science Buddies
Figure 6. Ingredients for the castile soap shampoo. Note: The kit includes chamomille tea; however, any other herbal tea or fresh herbs will work as well. - Prepare the herbal infusion for your shampoo.
- Pour 4–5 oz of tap water into a kettle or cup and heat it up on the stove or in the microwave.
- Place the fresh herbs or the herbal teabag in a cup and pour the simmering hot water on top.
- Cover the cup and let sit for about 15–30 minutes.
- Then, remove the teabag or strain the infusion to remove all the herbs.
- Pour the freshly-made herbal infusion into a clean bowl and add the other ingredients shown in Table 1 under Recipe 2 to the water.
- Gently stir until everything is mixed.
- Then label a second 16 oz bottle with "Castile soap herbal shampoo" and fill it with the prepared shampoo.
- You should now have two homemade organic shampoo formulations plus the store-bought shampoo ready for the next step, which is the shampoo evaluation.
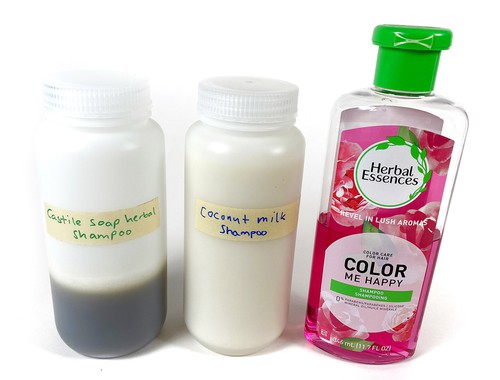 Image Credit: Svenja Lohner, Science Buddies / Science Buddies
Figure 7. Prepared shampoo bottle ready for the shampoo evaluation. - Note: You can store both shampoo recipes in a refrigerator for up to seven days if you don't have time to proceed with the shampoo testing right away. Both shampoos should be at room temperature before you start the testing.
- Based on your shampoo ingredients and the information from the Introduction, how do you think the different shampoos will perform in each test?
Testing the Cleaning Power
The most important criterion for a shampoo is how efficiently it removes dirt and grease from your hair. In this test, you will measure how much grease is removed from dirty wool (which simulates hair) in one washing cycle.
Before you start, copy Table 2 into your lab notebook. It will help you record the data.
| Grease removal from dirty sample | |||||||
|---|---|---|---|---|---|---|---|
| Mass measurements, expressed in grams (g) | |||||||
| Wool at start | Wool soaked with grease | Grease in wool |
Wool dried and washed | Grease removed | Percentage | ||
| Coconut milk shampoo | Trial 1 | ||||||
| Trial 2 | |||||||
| Trial 3 | |||||||
| Average | |||||||
| Castile soap herbal shampoo | Trial 1 | ||||||
| Trial 2 | |||||||
| Trial 3 | |||||||
| Average | |||||||
| Store-bought shampoo | Trial 1 | ||||||
| Trial 2 | |||||||
| Trial 3 | |||||||
| Average | |||||||
- Take the 100% wool yarn and prepare three pieces that weigh approximately 5 g each (Figure 8). Use the digital scale to measure each one and write down its mass into your data table. Note: The wool yarn provided in the kit is very thin. Each wool piece (loop) weighs approximately 10 g. If you cut each loop into two equal pieces you should have two wool pieces that each weigh approximately 5 g. Thicker wool yarn, as shown in the images below, can also be used for this project.
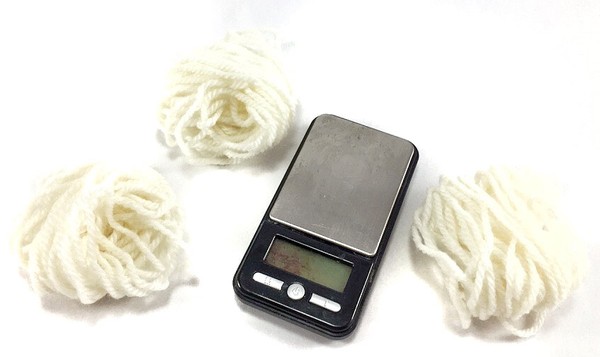 Image Credit: Svenja Lohner, Science Buddies / Science Buddies
Figure 8. Each of the wool pieces should weigh approximately 5 g. Note: The wool yarn provided in the kit is much thinner than the wool yarn shown in this, and the following pictures.
- Soil the wool pieces with artificial sebum or hair grease.
- Prepare a 10% solution of artificial sebum or hair grease, as shown in Figure 9.
- Add 15 g of coconut oil and 15 g of olive oil to a 16 oz bottle.
- Stir the oil mixture with a spoon until it is smooth.
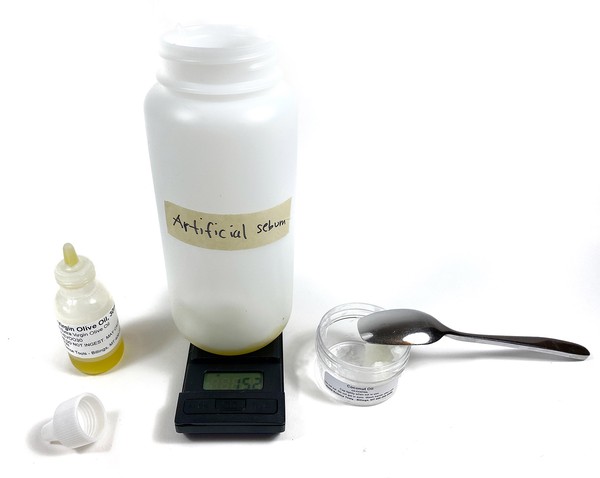 Image Credit: Svenja Lohner, Science Buddies / Science Buddies
Figure 9. Mix the ingredients to make the artificial sebum.
- Put on your safety goggles and gloves and carefully pour 150 mL of acetone into the clean, dry measuring cylinder. Important: When working with the acetone, make sure there are no open flames close by and that you work in a well-ventilated area.
- Add the acetone to the oil mixture in the bottle. Then pour another 120 mL of acetone into the measuring cylinder and add it to the oil mixture in the bottle. In total, you should now have added 270 mL of acetone to the bottle with the oil mixture. Tightly close the lid of the bottle and shake it until everything is dissolved. The solution should now be yellow, as shown in Figure 10.
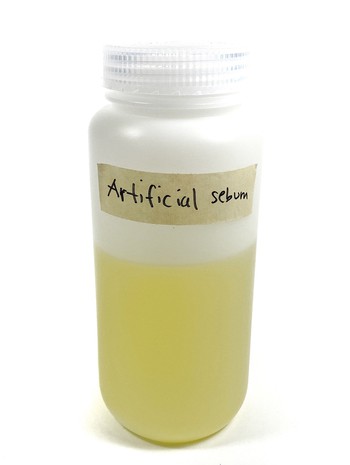 Image Credit: Svenja Lohner, Science Buddies / Science Buddies
Figure 10. The artificial sebum should have a yellow color.
- With the thin wool yarn it might be helpful to tie a loose knot into each strand of wool to make sure you can easily separate them later. Then put all three prepared wool pieces into the bottle with the dissolved oil mixture, close the lid and set the timer for 20 minutes.
- Shake the jar with the wool up and down for 2 minutes, then let it sit for 3 minutes. Repeat four times (until 20 minutes have passed) (Figure 11).
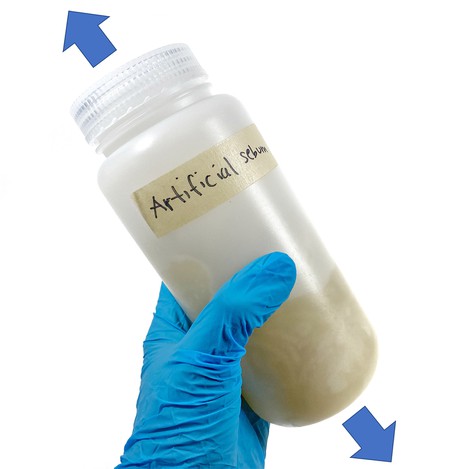 Image Credit: Svenja Lohner, Science Buddies / Science Buddies
Figure 11. Mixing the wool with the artificial sebum.
- Go outside. While still wearing gloves, carefully remove the wool pieces from the bottle (Figure 12). Important: Do not wring the wool pieces. The soaked up acetone contains the fat. If you wring the acetone out of the wool, the wool won't take up as much fat. Separate the wool pieces and place each one in a different aluminum pan. You can also place all wool pieces on a piece of aluminum foil. Untangle the wool a little bit so it can dry better. Let the wool sit outside (or close to an open window) for about 1 hour so the acetone can evaporate. Note: While waiting, you can start the other shampoo tests described below.
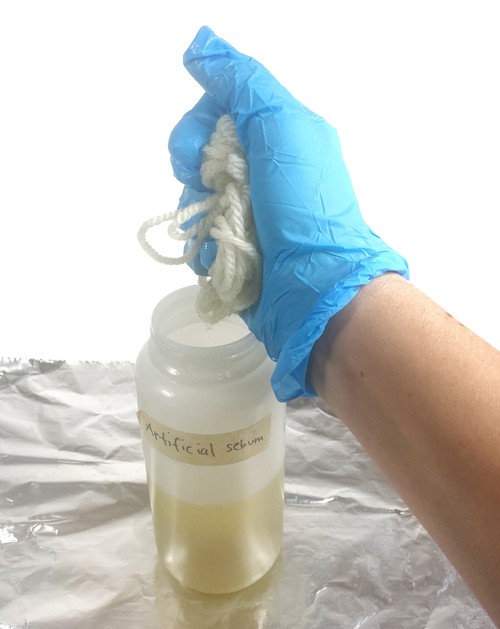 Image Credit: Svenja Lohner, Science Buddies / Science Buddies
Figure 12. Removing the wool pieces from the sebum solution.
- After one hour, feel the wool pieces to see if they have dried. You can also carefully smell them. If they are still wet, wait another 30 minutes. If they feel (almost) dry and don't smell like acetone anymore, bring the aluminum pans or foil with the wool pieces inside. If your wool pieces are not in the aluminum pans, yet, put one wool piece into each of the aluminum pans. Blow-dry all of them with your hair dryer on low for one minute (Figure 13). Do the wool pieces feel very greasy?
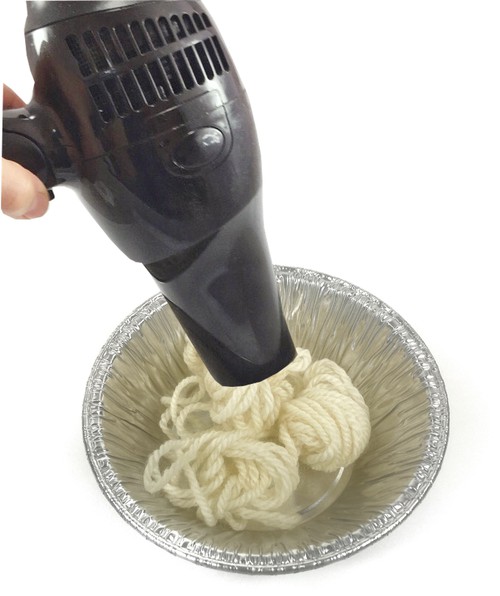 Image Credit: Svenja Lohner, Science Buddies / Science Buddies
Figure 13. Blow-drying the wool pieces makes sure all the acetone is gone.
- Prepare a 10% solution of artificial sebum or hair grease, as shown in Figure 9.
- Use the digital scale to measure how much grease was taken up by the wool.
- Weigh the three pieces of wool one at a time (Figure 14) and write down the results in the data table. Ideally, the wool should now be at least 1.5 g heavier than before.
- Note: At this point, the masses of all wool pieces will not be the same anymore. As you go forward, you have to keep track of which one is which. The best way to do this is to keep each wool piece in a separate aluminum pan. Label each pan with the type of shampoo. This way you can track which wool piece you treat with which shampoo in the next steps. Alternatively, you could mark each wool piece with a different number of knots at the end of the yarn.
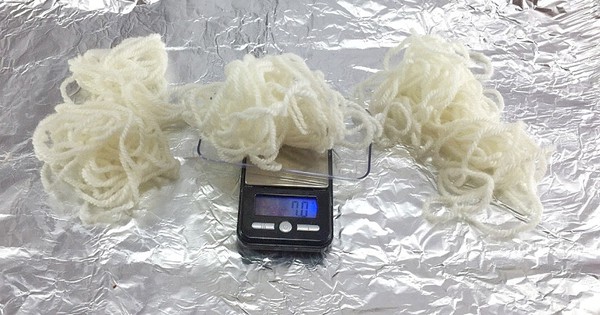 Image Credit: Svenja Lohner, Science Buddies / Science Buddies
Figure 14. Weigh each piece of wool to find out how much grease the wool has taken up.
- Preheat your oven to 76°C (170°F).
- Prepare a 5% wash solution of each shampoo in a separate labeled 8 oz bottle. The temperature of the water that you use for this step should be around 37°C (99°F). Use a thermometer to make sure the water is the right temperature.
- Add 10 g of the first shampoo recipe to a labeled 8 oz bottle and fill it with 37°C (99°F) tap water until the scale reads 200 g. Note: Shake the shampoo slightly before use to make sure it is well-mixed, and make sure that the water is about the same temperature for each shampoo and each trial.
- Use a teaspoon to mix the solution.
- Wash, rinse, and dry the soiled wool pieces.
- Add one wool piece to each of the prepared shampoo solutions. Make sure you know the mass of the piece that you added to each shampoo.
- Close the lids of the bottles and shake them up and down for 4 minutes each (Figure 15).
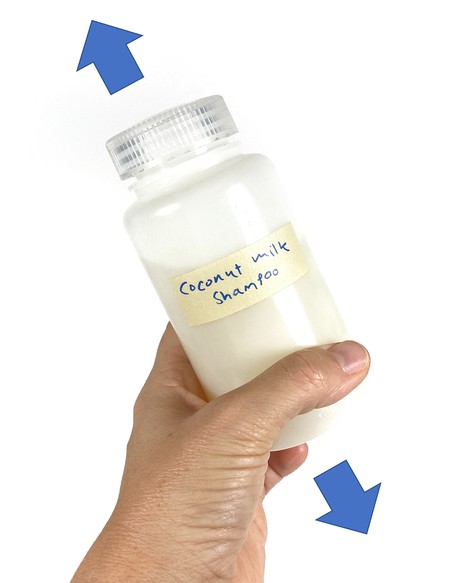 Image Credit: Svenja Lohner, Science Buddies / Science Buddies
Figure 15. Wash the wool by mixing it with the shampoo solution.
- Open the bottles in the sink and rinse each of the wool pieces separately.
- For each rinse, fill the cleaned measuring cylinder with 200 mL of warm water. The water should have the same temperature as the water you used for washing the wool (around 37°C/99°F).
- Slowly pour the water over your washed wool piece, as shown in Figure 16. Squeeze out all the foam from the wool during rinsing (do not pour the water over your wool too quickly). Make sure you use the same rinsing technique every time.
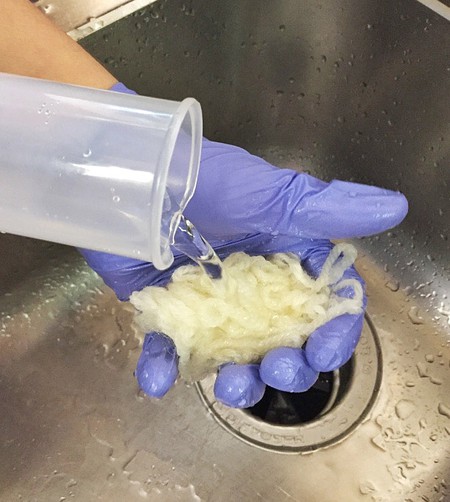 Image Credit: Svenja Lohner, Science Buddies / Science Buddies
Figure 16. Rinsing the wool gets rid of the shampoo and the foam.
- After rinsing, place the wool pieces in between two paper towels. Press on the paper towels to soak up the water from the wool. Make sure to keep track of which piece was washed with which shampoo and keep each wool piece in a separate, labeled aluminum pan.
- Keep the wool pieces in the aluminum pans and blow-dry each wool piece with a hair dryer on low for five minutes.
- After blow-drying, place the aluminum pans with the wool pieces in the preheated oven (170°F) for 30 minutes.
- Take the aluminum pans out of the oven (be careful not to burn yourself), and let them cool down.
- Finally, once all the wool pieces are dry, reset the scale to zero and weigh each piece separately. Record their masses in your data table.
- Feel the wool pieces with your hands. Do they still feel greasey? Write your observations in your lab notebook.
- You have now completed one trial. Repeat steps 1–8 two more times for a total of three trials for each recipe.
- Rinse out all the 8 oz bottles properly and dry them. Keep your homemade shampoos for further testing.
- Note: Do NOT flush the remaining artificial sebum down the drain. Acetone in larger quantities such as those used in this project, have to be taken to a hazardous waste disposal facility. Find out how the disposal procedure for larger quantities of acetone works in your community, and dispose of the liquid properly!
Testing Compatibility with Skin and Hair
In this test, you will find out how acidic or basic your shampoo is, which you can find out by measuring its pH. A pH greater than 7 means a solution is basic, whereas a pH less than 7 means that a solution is acidic. A solution is neutral if its pH is equal to 7. Your skin and hair have a pH that is in the neutral to slightly acidic range (5.5–6). Their pH balance can easily be affected by products that are very acidic or basic. Therefore, this pH test will evaluate if the shampoo is skin- and hair-friendly, or if it has the potential to irritate your scalp and damage your hair.
Before you start, copy Table 3 into your lab notebook. It will help you record the data.
| pH of the 10% shampoo solution | |
|---|---|
| Coconut milk shampoo | |
| Castile soap herbal shampoo | |
| Store-bought shampoo |
- Prepare a 10% solution of the first shampoo.
- Add 10 g of the first shampoo recipe to a clean, dry, and labeled 8 oz bottle and fill it with tap water until the scale reads 100 g. Note: Shake the shampoo slightly before use to make sure it is well-mixed.
- Use a teaspoon to mix the solution.
- Repeat step 1 with the other two shampoos.
- Use a pH test strip and dip it into one of the solutions. It will change color depending on how acidic or basic your shampoo is, as shown in Figure 17.
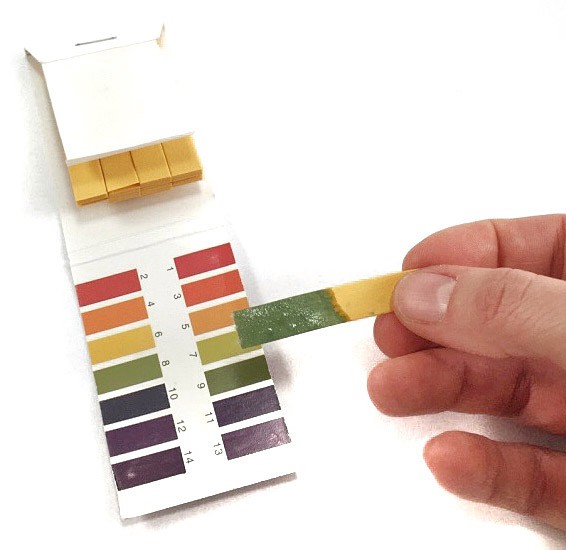 Image Credit: Svenja Lohner, Science Buddies / Science Buddies
Figure 17. Compare the color of your test strip with the color palette on the pH strip package to find out what pH your shampoo has.
- Compare the color of your test strip with the color palette on the package of your pH test trips. Match the color to a pH value and write the result in your data table.
- Repeat steps 3 and 4 for the other two shampoo solutions.
- Rinse out all the 8 oz bottles properly and dry them. Keep your homemade shampoos for further testing.
Testing the Foaming Behavior
Most people assume that a great volume of foam means a "better" shampoo product (although scientific tests have shown that foam does not have a great influence on a shampoo's cleaning power). Therefore, the foaming behavior is an important characteristic for customer acceptance. In this test, you will evaluate the shampoo's foam volume and stability.
Before you start, copy Table 4 into your lab notebook. It will help you record the data.
| Foam volume (in mL) and stability of the 10% shampoo solution | ||||||||||||||||
|---|---|---|---|---|---|---|---|---|---|---|---|---|---|---|---|---|
| Trial 1 | Trial 2 | Trial 3 | ||||||||||||||
| Foam level (mL) | 0 min | 1 min | 2 min | 3 min | 4 min | 0 min | 1 min | 2 min | 3 min | 4 min | 0 min | 1 min | 2 min | 3 min | 4 min | |
| Coconut milk shampoo | Top | |||||||||||||||
| Bottom | ||||||||||||||||
| Average | ||||||||||||||||
| Castile soap herbal shampoo | Top | |||||||||||||||
| Bottom | ||||||||||||||||
| Average | ||||||||||||||||
| Store-bought shampoo | Top | |||||||||||||||
| Bottom | ||||||||||||||||
| Average | ||||||||||||||||
- Prepare a 10% shampoo solution for your first shampoo
- Add 20 g of the first shampoo recipe to a clean, dry, and labeled 8 oz bottle and fill it with tap water until the scale reads 200 g. Note: Shake the shampoo slightly before use to make sure it is well mixed.
- Use a teaspoon to mix the solution.
- Get your 250 mL measuring cylinder and carefully pour 50 mL of the 10% shampoo solution inside (Figure 18). You do not want to create any foam yet!
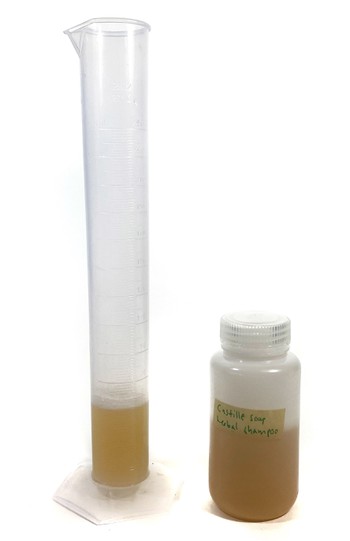 Image Credit: Svenja Lohner, Science Buddies / Science Buddies
Figure 18. Make sure not to create lots of foam when pouring the shampoo into the measuring cylinder.
- Have a timer ready and set it to four minutes.
- Take the measuring cylinder between your hands so that your palm covers and seals off the top and shake it very hard 10 times up and down (Figure 19). Note: Do your best to keep the shaking speed constant for all shampoos and trials.
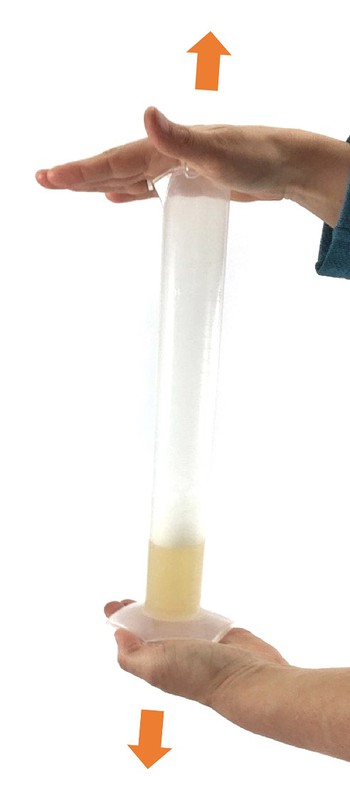 Image Credit: Svenja Lohner, Science Buddies / Science Buddies
Figure 19. To create foam, shake the measuring cylinder up and down.
- Immediately after you are done shaking, start your timer and read the volume of the generated foam inside the measuring cylinder. Important: You have to read the mL level at which the foam phase starts (at the bottom, right above the liquid) and where it ends at the top (see Figure 20). Write down the results in your data table.
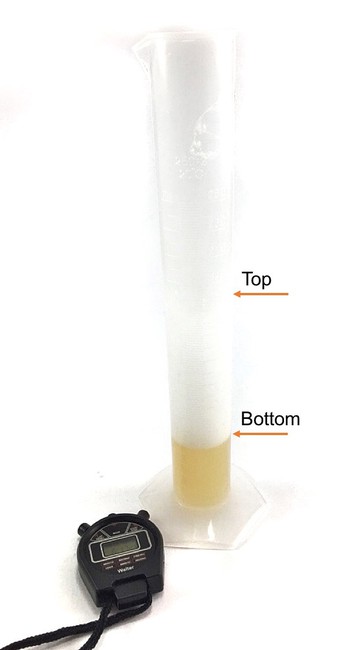 Image Credit: Svenja Lohner, Science Buddies / Science Buddies
Figure 20. Shaking the shampoo results in foam production. The arrows in the picture indicate where to read the foam levels.
- To assess the foam stability, keep reading the foam volumes every minute for four minutes in total. Note: The foam level is likely to change most at the interface between the liquid and the foam, not at the top of the foam layer.
- Once you have monitored the foam volume over four minutes, clean out the measuring cylinder (make sure all the shampoo and foam is removed) and repeat steps 1–6 with the other two shampoos.
- You have now completed one trial. Repeat steps 1–7 two more times for a total of three trials for each shampoo.
- Rinse out all the 8 oz bottles properly and dry them. Keep your homemade shampoos for further testing.
Testing the Dirt Dispersion
A good shampoo should make it easy to rinse dirt from your hair. However, if the dirt gets trapped in the foam of the shampoo, it is likely to redeposit on your hair and will stay there. In this test, you will assess whether the shampoo concentrates dirt in the water phase (which makes it easier to rinse it off) or in the foam phase. In contrast to the previous tests, which were quantitative tests, this will be a qualitative test, in which you will observe (but not measure) the quality of each shampoo.
Before you start, copy Table 5 into your lab notebook. It will help you record the data.
| Amount of ink (color intensity) in the foam | |||
|---|---|---|---|
| Trial 1 | Trial 2 | Trial 3 | |
| Coconut milk shampoo | |||
| Castile soap herbal shampoo | |||
| Store-bought shampoo | |||
- Get the test tubes (or mini cups with lids), black ink, a pipette or dropper, and some water ready for the test.
- Label three test tubes (or mini cups with lids) for each shampoo recipe.
- Use the pipette to add 0.5 mL of shampoo to the corresponding empty test tube or mini cup and add 10 mL of water.
- Add one drop of black ink to the shampoo solution (Figure 21).
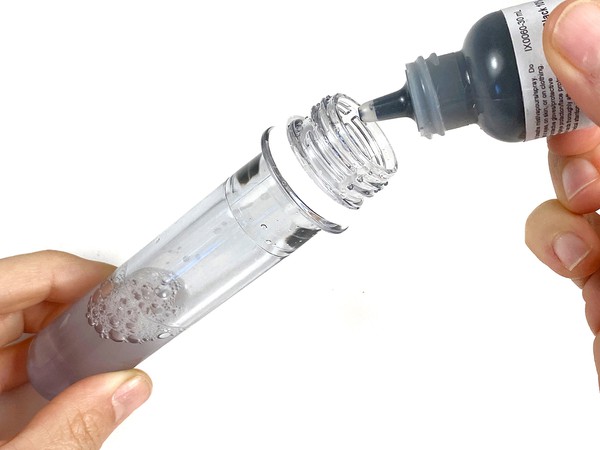 Image Credit: Svenja Lohner, Science Buddies / Science Buddies
Figure 21. Add one drop of ink to the shampoo solution.
- Close the lid and shake the test tube or cup 10 times up and down.
- Immediately after you finished shaking, look at the foam that has formed. Estimate the amount of ink in the foam as "None," "Light," "Moderate," or "Heavy" and write your results into your data table.
- Repeat steps 3–6 with the other two shampoo recipes. Do your best to keep the shaking speed constant for all shampoos.
- You have now completed one trial. Repeat steps 3–7 two more times for a total of three trials for each recipe. Note: You can reuse the same test tubes or cups. Make sure you rinse them out and dry them in between trials.
Analyzing Your Results
You have collected a lot of data! Now it is time to bring it all together and assess each test separately, as well as all tests combined.
- Assess cleaning power from your results in data table 2.
- Start by calculating how much grease, or artificial sebum, (in grams), was taken up by each of the wool pieces. To do this, subtract the starting mass of the wool from the wool mass soaked with grease (after the acetone evaporation). Write down your results in your data table.
- Next, calculate how much grease was removed during the washing cycle for each trial: Subtract the final mass of the wool piece after washing and drying from the mass of the wool soaked with grease. Record the results in your data table. Note: If your result is negative, that means that instead of removing grease, the wool gained mass during the washing. If this happened, do you think this could be extra grease? Did the wool piece still feel very greasy after washing? Where could the extra grease have come from?
- Calculate the average wool masses from each step from each of your three trials. Write down the averages in your data table.
- Finally, you can calculate the cleaning power of your shampoo as percentage. To do this, divide the amount of grease removed by the amount of grease taken up by the wool and multiply by 100.
Note: Again, if your percentage is negative, that means that your wool mass increased instead of decreased. If this was the case, think about what this extra mass could be and where it could have come from (see questions in step 1b.).
If your percentage is above 100% this means that during the washing and drying cycle you lost more mass than the wool gained due to the grease. Why could that be? Could it have something to do with how dry the wool was at the end versus the beginning? - Make a bar graph with the shampoo name on the horizontal x-axis and the cleaning power in percentage on the vertical y-axis.
- Looking at your cleaning power results, which shampoo is most efficient in removing grease from your hair? Was there a shampoo that had very low to no cleaning power? Can you think of reasons why a wool piece could gain mass during washing? Can you explain the differences in cleaning power by looking at the ingredient list of each shampoo? Look back to the Introduction to find out which shampoo ingredients are most important for removing grease. Do you find this type of ingredient in all the shampoo recipes?
- Assess skin and hair compatibility from your results in data table 3.
- Make a bar graph that shows the shampoo name or recipe on the x-axis and the average pH value on the y-axis.
- Do all the shampoos have the same pH value? If not, which ingredients do you think make a difference? Do you think your shampoos are skin- and hair-friendly? Why or why not?
- Assess foam volume and stability from your results in data table 4.
- Calculate the foam volume for each shampoo and each trial by subtracting the mL readings at the bottom from the readings at the top for each time point. Record the calculated volumes in your data table.
- Determine the average foam volumes.
- Make a bar graph that shows the initial foam volume after shaking (at 0 minutes) for each shampoo, with the shampoo name on the x-axis and average foam volume on the y-axis.
- Make another graph that shows foam stability and how the foam volume changes over time. This time, use a line graph and plot the time point (0, 1, 2, 3, and 4 minutes) on the x-axis and the average foam volume for each time point on the y-axis. You can make an individual graph for each shampoo recipe or show all shampoos in one graph using different colors for each line.
- Which shampoo made the most foam? How stable was the foam? Was there a shampoo that did not make any foam? Can you correlate the foaming behavior with a specific shampoo ingredient when looking at the differences in the shampoo recipes?
- Assess dirt dispersion from your results in data table 5.
- You can use your data table directly to show your results on the display board.
- Did all shampoos perform the same? Which shampoo do you think will remove dirt best from your hair?
- Can you draw a final conclusion from your study about which shampoo performs best? What did you learn from each test about the shampoos? Do you think you need more tests to confirm your results? What do your combined results mean for your shampoo recipes? What ingredients did you find to be most important in your shampoos?
Ask an Expert
Variations
- Are you curious about how other shampoos perform? What about specialty shampoos such as baby products or dandruff shampoos? Do they have different qualities? Find out by repeating the tests in this experiment with these products and compare the results to regular shampoo. You can always include more shampoos in your testing, including other homemade recipes that you want to try.
- The cleaning power of shampoos is very important. Do you think you can improve a shampoo's cleaning power by changing the temperature of the washing water or using more or less shampoo for each wash? Experiment with a range of shampoo concentrations or water temperatures and find out!
- What other qualities of a shampoo are important for customers and could be tested? Do some research and find out about other shampoo evaluation tests. Here are some ideas that you can look up: wetting behavior, percent solids, viscosity, conditioning, detergency—or create your own tests!
- Whereas all the tests in this experiment measure a specific quality or property of each shampoo, the results will still not tell you whether people will actually like the shampoo. Design an experiment in which you test how customers rate each shampoo's performance. For your survey, you could, for example, use real hair swatches that you wash with each shampoo and let volunteers decide which one looks and feels best.
- If you are interested in more cosmetic science projects and putting other beauty products to the test, check out Science Buddies' project Cosmetic Science: Testing Lip Balm Recipes.
Careers
If you like this project, you might enjoy exploring these related careers:


Contact Us
If you have purchased a kit for this project from Science Buddies, we are pleased to answer your questions.In your email, please follow these instructions:
- What is your Science Buddies kit order number?
- Please describe how you need help as thoroughly as possible:
Examples
Good Question I'm trying to do Experimental Procedure step #5, "Scrape the insulation from the wire. . ." How do I know when I've scraped enough?
Good Question I'm at Experimental Procedure step #7, "Move the magnet back and forth . . ." and the LED is not lighting up.
Bad Question I don't understand the instructions. Help!
Good Question I am purchasing my materials. Can I substitute a 1N34 diode for the 1N25 diode called for in the material list?
Bad Question Can I use a different part?
Contact Us
Related Links
- Science Fair Project Guide
- Other Ideas Like This
- Chemistry Project Ideas
- Cosmetic Chemistry Project Ideas
- My Favorites