Abstract
Lights and music make a great combination! Getting sound and lights to complement each other just right helps set the mood for everything from DJ parties and concerts, to theater shows, the circus, and ballet performances. You can put together your own lights and music show using a Raspberry Pi. Check out the video to see what this simple, but fun, project looks like:
Once you have the basics down, you can keep tinkering with the circuit, the sounds, and the program to make fancier versions of your homemade light-up piano. Keep it as a musical instrument, where each note or sound is synced with a single light, or try a project like the one shown in the second part of the video, where a single press of a keyboard button turns on a choreographed show of sound clips and blinking lights.
Summary

Introduction
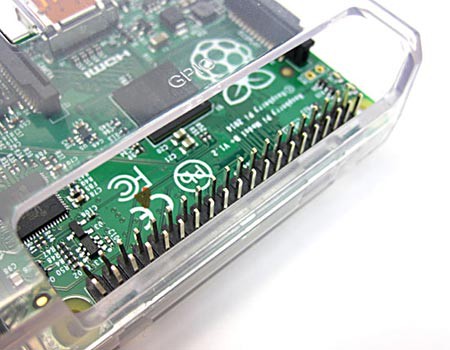
A Raspberry Pi (Figure 1) is a tiny computer that you can use to write programs and build and control your own electronic circuits, like the light-up piano in this project. The circuit uses sensors to gather information from the world around it. You can use information from those sensors to tell your computer program what to do. Many electronic devices we use every day, like phones and video game controllers, use sensors in the same way.
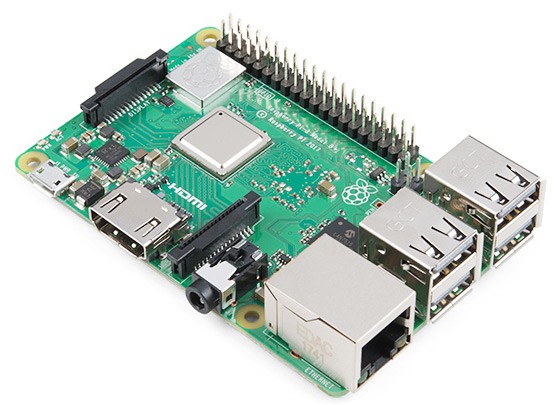 Image Credit: SparkFun Electronics / Creative Commons Attribution 2.0
Figure 1. A Raspberry Pi computer. (Image credit SparkFun Electronics, licensed under Creative Commons Attribution 2.0).
You can do this project as a fun activity, or turn it into an engineering or science project. To make it an engineering project, you will need to follow the engineering design process. Start by defining what you want your light-up piano to be able to do, then work through the rest of the design process until you have a completed piano to show off at your science fair.
If you want to use this for a science project, you will need to follow the scientific method. Start by coming up with a question for which you can use the light-up piano as a tool to help answer. For example, it is known that both colors and music affect people's moods. Do some research to see what kinds of music (hint: research the effects of major and minor keys on mood) and what kinds of colors make people feel happy or sad. If you give people a choice between a sad song with happy-colored lights and a sad song with sad-colored lights, using your light-up piano, will they feel that the lights and the music match better in one case than in the other?
Bibliography
- Raspberry Pi Foundation (n.d.). Teach, Learn, and Make with Raspberry Pi - Raspberry Pi. Retrieved August 28, 2019.
- Wikipedia Contributors (2019, August 8). Electronic Musical Instrument. Wikipedia. Retrieved August 28, 2019.
- Science Buddies (n.d.). Raspberry Pi Setup. Retrieved August 28, 2019.
Materials and Equipment
If you already have access to a Raspberry Pi, read through the Procedure to see the additional parts you will need to build the circuit.
Experimental Procedure
Introduction
This project will let you program different keys on your keyboard to play sounds and activate lights. If you have not already, you will need to set up your Raspberry Pi before you begin. Watch this quick video for a demonstration.
Writing Your First Program
To get started, you will need to learn how to write programs in Scratch. Scratch is a beginner-friendly programming environment that lets you write computer code by dragging together colored blocks. Open Scratch 2 by double-clicking the desktop icon. You can also find it by clicking the Raspberry Pi logo in the upper-left corner of your screen, then Programming. Make sure you select Scratch 2 and not Scratch. This video will show you how to write a program in Scratch 2:
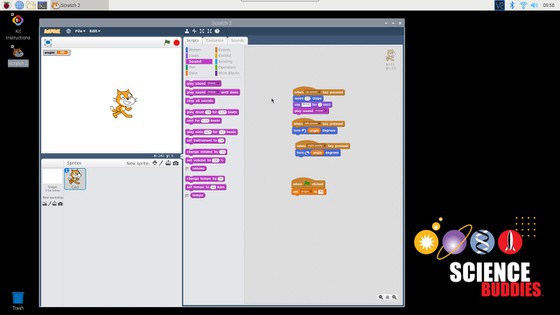
After you open Scratch 2, you should see a screen that looks like this:
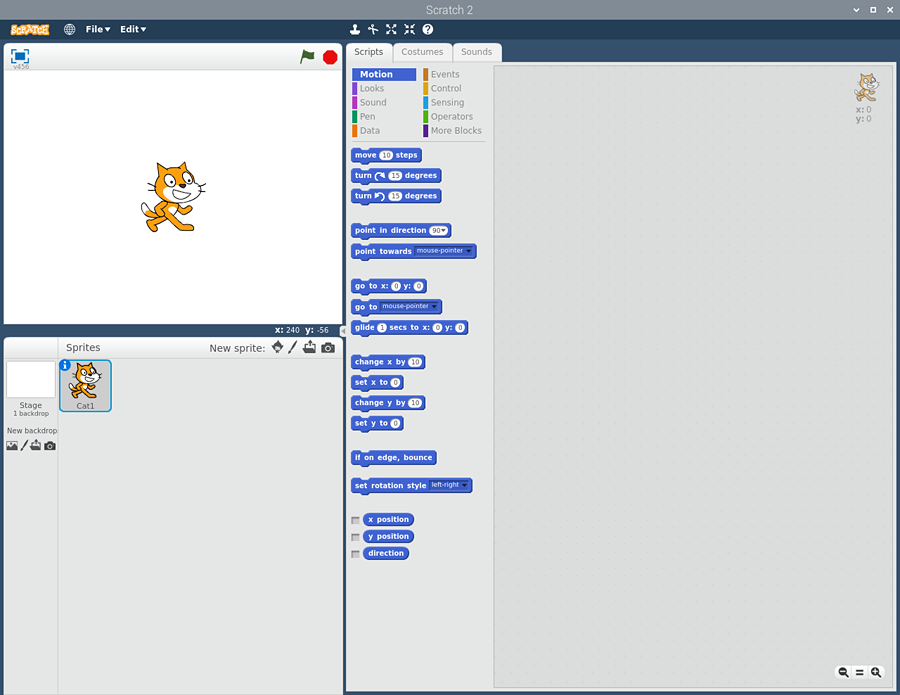 Image Credit: Ben Finio, Science Buddies / Science Buddies
Figure 2
Click Events, then click and drag a when space key pressed block into the open area on the right side of the screen. This is where you will write your program.
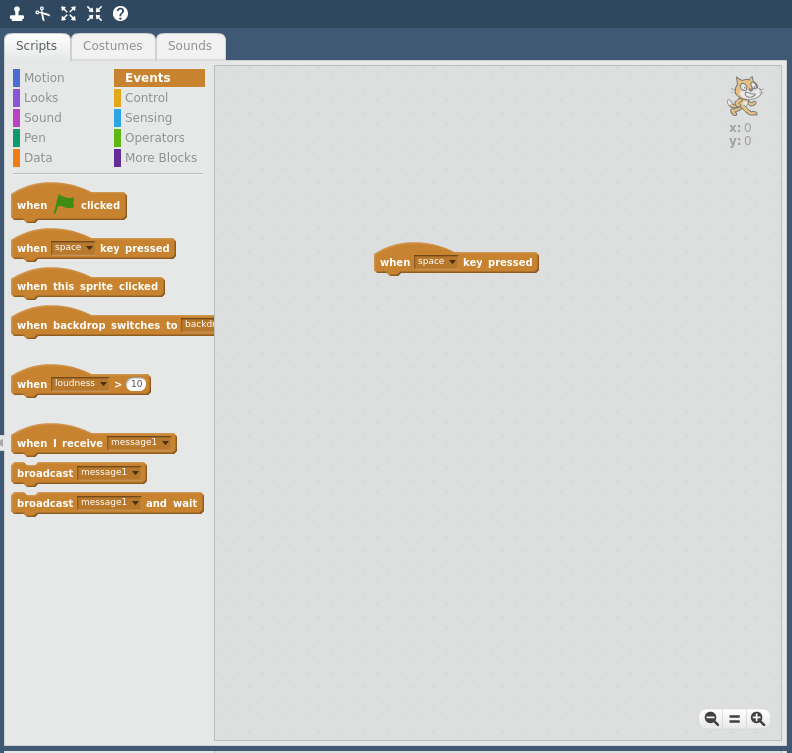 Image Credit: Ben Finio, Science Buddies / Science Buddies
Figure 3
Then click Sound and drag a play sound meow block so it snaps on to the bottom of the when space key pressed block.
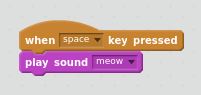 Image Credit: Ben Finio, Science Buddies / Science Buddies
Figure 4
Congratulations—you just wrote your first program! Press the space key and you should hear a meow sound. Now is a good time to save your program. It is important to save your work frequently in case of a computer crash or power outage. Select File→Save Project to save your program.
What if you want more sounds? Click the Sounds tab toward the top of your screen, then click the speaker icon to choose existing sounds from the library.
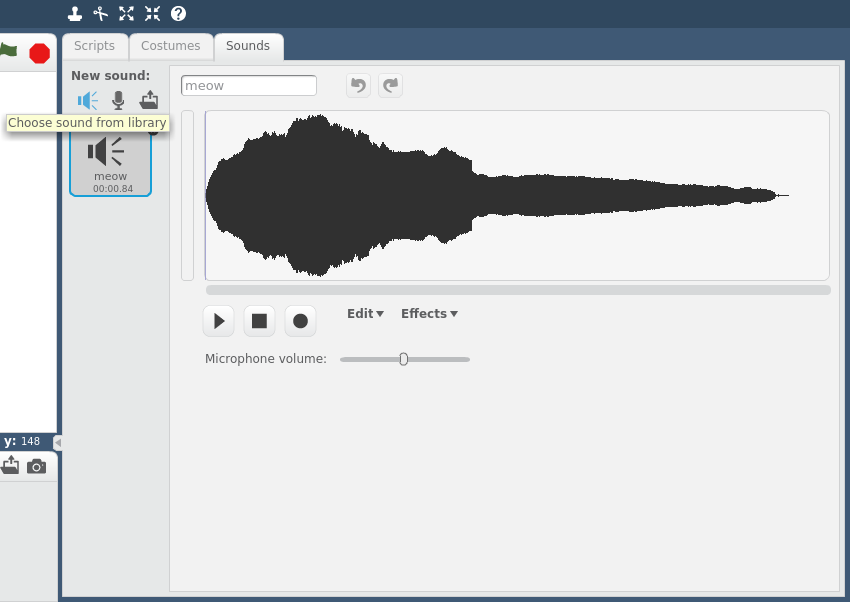 Image Credit: Ben Finio, Science Buddies / Science Buddies
Figure 5
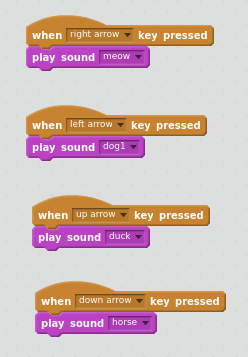
Click the Scripts tab to go back to your program. Try adding more keys that play different sounds using the when ____ key pressed and play sound ____ blocks. To choose a different key or sound, use the drop-down menu on the block. Can you write a program like this? Hint: to copy sections of code, right click a block and select duplicate.
Building Your First Circuit
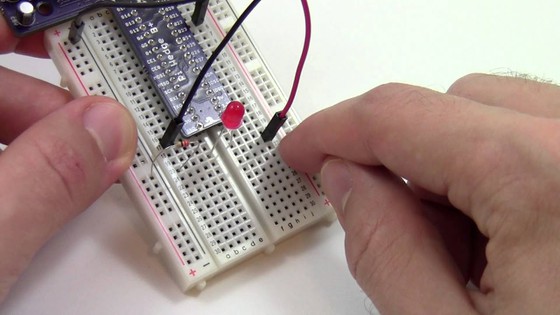
Next, you will learn how to use your Raspberry Pi to control an external circuit. To do that, you will need to learn how to use a breadboard. Watch this video for an introduction to breadboards:
The Pi Wedge is a special part that allows you to connect your Raspberry Pi to a breadboard. Use the gray ribbon cable in your kit to connect the Raspberry Pi to the Pi Wedge as shown here. The pins on the Pi Wedge should go into columns E and F on the breadboard, starting in row 1 and going to row 17.
 Image Credit: Ben Finio, Science Buddies / Science Buddies
Figure 7
To build your circuit, you will need jumper wires, LEDs, and resistors from your kit.
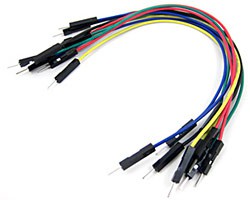 Image Credit: Science Buddies Image Credit: Science Buddies
Figure 8 |
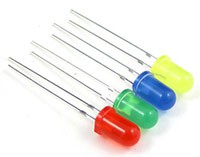 Image Credit: Science Buddies Image Credit: Science Buddies
Figure 9 |
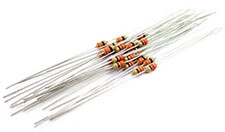 Image Credit: Science Buddies Image Credit: Science Buddies
Figure 10 |
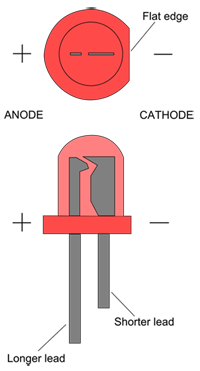
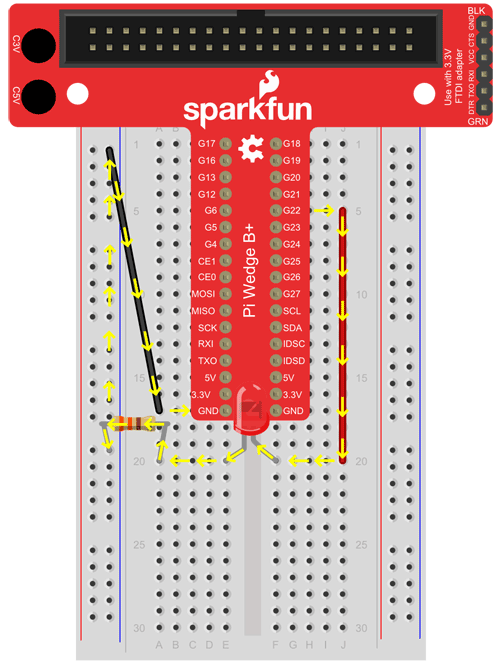
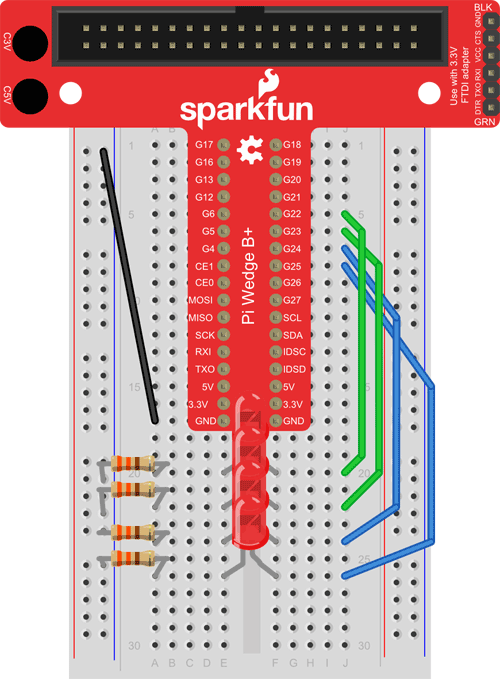
Connect two jumper wires, an LED, and a resistor, as shown in the table and diagram below. Remember that you can use the breadboard's grid system of labeled rows and columns to know exactly where to insert a component's leads (pronounced "leeds" — leads are the tiny metal legs on the end of each component). Watch the video above if you need a reminder of how to use a breadboard.
| Part | Picture Reference | First Hole | Second Hole |
|---|---|---|---|
| Red M-M jumper wire |  Image Credit: Science Buddies Image Credit: Science Buddies
|
J5 (Pi Wedge G22) |
J20 |
| Black M-M jumper wire |  Image Credit: Science Buddies Image Credit: Science Buddies
|
A17 (Pi Wedge GND) | Ground bus (left side) |
| Red LED | F20 (long lead) |
E20 (short lead) | |
| Resistor | A20 | Ground bus (left side) |
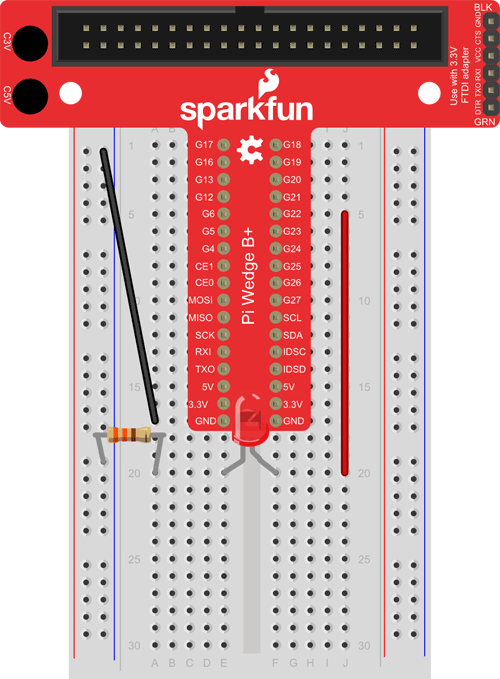 Image Credit: Science Buddies
Figure 11
This breadboard diagram was made with Fritzing, a free circuit design tool. You can learn more about Fritzing or use it yourself at fritzing.org.
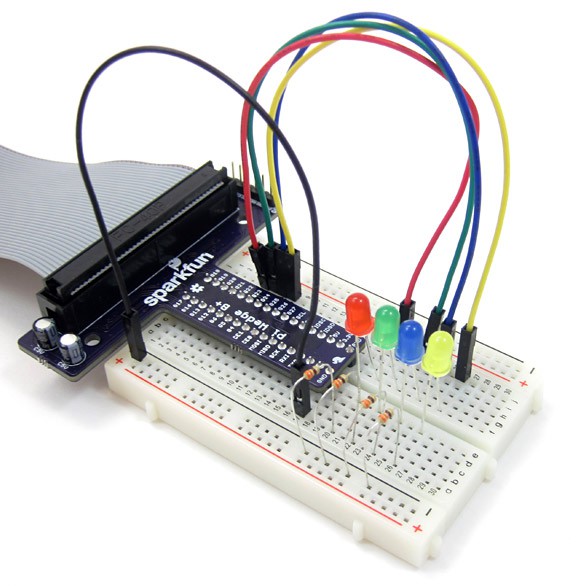
Your circuit should look like this:
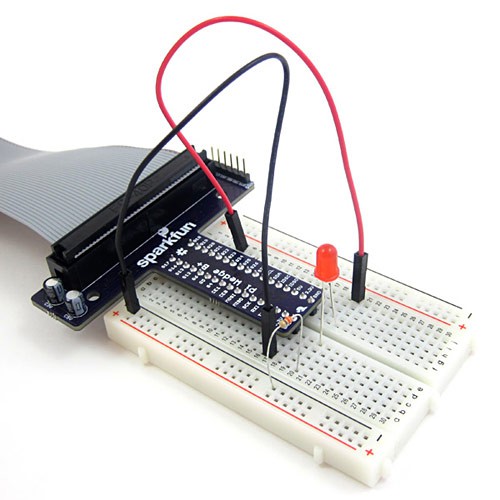 Image Credit: Science Buddies
Figure 12
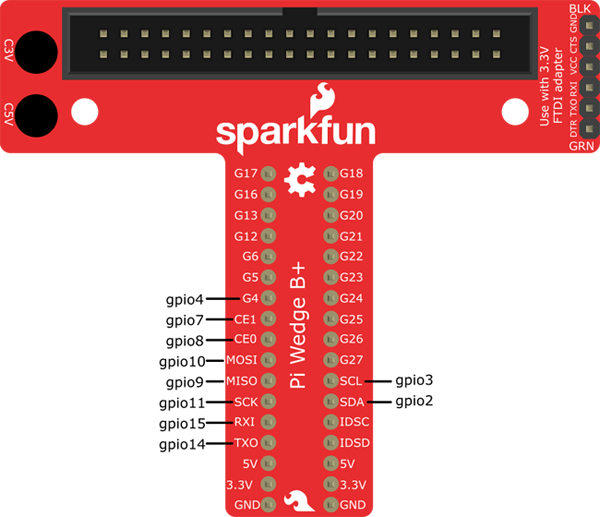
You might be wondering what all those labels on your Pi Wedge (like "G22") stand for. These labels correspond to your Raspberry Pi's General Purpose Input and Output, or GPIO, pins. Your Scratch program can control these pins and make them interact with external circuits; for example, by turning an LED on and off.
Modifying Your Scratch Program
Now you will modify your Scratch code to light up the LED, in addition to playing a sound. You can do this by using Scratch to control the Raspberry Pi's GPIO pins. Click on More Blocks then Add an Extension:
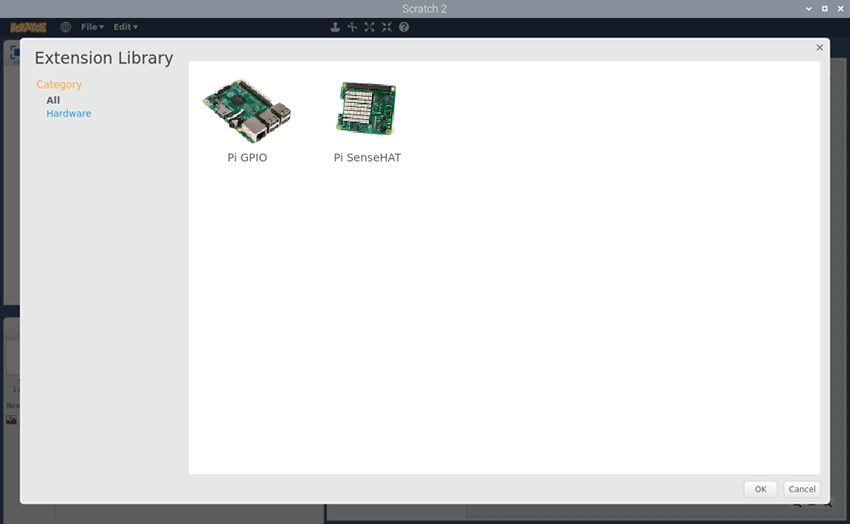 Image Credit: Ben Finio, Science Buddies / Science Buddies
Figure 13
Select Pi GPIO then click OK. You should now have two new blocks in the More blocks section: set gpio __ to output high and gpio __ is high?. These blocks can be used to set and read GPIO pin values. Use these blocks, along with the wait block (under Control), to make your program look like this:
 Image Credit: Ben Finio, Science Buddies / Science Buddies
Figure 14
Now, try pressing the key. Your "piano" should light up in addition to playing a sound!
Adding More LEDs
Now you want to add even more LEDs to your light-up piano. First, add more jumper wires, LEDs, and resistors to your circuit, as shown below.
| Part | Picture Reference | First Hole | Second Hole |
|---|---|---|---|
| Green LED |
|
F22 (long lead) |
E22 (short lead) |
| Blue LED |
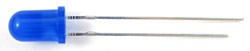 Image Credit: Science Buddies Image Credit: Science Buddies
|
F24 (long lead) | E24 (short lead) |
| Yellow LED |
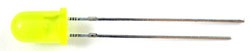 Image Credit: Science Buddies Image Credit: Science Buddies
|
F26 (long lead) |
E26 (short lead) |
| Green M-M jumper wire |
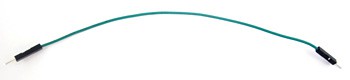 Image Credit: Science Buddies Image Credit: Science Buddies
|
J6 (Pi Wedge G23) | J22 |
| Blue M-M jumper wire |
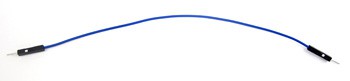 Image Credit: Science Buddies Image Credit: Science Buddies
|
J7 (Pi Wedge G24) |
J24 |
| Yellow M-M jumper wire |
 Image Credit: Science Buddies Image Credit: Science Buddies
|
J8 (Pi Wedge G25) | J26 |
| Resistor |
|
A22 | Ground bus (left side) |
| Resistor |
|
A24 | Ground bus (left side) |
| Resistor |
|
A26 | Ground bus (left side) |
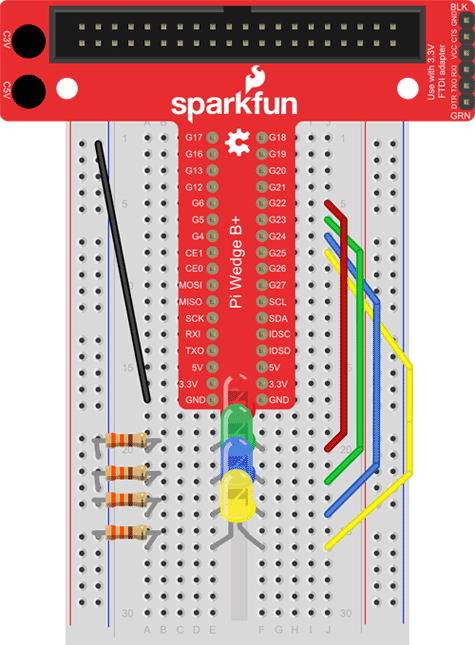 Image Credit: Science Buddies
Figure 15
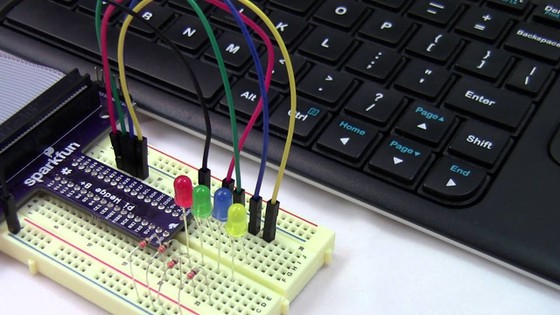
Your circuit should look like this:
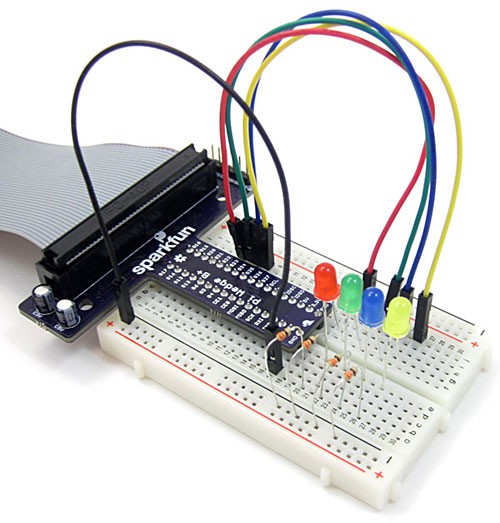 Image Credit: Science Buddies
Figure 16
Now, you need to modify your Scratch program to control multiple LEDs. Modify your program to look like this:
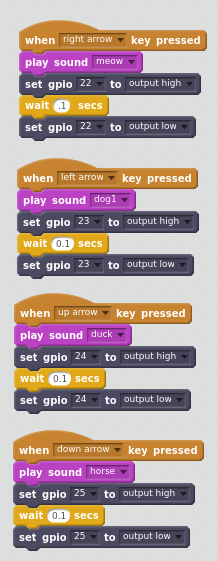 Image Credit: Ben Finio, Science Buddies / Science Buddies
Figure 17
Now, try playing all of your piano's keys to make sure the LEDs light up. If any individual LED does not light up, go back to the Troubleshooting: My LED does not light up! section above and check each of the LEDs individually. Once you have everything working, have fun playing your light-up piano! When you are ready, you can go back to Raspberry Pi Projects Kit to select a new project, or continue reading below to tinker with your piano.
Going Further
Try expanding your program to add even more sound effects to more keys, or make each key play multiple sounds. If you want to add more LEDs, you need to read a little more about how the Raspberry Pi's GPIO pins interact with Scratch. Read the section below to learn more.
Troubleshooting
For troubleshooting tips, please read our FAQ: Build an Electronic Piano with a Raspberry Pi.
Ask an Expert
Global Connections
The United Nations Sustainable Development Goals (UNSDGs) are a blueprint to achieve a better and more sustainable future for all.

Frequently Asked Questions (FAQ)
Kit General Questions
- Who is the kit appropriate for?
- Are the kit parts reusable?
- Aren't there other Raspberry Pi kits on the market? How is yours different?
- I already have a Raspberry Pi. Can I just buy the circuit parts separately?
- What programming language do the projects use?
Setting Up and Using Your Raspberry Pi FAQ
- How do I connect my Raspberry Pi to my TV or computer monitor?
- Can I use a laptop as a display and/or keyboard?
- How do I connect my Raspberry Pi to the internet?
- How do I shut down or reboot my Raspberry Pi? There's no power button!
- How can I adjust the Raspberry Pi's display resolution?
- I have everything connected properly, why can't I hear any sound?
- Why won't my Raspberry Pi turn on?
- My Raspberry Pi starts to boot up, but then it freezes or the screen goes blank. What is wrong?
- My Raspberry Pi froze and is not responding to mouse or keyboard input. What should I do?
- My Raspberry Pi is acting strangely (it suddenly will not boot up properly, certain programs do not work, etcetera). What is wrong?
- I think I corrupted my Raspberry Pi's SD card. What should I do?
- I need help with a question, related to my Science Buddies Raspberry Pi Projects Kit or Raspberry Pi Circuits Parts Only Kit, not listed here. Who can I ask?
Kit General Answers
Q: Who is the kit appropriate for?A: The kit is meant for anyone (ages 8 and up) who wants to learn some basic programming and electronics skills while having fun. Students up to age 10, or older if their reading skills are behind grade level, may need adult assistance in reading and following the on-screen instructions. The projects included in the kit were beta tested and approved by students ages 8 to 16.
Q: Are the kit parts reusable?
A: Yes, all the electronics components in the kit can be re-used to do new projects or to repeat the projects.
Q: Aren't there other Raspberry Pi kits on the market? How is yours different?
A: Yes, there are other Raspberry Pi kits, and some of them are quite good! The Raspberry Pi Projects Kit and Raspberry Pi Circuit Parts Only Kit have been designed to contain the specific materials needed to do the accompanying Science Buddies Raspberry Pi projects. Our kit and associated projects are specifically meant for people who have no prior experience programming or connecting circuits. The projects are 100% beginner friendly with clear on-screen instructions, pictures, and videos. We think the kit, with its associated projects, is one of the most fun kits out there! But, if you are already an ace programmer or electronics guru, you may not find this the best fit for your own personal use. Even so, it may be a fun way for you to introduce others to programming and electronics.
Q: I already have a Raspberry Pi. Can I just buy the circuit parts separately?
A: Yes! We sell two different kits: the Raspberry Pi Projects Kit which includes a Raspberry Pi and the required accessories, and the Raspberry Pi Circuit Parts Only Kit, which only contains the additional circuit parts you need to do the Science Buddies projects. Both kits contain an SD card with the Raspbian operating system and a desktop shortcut to the Science Buddies project instructions.
Q: What programming language do the projects use?
A: The projects use Scratch 2. Scratch is a "graphical" programming language developed by the MIT Media Lab. It allows you to write code by clicking, dragging, and snapping together color-coded blocks. This allows beginners to write working code without worrying about formatting or typos. On the Raspberry Pi, Scratch allows you to control the general purpose input and output (GPIO) pins so your program can interact with a circuit in the physical world.
Note: three different versions of Scratch (1, 2, and 3) are available for the Raspberry Pi. The instructions for the Science Buddies projects (including example code) are specifically written for Scratch 2, which runs well on the Raspberry Pi model 3B+. If you have an older model Raspberry Pi, Scratch 2 may run more slowly, or may not run at all. If you want to use a different version of Scratch, you will need to consult the official documentation for Scratch 1.4 or Scratch 3 and modify the programming steps accordingly.
Setting Up and Using Your Raspberry Pi FAQ Answers
Q: How do I connect my Raspberry Pi to my TV or computer monitor?A: The easiest way to set up your Raspberry Pi is to use an HDMI cable (included in the Science Buddies Raspberry Pi Projects Kit) to connect to a TV or computer monitor that has built-in speakers. If you are using a computer monitor with an HDMI port but no built-in speakers, you will also need separate speakers or headphones with a 3.5 mm audio plug (a regular "headphone jack").
If your TV or monitor does not have an HDMI port, you will need an HDMI to DVI or HDMI to VGA adapter (see pictures in table below). DVI and VGA do not transmit sound, so you will need separate headphones or speakers if you are using one of those options.
| HDMI | DVI | VGA |
|---|---|---|
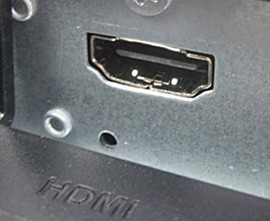 Image Credit: Ben Finio, Science Buddies / Science Buddies Image Credit: Ben Finio, Science Buddies / Science Buddies
|
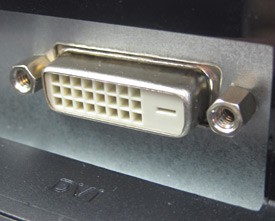 Image Credit: Ben Finio, Science Buddies / Science Buddies Image Credit: Ben Finio, Science Buddies / Science Buddies
|
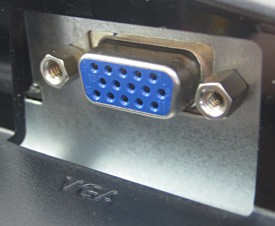 Image Credit: Ben Finio, Science Buddies / Science Buddies Image Credit: Ben Finio, Science Buddies / Science Buddies
|
Q: Can I use a laptop as a display and/or keyboard?
A: The short answer is "not easily." Many newer laptops have HDMI ports, but they only function as HDMI out, to send a video signal from the laptop to a television or projector. They do not work as HDMI in to display an external signal on the laptop's screen. The laptop's keyboard is only designed to work with the laptop itself, not as a standalone keyboard for an external device like the Raspberry Pi.
The longer answer is that, similar to the Remote Desktop feature on Windows and Mac computers, you can use special software to remotely operate a Raspberry Pi that is connected to the internet. This would allow you to control a Raspberry Pi using your laptop's screen and keyboard. This option is only recommended for advanced users, and you can find instructions at Raspberry Pi Documentation.
Q: How do I connect my Raspberry Pi to the internet?
A: Unlike earlier models, the Raspberry Pi 3B+ contains built-in Wi-Fi functionality. It does not require an external USB Wi-Fi adapter. You can connect your Raspberry Pi to the internet by clicking the internet icon in the taskbar and searching for available Wi-Fi networks, just like you would on a Windows or Mac computer. Your Raspberry Pi also has an ethernet port, which you can use to plug directly into a router for a hardwired connection.
Q: How do I shut down or reboot my Raspberry Pi? There's no power button!
A: Unlike most computers, the Raspberry Pi does not have a power button. You can shut down or reboot by clicking the raspberry icon in the upper left corner of your desktop, then select Shutdown. After the Raspberry Pi has shut down, it is safe to unplug the micro-USB power cable. Plug the cable back in to reboot. Important: never unplug the power cable while the Raspberry Pi is still running. This can corrupt the SD card.
Q: How can I adjust the Raspberry Pi's display resolution?
A: Click the Raspberry Pi logo in the top-left corner of your desktop. Select Preferences, then Raspberry Pi Configuration, then click the Set Resolution... button on the System tab.
Q: I have everything connected properly. Why can't I hear any sound?
A: Right-click the speaker icon on the desktop taskbar. This allows you to manually select HDMI or analog (the headphone jack) for sound output. Make sure you have the proper output selected. Also, make sure your Scratch program is set to play a sound. You can write a simple program to test if your sound is working using the "when space key pressed" and "play sound meow" blocks.
Q: Why won't my Raspberry Pi turn on?
A: If your Raspberry Pi will not turn on (the screen remains blank after everything is plugged in), go through this checklist to make sure everything is set up properly.
- Make sure your SD card is pushed in all the way (see Figure 1).
- Make sure the red power LED on your Raspberry Pi (labeled "PWR," near the micro-USB port, see Figure 2) is on. This means the Raspberry Pi is receiving power from the micro-USB port. If the LED is not on, make sure you pushed the micro-USB connector into the micro-USB port all the way.
- When you first plug the micro-USB cable in, the green LED (labeled "ACT," next to the PWR LED, see Figure 2) should flash several times. This LED flashes when the Raspberry Pi reads data from the SD card. After the Raspberry Pi is done booting up, it should turn off. If it does not flash at all, your SD card might not be inserted properly. Go back to step 1.
- Make sure your display (television or monitor) is turned on. If your display is turned off, you will not see anything on the screen, even if the Raspberry Pi is on.
- Make sure your display is set to the correct input. Many modern TVs have more than one HDMI input, and some computer monitors have DVI or VGA inputs in addition to HDMI.
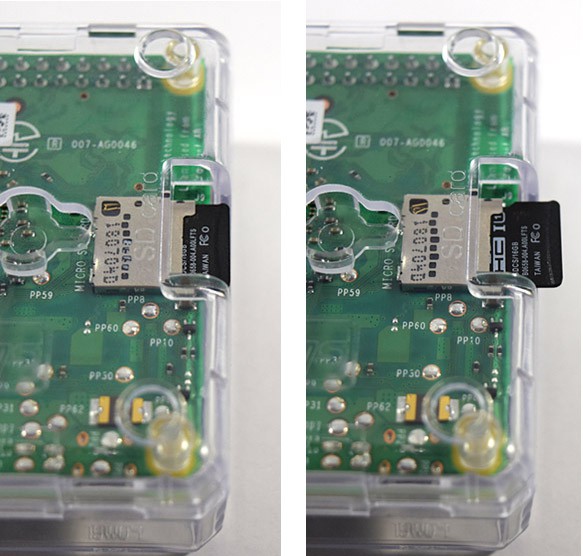 Image Credit: Ben Finio, Science Buddies / Science Buddies
Figure 1. A micro-SD card that is inserted properly (left) and one that is not pushed in all the way (right).
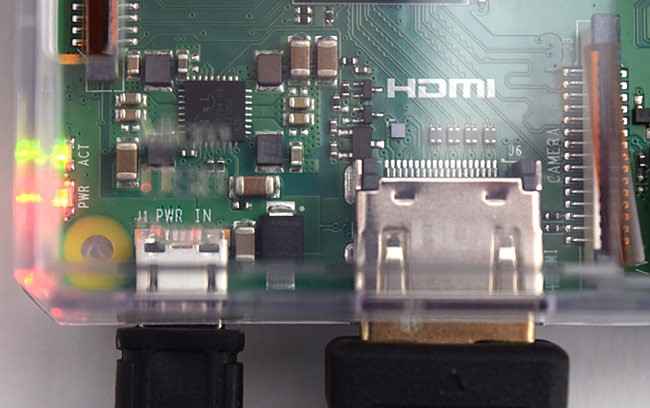 Image Credit: Ben Finio, Science Buddies / Science Buddies
Figure 2. The PWR (red) and ACT (green) LEDs near the micro-USB port.
Q: My Raspberry Pi starts to boot up, but then it freezes or the screen goes blank. What is wrong?
A There may be a problem with your Raspberry Pi or SD card. If you are using the Raspberry Pi or SD card that came with the Raspberry Pi Projects Kit or Raspberry Pi Circuit Parts Only Kit purchased from our partner Home Science Tools, please contact them directly at service@homesciencetools.com for assistance.
Q: My Raspberry Pi froze and is not responding to mouse or keyboard input. What should I do?
A: First, be patient and give the Raspberry Pi a few minutes to try and process whatever it was doing. If you click on a whole bunch of things in rapid succession, or run a really complicated Scratch program, the Raspberry Pi might slow down or freeze temporarily.
Next, if you are using a wireless keyboard and mouse, make sure they have fresh batteries.
Finally, as a last resort, if your Raspberry Pi is not responding, unplug the micro-USB cable and plug it back in. In general, you want to avoid doing this, because suddenly cutting power to the Raspberry Pi without properly shutting it down first can corrupt the SD card, and prevent the Raspberry Pi from working properly.
Q: My Raspberry Pi is acting strangely (e.g. it suddenly will not boot up properly, certain programs do not work, etc.). What is wrong?
A: If your Raspberry Pi is not "dead," but seems to be behaving strangely, there is a chance that your SD card has become corrupted. This can happen if you unplug the Raspberry Pi's power cord without properly shutting it down first. See the next question.
Q: I think I corrupted my Raspberry Pi's SD card. What should I do?
A: If the SD card came with the Raspberry Pi Projects Kit or Raspberry Pi Circuit Parts Only Kit you purchased from our partner Home Science Tools, please contact them directly at service@homesciencetools.com for assistance. Make sure to include a detailed description of the problem you are having. They will work with you to resolve the issue.
Careers
If you like this project, you might enjoy exploring these related careers:


Related Links
- Science Fair Project Guide
- Other Ideas Like This
- Computer Science Project Ideas
- Music Project Ideas
- My Favorites