Water Drops and Sparks! Experimenting with a Kelvin Electrostatic Generator
Abstract
Water is an interesting thing. We drink it, swim in it, and wash ourselves with it. We can get energy from water by damming it and sending it through a turbine. But did you know that we can use the natural electrical charges present in water and a Kelvin electrostatic generator to create sparks? You can even use a Kelvin electrostatic generator to temporarily light a bulb! Now that is one bright idea!Summary
Michelle Maranowski, PhD, Science Buddies; edited by Braeden Benedict, Science Buddies CSA winner
This science project idea is based on this 2010 California State Science Fair entry: Benedict, Braeden. (2010). Optimization of the Water Flow Rate in a Clean Energy Electrostatic Power Generator.
Trademarks
- Styrofoam™ is a registered trademark of The Dow Chemical Company.

Objective
To build a Kelvin electrostatic generator and investigate the effect that the water flow rate has on the generator's time to spark.
Introduction
Our bodies need water to thrive and to maintain health. In fact, our bodies are 55–60 percent water. We use water to cook, to clean, and to grow our food. You might think that water is kind of dull, but if you looked at water closely, you would see that water is a fluid that has electrical charges moving around. The charges are called ions. Don't worry! There's no chance of electrocuting yourself by drinking water, because half of the charges are positive and half are negative, so water has no overall electric charge. The interesting thing is that you can use ions that water contains to make a really cool tool called a Kelvin electrostatic generator.
The Kelvin electrostatic generator uses the electrical charges in water to make static electricity (you can read more about static electricity in the Science Buddies Electricity, Magnetism, & Electromagnetism Tutorial). In other words, this generator can make sparks! How? Well, first let's take a look at an example of a Kelvin electrostatic generator, shown in Figure 1.
 Image Credit: (Courtesy of Braeden Benedict.) / Permisstion granted
An electrostatic generator is made from a water jug, tubes, two droppers, two inducers made from soda cans, wire, and coffee cans. All these materials are held together in a frame made from PVC pipes. An upside jug holds water at the top of the frame and a tube splits the water into two droppers placed on either side of the frame. The water drips past rings cut from soda cans and into coffee cans below. Probes in each coffee can connect to the opposide soda ring with wires so a charge can flow between them.
Figure 1. Kelvin electrostatic generator made from parts found at the hardware store. (Courtesy of Braeden Benedict, 2010.)
The generator is made up of a water source, two droppers, two inducers, two water collectors, wires, and two probes between which the spark occurs. The water source is split into two droppers. The bottom end of each dropper sits just above a metal ring, called the inducer. Below each inducer there is a water collector. The inducer on the right is electrically connected to the water collector on the left with an insulated wire, and the inducer on the left is electrically connected to the water collector on the right with an insulated wire.
Usually, there will be a small charge on one of the water collectors that starts the process. That's because in dry conditions, everything that is handled ends up with a tiny electric charge. Let's say that the left water collector has a small positive charge. Since the left water collector is connected to the right inducer, the right inducer will also develop a positive charge. The positive charge will attract negative charges into the tip of the water dropper and will repel positive charge into the other end of the water dropper. When a drop of water breaks away from the tip of the dropper it will still have an overall negative charge. As it falls through the inducer into the right water collector, it charges the right water collector and the collector will develop a negative charge. Since the left inducer is electrically connected to the right water collector, it too will develop a negative charge. The negative charge on the left inducer will attract positive charge into the tip of the left dropper and repel negative charges to the other end of the left dropper. As a water drop breaks away from the tip of the left dropper, it has an overall positive charge. The positive drop of water falls through the left inducer and into the left water collector and the left water collector becomes more positively charged. The process then continues, as described at the beginning of this paragraph.
As time goes on, the water collectors become more charged. Notice in Figure 1 that each water collector has a probe electrically connected to it and that the space between the tips of the probes is approximately 1 centimeter (cm). As the charge on the water collectors increases, the electric field between the probe tips increases as well. Eventually, the electric field gets so high that the air between the two probes conducts electricity. When this happens, this is called the dielectric breakdown of air. Normally, air is an insulator and not a conductor. When air conducts electricity, that is when you will see sparks fly between the probes.
In this electricity and electronics science project, you will build your own Kelvin electrostatic generator. You will investigate the effect that the rate of water flow has on the generator's time to spark. Will the spark occur faster if the water flow is fast, or will the spark occur faster if the water flow is slow? Let's get sparking!
Terms and Concepts
- Electrical charge
- Ions
- Kelvin electrostatic generator
- Static electricity
- Electric field
- Dielectric breakdown
- Insulator
- Conductor
- Short circuit
Questions
- What are the ions that naturally occur in water? What is the charge of the ions?
- What is the dielectric breakdown field of air?
- Who is Lord Kelvin and what are some of his other accomplishments?
Bibliography
- Beaty, B. (1995). Kelvin's Thunderstorm: Lord Kelvin's Electrostatic Generator. Retrieved October 26, 2010.
- Wikipedia Contributors. (2010, October 13). Kelvin Water Dropper. Wikipedia: The Online Encyclopedia. Retrieved October 26, 2010.
- National High Magnetic Field Laboratory. (n.d.). Kelvin Water Dropper. Retrieved October 26, 2010.
Materials and Equipment
Stand:
- Hand saw
- Plywood, ½-inch thick
- Adult volunteer
- Sandpaper
- Spray primer
- Spray paint, your favorite color
- Screw
- Screwdriver
- Hammer
- Nail
- PVC caps, 1-inch (2); available at your local hardware store
- Drill with ¼-inch bit
- Nuts and bolts, ¼-inch X 2-inch (5); available at your local hardware store
- Tape measure
Water Assembly:
- Fishing line; available at your local sporting goods store
- Heat gun
- Polyethylene tubing, ¼-inch (5 feet)
- Utility knife
- Quick-connect polypropylene straight valve, ¼-inch X ¼-inch (1)
- Quick-connect polypropylene tee, ¼-inch X ¼-inch X ¼-inch (1)
- Quick-connect polypropylene elbow, ¼-inch X ¼-inch (2)
PVC Tube Assembly:
The next seven PVC items can be purchased at your local hardware store.- PVC pipe, 1-inch (6 feet)
- PVC pipe, ¾-inch (3 feet)
- PVC elbow, 1-inch X 90-degree (6)
- PVC tee, 1-inch X 1-inch X 1-inch (2)
- PVC tee, 1-inch X 1-inch X ¾-inch (4)
- PVC saw
- PVC glue
Water source:
- Empty and thoroughly cleaned 4-liter juice jug
Inducers:
- Rubber stopper, #5 (1 each). Rubber stoppers can be purchased at your local hardware store or online at WidgetCo, www.widgetco.com, part # 7-R05-S-EPDM-RS
- Rubber stopper, #3 (2 each). Rubber stoppers can be purchased online at WidgetCo, www.widgetco.com, part # 7-R03-S-EPDM-RS
- Empty and thoroughly cleaned soda can (1)
- Sharp scissors
- Washers for ¼-inch bolts (4); available at your local hardware store
Water containers:
- Empty and thoroughly cleaned small coffee cans (2)
- Block of StyrofoamTM (2). You can find Styrofoam at your local crafts store
- Nails (2); available at your local hardware store
- Alligator clip cables (4) available from Jameco Electronics
Testing:
- Fan
- Dehumidifier (optional)
- Stopwatch (2)
- Plastic cups (2)
- Digital scale
- Towel
- Lab notebook
Disclaimer: Science Buddies participates in affiliate programs with Home Science Tools, Amazon.com, Carolina Biological, and Jameco Electronics. Proceeds from the affiliate programs help support Science Buddies, a 501(c)(3) public charity, and keep our resources free for everyone. Our top priority is student learning. If you have any comments (positive or negative) related to purchases you've made for science projects from recommendations on our site, please let us know. Write to us at scibuddy@sciencebuddies.org.
Experimental Procedure
Building the Kelvin Electrostatic Generator
Making the Stand
- Use the hand saw and cut two plywood boards to make the bottom of the stand. Cut a plywood board sized 2 feet (ft.) X 1 ft. Cut a second plywood board that is 2.5 inches (in.) X 2.5 ft. Caution: Remember to wear your safety goggles while using the saw. Ask an adult for help when using the saw. See Figure 1 to get an idea of what the stand looks like.
- Using sandpaper, sand down both boards to remove any rough spots.
- Prime the boards with the primer spray paint. Let the primer dry and then lightly sand the boards.
- Spray paint both boards with colored spray paint. Be sure you do this outside or in a well-ventilated area. Let the boards dry completely. Priming and painting the wood effectively seals the wood and prevents it from absorbing moisture from the air and becoming conductive. If the wood became conductive, there would be an extra path for the charge to travel and the generator would not work properly.
- Attach the two boards together in a square cross using screws. Place the thinner board on top of the larger board. Make a hole in the middle with a hammer and a nail so that you have a guide for the screw. Carefully screw the screw all the way down so that the head of the screw is flush with the wood.
- Drill three holes in the stand: one hole on both ends of the larger, bottom board and one hole in one end of the thinner board. Locate each hole 5 cm from the edge of the board at the middle. Drill the holes completely through the board. The size of the holes should accommodate the bolts. Caution: Remember to wear safety goggles when using the drill. Ask an adult for help when using the drill.
- Drill holes in the center of three of the PVC caps. Caution: Remember to wear your safety goggles when using the drill. Ask an adult for help when using the drill.
- Place one of the caps over the hole in one end of the board. Insert a bolt from the bottom of the board through the holes of the board and the cap. Use a nut and securely fasten the cap to the board. Repeat with the other two holes.
- The stand is now complete. Move on to making the water assembly.
Making the Water Assembly
- See Figure 2 to get an idea of what the water assembly looks like.
 Image Credit: (Courtesy of Wen Phan and Braeden Benedict) / Permission granted
Figure 2. Water assembly for Kelvin electrostatic generator. (Courtesy of Wen Phan and Braeden Benedict, 2010.)
- Cut a 4-inch piece of polyethylene tubing with the utility knife and attach it to the top part of the quick-connect straight valve. Refer to Figure 2.
- Now you need to connect the valve to the quick-connect tee. Cut off a 2-in. piece of polyethylene tubing. Attach it to the bottom of the quick-connect straight valve and then attach the other end into the quick-connect tee. Refer to Figure 2.
- Now cut two 6 in. pieces of polyethylene tubing. Attach one 6 in. piece to one side of the quick-connect tee and the other 6-in. piece to the other side of the quick-connect tee. Refer to Figure 2.
- Attach a quick-connect elbow to the ends of each of the 6-in. pieces of polyethylene tubing. Refer to Figure 2.
- Now you need to make the droppers. Cut a 1-ft. piece of polyethylene tubing. Insert a 14-in. length of fishing line through the tubing.
- Have your volunteer hold the ends of the tubing. Use the heat gun and gently move it around the middle of the polyethylene tubing. As the plastic gets warm and starts to melt, have your adult volunteer slowly pull the ends of the tubing apart until the middle of the tubing forms a dropper around the fishing line. Turn off the heat gun and remove the fishing line. Allow the tubing to completely cool, then cut the tubing in the middle. You now have two 6-in. droppers.
- Attach a dropper to one of the quick-connect elbows. Repeat with the second dropper and elbow. Refer to Figure 2.
- The water assembly is now complete. Move on to making the PVC tube assembly.
Making the PVC Tube Assembly
Constructing the top:
- Now start to put together the PVC tube assembly. This assembly bolts into the stand and its purpose is to hold the water source and the water assembly. Refer to Figure 1.
- To make the top, cut six 4-in. segments of 1-in. diameter PVC pipe with the PVC saw.
- Attach one end of a 4-in. PVC pipe to a PVC elbow. Use PVC glue to bond the surfaces. Insert and glue the straight segment 1 in. into the elbow.
- Attach the other end of the 4-in. PVC pipe to a PVC elbow. Attach the segment using PVC glue to bond the surfaces. Insert and glue the straight segment 1-in. into the elbow. Make sure that the elbows are square to each other and not cocked. If they are not square, then the stand will not fit together well.
- Attach a 4-in. PVC piece to the open end of one of the elbows. Insert and glue the segment 1 in. into the elbow. Duplicate on the other side with the other elbow and a 4-in. piece of PVC.
- Insert the free end of the PVC tube to a PVC tee. Glue with PVC glue. Make sure that the tee is pointing out. Duplicate on the other side. Refer to Figure 1.
- Repeat steps 3–5 to create another U-shaped piece. Attach this piece to the PVC tees of the piece from step 6. You now have a PVC rectangle.
Constructing the Sides:
- Measure the distance between the centers of the caps on the stand that you attached in the first section. Note this value in your lab notebook.
- Cut two segments of PVC tube that are 18 in. long. Insert a segment into each one of the caps on the stand. Refer to Figure 1 to see how to fit these pieces together.
- On each segment end, attach a 1- X 1- X ¾-in. tee. Each tee should be at the same height and the openings should face each other exactly. Insert and glue the segment 1 in. into the tee.
- Cut two 3-in. segments of ¾-in. PVC pipe. Insert and glue each segment into the tee openings that face each other. Refer to Figure 1 to see how these pieces fit together.
- Now cut two 4-in. segments of 1-in. PVC. Insert and glue each segment 1 in. into the top part of each tee.
- Attach and glue a 1- X 1- X ¾-in. tee to the top of each of the 4-in. segment. Each tee should be at the same height and the openings should face each other exactly. Insert and glue the segment 1 in. into the tee.
- Now you need to cut a segment of ¾-in. PVC that fits between and into the tees. The purpose of this piece is to add stability to the entire assembly and the water system. Don't glue this segment in yet.
- Measure the distance between the droppers on the water assembly. Lay the water assembly on top of the ¾-in. pipe. Use a permanent marker and mark the location of the droppers on the PVC pipe.
- Drill the ¾-in. pipe all the way through at the black marks. Ask your volunteer to help by holding the ¾-in. PVC pipe steady.
- Attach and glue the ¾-in. pipe to the tees. Make sure that the holes in the pipe are facing down.
- Cut two 1-ft.-long segments of 1-in. PVC.
- Insert and glue the segments into the top of the tees. Refer to Figure 1. The ends of the segments must be at the same height.
- Insert and glue a 1-in. PVC elbow to each of the PVC pipes. Make sure that the openings of the elbows are facing each other and that they are at the same height.
Attaching the Top to the Sides:
- Now have your volunteer help you attach the top to the sides. Place the empty juice jug, open side down, on the top. You need to measure the distance between the openings of the elbows on the sides to the openings of the tees on the top.
- Keep in mind that the top has to fit such that the droppers fit through the holes in the ¾-in. PVC pipe. Having the juice jug in place will allow you to have a better idea of the length of the segments you need to fit the top and sides in place. Refer to Figure 1.
- Cut out two segments of 1-in. PVC pipe that allows you to accurately fit the top to the sides.
- Once this is completed, you need to connect the water assembly.
Attaching the Water Assembly
- Take a #5 rubber stopper and drill a hole through it. The diameter of the hole should be the diameter of the clear tubing that you used to construct the water assembly. Caution: Wear safety goggles and ask for an adult's help when using the drill.
- Carefully open a hole in the bottom of the juice jug. This opening will allow you to add water to the source (the juice jug).
- Insert the rubber stopper into the juice jug. Carefully insert the water assembly into the hole in the rubber stopper. Then place the entire thing on the top holder. Use the hot glue gun and glue sticks to seal the tube the rubber stopper. Refer to Figure 1 and Figure 3. Figure 3 shows how the rubber stopper, the juice jug, and the water assembly fit together.
 Image Credit: (Courtesy of Braeden Benedict) / Permission granted
Figure 3. Juice jug, rubber stopper, and the top of the water assembly. (Courtesy of Braeden Benedict, 2010.)
- Insert the droppers through the holes in the PVC pipe.
- Now make the inducers.
Making the Inducers
- Cut the soda can into 1-in. thick rings with the hand saw. Caution: Wear safety goggles when using the hand saw. Ask your adult volunteer for help if you need it. You will need two rings to make two inducers, along with nuts, bolts, and washers.
- Sand the inside and outside of the rings until the outer coating is completely gone.
- Use the scissors and cut a little tab in each inducer and bend back the metal. See Figure 4.
 Image Credit: (Courtesy of Braeden Benedict) / Permission granted
Figure 4. An example of an inducer with a tab in the side. (Courtesy of Braeden Benedict, 2010.)
- Drill a hole in each of the #3 rubber stoppers. The diameter of the hole should match the diameter if the bolt. Caution: Wear safety goggles when using the drill. Ask an adult volunteer for help if you need it.
- Now attach the inducer to the rubber stopper, as shown in Figure 5 and Figure 6.
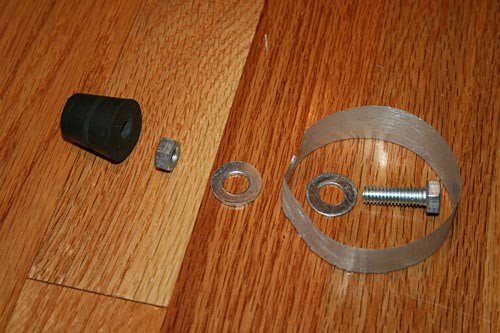 Image Credit: (Courtesy of Braeden Benedict) / Permission granted
Figure 5. Parts of an inducer. (Courtesy of Braeden Benedict, 2010.)
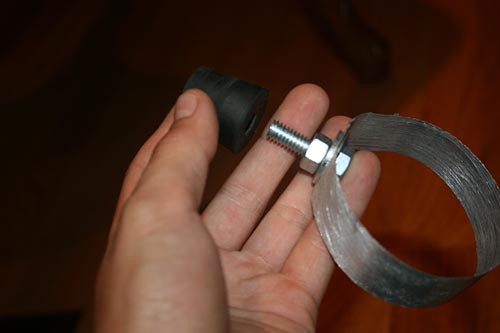 Image Credit: (Courtesy of Braeden Benedict) / Permission granted
Figure 6. A completed inducer. (Courtesy of Braeden Benedict, 2010.)
- Push one rubber stopper and inducer assembly into each of the openings in the tees on the stand. Make sure that a dropper from the water assembly is positioned over the inducer so that when water comes out of the dropper it will go through the inducer. Refer to Figure 1.
- Now work on attaching the water collectors to the bottom of the stand.
Attaching the Water Collectors and Making the Probes
- Cut out two Styrofoam pieces sized to the bottom of the coffee cans. They should be the same thickness.
- Hot glue each Styrofoam piece to the bottom of the stand, exactly underneath a dropper and inducer.
- Place a coffee can on top of each Styrofoam piece.
- Cut a 6-in. segment of 1-in. PVC tube. Attach and glue it to the cap that is bolted to the narrow piece of plywood.
- Push two nails into a piece of Styrofoam so that the tips are 0.5 cm apart. Hot glue the nails to the Styrofoam. See Figure 7.
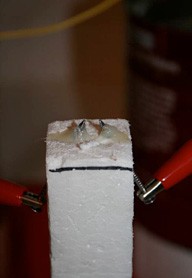
- Insert the Styrofoam into the pipe opening.
- Now electrically connect all the parts.
Electrically Connecting the Kelvin Electrostatic Generator
- Electrically connect the left inducer to the right coffee can with an alligator clip cable.
- Electrically connect the right inducer to the left coffee can with an alligator clip cable.
- Electrically connect the left coffee can to the left nail with an alligator clip cable.
- Electrically connect the right coffee can to the right nail with an alligator clip cable.
- The Kelvin electrostatic generator is now complete.
Testing the Kelvin Electrostatic Generator
- Find a quiet room with little foot traffic for your test.
- If it is humid when you are testing the generator or in the room in which you are testing the generator, use a dehumidifier. To keep the humidity constant throughout the test, turn on and leave on the dehumidifier and fan until no more water condenses in the room.
- Fill up a bucket with tap water. Vigorously stir the water with a wooden spoon to reduce dissolved gas in the water. Then fill the juice jug with water.
-
Turn the valve to the desired flow position and start the first stopwatch simultaneously. Make a little
mark on the valve so that you know the position of the valve. Start with a flow rate of 90 milliliters (mL)
per minute.
- To calculate the flow rate first weigh a plastic cup on the scale in terms of ounces and record the value in your lab notebook. Ask your volunteer for help holding two plastic cups under the droppers. Open the valve and start timing 1 min. on the stopwatch.
- After the minute is over, close the valve. Hold the cups under the droppers until the droppers have stopped dripping water. Don't allow any stray water to hit the generator.
- Pour the water into one cup. Weigh the water on the digital scale. Get the weight in terms of ounces. Subtract the weight of the cup.
- Convert between fluid ounces and milliliters. Then divide this number by 1 min. This is the flow rate and will be in terms of milliliters per minute.
- Repeat steps a–d until you arrive at the correct valve position.
- Open the valve to get a flow rate of 90 mL per minute.
- After the first spark, record the time between the subsequent sparks with the second stopwatch. Record the times in your lab notebook.
- After 20 recorded times (or 10 times for extremely long tests), close the valve and stop the first stopwatch simultaneously. Record the time in your lab notebook.
- Disconnect the alligator clip cables from the coffee cans.
- Remove the coffee cans from the generator and replace the cans with cups to catch any extra water. This will prevent the coffee cans from shorting during subsequent trials.
- Calculate the flow rate of the water. Weigh the plastic cup on the scale. Record the weight in your lab notebook. Now use the funnel and carefully pour the water from the coffee cans into the plastic cup. Record the final weight of the water and the cup in ounces in your lab notebook. Subtract the weight of the cup from the weight of the water and cup. Convert between fluid ounces and milliliters. Then divide this number by the time (minutes) from the first stopwatch. This is the flow rate and will be in terms of milliliters per minute.
- Pour the water back into the juice jug. Dry the coffee cans with a towel and replace them under the dropper and inducers in the generator.
- Repeat steps 4–10 two more times. Open the valve to the spot that you marked on the valve in step 4. It is important to repeat your experiments at least three times in order to ensure that your results are reproducible and accurate.
- Repeat steps 4–11 for two more flow rates. Choose one flow rate that is faster than the original flow rate and one flow rate that is slower than the original flow rate. Try changing the rate in both directions by 20 percent. Record all of your data in your lab notebook.
Analyzing the Data
- Gather and review the data that you have collected so far. Average the time-to-spark data for each flow rate. Record these values in your lab notebook.
- Plot your data. Label the x-axis Flow rate (ml/min) and the y-axis average Time to Spark (sec.). Plot the average Time to Spark for each trial for each flow rate. What kind of dependence do you see in your data? Do you think that a Kelvin electrostatic generator can be used to create power on a large scale?
Ask an Expert
Variations
- Try more flow rates. You might see that groups of flow rates have a different linear pattern. Can you make any observations during the experiment of how and where the water breaks into drops that could explain the different linear patterns? What is the physical explanation behind this?
- Try using the generator to light a fluorescent bulb.
- If you enjoy creating sparks, try this Science Buddies project: Where There is Charge, There Can Be Sparks!
Careers
If you like this project, you might enjoy exploring these related careers:


Related Links
- Science Fair Project Guide
- Other Ideas Like This
- Electricity & Electronics Project Ideas
- My Favorites