Abstract
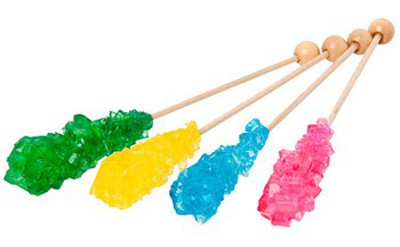
Here is a riddle for you: what kind of rock grows? The answer is: rock candy! This delicious candy is actually crystallized sugar and you can "grow" it from a sugar-water solution. In this science fair project you'll learn how to grow your very own rock candy and determine if using seed crystals changes the growth rate of your sugar crystals.Summary
Sandra Slutz, PhD, Science Buddies
Popsicle© is a registered trademark of Good Humor-Breyers Ice Cream, which is a subsidiary of Unilever Supply Chain, Inc.
Objective
In this science fair project you will investigate how the presence of seed crystals changes the growth rate of rock candy.
Introduction
Have you ever looked at rock candy and wondered how it's made? Rock candy is actually a collection of large sugar crystals that are "grown" from a sugar-water solution. Sugar, like many other materials, can come in many different physical states. As a solid it can either be amorphous, without shape, like when it forms cotton candy, or crystalline, with a highly ordered structure and shape, like when it forms rock candy crystals.
Crystals form when the smallest particles of a substance, the molecules, arrange themselves in an orderly and repetitive pattern. Molecules are too small for us to see moving around and arranging themselves, but you can get a rough idea of what this would look like by taking a small shallow tray and filling it with marbles, ball bearings, or other spheres. As you add more spheres, the bottom of the tray becomes covered, then the spheres must form layers on top of one another, and a structure or pattern emerges.
So how do the molecules of a substance get together to form a crystal? First there have to be enough molecules in one area that they have a high chance of bumping into one another. This happens when a solution, which is made up of a liquid and the compound that will be crystallized, is saturated. In the rock candy, the liquid is water and the compound is sugar. A solution is saturated when the liquid holds as much of the compound dissolved in it as possible. For example, when making rock candy, you dissolve as much sugar as possible in water to make a saturated solution. If you add more compound than can dissolve in the liquid, the undissolved bits remain as solids in the liquid. In a saturated solution, the molecules bump into one another frequently because there are so many of them. Occasionally when they bump into each other, the molecules end up sticking together; this is the beginning of the crystallization process and is called nucleation. Once several molecules are already stuck together, they actively attract other molecules to join them. This slow process is how the crystal "grows."
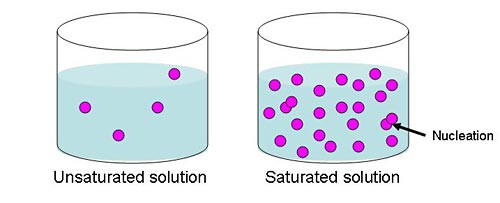 Image Credit: Sandra Slutz, Science Buddies / Science Buddies
Figure 1. This diagram illustrates the large number of molecules in a saturated solution. With so many molecules in the liquid, there is a high chance of them bumping into one another and creating a nucleation event.
In this science fair project you will make a saturated solution of sugar and water in order to grow your own rock candy sugar crystals. You will compare the rate of growth between rock candy that is left to nucleate on its own in the solution, and rock candy that starts off with some assistance. To assist this rock candy, you will jump-start the nucleation process by adding sugar crystals, called seed crystals, to the string first.
Terms and Concepts
Here are some terms you should know, and questions you should think about before starting this science project. Have an adult help you look up these words and concepts.
- Amorphous solid
- Crystalline solid (also known as crystal)
- Molecule
- Solution
- Compound
- Saturated
- Nucleation
- Seed crystal
Questions
- How do you make a saturated solution?
- Which holds more sugar: cold water or hot water?
- How do crystals grow?
- What is nucleation?
Bibliography
- Semper, R. et al. (n.d.). Science of Sugar. Retrieved April 15, 2008.
- For another experiment, this website will show you how to grow rock candy with just one large seed crystal:
Helmenstine, A.M. (2019, December 8). Grow Your Own Seed Crystal. ThoughtCo. Retrieved February 3, 2023
Materials and Equipment
This project is customized for jars that hold approximately 14 oz. If your jars are larger you will need to double the amount of water and sugar.
- Yarn or cotton string (about 1.5 feet)
- Water
- Cup
- Tablespoon measuring spoon
- Small plate
- Granulated white sugar (3 cups)
- Wax paper
- Screws, wooden beads, or other small nontoxic objects to use as weights (2)
- Wooden skewers, Popsicle® sticks, or pencils (2)
- Marker to write with
- Ruler (with centimeter markings)
- Tape
- Glass jars, make sure they are identical in size and shape (2)
- Pot
- Stove
- Measuring cup (for liquid ingredients)
- Measuring cup (for dry ingredients)
- Wooden mixing spoon
- Pot holders
- Paper towel
- Lab notebook
Experimental Procedure
This video shows how to make a single jar of rock candy. Note that the quantities in the procedure for this project are different, since you will make two jars.
Day 1
- To start this science fair project, cut two pieces of yarn. Each piece should be approximately 1 inch longer than the height of the glass jars.
- Set one of the pieces of string aside and do nothing to it. Soak the other piece of string in a cup of water for 5 minutes.
- After soaking, use your hand to squeeze the excess water from the string. Roll the string in 1 tablespoon of sugar on a plate. The string will be coated with sugar. These small bits of sugar are the seeds on which other sugar crystals might grow.
- Lay both your seeded (sugar-coated) string and your non-seeded string on a piece of wax paper overnight. Make sure they are not touching.
Day 2
-
Prepare the strings.
- Take your seeded string and tie one end to a screw, wooden bead, or other small object that can serve as a weight. It is ok if some of the sugar falls off while you're tying it to the weight. Repeat the process with the non-seeded string and a second weight. Be sure to use the same type of weight for each string.
-
Tie the other end of each piece of string to a skewer, Popsicle stick, or pencil. See Figure 2 below.
- Using a marker, color the edges of the skewer that is holding the seeded string. That way you will know later which string had sugar on it. Make sure to write down in your lab notebook the marking of your seeded string skewer in case you forget later.
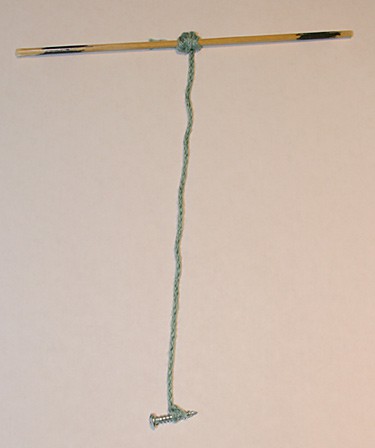 Image Credit: Sandra Slutz, Science Buddies / Science Buddies
Figure 2. The string in this photo has been tied to a skewer and weighted down with a screw on the other end. It is ready to be used to make rock candy.
- Lower the weighted end of the seeded string into one of the jars and rest the skewer across the mouth of the jar. Roll the skewer to wind the string until the weight is suspended approximately 1 centimeter (cm) from the bottom of the jar, which you can measure with your ruler. Tape the string around the skewer so that the length of the string cannot change. Repeat this process for the non-seeded string, then take the skewers and strings out of the jars and set them aside.
-
Preheat the glass jars. This will ensure that you are not adding your hot sugar-water solution to a cold jar, which would result in a dramatic temperature change that might make small crystals form along the glass. The small crystals would disrupt your rock candy formations.
- Caution: get help from an adult when handling boiling water.
- Boil enough water to fill both jars.
- When the water is boiling, carefully pour it into the jars. You might want to use a funnel to avoid spilling too much water.
- Let the full jars sit, with the hot water in them, until your sugar-water solution is ready.
-
Make the sugar-water solution.
- Using a liquid measuring cup, add 1 cup of water to a pot. Bring the water to a rolling boil on the stove. Turn the heat down to low. Note: if you are using jars that are larger than 14 oz, heat 2 cups of water.
- Using a dry measuring cup, add 2 cups of sugar to the hot water. Note: if you are using jars that are larger than 14 oz, add 4 cups of sugar.
- Mix with a wooden mixing spoon until all the sugar has dissolved.
- Turn the heat back up and wait until the sugar-water solution returns to a rolling boil. Make sure to keep stirring so the temperature is consistent throughout the solution.
- Remove the boiling sugar-water solution from the stove.
- Continue to add sugar 1 tablespoon at a time. Stir thoroughly after each added spoonful, making sure that the sugar is completely dissolved before adding another spoonful. Note: do not confuse the tiny little bubbles in the solution for undissolved sugar. You can tell them apart by stopping your stirring for a moment; the sugar will settle to the bottom of the pan, the bubbles will remain suspended throughout the solution.
- Keep adding sugar until no more will dissolve in the solution. If you think you've added too much sugar to your solution, don't worry. Keep stirring and if even after a full 2 minutes of stirring, you have undissolved sugar at the bottom of your pot, return the pot to the stove. Heat the solution until it just begins to boil, then remove it from the stove. This should help you to get that last bit of sugar into the solution.
- After the last bit of sugar has been dissolved, allow the solution to cool for 5 minutes.
- Pour the hot water out of the preheated glass jars. Caution: the jars will be hot, so use oven mitts or pot holders to handle them.
- After the sugar-water solution has cooled for 5 minutes, pour the solution into the two preheated glass jars, dividing the liquid equally between the two containers. Caution: Be extremely careful when pouring the sugar-water solution; it is hot and will burn if spilled on your skin.
- Using pot holders, move the jars of sugar-water solution to a place where they can be left undisturbed for one week. Place both jars in the same location. Large fluctuations in temperature can interfere with the crystallization process, so avoid putting the jars in places that get direct sunlight, or are near a heating or cooling vent.
- Gently lower the weighted strings into the jars of sugar-water solution, one string per jar.
-
Securely tape the skewers holding the strings to the edges of the jars to prevent the strings from being accidentally jostled. See Figure 3 below.
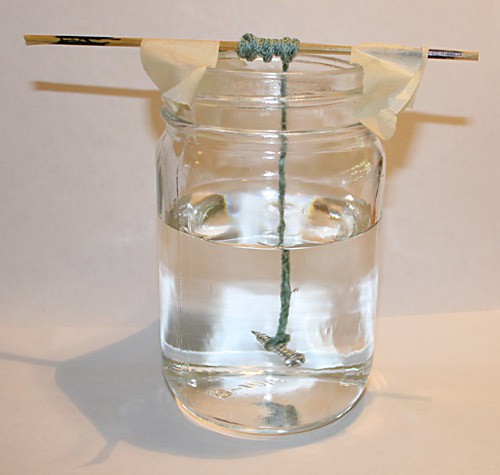 Image Credit: Sandra Slutz, Science Buddies / Science Buddies
Figure 3. When the experiment is all set up, your rock candy growing jars should look like the one pictured here. - Loosely cover the jars with a paper towel to prevent dust and debris from flying in, while still allowing evaporation to occur.
Observations and Measurements
-
Look at your jars once a day. What do you see? Are there any crystals growing? Where are the crystals? Which string has more crystals: the one that was or wasn't seeded? Make a data table, like the one below, in your lab notebook and record your observations every day. While you actually prepared your strings on the "Day 1" step above, for the purposes of the experiment, Day 1 in your data table will be the day you made your solution and began running the experiment.
Days Spent in Jar Observations Day 1 (the day the sugar-water solution was made) Day 2 Day 3 Day 4 Day 5 Day 6 Day 7 -
Make observations of your sugar-water solution jars for one week. On the seventh day, remove the strings from the jars and take measurements of your rock candy crystals.
- If there is a layer of hardened sugar syrup coating the top of your jar, you can use a spoon to gently break that layer before pulling out your sugar crystals.
- Briefly rinse the rock candy crystals in cold water, then leave them on a paper towel for 30 minutes to dry.
- Using a ruler, measure the length of the rock candy, and the width at the widest point. Record your measurements in a data table, like the one below, in your lab notebook. Did seeding make a difference in the size of the rock candy that you grew?
Starting String Conditions Length (cm) Height (cm) Seeded Not Seeded - Once you've recorded all your measurements and observations, you can enjoy all your hard labor by eating the rock candy you grew!
Ask an Expert
Variations
- How big can your rock candy grow? This will take a little more patience, but instead of stopping your experiment at Day 7, keep going! Do the crystals continue to grow? For how long?
- Is there any difference between starting with one large seed crystal versus many small seed crystals? Design an experiment to find out. Hint: you can find directions on how to make a single large seed crystal on this Grow Your Own Seed Crystal webpage.
- Cold water holds less dissolved sugar than hot water. What happens to the rate of crystallization if you rapidly cool your sugar-water solution? Do crystals form? Design an experiment to compare the size and structure of sugar crystals formed by rapid versus slow cooling.
- Try making crystals from other substances. You'll need to do a little reading and experimenting on your own to figure out which substances might make crystals. Hint: Try starting with materials you already know come as mini crystals, such as salt.
- Try enhancing your rock candy by adding a few drops of food coloring or flavoring (vanilla, mint, etc.) to your sugar water solution in step 2. Will you end up with colorful or flavorful candy, or do you think the additives will evaporate away with the water?
- Want to learn more about crystals and try your hand at growing the best and biggest crystals around? See Crazy Crystal Creations: How to Grow the Best and the Largest Crystals
- Try growing crystals from another kind of sugary solution—maple syrup! Check out Making Maple Syrup Candy: How Does Temperature Affect It?
Careers
If you like this project, you might enjoy exploring these related careers:
Related Links
- Science Fair Project Guide
- Other Ideas Like This
- Cooking & Food Science Project Ideas
- My Favorites
- Chemistry Safety Guide


