Abstract
Oooey gooey cheese...yum! Who doesn't like a slice of warm pizza straight from the oven? There's nothing quite like a slice of pizza and a glass of milk, so what makes pizza so great? The cheese! But did you know that making cheese is all about science and chemistry? In this science fair project, you will learn more about the science of cheese making and what kind of milk works best. Try this science fair project and you'll learn about science and get something yummy to eat afterward!Summary
Michelle Maranowski, PhD, Science Buddies

Objective
To investigate how different kinds of milk affect the resulting cheese.
Introduction
What makes a pizza so delicious? Is it the crust? The toppings? The sauce? A pizza just wouldn't be a pizza without ooey, gooey, melted cheese. There is a great variety of cheeses available. Cheese can taste buttery, bland, rich, creamy, sharp, or salty. Cheese can be hard, like Mimolette, or soft, like Brillat Savarin. Some cheeses are so soft that you need a spoon to eat them. Some cheeses are stinky, and some are aromatic. Whatever your taste is, there is a cheese that can satisfy it.
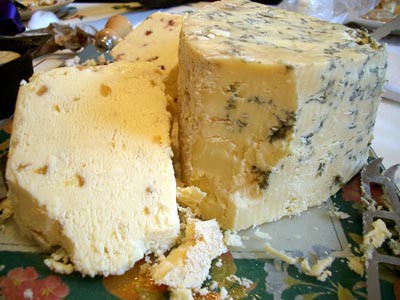 Image Credit: www.freedigitalphotos.net / Free download but requires hyperlink to site.
Figure 1. These are examples of cheeses. (Freedigitalphotos.net, 2008.)
We don't know when humans started making cheese, but we do know that cheese making is one of the most ancient forms of manufactured foods. There is evidence that humans in Egypt and Europe were making cheese in 3000 BC. For ancient man, cheese was a way to preserve and store milk. Milk spoils if it's left out too long, but some cheeses, like Mimolette, can keep for more than a year! Since cows and sheep usually give milk in the spring and summer months, cheese was a way for ancient humans to eat dairy in the winter months.
Cheese making is thought to have originated in the Middle East by Arab nomads. Legend has it that an Arab nomad stored some milk in a container made from the stomach of an animal. As he traveled, the galloping of the horse, the hot sun, and the rennet from the stomach served to separate the milk into curds and whey. Rennet is a natural complex of enzymes found in mammalian stomachs that is used to digest mother's milk. Imagine the nomad's surprise when he discovered his milk had changed to nutritious curds and refreshing whey!
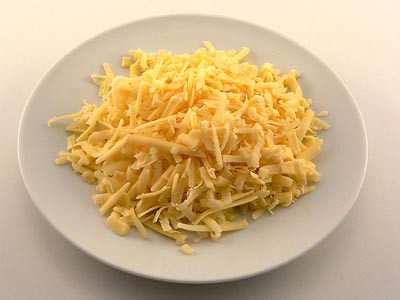 Image Credit: www.freedigitalphotos.net / Free download but requires hyperlink to site.
Figure 2. Grated cheese, just right for pizza! (Freedigitalphotos.net, 2008.)
Milk is a biological product made up of proteins, as well as fats and other minor ingredients. Milk proteins are 80 percent casein (pronounced "kay-sin") and 20 percent whey protein. The casein protein is dispersed through the milk. Cheese is coagulated casein protein. Making cheese requires an agent to collect and coagulate the casein protein. One way to collect the casein is to acidify the milk with an acid, like lemon juice or vinegar. Once the milk has been acidified, cheese makers use rennin, the active enzyme in rennet, to accelerate the coagulation. Rennin causes the milk to change without changing itself; rennin is a catalyst. To make cheese with rennet requires that the temperature of the milk be a constant temperature. If the milk is too hot or too cold, the reaction will not take place. The kind of milk used will also affect the end product. Sheep's milk, cow's milk, and goat's milk all result in different cheeses. The fat content in the milk affects how the cheese feels in your mouth as you eat it.
In this science fair project, you will make your own mozzarella cheese! You will investigate how different milks (ultra-pasteurized, low-fat, and homogenized whole) affect cheese making. It's amazing to think that a food product we are all familiar with can have serious chemistry behind it. Enjoy this science fair project and be sure to share the cheese you make with friends and family!
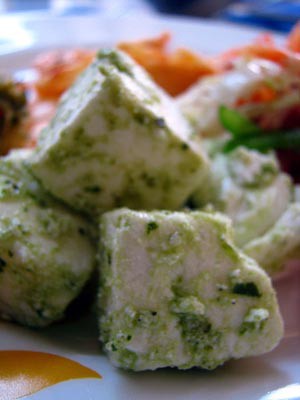 Image Credit: Wikipedia, photograph by Kirti Poddar / Creative Commons Attribution 2.0
Figure 3. This image shows a dish made from the Indian cheese paneer. (Feastguru.com, 2008.)
Terms and Concepts
- Rennet
- Curd
- Whey
- Enzyme
- Protein
- Coagulate
- Acid
- Catalyst
Questions
- What are some different varieties of cheeses?
- What are the different production methods used to make cheese? Hint: Look at one of the bibliographical entries for the answer!
- What kinds of milks are used to make cheese?
- What is your favorite cheese and why? What are your friends' and family members' favorite cheeses?
Bibliography
There are many websites related to cheese making. The following is a small selection:
- New England Cheesemaking Supply Company. (2008). Cheese Making. Retrieved December 1, 2008.
- Wikipedia Contributors. (2008, September 5). Rennet. Wikipedia: The Free Encyclopedia. Retrieved September 23, 2008.
This website has good information on the varieties of cheeses and the different production methods.
- Alden, Lori. (n.d.). Cheese. The Cook's Thesaurus. Retrieved September 17, 2008.
Materials and Equipment
- Stainless steel pot with a lid, 8-quart. Caution: Do not use an aluminum or an iron pot. Making cheese requires acidifying milk, and the acid can cause the aluminum or iron to etch, or come off of, the pot. The etched aluminum or iron would then end up in the milk, which is not good for your health.
- Stovetop
- Vegetable rennet (3 tablets); available online at websites such as www.cheesemaking.com
- Cutting board
- Knife, should be as long as the pot is deep
- Measuring cups (2)
- Spoons (2), do not use wooden spoons
- Mixing bowls (2)
- Food-grade citric acid, granulated form (15 teaspoons); available online at websites such as www.cheesemaking.com
- 1/4 teaspoon measure
- Water (11 1/4 cups), filtered non-chlorinated
- Whole pasteurized milk (2 gallons)
- Ultra-pasteurized milk (2 gallons)
- Low-fat milk (2 gallons)
- Dairy thermometer; available online at websites such as www.cheesemaking.com
- Slotted spoon, do not use a wooden spoon
- Timer
- Digital camera (optional)
- Cheesecloth
- Colander
- Microwave-safe bowl
- Microwave oven
- Oven mitt
- Dishwashing gloves
- Teaspoon measure
- Salt
- Bowl
- Ice water
- Volunteers (at least 3)
- Lab notebook
Disclaimer: Science Buddies participates in affiliate programs with Home Science Tools, Amazon.com, Carolina Biological, and Jameco Electronics. Proceeds from the affiliate programs help support Science Buddies, a 501(c)(3) public charity, and keep our resources free for everyone. Our top priority is student learning. If you have any comments (positive or negative) related to purchases you've made for science projects from recommendations on our site, please let us know. Write to us at scibuddy@sciencebuddies.org.
Experimental Procedure
While making cheese is definitely a science, it is considered an art as well. Sometimes your cheese might not be perfect, but keep trying and be sure to finish all of the steps.
- To start this science fair project, you should clean your work area. Make sure that all of the cooking implements are clean and have no food residue on them, and that the cheesecloth is clean and dry.
- Place the pot on the stovetop.
- Put one of the rennet tablets on the cutting board and cut the tablet into four equal pieces with the knife. Dissolve one of the four pieces into 1/4 cup of filtered, non-chlorinated water. Mix well with one of the spoons. Set the mixture aside.
- Dissolve 1 1/4 teaspoons of citric acid into 1 cup of filtered, non-chlorinated water. Mix well with the other spoon and set the mixture aside.
- Pour 1 gallon of whole milk into the pot. Turn the burner to the medium setting—no higher or you might scald the milk.
- Use the dairy thermometer to keep track of the temperature of the milk. Add the citric acid and water mixture to the pot when the milk reaches 60°F. With the slotted spoon, mix the citric acid mixture into the milk. Use consistent strokes. Don't mix too fast or too slow. Mix continuously until the temperature of the milk is 90°F. Once the temperature of the milk is 90°F, turn the burner off and take the pot off the burner.
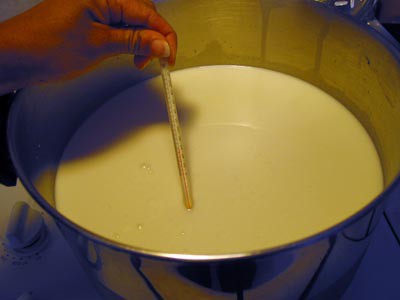 Image Credit: Michelle Maranowski, Science Buddies / Science Buddies
Figure 4. Waiting for the temperature of the milk to reach 90°F.
- Add the rennet and water mixture to the milk. Mix the rennet mixture into the milk using consistent strokes. Don't mix too fast or too slow. Mix the two together for 20 seconds.
- Once the rennet has been mixed in, cover the pot with the lid and let the mixture stand, undisturbed, for 5 minutes.
- After 5 minutes have elapsed, uncover the pot. You should see the curds separated from the whey. The color of the whey should be clear to light greenish yellow. The curds should have a custard-like texture. If the whey is still milky, then let the mixture sit for another few minutes.
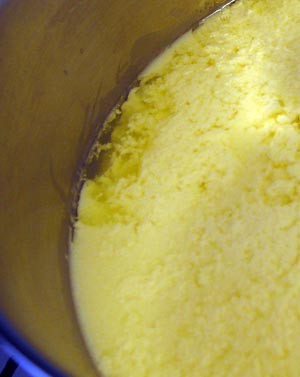 Image Credit: Michelle Maranowski, Science Buddies / Science Buddies
Figure 5. This picture shows the curds separated from the whey.
- Take the knife and cut the curds into smaller pieces. Carefully insert the knife at an angle into the curds at one end of the pot. Cut curds in an orderly fashion, from one end of the pot to the other end of the pot, making sure to cut all the way to the bottom of the curds and that the cuts are about 3/4 inch apart. Keep cutting until all of the curds have been cut in one direction. Turn the pot 90 degrees and cut the curds the same way again. You can take a photograph during this step and place it in your lab notebook.
- Place the pot back onto the burner. Turn the burner back onto the medium setting. Stir the curds gently with the slotted spoon until the curds and whey are about 105°F. Turn the burner off and take the pot off the burner.
- Line the colander with the cheesecloth and put it in the sink. Do not turn the sink on. Drain the curds in the colander. Gently press the curds against the side of the colander to remove the excess whey.
- Transfer the curds to the microwave-safe bowl.
- Put the bowl into the microwave oven and microwave the curds for 50-60 seconds on the "High" setting.
- Remove the bowl from the microwave. Take care to not burn yourself. Use an oven mitt, if necessary. How does the cheese look? Is it shiny? Is it soft? Record your observations in your lab notebook in a data table like the one below. You can take a photograph at this step and place the picture in your lab notebook.
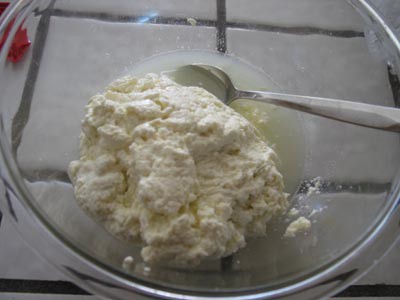 Image Credit: Michelle Maranowski, Science Buddies / Science Buddies
Figure 6. What your cheese may look like coming out of the microwave.
- Put on the dishwashing gloves. The curds should now be melted into one large piece of cheese. Gently push the cheese against the side of the bowl to remove the excess whey. Discard the whey. Pick up the cheese and stretch it out several times. What happens as you stretch the cheese? How long can you stretch the cheese before it breaks? Record your observations, as well as how long you spent stretching the cheese, in your lab notebook.
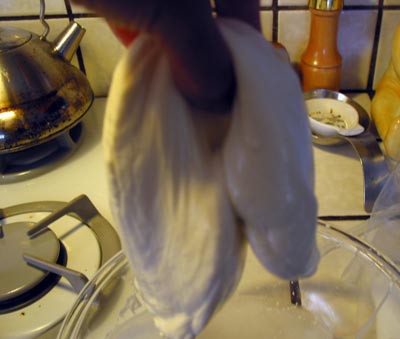 Image Credit: Michelle Maranowski, Science Buddies / Science Buddies
Figure 7. Stretching the cheese. This can be fun to do if you have someone help you!
- Put the cheese back into the microwave-safe bowl and into the microwave oven. Microwave the cheese for 20-30 seconds on the "High" setting.
- Remove the bowl from the microwave (again, using the oven mitt, if necessary) and then drain off the excess whey by pressing the cheese against the side of the bowl and pouring the whey out. Add 1 teaspoon of salt to the cheese and work it into the cheese with your kitchen gloves on. Stretch out the cheese as many times as needed until it is smooth and shiny and completely one piece. Set the cheese into a bowl of ice water to completely cool the cheese down. The cheese is now ready to eat. Cut a sample of cheese and taste it. Does it taste good? Record your observations in your lab notebook.
- Have your volunteers sample the cheese. Record their observations in your lab notebook. Sample questions include asking them to explain how it tastes and to describe its texture.
- Thoroughly clean and dry all of the kitchen supplies you used, including thoroughly rinsing out the cheesecloth and letting it dry.
- Repeat steps 1–20 for the other gallon of whole milk. Record all observations, along with the amount of time you spent stretching the cheese, in your lab notebook. Try to keep the time that you stretched the cheese the same throughout the experiment.
- Repeat steps 1–21 with ultra-pasteurized milk. What happens when you use ultra-pasteurized milk? Are you able to make cheese? Record your observations, as well as the stretch time, in your lab notebook.
- Repeat steps 1–21 for with low-fat milk. How does the cheese taste compared to the ones made from whole milk and ultra-pasteurized milk?
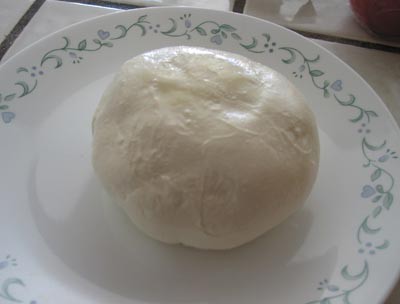 Image Credit: Michelle Maranowski, Science Buddies / Science Buddies
Figure 8. Here is a finished ball of mozzarella cheese.
| Variety of Milk | Total Time You Spent Stretching Each Cheese | Observations |
| Trial 1: | ||
| Trial 2: | ||
| Trial 1: | ||
| Trial 2: | ||
| Trial 1: | ||
| Trial 2: |
Ask an Expert
Variations
- Experiment with the amount of time you spend stretching the cheese and see if longer stretching times make for better melting. Make pizzas with your cheeses to determine which cheese has the best melting characteristics. You can also refrigerate the cheese and see if varying the time in the refrigerator affects the melting characteristics.
- Using a gallon of whole milk, experiment with how much citric acid is required to acidify milk properly. Can you get away with using 1/2 teaspoon of citric acid? Can you use 1 teaspoon of citric acid? Use pH paper to check the acidity of the milk. Is it easier or harder to make cheese if the acidity is too high or too low?
- Can you make crazy cheese from chocolate milk or strawberry milk? What does the resulting cheese taste like?
Careers
If you like this project, you might enjoy exploring these related careers: