Abstract
Gelatin! It's hard to think of another food that is used as frequently on the dinner table as off. You can find it in all sorts of sweet foods, from ice cream, yogurt, and gummy bears, to marshmallows and yellow colorings for sodas. Off the table, it shows up in glues, photographic paper, playing cards, crepe paper, medicine capsules, hair gels, and professional lighting equipment. From the kitchen to the theater—what a range of uses! In this cooking and food science fair project, you'll investigate how to change the strength of gelatin gels. What makes a gel weak and quivery, or strong and tough? Find out how gelatin can go from blubbery to rubbery!Summary
Kristin Strong, Science Buddies
- Popsicle® is a registered trademark of Good Humor-Breyers Ice Cream, which is a subsidiary of Unilever Supply Chain, Inc.

Objective
To determine how additives—like acids, sugars, salt, and milk—affect the strength of a gel.
Introduction
Wiggly, jiggly gelatin! Of all the foods we eat, this one seems to have magical powers, suspending fruits; molding into towering, translucent sculptures; transforming from a solid into a liquid as soon as a spoonful hits the warmth of our mouths. It's not magic, but special gelatin molecules that are responsible for these food tricks. Gelatin comes from collagen, the main protein in connective tissue, which is a specialized, fibrous tissue in animals that connects other tissues together. Ligaments, for example, which connect bones to bones, or tendons, which connect muscles to bone, are both rich in collagen. Other good sources are skin, bone, fascia, and the extracellular matrix that provides structural support for many cells. Collagen is so widespread and useful that it is the most common protein in the animal kingdom (which includes humans), making up about 50 percent of the total body protein content of most animals.
Imagine that you have a single strand of hair or a piece of thread several inches long. If you pull on each end at the same time (if you create a tensile force), then you might be able to break the hair or thread. But what happens if you take three strands of hair, or three pieces of thread, and braid or roll them together first to make a small rope-like fiber before you try pulling on them? You'll find that the tiny rope is much harder to break. This is similar to what happens with collagen. A collagen molecule is made up of three chains of amino acids that are wound tightly together to form a triple helix. The collagen molecule is then further strengthened by cross-links within the triple helix (which are like the rungs on a ladder). The collagen molecules are then bundled into fibrils and the fibrils into collagen fibers which are, like rope, very strong in tensile strength and are good at supporting and connecting tissues together.
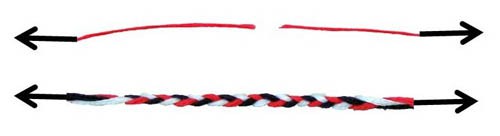 Image Credit: Kristin Strong, Science Buddies / Science Buddies
Figure 1. This image shows how the tensile strength of a single strand of thread can be increased by braiding it with two other strands of thread.
If you add heat to tissues containing collagen though, the collagen fibers can be taken apart. At around 140 °F, the bonds of the triple helix are broken. The collagen molecules can no longer hold their shape and they collapse. The three individual protein chains within each collagen molecule separate and disperse. These individual strands are the gelatin.
If animal tissues are cooked in water slowly over several hours, the collagen in all the connective tissues will have time to break down, and the gelatin will disperse and dissolve into the water, along with the other meat juices, forming a broth or soup stock. When the concentration of that gelatin reaches around 1 percent or more by weight in the broth, a gel can form as the hot stock cools down to around 100 °F, the melting temperature of gelatin. At this temperature, the strands of gelatin will begin to return to their coiled shape that they had when they were inside the collagen. Individual coils will pair up, and then form trios, making double and triple helixes again. This reassembly of the gelatin molecules forms a network that can trap liquid, turning the broth into a solid gel. You might have seen this in action if your parents have cooked a roast and put it in the refrigerator with the juices. When it's hot, the juices were flowing. But when it cools in the refrigerator, the juices congeal and form a weak gel. At a 1 percent concentration of gelatin, the gel that forms is delicate and will break easily when handled. Around 3 percent concentration, the gel becomes firmer and more rubbery.
The strength or firmness of a gelatin gel depends upon several factors:
- The concentration and quality of the gelatin.
- The absence or presence of additives, such as salt, sugar, milk, alcohol, or acids.
- How the gel is cooled—slowly at room temperature, or in a refrigerator.
In this science fair project, you will investigate how common additives influence gel strength. Do acids, like lemon juice, turn your gel into a quivering, fragile blob? Does sugar stiffen your gel and make it as tough and rubbery as a bouncy ball? It's time to find out!
Terms and Concepts
- Gelatin
- Molecule
- Collagen
- Protein
- Connective tissue
- Fibrous
- Ligament
- Tendon
- Fascia
- Extracellular matrix
- Tensile force
- Amino acid
- Triple helix
- Cross-link
- Fibril
- Collagen fiber
- Tensile strength
- Stock
- Concentration
- Gel
- Melting temperature
- Acid
- Saturated solution
Questions
- How is collagen used in animal bodies?
- What are the properties of collagen?
- From where does gelatin come, and how is it extracted?
- What factors influence gel strength?
Bibliography
- McGee, Harold. On Food and Cooking. New York, NY: Scribner, 2004.
- Lowe, B. (n.d.). Gelation And Stiffening Power Of Gelatin. Chestofbooks.com. Retrieved November 11,2016.
This source describes the physiologic and chemical properties of collagen:
- Wikipedia Contributors. (2008, October 31). Collagen. Wikipedia: The Free Encyclopedia. Retrieved October 31, 2008.
Materials and Equipment
- Popsicle® molds with lid (12); the lid should be separate from the stick portion, and the molds should be equally sized; these are available at sellers like Amazon.com. Note: You will need two sets of molds to have the correct number, 12, for this project.
- Masking tape (1 roll)
- Small funnel
- Spoon, used for stirring
- Popsicle sticks; Note: Only 1 is needed, but get at least 10 to account for breakage during the formation of the test instrument.
- Small paper cups; Note: Only 2 are needed, but get at least 10 to account for errors in forming the test instrument.
-
Test additives, choose 3 of the following (you will need 8 tbsp. of each one you select):
- Citric acid, also known as "sour salt;" available at some grocery stores and from online spice sellers
- Table salt
- Powdered milk
- Sugar
- Tablespoon
- Gelatin, plain, unflavored; available at grocery stores (1 box)
- Saucepan, medium-sized, about a 6-cup capacity
- Measuring cup, 2-cup
- Spoon
- Paring knife
- Scissors
- Sandpaper (1 square), or nail file
- Quarters (20)
- Liquid measuring cup, 1-quart size, microwave-safe
- Lab notebook
Disclaimer: Science Buddies participates in affiliate programs with Home Science Tools, Amazon.com, Carolina Biological, and Jameco Electronics. Proceeds from the affiliate programs help support Science Buddies, a 501(c)(3) public charity, and keep our resources free for everyone. Our top priority is student learning. If you have any comments (positive or negative) related to purchases you've made for science projects from recommendations on our site, please let us know. Write to us at scibuddy@sciencebuddies.org.
Experimental Procedure
Preparing Your Popsicle Molds
- Place a small piece of masking tape on each of 12 Popsicle molds. Be sure to put the labels on the molds and not on the lid, in case the lid gets disoriented and placed the wrong way on the molds.
- On of the pieces of masking tape, write down Control with a pen or pencil. These will be the molds that have only gelatin, and nothing else added.
- Select three additives that you want to test to see how they influence gel strength. Use the knowledge you have to make an educated guess or hypothesis on the outcome of your test.
- Write down the name of each of the additives three times on three different pieces of masking tape, and attach them to the molds. Now you should have 12 molds labeled as follows: 3 as Control, and the other 9 labeled with a test additive.
-
Add the appropriate test additives to each of the molds:
- For the molds labeled Control, add nothing to the mold.
- For the molds labeled Acid, add 2 tbsp. citric acid to each mold.
- For the molds labeled Sugar, add 2 tbsp. of sugar to each mold.
- For the molds labeled Salt, add 2 tbsp. of salt to each mold.
- For the molds labeled Milk, add 2 tbsp. of powdered milk to each mold.
Preparing Your Gelatin
- Pour 2 cups of cold water into a sauce pan.
- Add two packages of plain, unflavored gelatin. Each package should weigh 7.2 gm. Stir the water and gelatin with a fork or spoon for a few seconds, and then allow it to sit. This is called "softening the gelatin." Do not add heat to the pan.
- Add 2 cups of water to a microwave-safe, liquid measuring cup and place it in the microwave. Microwave the water on high until it comes to boil.
- Carefully remove the boiling water from the microwave and pour it into the sauce pan. Use caution to avoid burns.
- Stir the contents of the sauce pan with a spoon until the gelatin dissolves, about 1 min.
Filling Your Molds
- Bring your sauce pan close to the Popsicle molds.
- Using a 1/3-cup measuring cup, scoop up 1/3 cup of the gelatin and pour it into one of the molds. A funnel will help avoid spills.
- Use a clean spoon to stir the solution in the mold, scraping the bottom 3 times.
- Repeat step 2 and 3 until all the molds are filled.
- Do not add any Popsicle sticks or other sticks to the molds. Cover the molds with the mold's lid, and place the molds in the refrigerator for at least 24 hours. Do not disturb them as they cool.
- Note: Not all off the additive dissolves in the gelatin. This is intentional. It ensures you compare saturated solutions, or solutions that have the maximum amount of additive dissolved in it.
Making Your Test Instrument
- Using scissors, trim off some of the wood on one end of a Popsicle stick so that it becomes more pointed. This may take a few tries to get it right, so don't get frustrated if it breaks and you need to try again with a fresh Popsicle stick! Ask an adult for help you if you need it. If there are any rough edges after you have made your point on the Popsicle stick, use a piece of sandpaper or a nail file to smooth them out.
- Stack two small paper cups, one on top of the other.
- Push the tip of a small paring knife through both cups to create a small slit about 1/4 inch long. Use caution when handling the knife and ask for an adult's help, if necessary.
- Insert the rounded end of the Popsicle stick into the slits in the cup, so that it is sticking up through the inside of the cups about 1/2 an inch. If the stick doesn't feel tight or secure inside the cups, then you can use a piece of masking tape to secure it, or try again with another pair of cups and make a smaller slit. If you do use masking tape, make sure the bottom of the paper cups remains flat.
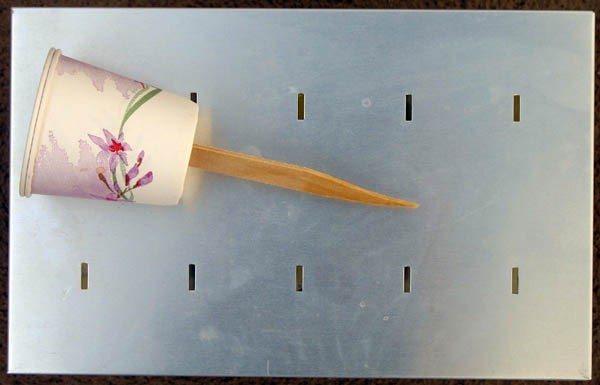 Image Credit: Kristin Strong, Science Buddies / Science Buddies
Figure 2. This photo show the test instrument lying on top of the mold lid, ready to be inserted into the molds.
Testing Your Molds
- Remove your molds from the refrigerator after they have chilled for at least 24 hours.
- Remove the lid and inspect the molds. Touch the surface of the molds gently with your finger, and write down how each one feels in your lab notebook. Are they springy? Soft? Mushy? Rubbery? Firm?
- Put the lid back on top of your molds.
- Insert the sharpened point of your test instrument through one of the slits cut in the lid, so that the sharpened point is resting on the surface of one of your molds, as shown in Figure 2. Do not push the Popsicle stick into the gelatin.
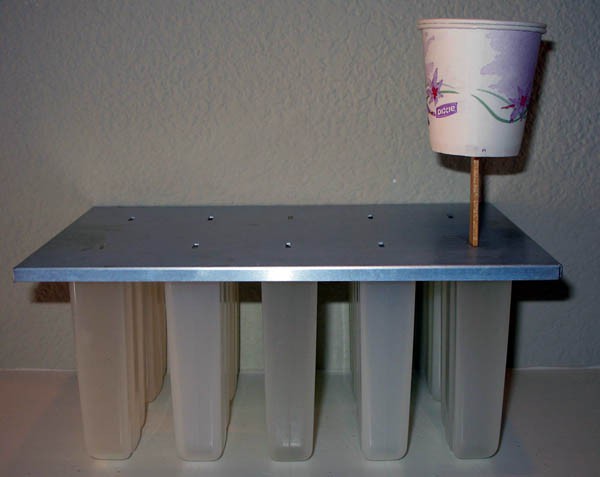 Image Credit: Kristin Strong, Science Buddies / Science Buddies
Figure 3. This photo shows the test instrument inserted into one of the molds and resting on the surface of the gelatin. The next step will be to add quarters to the cup to push the stick toward the bottom of the mold.
-
Add a quarter to the cup on top of the Popsicle stick. Watch the test instrument to see if it starts to move down.
- If the test instrument does not move down, then add another quarter. Continue adding quarters until the test instrument starts to move down.
- If the test instrument starts to move down, then do not add any more quarters, unless the test instrument stops moving again, or the bottom of the cups is not yet resting on the lid.
- Once the bottom of the cups is resting on the lid of the molds, as shown in Figure 3, count the number of the quarters inside the cup and record it in a data table, like the one below.
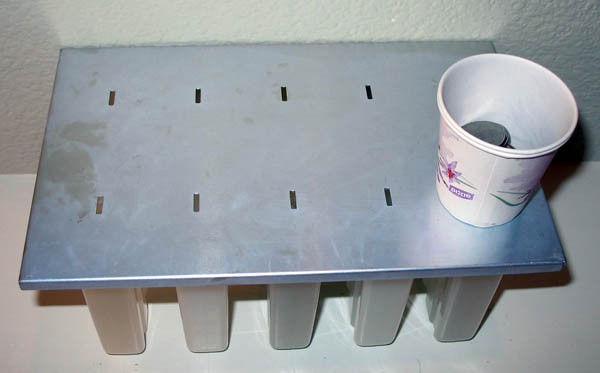 Image Credit: Kristin Strong, Science Buddies / Science Buddies
Figure 4. This photo shows the test instrument after it has fully passed through the Popsicle mold and the cup is resting on the lid.
- Repeat steps 4–6 for all your molds so that you have a total of three trials for each type of additive.
Data Table: Number of Quarters Required to Cut Through Mold
| Additive to Gelatin Mold | Control (nothing added) | Acid Added (example) | Sugar Added (example) | Salt Added (example) |
| Trial 1 | ||||
| Trial 2 | ||||
| Trial 3 | ||||
| Average of trials |
Analyzing Your Data Chart
- For each test additive, average the number of quarters that was required to cut through the Popsicle mold.
- Create a bar chart showing the additive to the gelatin on the x-axis, and the average number of quarters that was required on the y-axis. Which additive created the strongest gelatin? Which additive created the weakest gelatin?
Ask an Expert
Variations
- Place uncooked fruits, such as papaya, pineapple, melons, and kiwi, in gelatin and pour them in the molds. Then place these same fruits in a cooked state (simmered in small amount of water for a few minutes) inside gelatin in another set of molds. Compare the gel strength of the two groups of gelatin and explain the difference.
- Compare the gel strength of equal Popsicle molds that are allowed to gel at room temperature, with those that are allowed to gel in the refrigerator. Take measurements at different times: 1, 2, 4, 8, 12, 24, and 48 hours.
- Compare the gel strength of different concentrations of gelatin. Note: One 7.2-gm package of plain, unflavored gelatin mixed in 1 cup of water makes a gel concentration of about 3 percent.
Careers
If you like this project, you might enjoy exploring these related careers: