How Do You Take Your Tea? Make a Simple Electronic Device to Measure the Strength of Tea
Abstract
A nice hot cup of tea sure can wake and warm you up in the morning. In this project, you will investigate the chemistry of tea. The longer you steep a tea bag in hot water, the stronger the tea will be. But how does the strength of the tea change with longer brewing time? In this project you will make a very simple electronic device to measure the strength of tea. The device will determine how strong the tea is by measuring the amount of light the tea absorbs.Summary
David B. Whyte, PhD, and Ben Finio, PhD, Science Buddies
Recommended Project Supplies
Objective
Determine how brewing time affects the strength of tea, using a simple homemade electronic device that measures light absorption.
Introduction
Cooking and chemistry have a lot in common. When you make a cup of tea, for example, you are performing a sort of chemical extraction. In chemistry terms, the tea is an infusion. The hot water becomes dark, due to the presence of water-soluble chemicals that are extracted from the tea leaves. The concentration of the extracted chemicals depends on the temperature of the water and how long the tea is soaked in the water. The more water-soluble chemicals there are in the water, the stronger the tea is. But how does the strength of the tea change with brewing time? Is tea that has brewed for 4 minutes twice as strong as tea that has brewed for 2 minutes, something else? The goal of this science fair project is to collect data on how the strength of the tea depends on the brewing time.
If you have ever brewed tea, you have probably noticed that stronger tea tends to be darker. The water you start out with to make the tea is crystal-clear, but eventually the tea becomes so dark that you might not even be able to see the bottom of the mug. So, to measure how strong the tea is, you can measure its ability to absorb light. You will do this using a photoresistor, a special type of electrical resistor that is sensitive to light. Its resistance to the flow of electricity, which is measured in ohms (Ω), is very high in the dark and very low in bright light. So, if you put a photoresistor at the bottom of a cup of tea, its resistance will change depending on how much light the tea absorbs. You will use a multimeter to measure the resistance of the photoresistor. How will the darkness of the tea (and thus the resistance of the photoresistor) change with brewing time? Try this project to find out!
Terms and Concepts
- Chemical extraction
- Infusion
- Photoresistor
- Resistor
- Ohm (Ω)
- Multimeter
- Short circuit
Questions
- Which chemicals are responsible for the color of tea?
- How does the strength of tea change with brewing time? Can the strength of tea increase indefinitely, or will it eventually "level off"?
- How does the resistance of a photoresistor change with light intensity?
Bibliography
- Sheffield Hallam University. (n.d.). Beer's Law. Retrieved May 30, 2016.
- Lady Ada (2015, November 19). Photocells. Adafruit Industries. Retrieved May 30, 2015.
- Jameco Electronics (n.d.). Photoconductive Cell CdS P/N: CDS001-8003. Retrieved May 23, 2016.
- Science Buddies Staff. (n.d.). How to Use a Multimeter. Science Buddies. Retrieved May 23, 2016.
Materials and Equipment 
Recommended Project Supplies
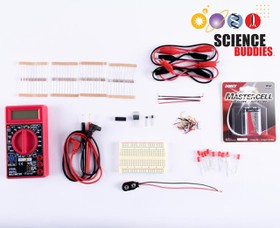
The following specialty items are available from our partner Home Science Tools:
- Electronic Sensors Kit (1). You will need the following items from the kit.
- Photoresistor
- Digital multimeter
- Alligator clip leads (2)
You will also need the following items (not included in the kit):
- Stove (or electric tea kettle)
- Tap water
- Pot or tea kettle
- Tea bags (12 of the same type)
- Mugs or glasses for brewing tea (15)
- Clear plastic cups (16)
- Note: having this many mugs and cups allows you to prepare all your tea samples at once. You can do the project with fewer mugs and cups, but you will need to wash, dry, and re-use them between trials.
- Stopwatch
- Measuring cup
- Aluminum foil
- Electrical tape
- Masking tape
- Permanent marker
- Room with good overhead lighting and consistent ambient light conditions. Avoid doing the experiment in a room with lots of windows on a partly cloudy day when the amount of sunlight might change, or in a crowded room where lots of people might walk by and cast shadows on your experiment.
- Lab notebook
Disclaimer: Science Buddies participates in affiliate programs with Home Science Tools, Amazon.com, Carolina Biological, and Jameco Electronics. Proceeds from the affiliate programs help support Science Buddies, a 501(c)(3) public charity, and keep our resources free for everyone. Our top priority is student learning. If you have any comments (positive or negative) related to purchases you've made for science projects from recommendations on our site, please let us know. Write to us at scibuddy@sciencebuddies.org.
Experimental Procedure
- Make your light-measuring device by wrapping a clear plastic cup in aluminum foil and taping a photoresistor (Figure 1) to the bottom with electrical tape, as shown in Figure 2.
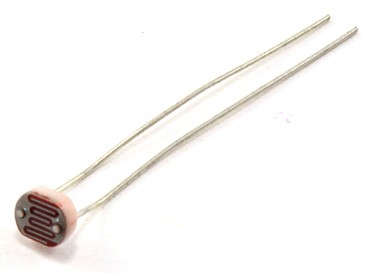 Image Credit: Ben Finio, Science Buddies / Science Buddies
Figure 1. Picture of the photoresistor in your kit.
- Wrap aluminum foil around the sides of the cup and secure it with electrical tape.
- Bend the leads of the photoresistor sideways.
- Tape the photoresistor to the bottom of the cup so it is facing up (the side with the squiggly line should be pressed against the bottom of the cup). Make sure the leads of the photoresistor stick out from under the edge of the cup, since you will need to connect to them with alligator clips later.
- Important: do not let the leads of the photoresistor touch the aluminum foil. Make sure to insulate the aluminum foil and the leads with electrical tape. Otherwise you will create a short circuit and the resistance of your photoresistor will always read zero.
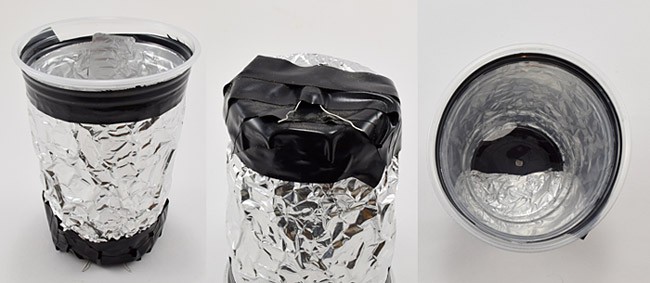 Image Credit: Ben Finio, Science Buddies / Science Buddies
Figure 2. Three different views of a plastic cup covered in aluminum foil, with photoresistor attached at the bottom using electrical tape.
- Prepare 15 mugs: 3 mugs of water, and 3 each of tea with brewing times of 10, 30, 90, and 270 seconds. Use exactly the same amount of water for each mug.
- Note: if you do not have 15 mugs or glasses available, you can just do 5 at a time (one for water and one for each brew time), then wash and dry them and repeat the experiment.
- Boil water in a pot or tea kettle. It is important to start each sample with water at the same temperature. If you need to add more water as you prepare your samples, always wait for it to start boiling again before you prepare the next mug of tea.
- Use masking tape and a permanent marker to label 15 mugs with the brewing times (or "water only").
- Place a tea bag in each mug.
- Decide how much water you will use for each mug of tea. It is important that this amount be exactly the same for each mug, since the depth of the water will affect how much light is absorbed. For example, you could use 200 mL if you have metric measuring utensils (or 1 cup (C) if you have English measuring utensils).
- Pour exactly 200 mL of water into 3 of the mugs.
- Prepare your stopwatch.
- Use the measuring cup to pur exactly 200 mL of boiling water into a mug and start your stopwatch. Get help from an adult if you are not comfortable measuring and pouring hot water.
- Remove the tea bag after 10 seconds.
- Repeat steps 2f–2h for each of the remaining mugs, preparing three samples for each brewing time.
- Allow all of the mugs to cool to room temperature before you continue.
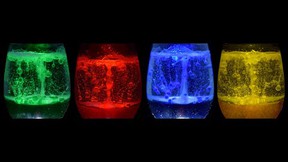
- Transfer the contents of each mug to a clear plastic cup, as shown in Figure 3. Label the cups with a permanent marker so you do not lose track of the brewing times.
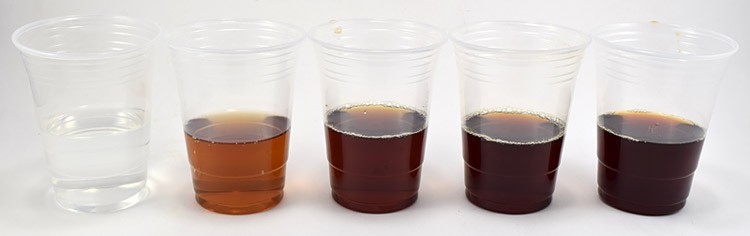
Figure 3. A plastic cup of just water, and cups of tea with brewing times of 10, 30, 90, and 270 seconds. For your project you should prepare three samples of each.
- Measure the resistance of the photoresistor for each sample by placing the sample cup inside the aluminum foil-lined cup.
- Set up your experiment in a room with good overhead lighting, and with as few disturbances in lighting as possible. The photoresistor is very sensitive, so variations in sunlight coming through a window on a cloudy day, or even shadows and reflections created as people walk around the room, can all affect the readings.
- Tape the aluminum-foil covered cup down in one spot so it does not move throughout the duration of your experiment. That will ensure that it receives consistent lighting.
- Set up your multimeter to measure the resistance of the photoresistor, as shown in Figure 4.
- Plug the black multimeter probe into the port labeled COM.
- Plug the red multimeter probe into the port labeled VΩmA.
- Connect the multimeter probes to the leads of the photoresistor using alligator clips. Make sure the metal parts of the alligator clips do not touch the aluminum foil, or this will create a short circuit.
- Set the multimeter dial to measure resistance in the 20 kilo-ohm (kΩ) range.
- Turn the multimeter's power switch to ON.
- If this is your first time using a multimeter, see the Science Buddies resource How to Use a Multimeter, particularly the section How do I measure resistance? to learn more.
- Place your first sample cup inside the aluminum foil-covered cup.
- Record the resistance of the photoresistor in your lab notebook. Remember to pay attention to units. If your multimeter dial is set to "20k", then your resistance measurements are in kilo-ohms (kΩ).
- Note: if your multimeter screen reads "1 .", then the resistance is too high for the current dial setting. Rotate the dial up to "200k" and try again.
- Repeat steps 3d–3f for each of your remaining sample cups.
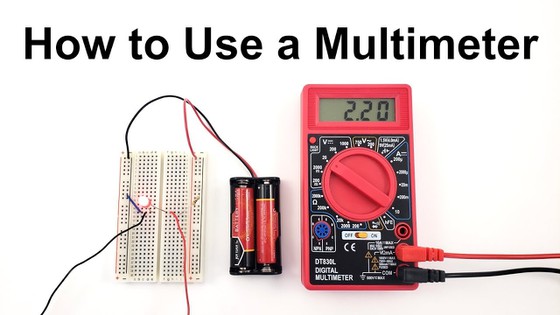
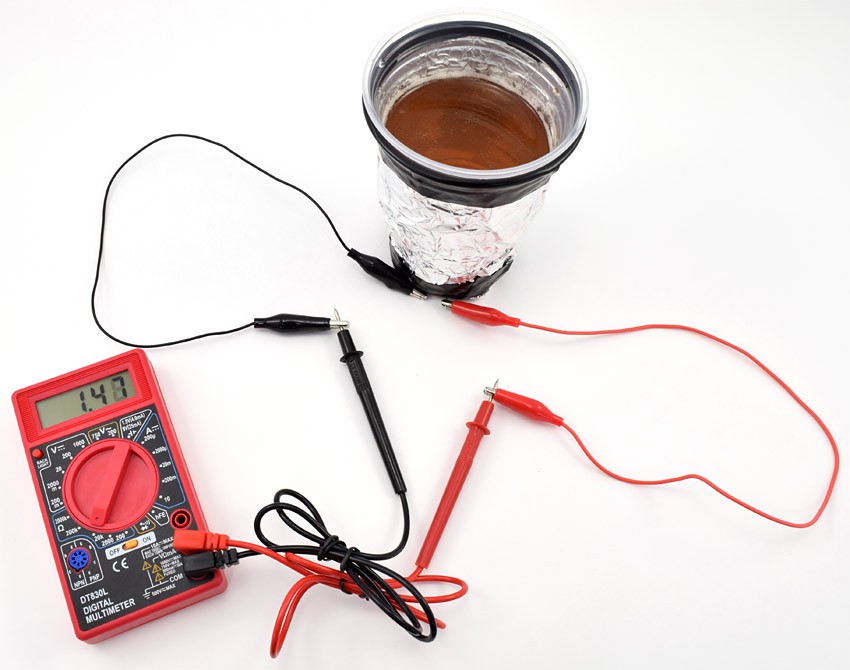 Image Credit: Ben Finio, Science Buddies / Science Buddies
Figure 4. Experimental setup for measuring the strength of tea.
- Analyze your results.
- Make a data table with the resistance readings for each sample.
- Calculate the average resistance for each brew time.
- Subtract the value of the negative control (cup of water) from the other values.
- Graph the average resistance, in ohms, on the y-axis vs. time (in seconds) on the x-axis.
- Discuss the shape of the curve. Is it a straight line or something else?
- What does this tell you about the relationship between brew time and how much light the tea absorbs? If you increase the brew time, will the resistance of the photoresistor increase forever, or will it eventually reach a maximum?
Ask an Expert
Variations
- Try different temperatures of water to brew the tea. For example, 100°C, 50°C, 25°C, and 0°C, for 2 minutes each.
- Use the photoresistor to measure the strength of coffee. For example, brew a small pot of coffee with one, two, three, or four scoops, keeping the volume of water constant.
- Use the curve you made of resistance vs. time to determine how long an "unknown" sample was brewed.
- Graph the log (base 10) of the resistance vs. time. What is the shape of this curve? See the entry in the bibliography about Beer's Law to learn more about how the concentration of a chemical is related to the amount of light absorption.
- Develop a test to determine what photoresistor readings correspond to the best-tasting tea.
- Use the graph on the photoresistor's datasheet to convert the resistance values to lux, the unit of illumination. Then, use the bibliography reference about Beer's Law to calculate the transmittance and absorbance for each tea sample by comparing them to the lux values for plain water. Graph each quantity (lux, transmittance, and absorbance) vs. brewing time. How do the shapes of the graphs differ?
Careers
If you like this project, you might enjoy exploring these related careers:


Contact Us
If you have purchased a kit for this project from Science Buddies, we are pleased to answer your questions.In your email, please follow these instructions:
- What is your Science Buddies kit order number?
- Please describe how you need help as thoroughly as possible:
Examples
Good Question I'm trying to do Experimental Procedure step #5, "Scrape the insulation from the wire. . ." How do I know when I've scraped enough?
Good Question I'm at Experimental Procedure step #7, "Move the magnet back and forth . . ." and the LED is not lighting up.
Bad Question I don't understand the instructions. Help!
Good Question I am purchasing my materials. Can I substitute a 1N34 diode for the 1N25 diode called for in the material list?
Bad Question Can I use a different part?
Contact Us
Related Links
- Science Fair Project Guide
- Other Ideas Like This
- Cooking & Food Science Project Ideas
- Electricity & Electronics Project Ideas
- My Favorites
- Electronics Primer: Introduction