Abstract
If you love cooking, decorating cakes, or making edible table decorations, this is a project for you! You will compare three different recipes for rice paper and discover the recipe that works best for your application!Summary

Objective
Compare the material properties of edible rice paper resulting from three different recipes.
Introduction
Paper is made up of plant fibers or thread-like substances pressed together into a thin and flexible, but strong, mat. The fibers are cellulose, the material that gives plants their structural support. Cellulose is the threadlike component in grains, greens, and other vegetables or fruits. Brown rice flour, for example, contains about two percent cellulose. It is also found in other plants, such as wood; approximately 50 percent of the matter in wood is cellulose.
Cellulose has many qualities that make it an excellent material for creating paper. If it is soaked and then dried, it becomes an odorless, flexible, and strong material. To see for yourself, test these material properties on an unwrinkled sheet of paper, which is basically a mat of cellulose. To demonstrate its flexibility, test how easily it rolls up. To experience its strength, run your finger along the side while pushing lightly into the paper. You can feel that it does not give easily, and it does not instantly crumple up. However, pay attention and do not push hard! Your skin might give before the paper buckles in under the pressure, leaving you with a paper cut.
To make paper that is even stronger and smoother, manufacturers also add starches. Starches are sugars found in plants. When heated with a liquid, starches take up the liquid, swell up, and form a network of starch particles. This makes starch handy as a gluing and stiffening agent for paper.
Paper is edible because cellulose and starch are both edible. So, paper—without the ink and chemicals that are often added to create superior quality—is edible! Of course, you wouldn't want to eat any store-bought paper because it is made with additional chemicals. As well, most paper is just not very tasty, nor easy to chew. Is it possible to make paper that is tasty? And if so, what would you use it for?
In this project, you will make your own edible paper from rice flour, potato starch, and water. One recipe will be made with only rice flour, which contains cellulose fiber, the thread-like material that you find in plant matter. Another recipe will use rice flour and potato starch, and a third will use only potato starch. The potato starch contains no fiber, only starch. It can be used to provide strength, resilience, and smoothness. Can you predict the properties of the sheets of paper that result from each of these recipes?
Edible paper is frequently used in dishes like spring rolls, or to make cake decorations. However, you should not limit yourself to these applications! Maybe you would like to make edible straws, cutlery, or food wrappers. Try it out and see what you can bring to the table!
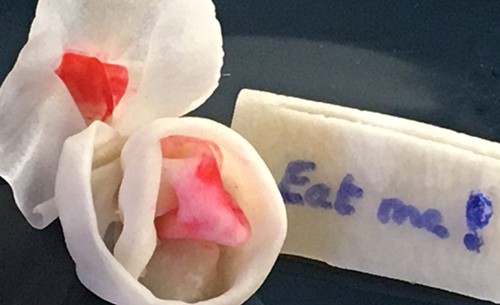
Figure 1. A name tag and flowers made from edible paper.
Terms and Concepts
- Fiber
- Cellulose
- Material properties
- Starch
- Edible
Questions
- What makes paper strong and flexible?
- What is used to make paper that is even stronger and smoother?
- What would you use edible paper for?
- What qualities does your edible paper need so that it can be used in this way?
Bibliography
- Some Interesting Facts Contributors. (n.d.). How Is Paper Made Step By Step. Retrieved November 22, 2019.
- Ceceri, Kathy. (2016, June 30). Make Edible Paper in 3 Easy Steps. Retrieved November 22, 2019.
Materials and Equipment
- Brown rice flour
- Potato starch
- Water
- Small bowl
- Tablespoon
- Spoon
- Microwavable plate
- Plates (3)
- Sticky notes (3)
- Plastic wrap
- Microwave
- Pencil or pen
- Lab notebook
- Metric ruler
- Optional: Salt
- Optional: Food-color (edible ink) pen
- Optional: Zip-top bags
- Optional: Adult help
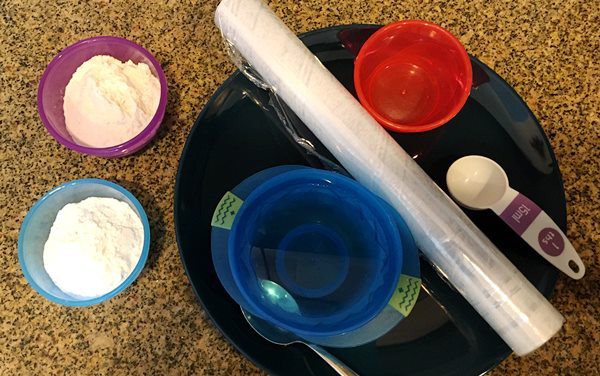 Image Credit: Sabine De Brabandere, Science Buddies / Science Buddies
Experimental Procedure
Preparing Edible Paper
Edible paper dries out quickly. If you need to take a break, store the sheets of paper in a zip-top bag so they do not dry out.
- Write "Recipe 1" on one of the three sticky notes and stick it to a plate. Repeat for "Recipe 2" and "Recipe 3".
- Stretch plastic wrap tightly over the microwavable plate so that it clings to the sides and does not touch the center of the plate, as shown in Figure 2.
 Image Credit: Sabine De Brabandere, Science Buddies / Science Buddies
Figure 2. Plastic wrap tightly stretched over a plate.
- Add 2 tbsp. of rice flour and about 1.5 tbsp. of water to the small bowl. Optionally, add a pinch of salt—this will be Recipe 1. Mix the ingredients until you have a smooth paste. The paste should have the consistency of white school glue, as shown in Figure 3. Add a little additional water if the paste is too stiff.
The pictures of the paper and paste are from Recipe 2. The consistency of the paste should always look similar, regardless of the recipe.
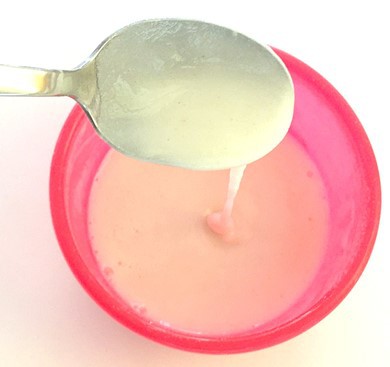 Image Credit: Sabine De Brabandere, Science Buddies / Science Buddies
Figure 3. Prepared paste for rice paper.
- Pour the paste onto the plastic wrap. Spread the paste out evenly with a spoon and/or by tilting the plate.
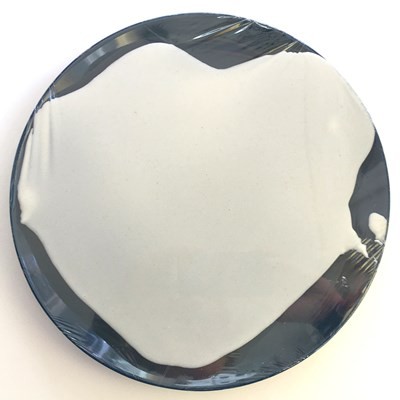 Image Credit: Sabine De Brabandere, Science Buddies / Science Buddies
Figure 4. Paste for edible paper spread out on the plastic wrap and ready to be heated.
- Put the plate in the microwave and heat the paste on high for about 45 seconds to dry it (note that the exact duration depends on your microwave). The sheet of paper will look dry when it is done, as shown in Figure 5. (Safety note: In general, food should not touch plastic wrap while it is being heated in a microwave, but it is fine occasionally for items of which you eat relative small quantities.)
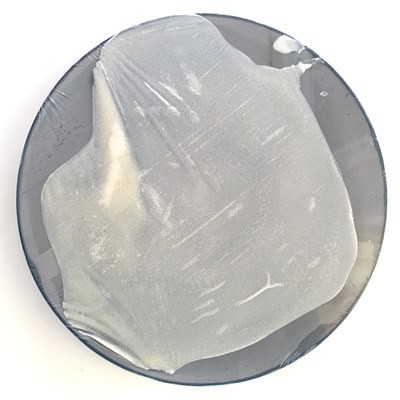 Image Credit: Sabine De Brabandere, Science Buddies / Science Buddies
Figure 5. Rice paper as it appears after being dried in the microwave.
- Let the sheet of paper cool. The edges might curl up a bit while cooling.
- Carefully peel the sheet of paper from the plastic wrap. This can be tricky, so take your time! Removing the plastic wrap from the plate first might help. Turning over the plate with plastic wrap and paper is another strategy. You can also ask an adult to help with this step. Figure 6 shows a sheet of paper made with Recipe 2.
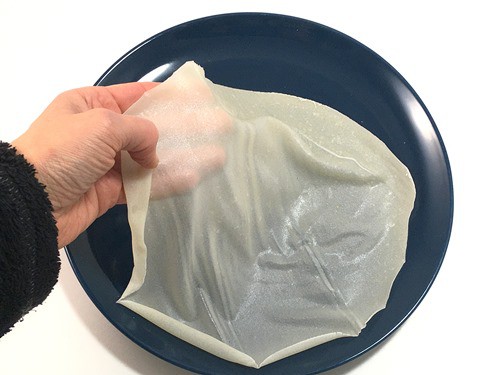 Image Credit: Sabine De Brabandere, Science Buddies / Science Buddies
Figure 6. A sheet of prepared edible paper.
- Lay your finished sheet of paper on the plate with the correct recipe number.
- Now it's time to make Recipe 2. Repeat steps 2 to 8, but this time mix 1 tbsp. of rice flour, 1 tbsp. of potato starch, and about 1.5 tbsp. of water. Add the optional pinch of salt if you used it in the first recipe.
- Finally, make Recipe 3 using the same procedure, but leave out the rice flour. Mix 2 tbsp. of potato starch and about 1.5 tbsp. of water. Again, add the pinch of salt if you have used it previously.
- If any of your paper sheets did not turn out well, try that recipe one more time. Note that it is harder to make paper from some recipes than others, but even a small sheet will work for this activity.
- Repeat the paper making procedure for each recipe one more time so that, if all goes well, you have two sheets of paper for each recipe. This time, aim to produce sheets that are as thin as you can make them. It is ok if some break in the process. A small piece that you can test is enough for the project, and you will get better with practice.
Preparing to Test your Paper
- Make a table in your lab notebook like Table 1.
| Recipe 1 | Recipe 2 | Recipe 3 | |
|---|---|---|---|
| Easy to make? | |||
| Appearance | |||
| Smoothness | |||
| Flexibility | |||
| Strength | |||
| Stretchiness | |||
| Taste | |||
| Total all-purpose edible paper |
- Think of what you like to use the paper for: spring rolls, cake decorations, candy wrappers... What properties does the paper need for this application? Are there any properties that are not yet on the list?
- Add rows to your table for any additional qualities that you want to test.
- If you have an application that you would like to use the paper for, create a row listing "Total __" where you fill in the purpose for your application. Then, highlight that row and all the rows with the properties needed for this application. For example, if you would like to use the paper to make cake decoration cutouts, your table might look like Table 2.
| Recipe 1 | Recipe 2 | Recipe 3 | |
|---|---|---|---|
| Easy to make? | |||
| Appearance | |||
| Smoothness | |||
| Flexibility | |||
| Strength | |||
| Stretchiness | |||
| Taste | |||
| Total all-purpose edible paper | |||
| Easy to color and write on | |||
| Total cake decoration cutouts |
- Repeat step 4 for any additional applications that you have in mind. Be sure to use a different color for each application.
Testing the Edible Papers' Properties
- Now it is time to test the properties of the different sheets of edible paper! Select the sheet of paper that came out the best for each recipe. In general, scientists would test several sheets and average the findings. As you might start this project without experience, it is possible that some sheets do not correctly represent the type of paper. For that reason, this project allows you to select which sheet of paper you will test.
- Assess one chosen paper sheets for each recipe. As you test each piece, take notes of your findings in your lab notebook. If you observe differences, try to explain why this difference occurs. The information in the background section can help you figure this out.
- Evaluate how easy it was to make each of the sheets. Rate each recipe on a scale of 1 to 3, with 1 being hard to make and 3 being easy to make. Write your findings in your data table.
- Observe the appearance of each sheet. Rate each one on a scale of 1 to 3, with 3 having the best appearance according to you. Write your findings in your data table. In your notes, write down why a particular sheet looked more appealing; was it the color, the transparency, the smoothness, etc? Add any ideas you might have on how to make them look better.
- Run your fingertips across each sheet to compare the smoothness of its surface. Rate each recipe on a scale of 1 to 3, with 3 being the smoothest. Write your findings in your data table.
- Bend your sheets as if you were going to roll them. Roll them as tight as possible. Measure the diameter of the roll and write the number for each recipe down in your notebook. Rate each recipe on a scale of 1 to 3, with 3 being the most flexible. Write your findings in your data table.
- Try to create a small rip in the sheets. Rate each recipe on a scale of 1 to 3, with 3 being the strongest and hardest to rip. Write your findings in your data table.
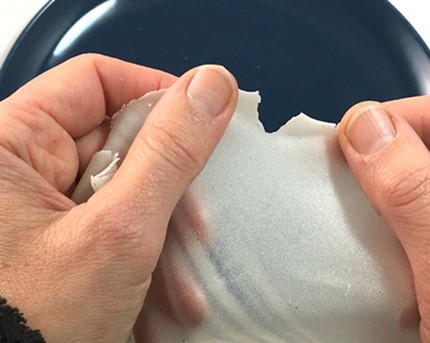 Image Credit: Sabine De Brabandere, Science Buddies / Science Buddies
Figure 7. A sheet of prepared edible paper being torn.
- If you pull on either side of a sheet of printer paper, you will see it does not stretch as a rubber band does. It is stiff; it does not become longer. Create a 5 by 5 centimeter sample of each type of edible paper. Try to stretch these samples one at a time as shown in Figure 8. Rate each recipe on a scale of 1 to 3, with 3 being the stiffest.
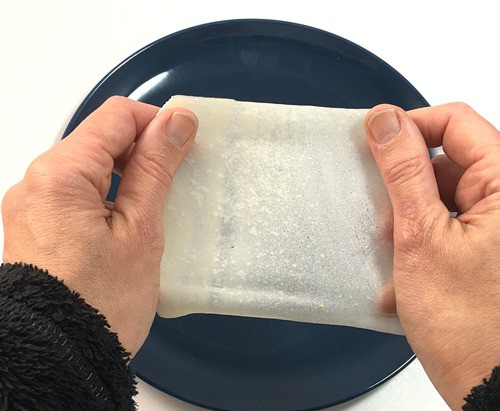 Image Credit: Sabine De Brabandere, Science Buddies / Science Buddies
Figure 8. Pull on opposite edges of a sample of paper to evaluate how well it stretches.
- Have a taste. Rate each recipe on a scale of 1 to 3; give a 3 to the paper that you think has the best taste and mouthfeel. In your notes, write down what made the sheets of one recipe taste or feel better in your mouth. Add any ideas you might have on how to make each recipe taste better or have a better mouthfeel.
- Add all the ratings in each column and write the totals in the row labeled "Total all-purpose edible paper".
- Test any additional criteria you added. Give a 3 to the best performing paper and a lower mark to the lesser performing sheets. To create a total score for each application, only add up the ratings for criteria that are important for that application. Your color code can help you find back these rows.
Analyzing the Data
- If you tested for a specific application, look back at your data table and see if one Recipe clearly produced better edible paper for that application. The total score for that application can help you identify the answer.
- Look again and evaluate whether one recipe clearly produced a better all-purpose edible paper than another? Why would that be the case?
- Can you represent your data graphically?
- If you are not so comfortable with graphs yet, make one graph for each property. Plot the recipes on the horizontal axis and the score (1, 2, or 3) on the vertical axis. Never forget to give your graph a name and to label the axes. Figure 9 shows an example graph. Note that your data might look differently!
- If you feel comfortable with graphing, plot each of the properties on the horizontal axis and their score (1, 2, or 3) on the vertical axis. Use different colors for each recipe. You might want to make a separate graph for the total scores.
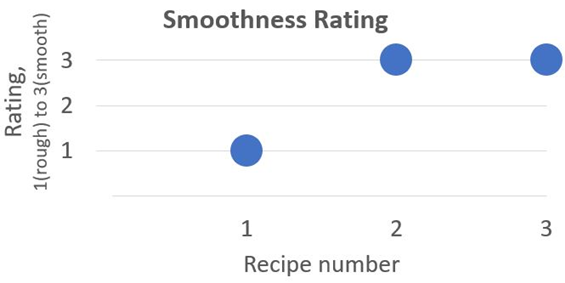 Image Credit: Sabine De Brabandere, Science Buddies / Science Buddies
Figure 9. Example graph representing the smoothness ratings of the edible paper sheets made. Your ratings might be different!
- What can you conclude from all this data? Think of some applications; are some recipes better for a particular application, or is one recipe best for all applications?
- Are your findings as you had expected? Look back at the background section for help. It provides information on why starches and fibers are used to make paper.
- Could you possibly make a better recipe for your favorite application? How would you do this, and why would you make this choice?
Ask an Expert
Variations
- Observe the thickness of the sheets. Because the sheets are very thin, you cannot directly measure them. You can use a microscope if available, or use the mass of a 4 by 4 centimeter piece of paper to give you a relative ranking of thickness.
- Replace the ingredients with others that have a similar fiber content. For example, replace the potato starch with cornstarch or tapioca, or replace the rice flour with wheat flour. How does a change of one ingredient change the paper's properties? Can you explain why this might happen?
- Use a food-color pen to write on the papers or color the paper with food coloring. Does the "ink" bleed? Which recipe is best to write on or to make colored edible paper?
- Look at the paper under a microscope. Choose the thinnest parts or edges where the paper was ripped. Can you see the fibers? Do the different recipes lead to paper that looks different on the microscopic level? Do they look different compared to commercial edible paper, or commercial printer paper?
- Study alternative sources for paper fiber, as explained in this Alternative Sources for Paper Fiber science project.
Careers
If you like this project, you might enjoy exploring these related careers: